Learn about CMS Workspaces, Channels, and Contributors
Learning Objectives
After completing this unit, you'll be able to:
- Describe the purpose of a CMS workspace.
- Add a publishing channel to a CMS workspace.
- Define the contributor roles in a CMS workspace.
- Add languages to a CMS workspace.
Centralize CMS Content
Chris, the Tucker Home Goods admin, is eager to help her content experts, Sheng, Elle, and Calvin get up and running on the Digital Experiences app. First, Chris makes sure that Digital Experiences is enabled in setup. Now she can create a CMS workspace in the Digital Experiences app and add the team members as contributors.
Ready to Get Hands-on with the Digital Experiences App and Salesforce CMS?
Launch your Trailhead Playground now to follow along and try out the steps in this module. To open your Trailhead Playground, scroll down to the hands-on challenge and click Launch. You also use the playground when it's time to complete the hands-on challenges.
First, enable Digital Experiences.
- From Setup, enter
Digital Experiencesin the Quick Find box, then select Settings.
- Select Enable Digital Experiences.
- Your digital experiences domain is shown under Domain preview. It includes your My Domain name in the format
MyDomainName.my.site.comfor production orgs.
- Click Save, then OK.
Create an Enhanced CMS Workspace
Now let’s dive into the app and create an enhanced CMS workspace.
- In the App Launcher, enter
Digital Experiencesin the search bar, then select Digital Experiences Home.
- Click Create a CMS Workspace.
- Name the workspace
Website Contentand add a brief description. Keep the default value for the API name or change it. You can’t edit the API name after you create the workspace.
- You can add channels now, or you can skip this step. We won’t check for channels in the hands-on challenge, so click Skip.
- Set the default language to English, then click Finish.

And that’s it! The foundations are ready for Tucker Home Goods’s enhanced CMS workspace.
An org can have multiple workspaces, each with different publishing channels, content, contributors, and languages. Some orgs need a handful of workspaces and others need hundreds. You can create workspaces for different audiences, geographies, campaigns, for internal or external information, and more. The organizational structure is limited only by your imagination.
You can also use folders to organize content in your CMS workspace. These are only an internal tool for content creators, so unlike collections—which you learn about later in this unit—folders don’t affect how content gets displayed in your channels.
Tucker Home Goods is just getting started with Salesforce CMS, so Chris is satisfied with one enhanced CMS workspace for now.
Add a Publishing Channel for CMS Content
Tucker Home Goods has an enhanced LWR site where they sell and promote their products. In order to deliver CMS content on this site, Chris must add the site as a publishing channel to the enhanced CMS workspace. To do this, she goes to Channels in the workspace settings and adds the enhanced LWR site.
In the future, Chris can add other publishing channels to the enhanced workspace. These might include another site or a public channel for a mobile app to distribute content to other audiences.
Add Contributors and Assign Roles for the CMS Workspace
Chris adds Sheng, Elle, and Calvin as workspace contributors who can create and manage content. As the Tucker Home Goods Salesforce admin, Chris designs and builds the enhanced LWR site. Delegating content creation and management to the team is a great help.
There are four different roles that can access the CMS workspace, all with different permissions. Here they are, from most to least access.
Salesforce Admin: Chris
A Salesforce admin has full access to the Digital Experiences app. This includes all CMS workspaces, with control over all site and digital experiences settings. The admin can create Experience Builder sites and apps. The admin can also create and manage CMS workflows and approvals for each enhanced CMS workspace. The admin works in Salesforce Setup, the Digital Experiences app, and in Experience Builder or the site settings.
Content Admin: Sheng
A content admin has full access to all content in the CMS workspace. They manage other contributors, channels, and publishing. The content admin can further delegate roles and responsibilities in the CMS workspace as needed.
Content Manager: Elle
A content manager has full access to all content in the CMS workspace. They review content submitted through the Basic Approval Request workflow in enhanced CMS workspaces.
Content Author: Calvin
A content author can only create, edit, and view content in the CMS workspace. They submit their content through the Basic Approval Request workflow in enhanced CMS workspaces. Content authors can’t publish or unpublish content.
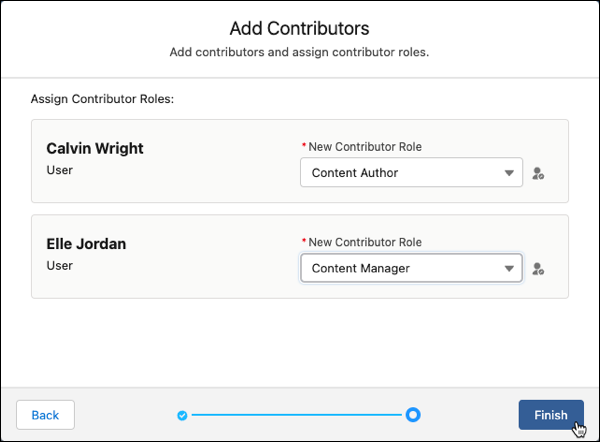
To add contributors to the enhanced workspace, Chris clicks  | Contributors and adds Sheng as a content admin, Elle as a content manager, and Calvin as a content author.
As the content admin, Sheng now has full control over the enhanced workspace and takes the reins. Sheng can add additional contributors, channels, and languages to the CMS workspace. Elle and Calvin can help with writing and managing material.
These contributors and their assigned roles are unique to this enhanced CMS workspace. If Chris creates additional CMS workspaces for Tucker Home Goods, she can add different contributors and assign different roles. For example, if Elle owns all of the content about furniture, Chris can create a new workspace specifically for content about furniture and designate Elle as the content admin of that workspace.
Add Languages to the CMS Workspace
Tucker Home Goods has a strong presence in Brazil and Japan, so localized content is an important part of the Salesforce CMS implementation. By adding languages to the workspace, contributors can flag content for translation and upload translated content into the workspace.
To add languages to the enhanced CMS workspace, Sheng clicks  | Languages and adds Brazilian Portuguese and Japanese.
