Work Smarter in Calendar and Events
Learning Objectives
After completing this unit, you’ll be able to:
- Identify the calendar features that help your reps work more efficiently throughout the sales process.
- Customize the calendar settings that are most useful to your reps.
- Understand how the calendar can be used with Salesforce objects to help reps sell smarter.
Work Smarter in Calendar and Events
Outside of Salesforce, calendars and events are straightforward features. They might even be a bit boring if we’re being honest. But in Salesforce, calendars and events can do so much to help employees reach business goals. Plus, they can help your teams collaborate more effectively than any other standard calendar tool. Let’s take a look at the ways you can help your reps work smarter, not harder, in calendars and events.
Customize Calendars
Sales reps can use object calendars to display milestones related to specific records, such as opportunities and tasks. For example, Lance has some important opportunities to close this month. He wants to make sure that he’s completing tasks for those opportunities on time and prioritizing his clients effectively. Lance creates an object calendar to show the dates of all his upcoming opportunities based on their close dates.
- Click the App Launcher (
 ).
).
- Search for and select Calendar.
- Click
 next to My Calendars.
- Click New Calendar.
- Select the required object in the Create Calendar pop-up window. For this example, let’s select Opportunities.
- Click Next.

- Provide the following information based on the information you want to track:
- Calendar Name:
Opportunities - Field for Start: Close Date (Date)
- Apply a Filter: All Opportunities
- Field Name to Display: Close Date
- Calendar Name:
- Click Save.

Create Custom Event List Views
Admin Maria can help her reps customize their object calendars by creating custom objects and list views on which they can base their object calendars. Reps like Erin and Lance can use list views to see more events listed in one view to help them plan their days or review past events. To enable the list view in your Calendar, click  and choose Table.
Plus, they can create custom list views to review events based on contacts, leads, and other data points. List views are available when viewing the calendar as a table.
There are several predefined list views that are useful to reps and don’t require any changes.
- My Recent Events
- My Team’s Recent Events
- My Team’s Upcoming Events
- My Upcoming Events
- New This Week
- Recently Viewed
- Today’s Agenda
Reps can adjust which fields display in (most of) these list views or use them as starting points to customize list views that focus on the data that’s most important to them.
To make things easier for her reps, Maria also created a custom list view for all of her reps to use.

Customize and Combine Calendar Views
Reps can add resource calendars, public calendars, user lists, and user calendars to determine what they see on their calendars. Then they can adjust their view to drill down further. They can also use the availability view with user lists to find a time to schedule across team members. You can customize the compact event layout for event preview cards so your reps see the event fields that matter the most to them.
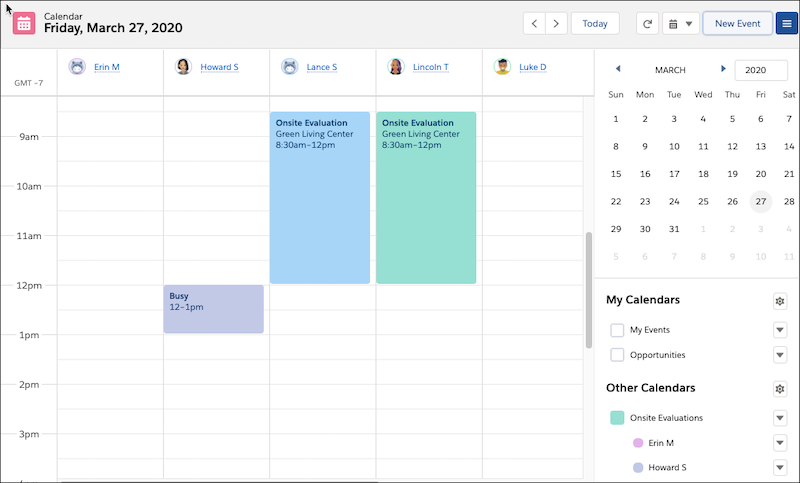
To make viewing schedules faster and easier, user list calendars can be combined with availability views. Let’s look at how this combination can help Lance and Erin. They share larger clients to disperse the workload. And, along with other members of their core sales team, they share responsibilities like onsite evaluations for current and potential clients. These evaluations require at least a half-day of availability to schedule since Lance and Erin leave the office for these evaluations and are unavailable to other clients.
Howard, the team’s administrative assistant, often schedules onsite evaluations. In addition to Lance or Erin, two solar panel technicians and their equipment truck are required for these evaluations. Howard needs a faster way to add everyone’s calendar to his view so he can figure out when everyone’s free on the same day while he has clients waiting on the phone. Maria makes it happen by setting up user lists and adding user list calendars to speed up Howard’s scheduling process.
Enable User List Calendars
Let’s see how Maria works with calendar settings to make scheduling easier for Howard. To help you with the following activities, you first create a Public Group for your sales reps. You start by navigating to Setup.
- Click
 and click Setup. The Setup page opens in a new tab.
- In the Quick Find box, enter
Groups, then select Public Groups.
- Click New.
- For Label, enter
Sales Reps. If this were your real org, you’d add specific users to the group. For now you’ll just save it as is.
- Click Save.
Good, now you can create a new user list for sales reps.
- Enter
Usersin the Quick Find box, then select Users.
- Select Create New View.
- For View Name, enter
Sales Team.
- Under Restrict Visibility, choose Visible to certain groups of users.
- Select Group: Sales Reps, then click Add.
- Note: Add filters to remove default users such as automated process and platform from this list view since it will be visible to users.
- Note: Add filters to remove default users such as automated process and platform from this list view since it will be visible to users.
- Click Save.
There’s one more thing to do before you can add the new user list to a calendar, and that’s to enable the setting.
- From Setup, enter
Activityin the Quick Find box, then select Activity Settings.
- Select Add user lists to calendar views in Lightning Experience.
- Click Submit.
Now when the reps select the Add Calendars option in the Other Calendars section of the Calendar side panel, they’ll see user lists as an option in the Add Calendars dialog box.

When users add a user list, all the users on that list display in their Other Calendars section. They can toggle the list on or off, depending on their scheduling needs. So, after Howard adds the user list that includes Erin and Lance’s calendars, he can quickly schedule an evaluation for a client while they’re on the phone, keeping the sales process moving.

To be sure her reps get the most out of user list calendars, Maria makes sure they know about availability view. Reps can see a day view with all their visible calendars in columns to easily compare schedules based on a client’s availability.
Help Teams Stay Connected with Public Calendars
Some events are team-based, including deadlines, milestones, training, and networking. Sales manager Lincoln wants his team to attend an upcoming green energy expo where they’ll likely find lots of new prospects. He also knows of some other seminars on solar energy technology the team can attend. But Lincoln doesn’t want to crowd their already busy schedules and distract them from selling. He asks Maria to add a public calendar for his team so he can schedule events like expos and seminars there.
Here’s how Maria sets up public calendars for Lincoln’s sales reps, which makes scheduling for the team easier and more efficient.
- From Setup, enter
Publicin the Quick Find box, then select Public Calendars and Resources.
- Click New from the Public Calendars list.
- For Name, enter
Expos & Seminars.
- Check Active.
- Click Save.
Your calendar is created, but you must also allow the Sales Rep group access to see events.
- Click Sharing.
- Click Add.
- Select Group: Sales Reps, then click Add.
Leave Calendar Access as Show Details, so it’s view-only for the Sales Reps group.
- Click Save.
Once he finishes setting up public calendars, Lincoln tells his reps to add the new public calendar to their view from the Other Calendars area in the side panel. Reps can hide public calendars to declutter their view when they need to focus on other events.
Get the Most Out of Your Events
Once their calendars are customized and connected, Maria makes sure her sales reps have everything they need for scheduling on their event layouts. Reps benefit from seeing attendees, creating recurring events with event series, and setting reminders.
If you haven’t already, review the benefits of syncing events between Salesforce and Microsoft Outlook or Google Calendar using Einstein Activity Capture. Attendees on Salesforce events only receive invitations if your org is set up to sync through one of these products.
Here’s a list of the standard event layout fields you should consider adding. Feel free to add others or customize your own fields as well.
- Attendees
- Reminder Set
- Repeat

Auto-relate Attendees
Another way to make scheduling easier for your reps is by turning on the auto-relate attendees feature. Lance and Erin often create events with clients and want to make sure their events show up in the Activity feed on the contact’s record page. The auto-relate attendees feature allows reps to add attendees to meetings and have the appropriate record automatically added to the Name field. To enable this feature, make sure Allow Users to Relate Multiple Contacts to Tasks and Events is selected. You did that in the last unit, so you can already auto-relate attendees.
Set Up Resources
If your company relies on different tools for client demonstrations or other purposes, you can catalog those items as resources in Salesforce. This way you can keep track of items and allow people to check out resources, sort of like a library system.
Lance has a home visit to survey the site and needs a truck equipped with all of the tools and equipment for the techs to complete their assessment. Here’s how Maria sets up resources so Lance and the other reps have everything they need to demonstrate products or assess a client’s needs effectively.
- From Setup, enter
Publicin the Quick Find box, then select Public Calendars and Resources.
- Click New from the Resources List.
- For Name, enter
Demonstration Truck.
- Check Active.
- Click Save.
Like before, you need to give your Sales Reps access to this resource. But this time, you’ll let them add it to events.
- Click Sharing.
- Click Add.
- Choose Group: Sales Reps, then click Add.
- For Calendar Access, choose Show Details and Add Events.
- Click Save.
Now Lance and Erin can automatically add a truck to the event for their onsite assessment so all the tech has to do is pick it up at the warehouse.
Create New Events from Anywhere
The next helpful tool for reps is global actions. Setting this up allows reps to quickly create events from opportunities and other standard objects in Salesforce. Say, for example, Lance comes across an opportunity who hasn’t been contacted in several months.
He wants to schedule a meeting to follow up since the notes indicate the contact was interested in hearing more. Using global actions for events allows Lance and other reps to quickly create events from opportunities and other standard objects in Salesforce. This way reps can move opportunities through their sales process even faster. Here’s how Maria sets this up.
- From Setup, enter
Globalin the Quick Find box, then select Global Actions.
- Click New Action.
- For Target Object, choose Event.
- For Label, enter
Quick Meet.
- Click Save.
Now you can simplify the layout to make it faster for sales reps to create an event.
- Click the Remove icon (
 ) for Description, Name, Related To, and one of the Blank Spaces.
- Click Save.
If you ever want to adjust the layout later, just click Edit Layout on the action. For now, since this button is meant for creating meetings, let’s prefill the Subject.
- Click New in the Predefined Field Values list.
- For Field Name, choose Subject.
- For Formula Value, enter
"Meeting".
Be sure to include the quotation marks.
- Click Save.
Maria can put this action into the layout wherever it’s helpful to add a new meeting. For example, the opportunity layout.

Maria set up user lists, resources, and public calendars to improve her reps calendar experience. Then she showed her reps how to customize their event list views and calendar views, which helped them save time, prioritize their work, and collaborate more easily. Maria also improved the event layout to ensure her reps have the information that’s most important to them.
Resources
- Salesforce Help: Customization Options for Events and Calendars
- Salesforce Help: Create and Manage a Public Calendar or a Resource Calendar
- Salesforce Developers: CalendarView Object Reference