Set up, Configure, and Monitor Features
Learning Objectives
After completing this unit, you’ll be able to:
- Navigate the Features page in Salesforce Go.
- Describe the steps to turn on and configure a feature.
- Interpret feature usage data to monitor adoption and evaluate impact.
Salesforce is a vast ecosystem. Thankfully, Salesforce Go simplifies the challenge of discovery. But for admins, the job doesn’t stop at finding a feature that solves a business problem. It continues with understanding what the feature offers, setting it up, configuring it for the team, making sure it becomes part of the workflow and actually gets used. That’s where the feature page comes in.
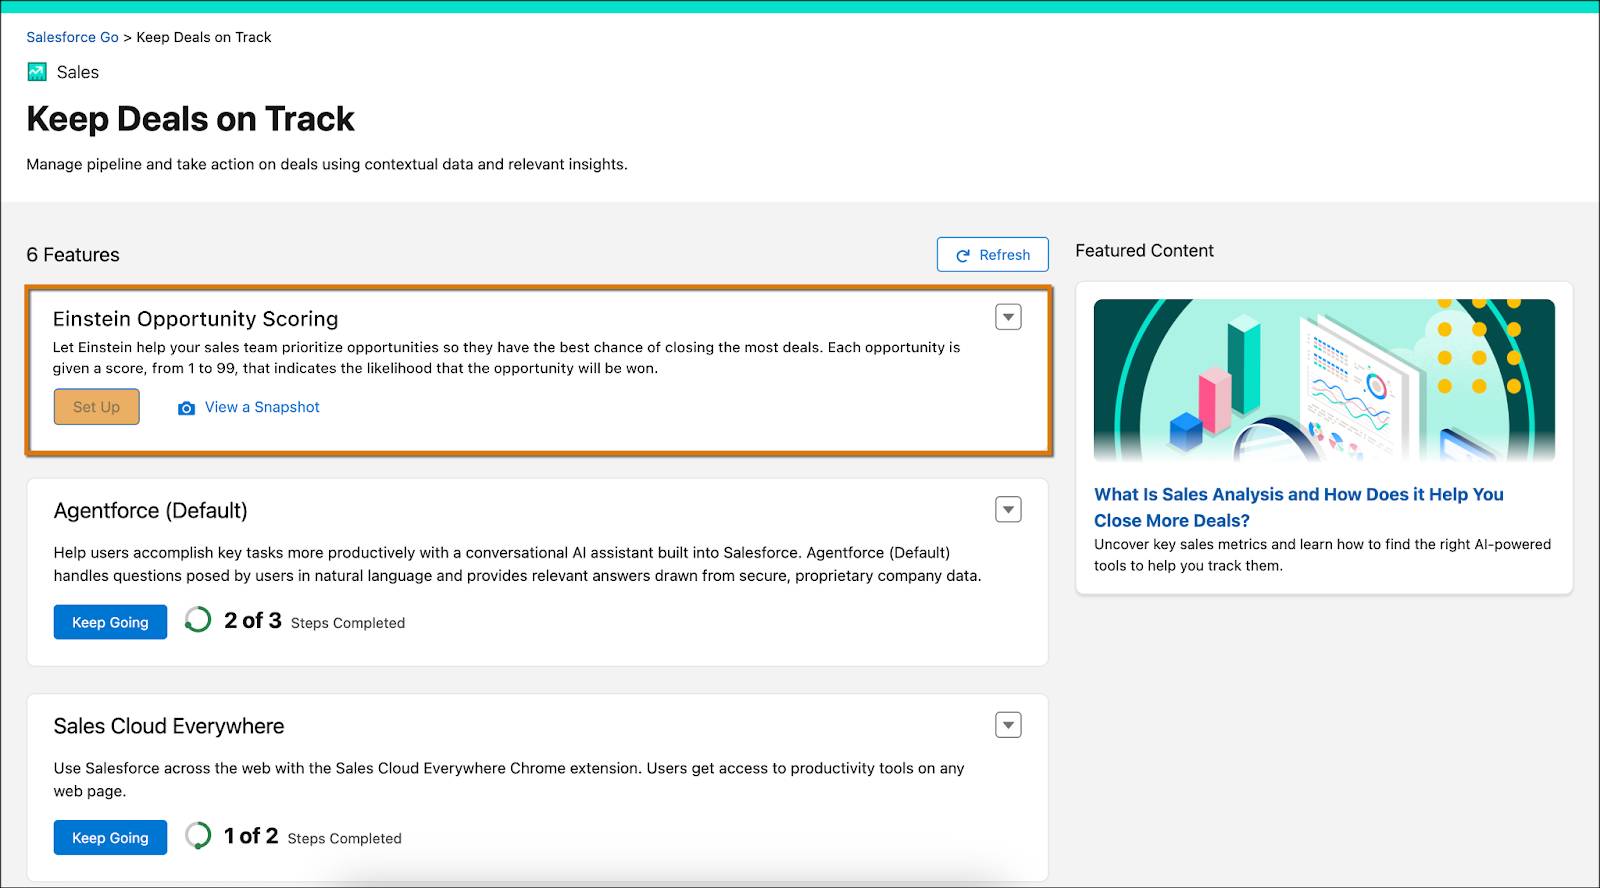
In the previous unit, you set out to find a smarter way for sellers to engage with their opportunities. You explored the feature sets, found one aligned with that goal, and zeroed in on Einstein Opportunity Scoring as a potential solution.
Click Set Up on the Einstein Opportunity Scoring feature card. This opens up the feature page.
Get to Know the Feature Page
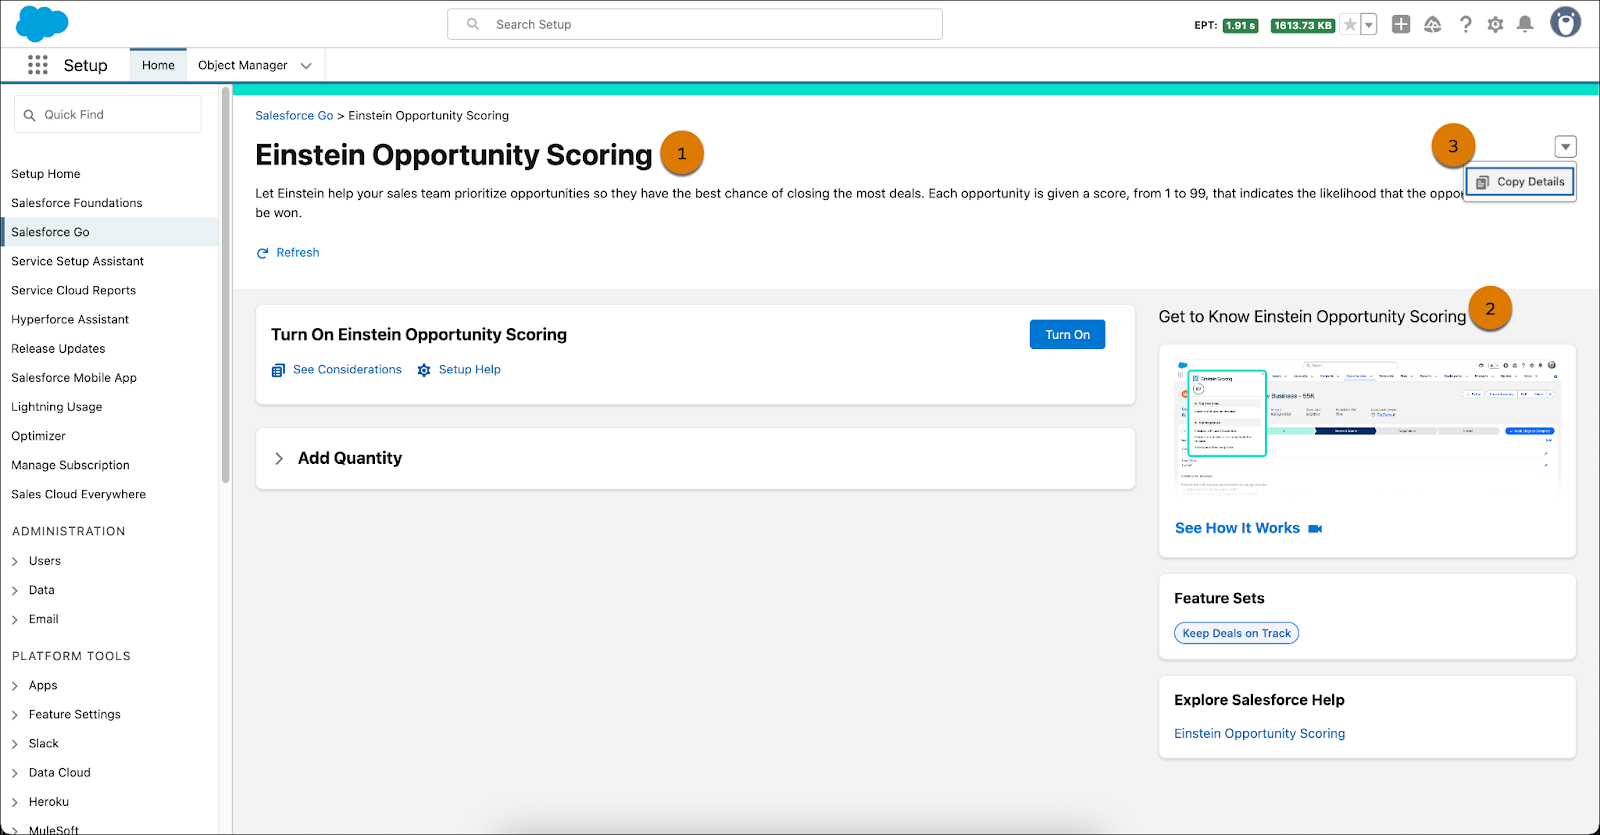
The anatomy of a feature page stays consistent, no matter which feature you explore. Front and center, you see the name of the feature and a short description of what it does (1). On the right, the Get to Know section offers relevant, contextual information to help you understand the feature quickly (2). On the Einstein Opportunity Scoring feature page, for example, you see a video on how this feature works, feature set(s) it belongs to, and a link to the help doc. You can also find links to relevant Trailhead content, guided learning, release notes, and more.
The goal is simple: Give you the right information when you need it, all in one place, so you don’t have to waste time hunting through docs.
You review the content, copy the key details (3), and share them with your sales manager to get her input.
Once you get the go-ahead and confirm that the feature fits her needs, you decide it’s time to set it up for the team.
Turn On and Configure a Feature
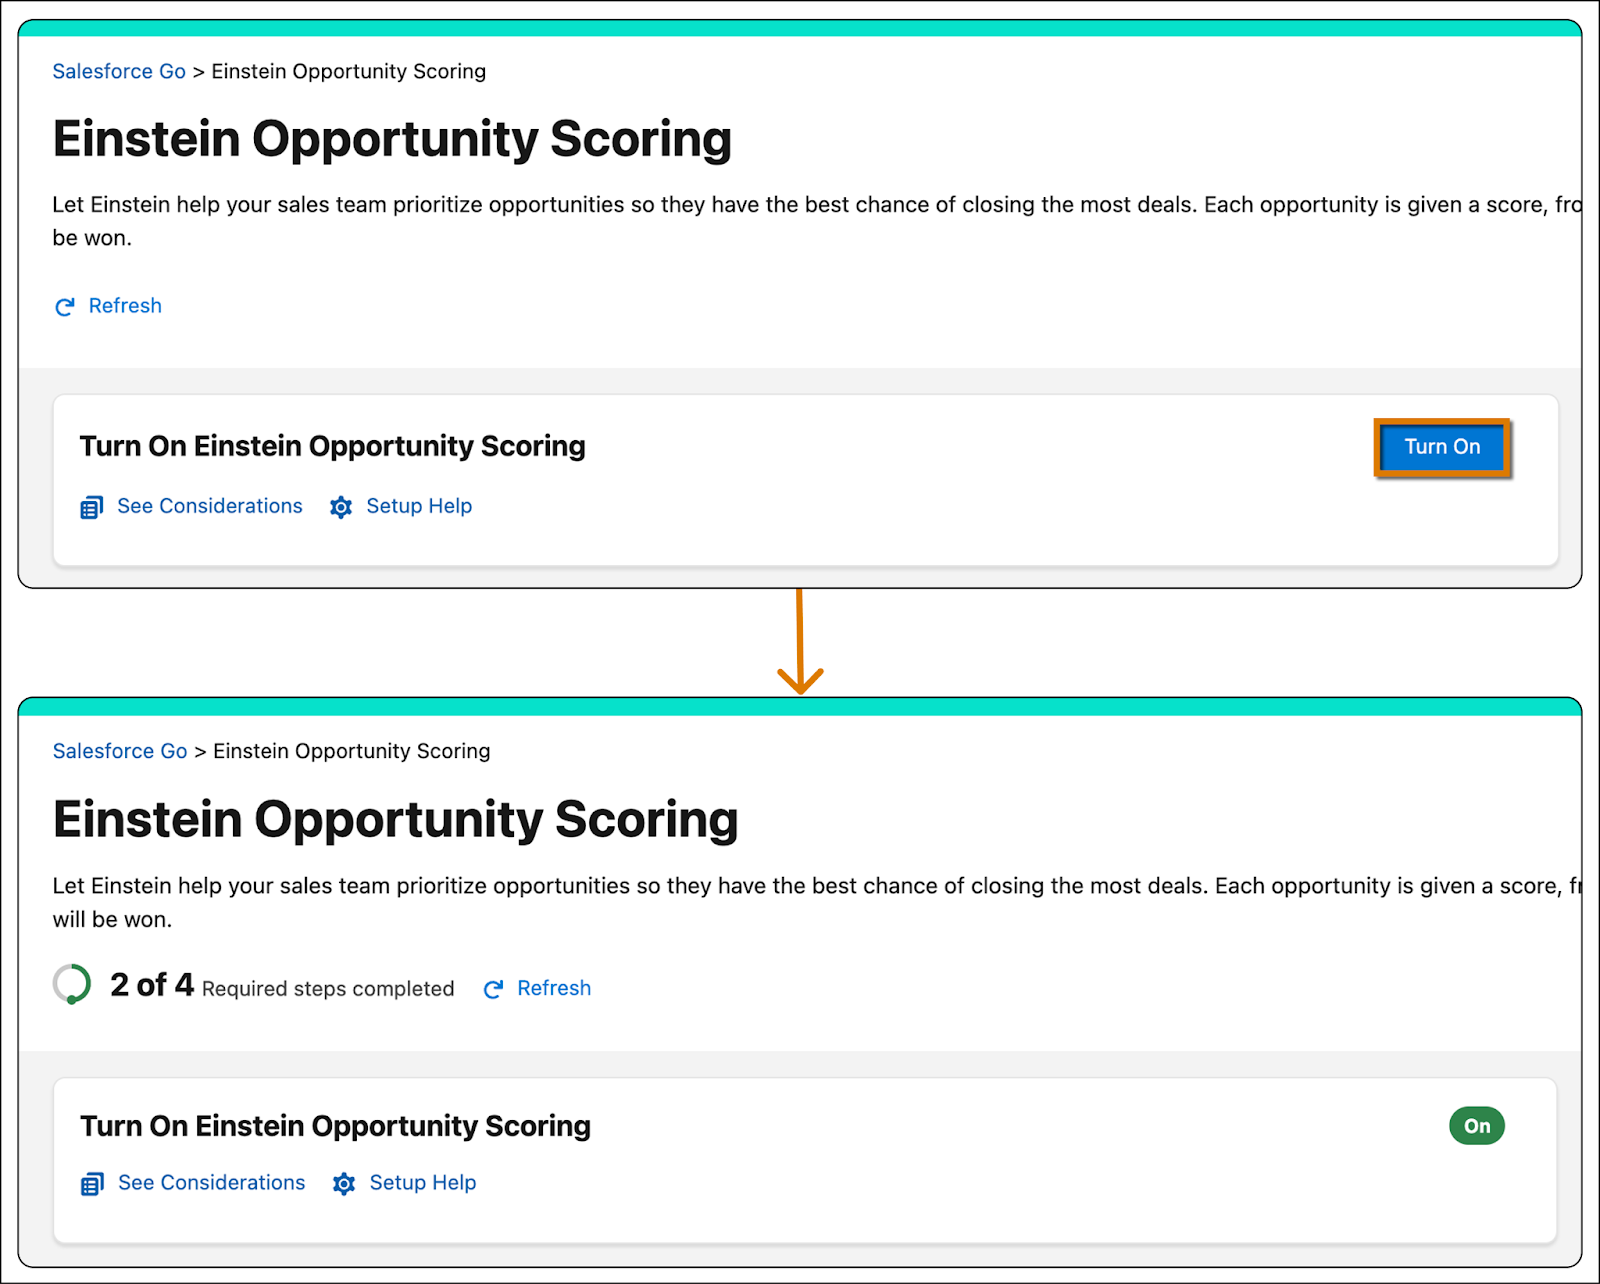
Setting up a feature is a simple two-step process: Turn the feature on and configure it to suit your needs.
Turn the Feature On
Before you can configure a feature, you need to enable it. Click Turn On to get started.
Turning on a feature is usually straightforward, but some features have a preenablement step you need to complete first.
A preenablement step is a specific action (or set of actions) required before you can turn the feature on. These steps vary by feature. For example, before you can turn on Einstein Lead Scoring, you first need to configure its settings on the Einstein Lead Scoring Setup page.
Don’t worry, you don’t need to memorize these steps for every feature. Salesforce Go has your back. It shows you whether a feature has a preenablement requirement, explains what needs to be done, and guides you to the right place to do it, all from the feature’s page.
Here’s how you know a feature needs a preenablement step:
- The Turn On button is grayed out.
- A
 icon appears next to the feature’s title.
Click  to get more details, including a link in the callout box that takes you straight to the Setup page.
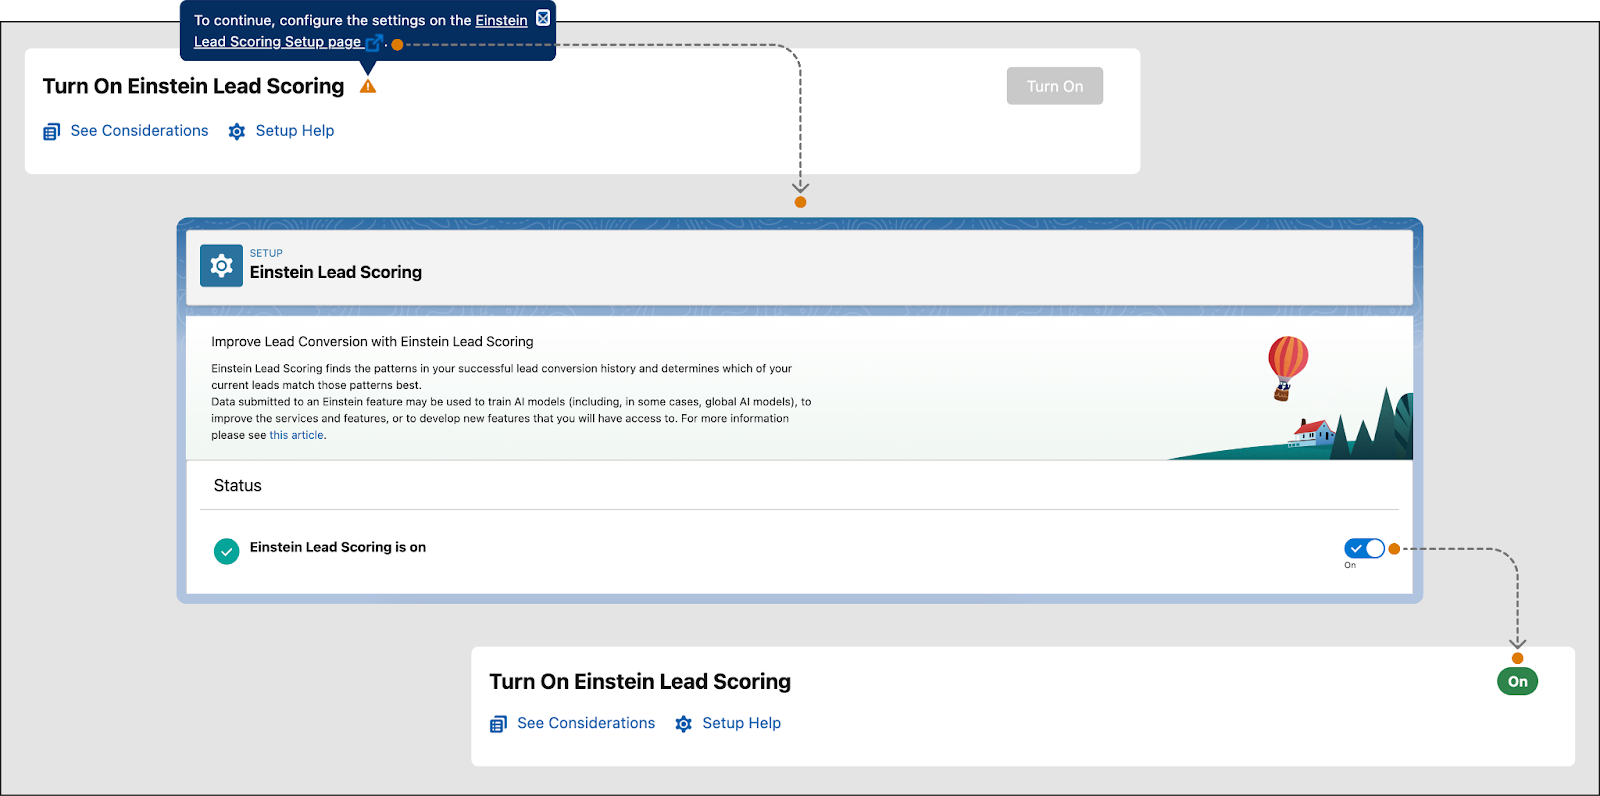
Once you complete the required step, you’re ready to turn the feature on and start configuring it.
Some features come with automated steps, actions that happen without you lifting a finger.
An automated step is a predefined action (or series of actions) triggered the moment a feature is turned on, executed seamlessly, without your input. Take Cadences, for instance. It’s closely linked to Sales Engagement. Turn on Cadences, and Sales Engagement switches on automatically. There’s nothing for you to do in these cases, just a heads-up. If a feature includes an automated step, you spot it by looking for a card that shows an action followed by  .
.
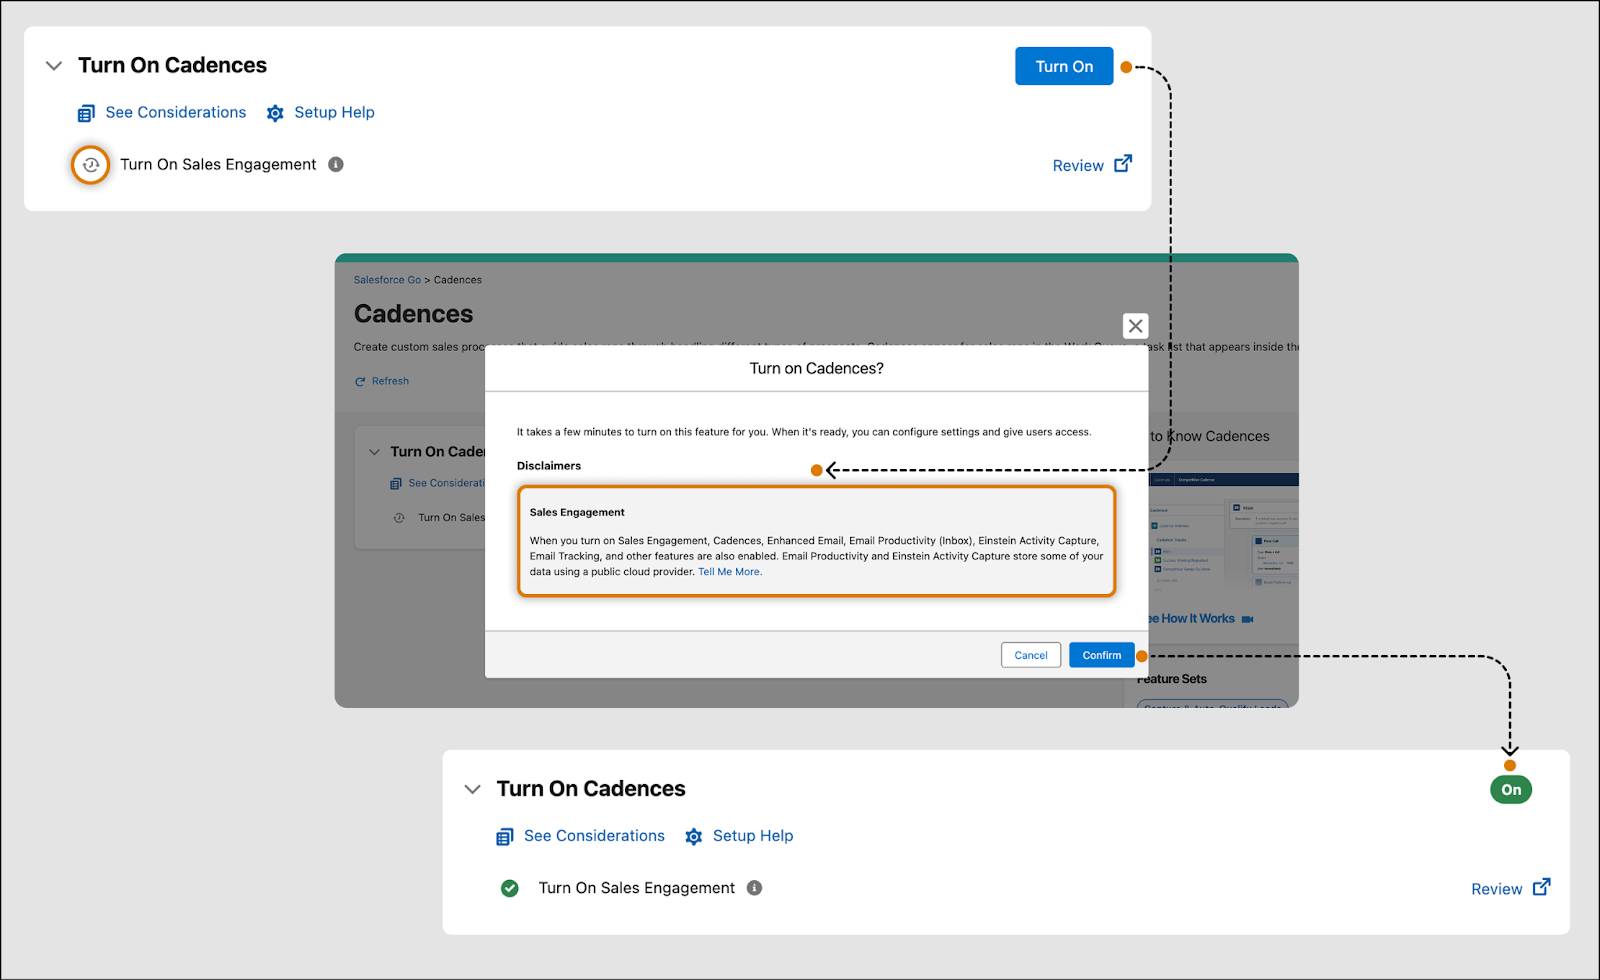
Some features in Salesforce Go include preenablement steps or automated steps. A preenablement step is something you complete before turning the feature on—it gets things set up properly. An automated step runs on its own as soon as the feature is enabled—no action needed from you. By handling these steps this way, Salesforce Go keeps the setup smooth, reduces manual work, and ensures everything runs in the right order.
Configure a Feature to Suit Your Needs
You’re on a mission to set up your sellers for success by enabling Einstein Opportunity Scoring, giving them the insights they need to prioritize high-impact deals. Activating the feature was simple, just the click of a button. Now, it’s time to configure it.
Once a feature is successfully turned on, its page automatically updates to display the configuration steps. These steps can differ depending on the feature, but each step provides clear, actionable guidance to help you tailor the setup to your specific business needs.
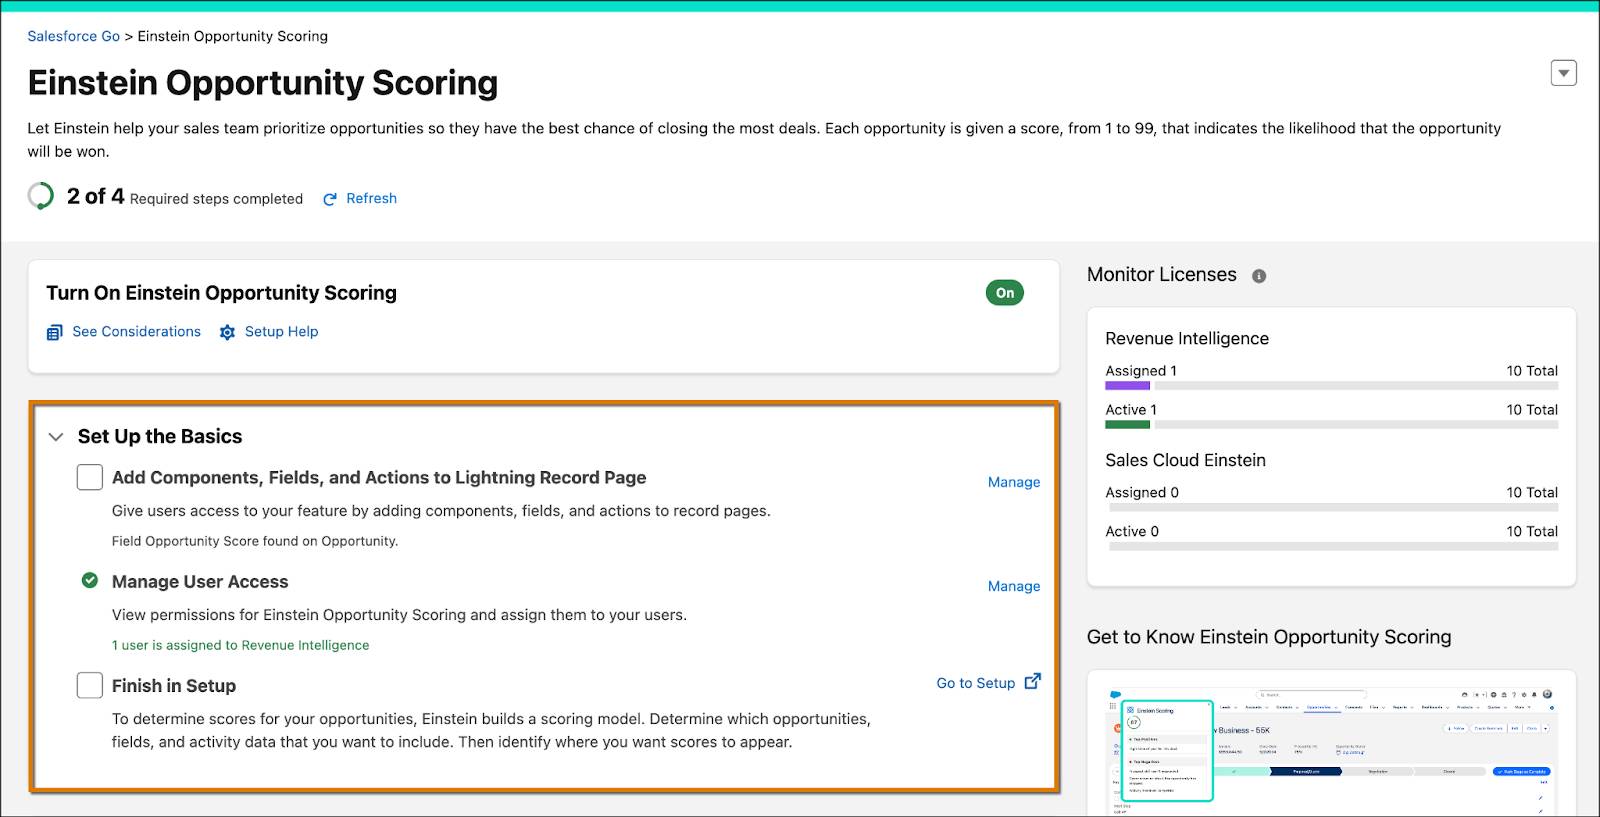
For Einstein Opportunity Scoring, three configuration steps are now available on the page.
-
Add Components, Fields, and Actions to Lightning Record Page to make the feature accessible to users. For instance, you can include the Opportunity Score field on the Opportunity record page to provide users with a quick view of key scoring information. This way, when users open the Opportunity record, they see all the necessary components and actions right where they need them.
-
Manage User Access by checking the permissions for Einstein Opportunity Scoring and assigning them to the right users. This ensures that only authorized users can view and use the feature. By setting up permissions properly, you help maintain control over who gets access to sensitive scoring information.
-
Finish in Setup by choosing the opportunities, fields, and activity data you want Einstein to use when building the scoring model. Once you select the relevant data, decide where you want the scores to appear, ensuring they’re easy for users to find and use. Manually checking this step finalizes the setup and ensures the scoring model is tailored to your needs.
Each configuration step includes a link that takes you directly to the appropriate location, whether it’s a specific page in Setup or a targeted popup window, so you can complete the task seamlessly.
For example, clicking Manage next to Add Components, Fields, and Actions to Lightning Record Page opens the opportunity record in Lightning App Builder, where you can add the necessary components based on your unique requirements. Similarly, selecting Manage next to Manage User Access launches a popup window, allowing you to assign the appropriate permissions to users, without even leaving the page.
The feature page clearly outlines each step in the correct sequence, eliminating guesswork and saving you from digging through documentation. Once all actions are complete, the feature is fully configured and ready for your team to use its full potential.
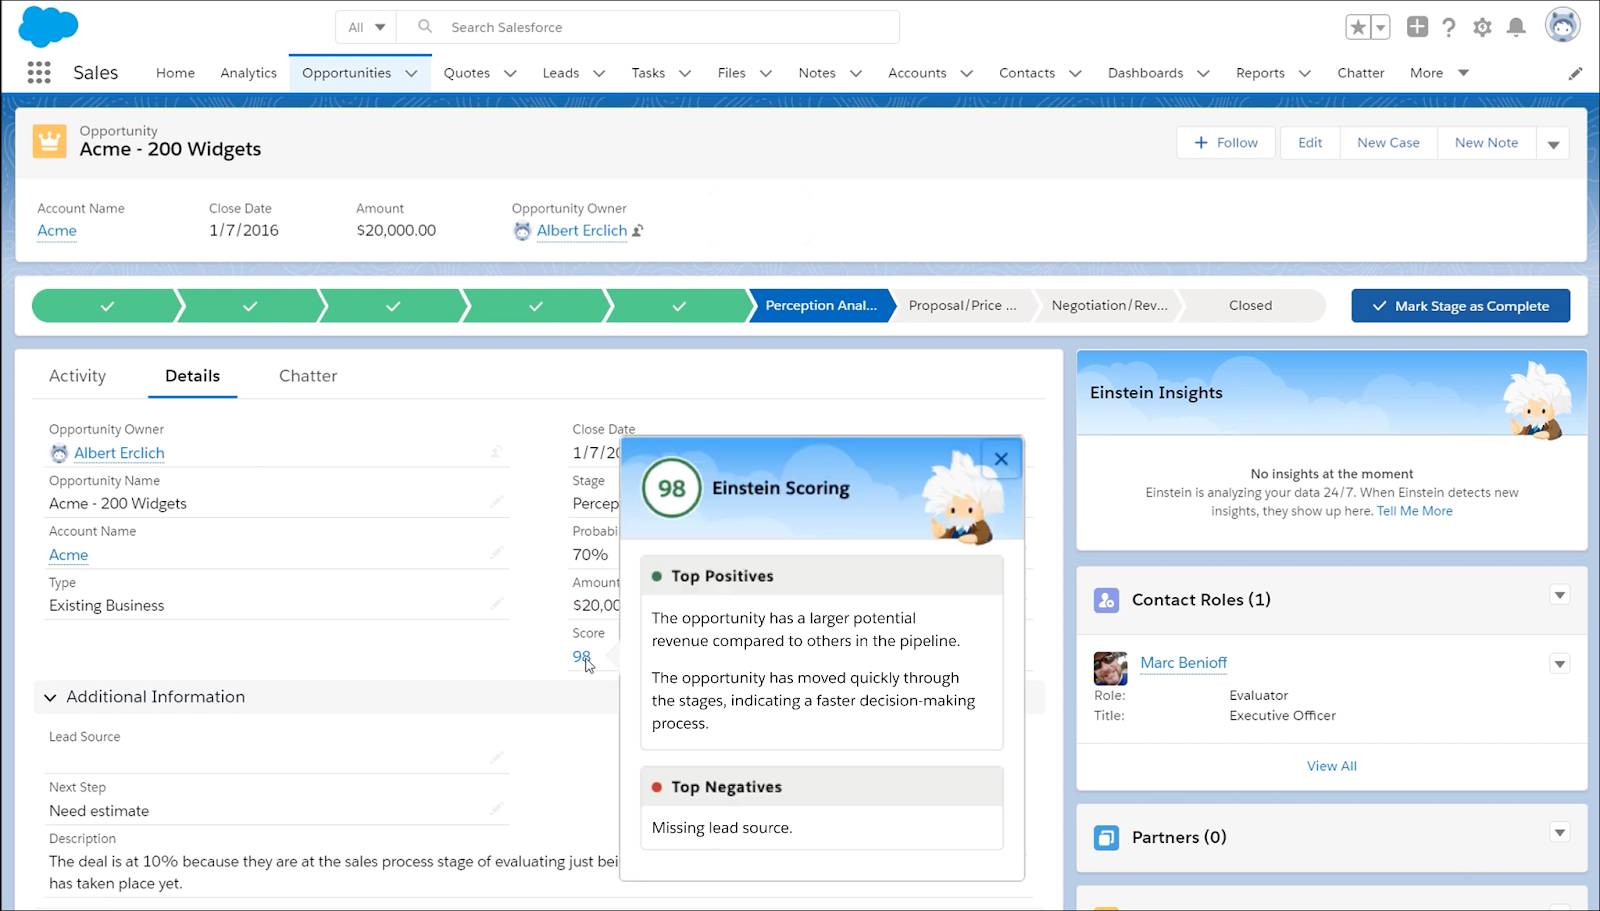
The sales team has seamlessly integrated Einstein Opportunity Scoring into their workflow, using the insights to strategically prioritize opportunities and allocate assignments. The sales manager, pleased with the improvements, is now refining her sales strategy to align with this data-driven approach. You’re encouraged by the results, especially after receiving a snapshot that highlights the positive impact.
-
Increased win rate: Sales teams saw a 15% boost in opportunity win rates, now closing 45% of opportunities compared to the previous 30%.
-
Time efficiency: The time spent prioritizing leads dropped by 60%, from 5 hours to just 2 hours per rep each week.
-
Smarter focus: Sales reps now focus on high-potential opportunities, thanks to AI-driven prioritization.
With the rollout of any new tool, a critical measure of success lies in its adoption, how many users are actively engaging with and benefiting from the implementation. Post-configuration, Salesforce Go can continue to provide support!
Monitor Usage
As an admin, you can monitor any feature you enable by reviewing its total available licenses, the number assigned, and how many are actively in use. For Einstein Opportunity Scoring, you had 10 available licenses, of which eight were assigned to the sales team. Of those, six are currently active, meaning six users have accessed the feature within the last 30 days.
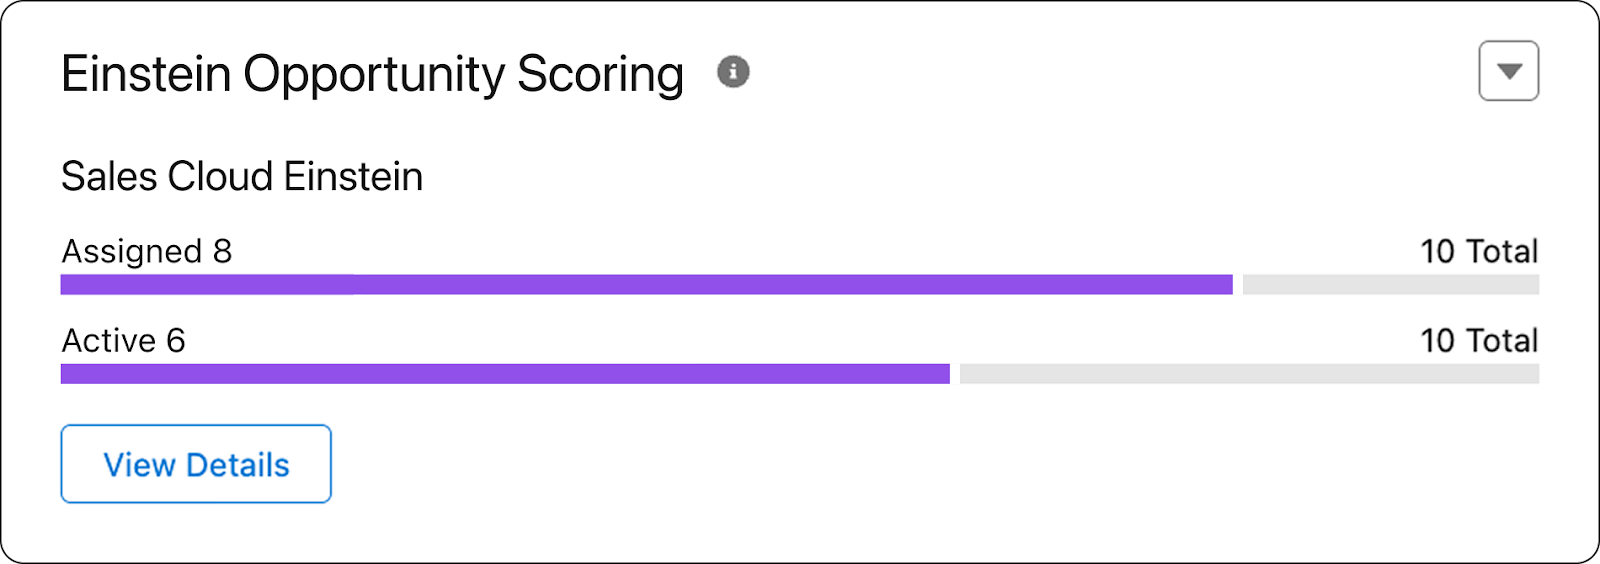
This metric offers valuable insight into user adoption. It helps you identify potential roadblocks and provide timely support to ensure that your teams maximize the value of their Salesforce investment.
See Salesforce Go in Action
Want to see Salesforce Go in action? Check out the video below!
Conclusion
That note’s still stuck to the side of your plant pot, but now, it feels less like a nagging reminder and more like a quiet win.

You started making space for what matters. You cut through the noise, enabled the right features, and tracked what’s being used. Slowly but surely, adoption is taking hold, because you made it happen.
Salesforce Go isn’t just another tool added to your stack. It makes discovering the right features for your goals, setting them up quickly and consistently, and driving adoption a whole lot easier. In a world where requests come flying in and setup steps are scattered across tabs and PDFs, that kind of consistency matters. It helps clear a path through the mess, so you can support your teams, your org, and yourself without burning out.
And tomorrow morning when you open your Admin Console dashboard, the potential won’t feel quite so untapped.