Explore Sales Agreement Components
Learning Objectives
After completing this unit, you’ll be able to:
- Describe the parts of a sales agreement.
- Explain the UI features of a sales agreement.
- Access a sales agreement and discuss how it works.
Open the Sales Agreements App
From the App Launcher, select sales agreements, and open the agreement you want. Select the Agreements Terms tab to view the revenue and quantity metrics for products.
Vance reviews the Agreement Terms tab to check product pricing for Acme, check planned revenue against actual revenue metrics, and confirm upcoming order schedules to align production.
The Parts of a Sales Agreement
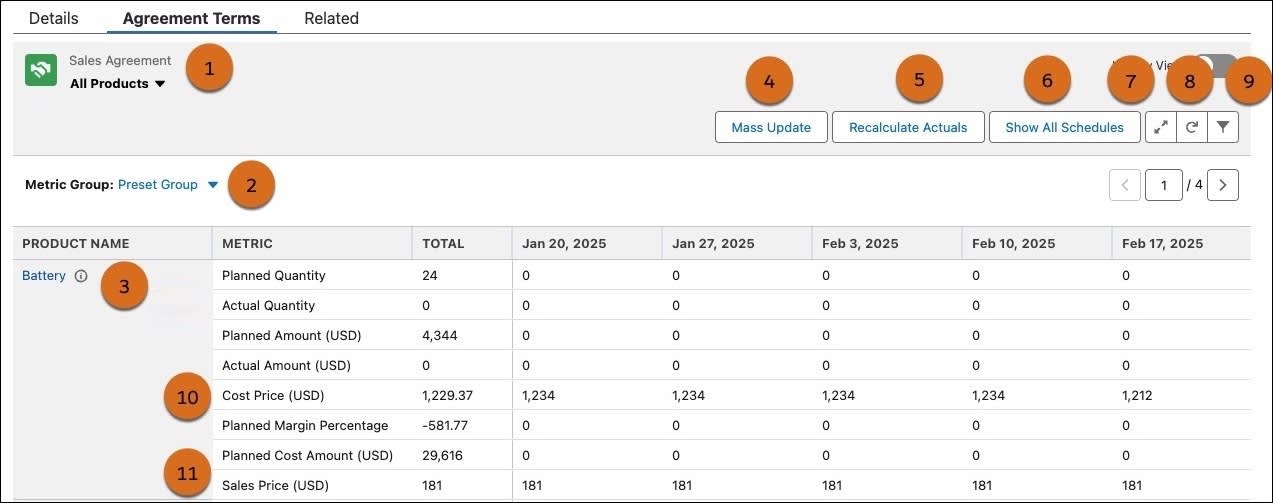
Now that you know the importance of sales agreements, it’s time to explore what makes them up. But first, learn some frequently used terms. Here’s an image of a sales agreement. Click the hot spots to learn more.
Sales Agreement UI Essentials
In addition to the main options for navigating a sales agreement, other key UI components simplify working with your agreement.
Here’s an example sales agreement showing the default view of All Products. You can track the key quantity and revenue metrics for long-term business negotiations that matter to your company.

The table defines each UI element highlighted in the example image.
UI Elements |
Description |
|---|---|
Sales Agreement (1) |
View all Products in the sales agreement using the All Products option. To view products edited after activation (UnderRevision), use the Products with Edits option. |
Metric Group (2) |
Use the Preset Group by default. Customize your view with New Metrics to define revenue and quantity fields, or select Margin Metrics to compare planned and actual margins. |
Information (i) icon (3) |
Need more information on individual products? While creating the sales agreement, select the User Specifies Planned Quantities option to manually distribute products across different schedules. The i icon is displayed next to the product name on the sales agreement. Click the i icon for product details, including allocated and nonallocated quantities. Allocate quantities based on production visibility as the sales agreement progresses through its lifecycle. |
Mass Update (4) |
Update values across multiple fields in the sales agreement efficiently with a single action. |
Recalculate Actuals (5) |
Recalculate quantity and amount metrics for past, current, or future schedules. For activated agreements, this includes all orders in the selected time range. |
Show All Schedules (6) |
View all schedules defined in the sales agreement to get a complete picture of product distribution. |
Expand (7) |
Open the agreement terms in a larger view for easier navigation and editing across multiple time intervals. |
Refresh (8) |
Refresh the agreement terms to display the latest values in real time. |
Filter (9) |
Filter agreement terms by product, product category, or time period to narrow your view. You can also view specific time ranges like May–Dec ’25 or select months such as May, June, and July ’25. |
Cost Price (10) |
Use cost prices to calculate profit margins and gain visibility into profitability on sales agreements. Drive these prices through entries in the cost book. Add final product costs to the cost book to populate cost metrics and support margin analysis within the agreement. |
Sales Price (11) |
Set the per-unit price for each product. Changing the sales price on a specific schedule affects only that schedule. |
You can use keyboard commands to perform key actions quickly, such as editing a cell, saving your changes, and redoing your changes. For more information, see Keyboard Actions for Sales Agreement Data.
After exploring the details of a sales agreement, you’re ready to create your own!