Configure Messaging
Learning Objectives
After completing this unit, you’ll be able to:
- Write the messages customers receive when a mobile worker is en route.
- Create a flow to streamline the messaging process.
Create Customer Messages
With Real-Time Location, customers receive two messages: one when the worker is en route to their job site and one when the worker is nearby. Maria has already set up messaging and Digital Engagement in her org so her customers can receive messages via WhatsApp and SMS.
That takes care of what needs to be in place for customers to receive messages. Next, Maria creates the messaging templates to define the contents of the messages that her customers receive.
- From Setup
 , in the Quick Find box, enter
 messaging, and click Messaging Templates.
- To create the En Route template, click New.
- Name the template.
- For Template Name, Maria enters:
Enroute Messaging Template - For Developer Name, Maria clicks to fill in
Enroute_Messaging_Template
- In the Insert Merge Field section, set up the link that takes the customer to the Experience Builder site.
- In Related To, select one of the options. Maria chooses Assigned Resource.
- In Field, select Appointment Assistant Info URL.
- Click Insert. The URL placeholder is added to the message.
Since Maria selected Assigned Resource in the Related To list, the URL placeholder looks like this:{!AssignedResource.ApptAssistantInfoUrl} - Complete the message that the customer receives.
Maria enters:Your mobile worker is on the way. Get ready for some sunshine! To see their location on a map, click here: {!AssignedResource.ApptAssistantInfoUrl} - Select one or more channels on which to send the message.
Maria selects All Channels.
- Save your changes.
Maria repeats these steps to create a template for the second message. This one is sent when the mobile worker is 1 mile (1.6 kilometers) away.
- Template Name:
Approaching Job Site - Insert Merge Field: same values as before
- Message:
Your mobile worker is 1 mile (or 1.6 kilometers) away. They’ll arrive soon and get to work. To see their location on the map, click here: {!AssignedResource.ApptAssistantInfoUrl} - Channels: same values as before
Maria has created the messages that customers see when their mobile workers are on the way. A customer sees the message on their preferred channel, then clicks the URL to view a map and more detailed information on the Experience Builder site.
Create Flows
Now that she has the messages ready to go, Maria sets up flows. Flows streamline the process of sending a customer a message when the Ursa Major mobile worker is en route. First, she defines the information needed to create the flow.
- Who triggers the flow? A mobile worker updating a record.
- What object triggers the flow? Assigned Resource.
- What is the action to take? Send a message.
- What is the message? The message defined in the En Route messaging template.
Maria creates and configures the flow.
- Click the App Launcher (
 ).
).
- In the Search apps and items box, enter
autoand then select Automation.
- In the Flows panel, click New.
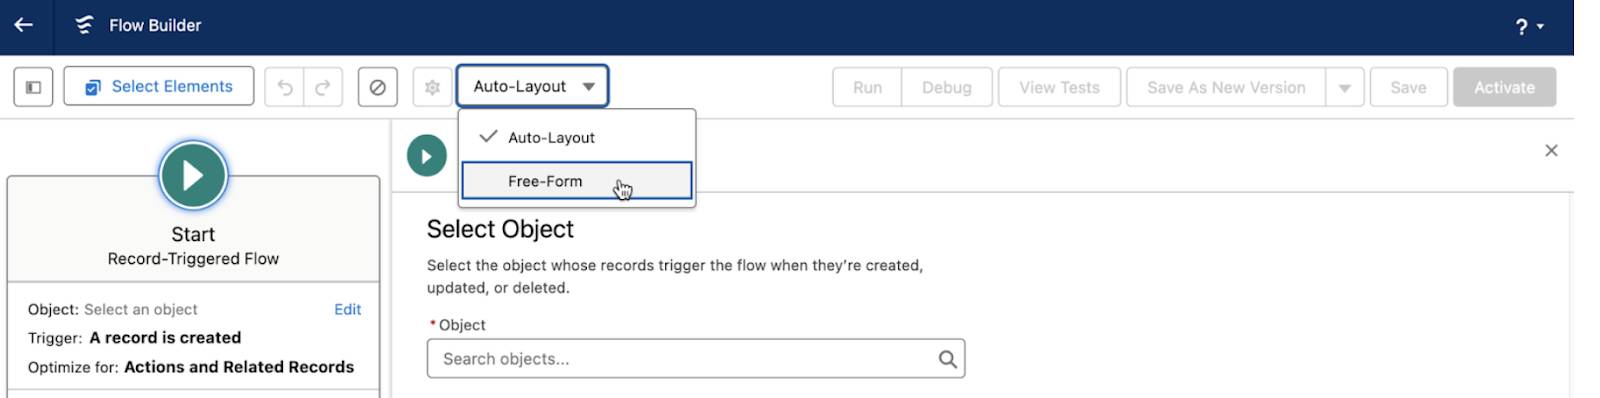
- Under Frequently Used, select Record-Triggered Flow.
- In the button bar, change the Auto-Layout setting to Free-Form.
- To configure the Start element, click Edit.
- For Object, select Assigned Resource.
- For Trigger the Flow When, select A record is updated.
- For Condition Requirements, select All Conditions Are Met (AND).
- For Field, select LocationStatus.
- For Operator, select Equals.
- For Value, enter
EnRoute.
- For Field, select LocationStatus.
- For When to Run the Flow for Updated Records, select Only when a record is updated to meet the condition requirements.
- In the Optimize the Flow for section, make sure Actions and Related Records is selected.
- Click Done.
Back in the Flow Builder, Maria sets up the action to perform.
- Drag the Action component into the flow.
- In the New Action dialog, enter
Messaging Notification.
- Fill in the fields. Maria uses the following values.
Field Name
Field Description
Maria’s values
Label
Label for the action
Send En Route MessageAPI Name
API name for the action. Click to fill in automatically.
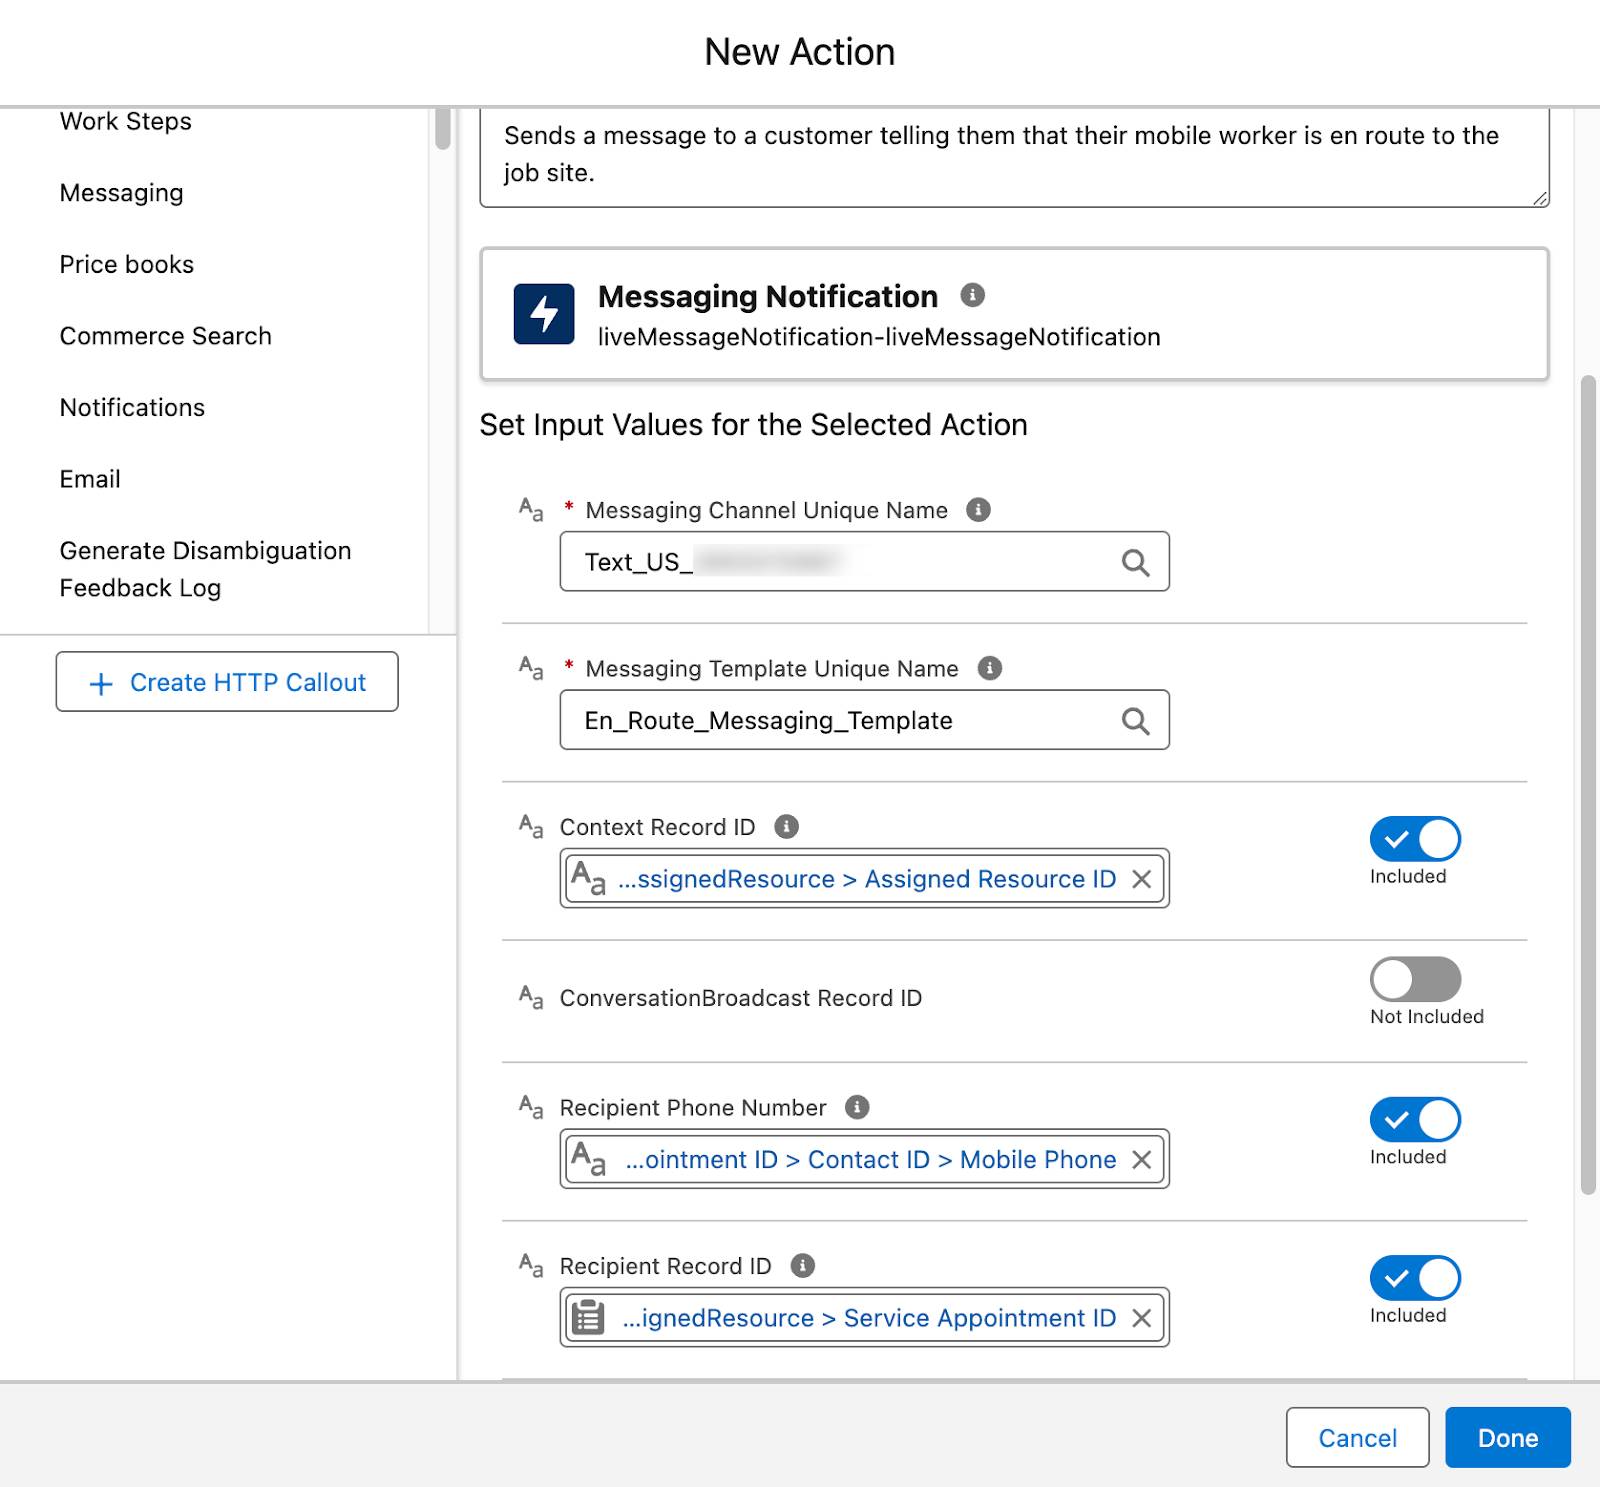
Send_En_Route_MessageDescription
Description of the action
Sends a message to a customer telling them that their mobile worker is en route to the job site.Messaging Channel Unique Name
Name of your channel. When you set up Digital Engagement, Salesforce assigns you this name.
Text_US_and her several digit channel nameMessaging Template Unique Name
Developer name of the Messaging template you created for En Route messages
En_Route_Messaging_TemplateContext Record ID
The record ID for Assigned Resource (the mobile worker who changed the status)
- Enable the toggle.
- Select Triggering Assigned_Resource__c, then Record ID
Recipient Phone Number
The contact phone number the message is sent to (the customer).
- Enable the toggle.
- Select Triggering Assigned_Resource__c, then Service Appointment ID (the one with a > next to it), then Contact ID (the one with a > next to it), then Mobile Phone.
Recipient Record ID
The record ID for the contact (customer)
- Enable the toggle.
- Select Triggering Assigned_Resource__c, then Service Appointment ID (the one with a > next to it), then Contact ID (this time, without a > next to it).
- Enable the toggle.
- Click Done.
In Flow Builder, connect the Start element to the Action element.
- Click the circle at the bottom of the Start element and drag the line to the circle at the bottom of the Action element.
- Save your flow.
Maria’s first flow is all done. Hooray!
Next, she creates a second flow to send a message to customers that the mobile worker is 1 mile (1.6 kilometers) away. To create the Approaching Messages flow, Maria repeats these steps with a few changes.
She names the new flow Approaching Messages. When she chooses the object that triggers the flow (Assigned Resource), she enters the following values.
- Condition Requirements: All Conditions Are Met (AND)
- Field: Location Status
- Operator: equals
- Value:
LastMile
Then, when she sets up the Action, she uses the following different field values:
- Messaging Template Unique Name: Maria enters the developer name of the Messaging template that she created for Approaching Messages.
- Messaging Channel Unique Name: Maria enters the developer name of the Approaching Messaging channel.
Now Maria has two flows, one for each message that is sent to customers.
In this unit, Maria set up the message template with messages to send to customers. Then she created a flow to streamline the process. Her work is done! Real-Time Location is set up and ready to start delighting Ursa Major’s customers.
Resources
- Salesforce Help: Set Up Messaging Channels
- Salesforce Help: Set Up Digital Engagement
- Salesforce Help: Create Messaging Templates
- Salesforce Help: Configure Field Service Settings
- Salesforce Help: Create Flows to Send Messages