Integrate Expression Sets for Rating
Learning Objectives
After completing this unit, you’ll be able to:
- Create an Integration Procedure.
- Describe how to add common components for rating.
- Prepare an Integration Procedure version for use.
Create an Integration Procedure
Cumulus Insurance offers a range of insurance products, and some involve more complex pricing calculations than a single expression set can handle. Solution Architect Justus needs a way to streamline the process, and combine multiple calculations and datasets. Enter Integration Procedures! He can use these powerful tools to orchestrate rating procedures that span multiple expression sets.
In this unit, learn how to configure an Integration Procedure to handle more complex rating needs.
Build an Integration Procedure
Integration Procedures contain a series of elements. With a single call, the procedure executes in order on the server-side and needs no user interaction. Data is maintained in JSON format and updated as each element executes.
There are three main build panels.
-
Available Components: This panel displays all the available component types. Drag a component into the Structure panel to make it an element.
-
Structure: Use this panel to place elements in the desired execution order. Drag and drop to reorder them.
-
Properties: Use this panel to view and customize the properties of a selected element.

[Alt text: The three panels with the Element structure highlighted.]
Review the Elements
For rating, it’s common to call expression sets and use other elements to adjust the JSON returned by one expression set before it is input to the next expression set. Explore these commonly used actions.
Expression Set Action
Use an Expression Set Action for each expression set your Integration Procedure calls. When the action executes, inputs go from the Integration Procedure to the expression set and output returns.
This table describes the different keys with reference to the Integration Procedure.
Key |
Sample Value |
Description |
|---|---|---|
includeInputKeys |
parentProdKey, productKey |
Use these additional keys for input beyond the Send JSON path. |
includeInputs |
true |
Use this key to include inputs in output. |
aggByKey |
ProductCode |
Use this key to group aggregations based on a key value. |
List Action
Use the List Action element to manipulate lists, also known as arrays, in the JSON. The element merges multiple list nodes by matching the values of specified nodes. Learn about two important properties using an example.
For input into a second expression set, Justus has two lists to merge into one.
-
input_1: This list contains the original input data. Each node has a key, AUTO.instanceKey, that identifies the vehicle along with other keys, such as carValue and driverBirthdate.
-
rateDriversTransform:AUTO: This list contains the transformed results from the first expression set. Each node has a key, AUTO.instanceKey, along with driver rating results, such as a ratedDriver-COLL key.
The goal is to combine nodes with the same value for AUTO.instanceKey. So, Justus configures a List Action element with the Merge List Order and Merge Fields specified.
Data Mapper Transform Action
You use Data Mapper Transform Actions to restructure, rename, and convert data. Use these actions to modify key names within the JSON data. By changing the key names, you ensure the data from one expression set is received and understood by the next expression set in the Integration Procedure.
The JSON returned by a rating Integration Procedure is always structured as a list, even if there’s only one node. Expression sets generate the correct JSON format, but if you manipulate the JSON structure, you can use a Data Mapper Transform Action with the Output Data Type of List<Map> to make a list.
Here, observe the original input data for an auto rating, and the output data following the calculation of the first expression set.

[Alt text: The JSON of Original Input Data and Data after First Expression Set.]
Following a list merge, the original input data and expression set output data are combined into a format that the second expression set requires.

[Alt text: The JSON of Result of List Merge.]
Response Action
Use one or more Response Action elements to end the execution of the Integration Procedure and send back results. Specify the results to send back using Send JSON Path, and use the Additional Output property to add data to the Data JSON.
With more than one Response Action, the same procedure can support more than one type of rating, such as age-based and composite. Use Execution Conditional Formula to control which elements to use when. Some users prefer all Response Actions at the end, while others prefer them as soon as results are available. Their locations do impact the conditions you need.
Preview the Procedure
Before implementing the Integration Procedure, confirm it works as required. Use the Preview tab to test and troubleshoot.
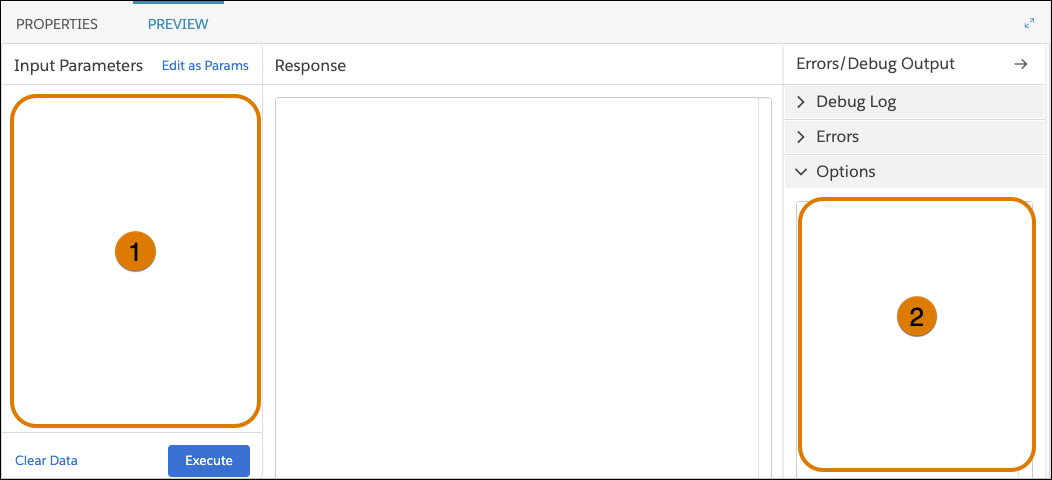
[Alt text: The preview screen with the Input Parameters panel and filter panel highlighted.]
The input for the test goes in the Input Parameters panel (1). Choose Edit as JSON to simply paste in or edit the input as JSON. You can set options in the filter panel (2) by adding an additional input parameter named Options. When ready, click Execute.
Check Results
After executing the preview, check the Response pane for the results.

[Alt text: The preview screen with the Response section and Debug Log section highlighted.]
Make sure the Response (3) section contains the JSON output you expect from the Integration Procedure. If it doesn’t, start troubleshooting. Check the Send JSON value of the Response Action. Confirm that the expression set version is activated and its simulation is still successful. Try simulating with just one node in the array and see if you get the same results as in the simulation of the expression set.
Use the Debug Log (4) to check the JSON one element at a time through the Integration Procedure to narrow down where the issue is.
Activate Integration Procedure
Your Integration Procedure tested successfully, so it's time to make it usable. To use it, you must activate a version. Select the Procedure Configuration element and click Activate Version.
Great work! Throughout this module, you’ve explored the foundations of a robust rating system. You now understand the key components of a rating procedure, from data preparation and decision matrix creation to expression set development and integration.
Ready to streamline the user experience? The next step of the quoting journey, covered in Business Processes for Insurance Quoting, involves creating guided flows using OmniScripts. These flows simplify product selection and configuration, enhancing the quoting experience for customers and agents.
Want to Learn More?
If you’re a Salesforce customer, check out these learning journeys to discover how to skill up on our suite of digital transformation tools and industry applications.
-
Digital Insurance Platform Consultant Learning Journey
-
Digital Insurance Platform Developer Learning Journey