Create Your First Quote Template
Learning Objectives
After completing this unit, you’ll be able to:
- Create a basic quote template to generate simple proposals.
- Add a watermark that appears dynamically.
- Migrate quote templates without encountering issues.
A Simple Starting Point
As you saw in the first unit, sales reps create proposals by clicking the Generate Document button which gives them the chance to choose a template to use. Your CPQ-enabled org has a sample template to get you started, but in real life you probably want to create your own templates to support your specific business needs. For example, you might not need to include a fax number any more, but you do want to link to your social media presence.
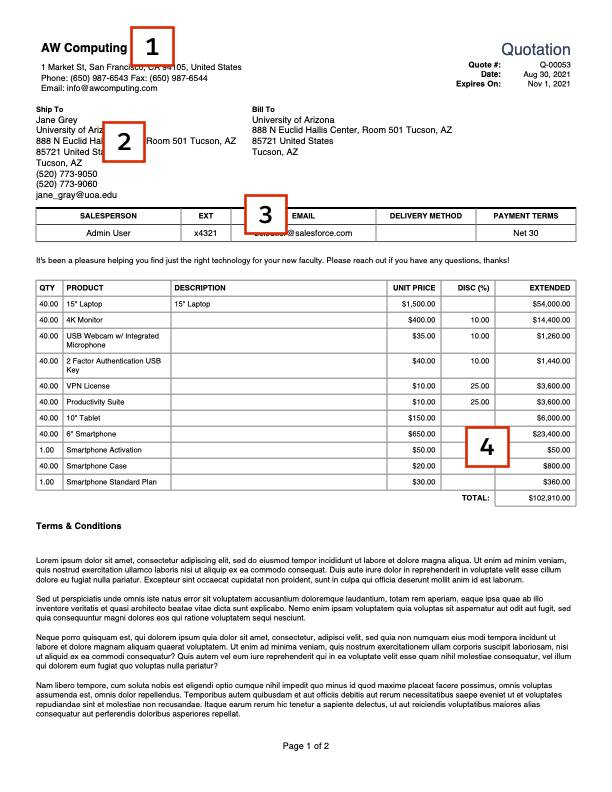
Creating a new template is easy, but it’s just the first step in making a template that works for your business. Without making any changes to the template you’ll get an output document that’s quite basic. It’ll have some details about your company [1], your customer [2], the sales rep [3], the products and their prices [4], and a signature block [5]. This information is fixed in a predetermined layout.
Yes, it’s basic, but it’s a good start! Let’s make a new quote template that will be the foundation for your work in later units. You start by navigating to the Quote Templates tab.
- In the navigation bar, click Quote Templates.
- Click New.
- For Template Name, enter
AW Proposal.
- Check Default.
This will make the template automatically selected on the Generate Document page.
- For Top Margin, enter
0.5.
This is a cosmetic change that will make future additions to the proposal look better.
- For Company Name, enter
AW Computing.
- For Company Slogan, enter
Always Winning!.
- For Company Phone, enter
(650) 555-1212.
In this example you skip the rest of the company information section, but in real life it’s smart to include everything so it’s there when you need it.
- For Shading Color enter
CCEEFF.
This is the hex code for a nice shade of blue that will help distinguish your new template from the existing one.
- Click Save.
And that’s it, you have a new quote template! Technically you don’t have to add company information or customize the shading color, but doing so will help you know that this template is truly yours. Let’s see what it looks like when used with Q-00053.
- In the navigation bar, click Quotes.
- Click Q-00053.
- Click Preview Document.
The AW Proposal template should automatically be selected since it is the default.
- Click Preview.
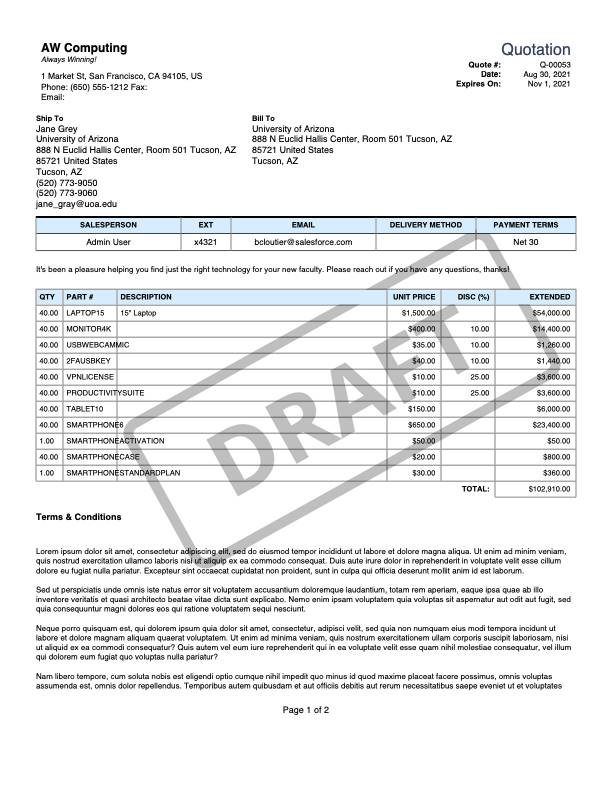
It looks surprisingly similar to what you saw in the last unit, but should have your custom blue coloring.
- Click the X to close the preview window.
A lot of important quote information is on the basic proposal; it’s almost good enough to use in a pinch. One thing you might find surprising is that your new proposal includes some text under the Terms & Conditions section. That’s because your CPQ-enabled org comes preloaded with sample Quote Terms, and CPQ automatically includes them on all proposals. In a later unit you learn how to create quote terms and manage their behavior.
OK, you’ve got a great foundation for your quote template. Let’s start building on it.
Add a Dynamic Watermark
Sales reps often create multiple proposals for a single sale as they negotiate with their customer. These “in progress” proposals are usually not approved by management yet, so it should be clear to the customer that the proposal they receive is not finalized. Salesforce CPQ has a built-in way to show a watermark on the proposal under certain conditions, like when the quote is not approved.
Setting up a dynamic watermark takes a few steps and requires you to go into Salesforce Classic for a minute, but it’s well worth it. You start by finding the document ID of the watermark image that’s part of the CPQ managed package.
- Click your profile icon (
 ) and click Switch to Salesforce Classic.
- Click the + symbol in the tab bar to show all tabs.
- Click Documents.
- Click Go! next to the Salesforce CPQ Assets folder.
- Click Draft Watermark.
- Copy the 15-character ID from the end of the URL in the address bar.
 Good, the watermark document ID is in your computer’s clipboard.
- Click Switch to Lightning Experience.
- In the navigation bar, click Quote Templates.
- Click AW Proposal.
- Click Edit.
- Paste the copied ID into Watermark ID.
- Click Save.
Great, now watermarks can potentially appear on your proposal, but they don’t show up by default. In order for a watermark to appear, the quote field named Watermark Shown must be checked.
Your CPQ-enabled org has this field in the quote page layout so that you can manually check it on Q-00053 and verify that the watermark appears. But in real life, you probably don’t want to give sales reps control over the field. Instead, we recommend that you automate the checking and unchecking. For example, you could create a Process Flow to check it whenever the quote Status is not Approved or Accepted, and uncheck it otherwise.
From the Quotes tab, click Q-00053, check Watermark Shown, and then Save. When you click Preview Document and then Preview, the draft watermark appears in the background layer of each page.
For the sake of simplicity, the rest of this module assumes Watermark Shown is unchecked.
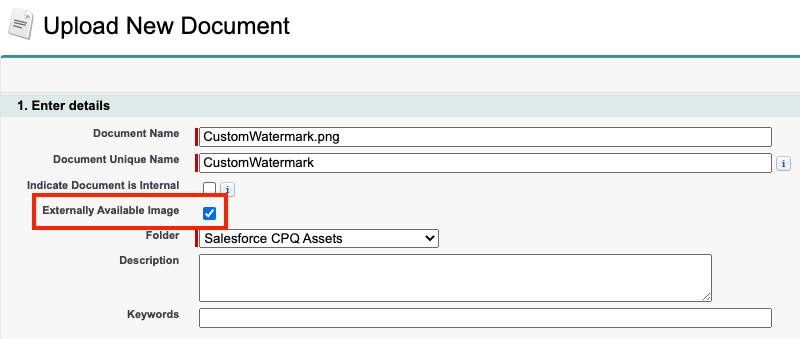
If you want to use your own PNG image for a watermark, just upload it to a folder under Documents, and check Externally Available Image. Then replace the Watermark ID on the template with the one from your own document. If you forget to mark the PNG as externally available, the watermark simply can’t appear in the proposal.
Developing and Migrating Templates
Responsible admins do their work and testing in sandboxes then migrate their work into production, and you do that too, right? When it’s time for you to migrate a quote template, there are a few things to keep in mind.
- If you use a custom draft watermark in your quote template, migrate the watermark document too. Then, after migrating the quote template you must update the Watermark ID field on it to use the new ID from your production org watermark.
- When you migrate records, sometimes you need to open the exported comma-separated value (CSV) file to tweak it before uploading it into production. This innocuous step can cause a critical issue for quote templates if you’re not careful. Some spreadsheet utilities like to “help out” by reformatting numbers. They take a number like 000000 and convert it to just 0. The issue is that 000000 is not just a number, but also a hex code that represents the color black, a very common color in quote templates. So when a tweaked CSV file is uploaded into production, a quote template field such as Border Color might accidentally get a value of 0. This breaks the template and causes an error message to appear when sales reps try to preview or generate the proposal. So if you need to edit the CSV file, make sure to undo any automatic reformatting the spreadsheet editor does upon opening, then set color-related columns to treat values as text.
Finally, by default the Deployment Status field on a quote template starts as In Development. Templates with this status can only be seen by admins on the Preview Document and Generate Document pages. After you’re done migrating a quote template, verify it works as expected by previewing a sample quote. If it looks good, change the Deployment Status to Deployed. Now your sales reps can see and use the template too.
Creating a quote template record is an important first step in giving your sales reps a basic proposal for their customers. In the next unit you learn how to create a more sophisticated template with your own look and feel.
Resources
- Salesforce Help: Display Watermarks on Draft Quote Document Previews
- Salesforce Help: Salesforce CPQ errors in attempt to generate or preview a Quote document