Use Data from a Custom Object to Drive Rules
Learning Objectives
After completing this unit, you’ll be able to:
- Describe the challenges of maintaining many, similar rules.
- Identify the types of fields you need in an object used for lookup query rules.
- Create a product rule that connects to a custom object containing lookup data.
- Construct a lookup query to pull relevant records from a custom object.
- Describe how validation and alert lookup rules differ from selection lookup rules.
A Mountain of Rules
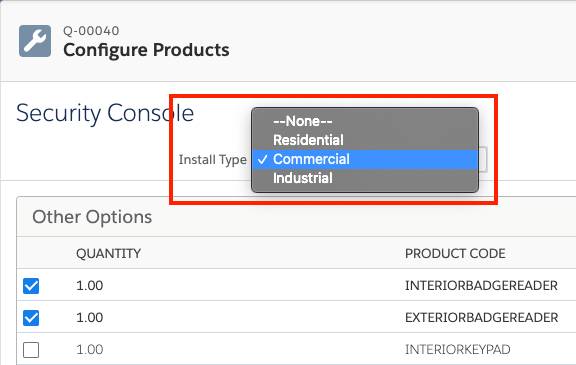
Some business requirements seem to take a lot of time and energy to implement. Consider this example: The Home Automation Hub bundle has a number of power strips and outlets that support different socket standards, so your customer in Germany can buy the same bundle as one in the United States. Now imagine that you want to limit which powerstrips and outlets can be sold to customers based on the country in the quote’s Ship To Country field. For example, if it’s Germany, they should only be able to buy the Smart EU Power Strip and the Smart EU Power Outlet. The other options are grayed out like in the screenshot.

One way to meet this requirement is to create a product rule for each country, each with their own error conditions, actions, and configuration rules. But every time you add another country, you have to create another rule. Worse yet is that you might have to revisit old error conditions to account for the new country. That can mean a lot of work in your future.
Thankfully there’s an easier way: Use a lookup query as part of your rule. With one rule, you can do all the work of the original three. And you don’t need to make new rules to support more countries.
It All Starts with Data
The key to lookup rules is having a source of data that describes all of the possible scenarios you want to handle. For the above example, you can imagine a simple table that describes what to do for each country and product combination.
Country |
Product |
Action |
|---|---|---|
United States |
Smart US Power Strip |
Enable |
United States |
Smart US Power Outlet |
Enable |
United Kingdom |
Smart UK Power Strip |
Enable |
United Kingdom |
Smart UK Power Outlet |
Enable |
Germany |
Smart EU Power Strip |
Enable |
Germany |
Smart EU Power Outlet |
Enable |
The data in this table needs to be somewhere CPQ can find it. Namely, a custom object. For your CPQ-enabled special org, we’ve already created a custom object called Outlet Locales to house this data and created the records.
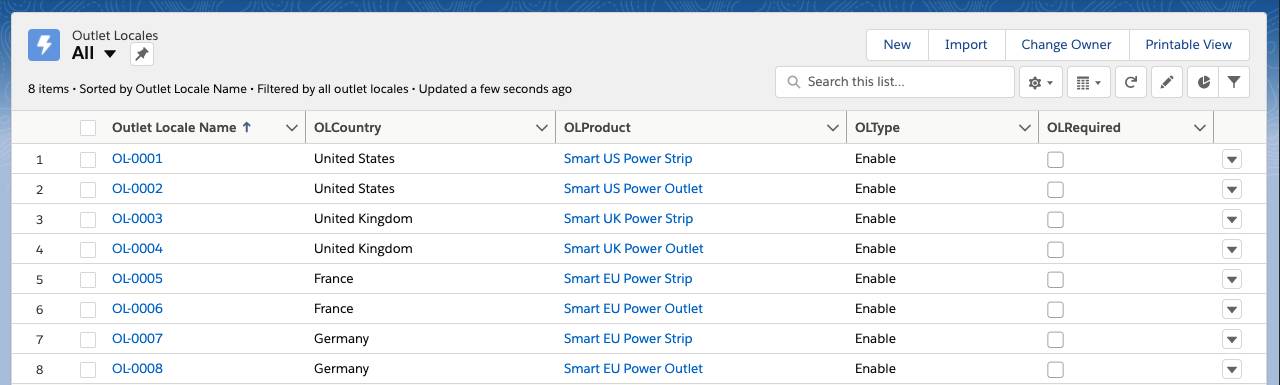
We named the fields OLCountry, OLProduct, and OLType so that it is clear where they’re coming from when you reference them later. In real life you don’t need to add a prefix.
OLCountry is just a text field. OLProduct is a lookup field to the Product object. OLType is a picklist that has all the types of actions you’d take in a product rule, such as Enable, Add, Hide & Remove, and so forth. Finally, we included OLRequired as a checkbox since CPQ expects to see it later (but it won’t play a role in this rule).
If you’d like to learn about creating custom objects, see the great Data Modeling badge in the Admin Beginner trail.
Now that you know where your data resides, you can start creating a product rule to use it.
Create a Lookup Product Rule
One of the most important parts of making a lookup rule is to tell CPQ where to find the data that drives the behavior of the rule. You do this in the product rule record itself. Let’s get started.
- In the navigation bar, click the Product Rules tab.
- Click New.
- For Product Rule Name, enter
Limit power options.
- For Type, choose Selection.
- For Scope, choose Product.
- For Evaluation Event, choose Load.
For this activity, you want the rule to run only when first opening a configuration. Otherwise, it might uncheck “good” options as the bundle is getting configured.
- Check Active.
- For Conditions Met, choose All.
OK, now for the interesting part. In the Lookup Query Information section, you have fields that tell CPQ where to find the data that tells it how to behave. So next you point it to the custom object and custom fields.
- For Lookup Object, choose OutletLocale__c.
This is the API name of the custom object. We’ve conveniently updated the picklist in your special org to include this value. We’ve also updated the picklists for the other fields in this section too. In real life you have to update the picklist values yourself.
- For Lookup Type Field, choose OLType__c.
- For Lookup Product Field, choose OLProduct__c.
- For Lookup Required Field, choose OLRequired__c.
You need to choose a Lookup Required Field even though you’re not using it in this example. If you don’t, an error appears when you try to configure the bundle.
- Click Save.
Great! Now CPQ knows exactly where to find the data about the products and actions for any given country. The next challenge is to make sure CPQ only uses data that’s relevant to the quote at hand. For example, if the quote’s ship to country is Germany, you only care about the last two rows of the table you saw earlier. That’s where lookup queries come in.
A lookup query is a little like a filter. You tell CPQ to compare information from the quote (Ship To Country) to data in the table (OLCountry field). If there’s a match, CPQ brings the data back. For this example you need to create just one Lookup Query.
- In the Lookup Queries related list, click New.
- For Match Type, choose Field Value.
You choose Field Value because you need to match a field (Ship To Country) with data in the table.
- For Tested Object, choose Quote.
- For Tested Field, choose SBQQ__ShippingCountry__c.
Great, you’ve pointed CPQ to half of the information you want to compare.
- For Operator, choose equals.
- For Lookup Field, choose OLCountry__c.
That’s the second part of the comparison.
- Click Save.
Excellent. Your lookup query is ready to go! Now when quoting to Germany, the rule only pulls back the two relevant records from the custom object.
For this example you compared a field (Ship To Country) to another field (OLCountry). It’s also possible to compare a static value to the lookup field. For example, you can pull all records where “active” matches the lookup field. That way you can maintain a table of actions that go in and out of service over time, maintained by simply flipping records to active. To use a static value when creating your lookup query, enter the value into Tested Value, and choose Static Value for Match Type.

You can also compare a configuration attribute to your lookup field. For example, instead of looking to the Ship To Country field on the quote, you could look to a configuration attribute made especially for sales reps to capture extra information.
In that case you would use the Tested Configuration Attribute lookup field in the query, then choose Configuration Attribute Value as the Match Type.
Lastly, you can create more than one lookup query for a single rule. That allows you to create a custom object that represents scenarios based on many factors, yet still get just the records that are relevant for the situation.
At this point our rule enables specific options based on country, but you need an action that disables everything else. You can do that in the same rule.
- In the Actions related list, click New.
- For Type, choose Disable & Remove.
- For Filter Field, choose Product Code.
- For Operator, choose contains.
- For Filter Value, enter
power.
- Click Save.
This is a simple action that disables any option with “power” in the product code. When selection rules have both actions and lookup queries, actions act first. So you start by disabling everything, then you come back to enable the correct options.
You’re almost done, you just need to tell CPQ to use this rule for the Home Automation Hub bundle.
- In the Configuration Rules related list, click New.
- Check Active.
- For Product, look up and choose Home Automation Hub.
- Click Save.
Congratulations, you’ve made a lookup rule! Let’s see it in action.
- From the navigation bar, click Quotes, then choose the All list view.
- Click Q-00043.
If you scroll to the bottom of the quote, you’ll see that it has a Ship To Country of United Kingdom.
- Click Edit Lines.
- Click Add Products.
- Check Home Automation Hub.
- Click Select.
You should immediately see the result of your hard work. In the Power feature, CPQ only enables the UK options and disables everything else.
In the future if you start selling other outlet types you just have to add the options to the bundle like normal, then add some Outlet Locales records to identify which products are acceptable for the country. All maintenance is done there, you never have to touch the rule again.
Validation and Alert Lookup Rules
You can use lookup rules to drive validation and alert rules too. The process is similar, except you only need two fields for your custom object: a lookup field, like OLCountry, and a text field to house the messages you want to display to your users.
You still tell CPQ which object has your data, but then you only have to set the Lookup Message Field to the text field on your custom object.

Since you’re fetching your messages from the lookup object there’s no need to enter a message in the product rule record itself.
Product rules that use lookup queries are an excellent way to reduce the number of rules you have to create. You also save time changing rules for your expanding business.
Resources