Create a Data Management Policy in Privacy Center
Learning Objectives
After completing this unit, you’ll be able to:
- Describe how to create an effective data management policy.
- Activate a data management policy.
- Retain data with Hyperforce Data Retention Store.
Introduction
Data management and right to be forgotten policies allow you to keep your customers’ data secure and ensure your organization follows applicable privacy laws. Data management policies are run on an organizational level, while right to be forgotten policies are run on behalf of an individual. While these policies have different purposes, the steps to set them up in Privacy Center are similar.
We’ll cover data management policies in this unit and right to be forgotten policies in the next unit.
Create a Data Management Policy
Salesforce data management policies allow you to ensure that only necessary data is retained in production.
Matt and his internal stakeholders at Cumulus Cloud have analyzed and documented their privacy requirements. They want to create a data management policy that meets these requirements and complies with local data residency requirements as well.
Matt needs to create a data management policy for customers who have closed their account on the Cumulus website. The company wants to erase and deactivate customer data after a set number of days, as described in the following bullets.
- After 60 days, remove all highly sensitive data from the Contact and any related objects, such as activities, history, and child objects.
- After 120 days, remove all personally identifiable information from the Contact object and any related data.
- After 365 days, remove the customer’s contact record and all related data if there are no open cases.
Matt plans to meet all three criteria with one data management policy by adding the same parent object, in this case the Contact object, to his policy multiple times. Each time he adds the object to his policy, he uses different filters to capture more data on the same object.
For the first two criteria, he creates masking rules in his policy with a filter based on the date the customer deactivated. The policy updates the sensitive data as required, setting non-required fields to blank and required fields to a static value such as REDACTED. As he creates and edits the policy, Matt can add child rules for related objects. If he uses compliance categorizations to tag how his fields are used, he can filter the fields in the policy by data categories.
He can schedule his policy to run daily, so that deactivated website customer accounts are processed frequently.
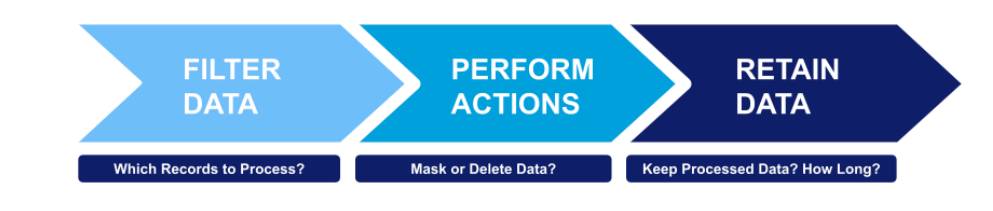
To create his data management policy in Privacy Center, Matt follows three overall steps.
-
Filter: Filter data based on specific criteria, such as data type or record age, to identify which records need to be managed.
-
Configure actions: Perform actions on the filtered data, such as masking or deleting records, to ensure that data is handled in accordance with privacy standards and organizational policies.
-
Retain data (optional): Determine if any of the data that was processed needs to be maintained—and if so, how long it should be stored.
Let’s take a closer look.
Step 1: Filter
Privacy Center gives you a lot of options to find relevant records. You can use factors such as age and data type, and even factors reaching up to parent records or down and across to child and other related records.
-
Filter using record-level logic.
-
Filter based on parent object criteria.
-
Filter based on cross-object query.
In the preceding example, Matt wants to create a policy that deletes contacts with closed cases at 365 days. He can set this policy up in two different ways, depending on whether he’s looking for contacts where at least one case is closed (even if others are open), or whether he’s looking for contacts where all cases are closed.
At Least One Case Closed |
All Cases Closed |
|---|---|
Goal: Find contacts where at least one case is closed. |
Goal: Find contacts where all cases are closed. |
|
Apply Filter Logic:
|
Apply Filter Logic:
|
|
Filter Result: This filter tells Privacy Center to look for contacts that have at least one case that is closed, and include only those accounts in the policy where this evaluates to TRUE. Note: The policy will run if at least one case is closed. This means the policy will execute even if the contact has other cases that are still open. |
Filter Result: This filter tells Privacy Center to look for contacts that do not have cases that are not closed, and it includes only those contacts in the policy where this evaluates to FALSE. Note: The policy will run only if all cases are closed. |
In this policy, Matt only wants to delete contacts where all cases are closed so he sets the Result Rule to FALSE.
Step 2: Configure Data Handling Actions
In the Data Handling section, indicate whether you want data captured by policy filters to be deleted or masked. The transformation option specifies what happens to the data in the originating Salesforce environment.
You can optionally choose to delete records from the related history object and field object trail, as well as permanently delete records. You can also choose how to handle files and attachments (leave untouched, delete, or only delete if they’re not shared with other objects). Take care when using this last selection to not accidentally leave files and attachments orphaned.
Step 3: Specify Retention Rules (Optional)
You can optionally specify retention rules for data captured by the policy. The data action specifies whether to move the processed data to the Hyperforce Data Store and how it will be handled.
Activate a Data Management Policy
Before you activate your data management policy, you can generate a preview that shows you approximately how many records will be affected when it runs. Once you activate it, you can choose to manually run the policy at any time. You can also automate your data management policy executions to run on a defined schedule. We recommend that you schedule the policy to run outside peak business hours to ensure that changes made to org records don’t affect business performance.
Hyperforce Data Retention Store
Matt wants to retain data outside the production environment. He needs to keep data for legal and compliance reasons but wants to minimize processing and access to reduce risk. The Hyperforce Data Retention Store allows him to do just that and comply with data residency or sovereignty requirements.
Cumulus wants authorized users to be able to view the retained data in the Hyperforce Data Retention Store within Salesforce. To set this up, Matt configures Hyperforce Data Retention Store as an external object with Salesforce Connect in the Data Stores tab. That way records can still be viewed by those who need access, but they are not available to everyday users in the system.
Sum It Up
In this unit, you learned about the three-step approach to creating Privacy Center data management policies. You also learned about the Hyperforce Data Retention Store. In the next unit, take a closer look at how to handle individual privacy requests within the context of the data access request lifecycle.