Implement Attribute-Based Pricing
Learning Objectives
After completing this unit, you’ll be able to:
- Set the price-impacting attributes on a product.
- Define attribute-based adjustments to calculate discounts based on a product’s attributes.
- Add an Attribute Based Price element to a pricing procedure.
Explore Attribute-Based Pricing
Attribute-based pricing is a powerful pricing strategy for calculating product prices based on specific, configurable characteristics called attributes. Think of attributes as the defining options of a product, such as size, color, material, or capacity.
Instead of a one-size-fits-all price, attribute-based pricing empowers you to adjust prices based on the customer’s selections. This gives businesses more control over pricing and enables them to offer highly customized solutions.
Richa Mani, the pricing admin, at InfinitraBytes wants to use attribute-based pricing to dynamically adjust the price of their Keyboard product. She plans to offer different pricing based on the configuration the customer selects:
- Normal Keyboards: $14.99
- Wireless Keyboards: $17.99
In this unit, you join Richa as she uses Salesforce Pricing to implement this pricing strategy.
Set Price-Impacting Attributes
Price-impacting attributes are specific characteristics or properties of a product that directly influence its price. For example, consider a mobile phone. You can create a pricing rule that offers a 10% discount on red phones. In this case, the phone’s color is the attribute that determines the discount.
To implement attribute-based pricing, products must have defined attributes and at least one attribute must be price-impacting. Here, you set the price-impacting attribute for the Keyboard product. Follow along with Richa in your Developer Edition org.
- On the Price Management home page, click the Products tile.
- Change the list view to All Products.
- Under Product Name, click Keyboard.
- On the Related tab, under Overridden Inherited Attributes, click Wireless.
- On the Product Attribute Definition page, next to the Is Price Impacting checkbox, click the Edit icon.
- Select the Is Price Impacting checkbox, and save your work.
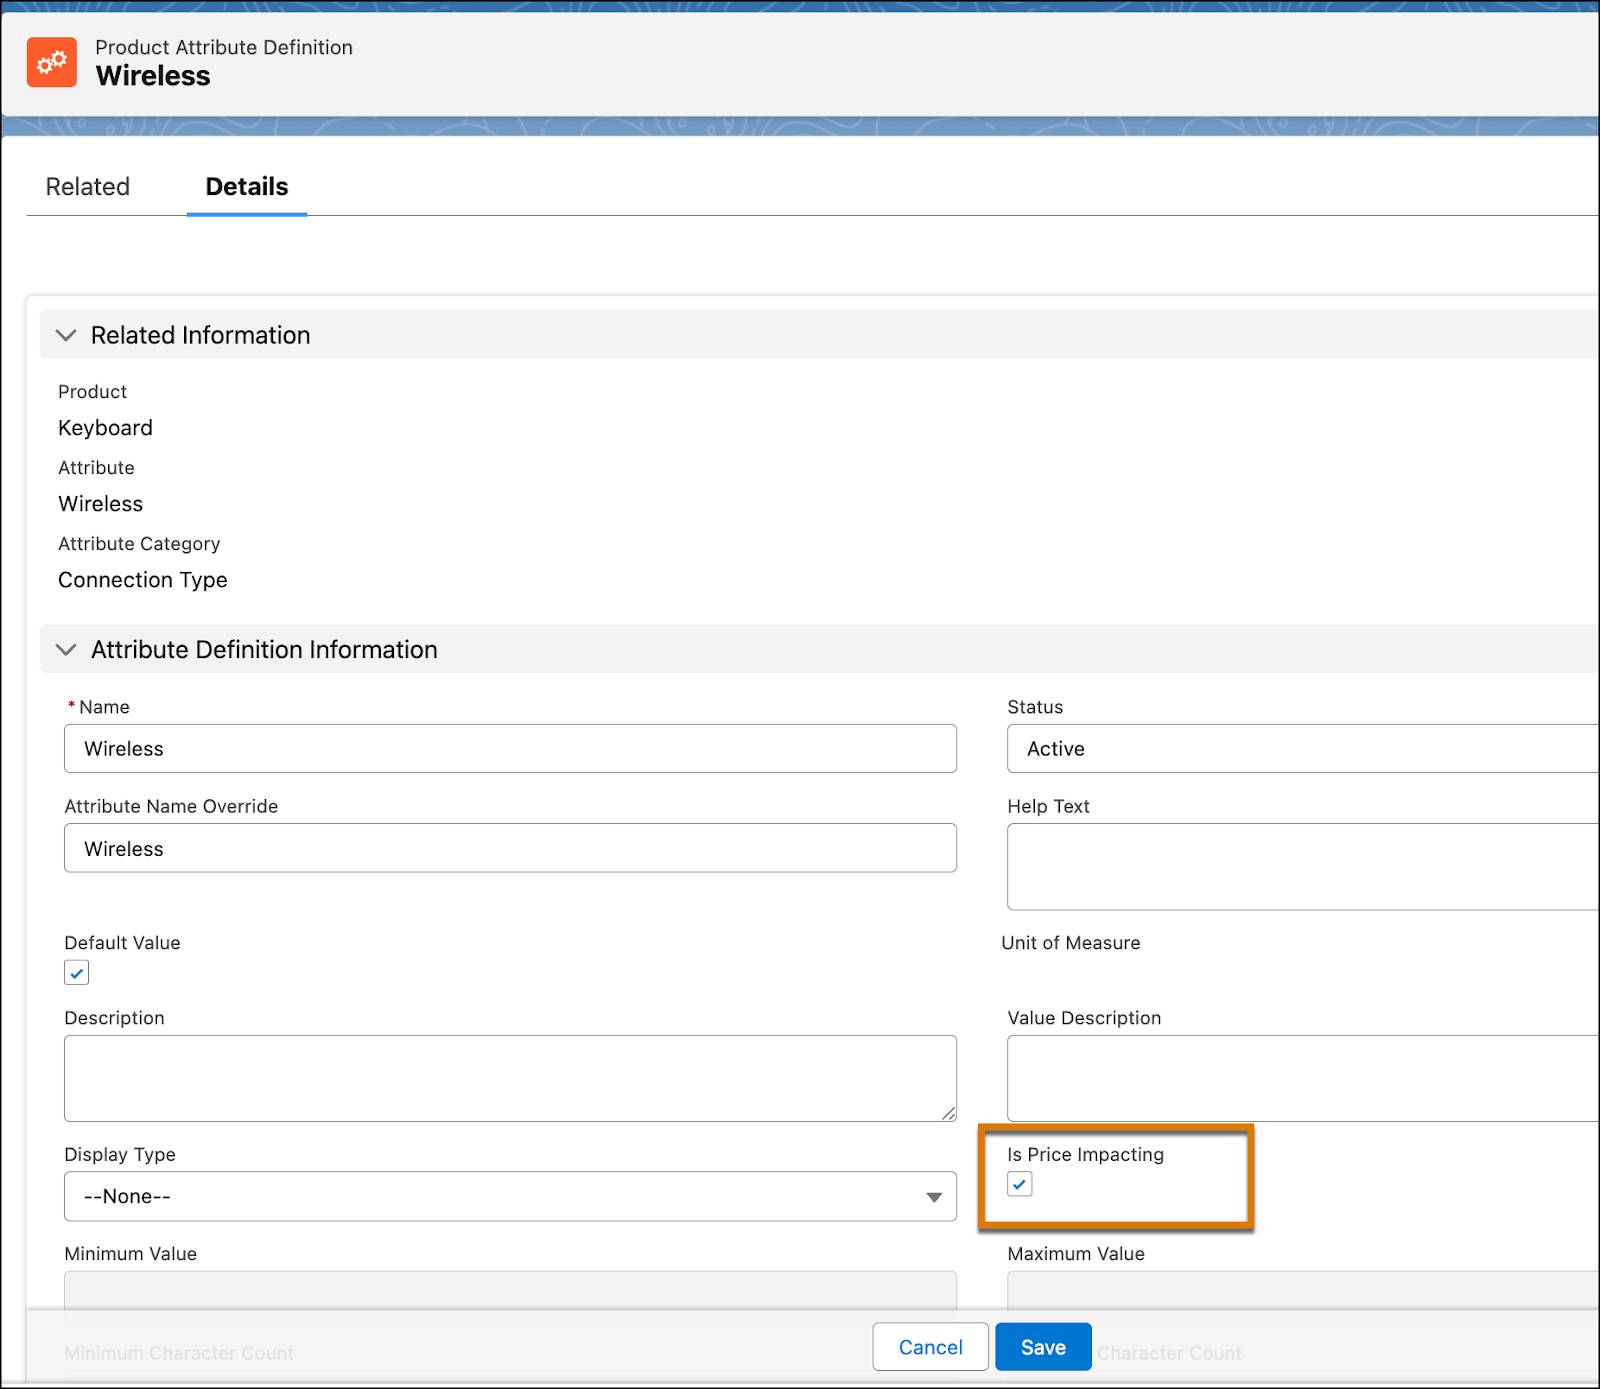
And that’s how you set the Wireless attribute of the Keyboard product as price-impacting.
Create an Attribute-Based Adjustment
With the Keyboard product’s price-impacting attribute in place, Richa carries on. She uses the out-of-the-box price adjustment schedule to define the attribute-based adjustment.
Follow along with the steps:
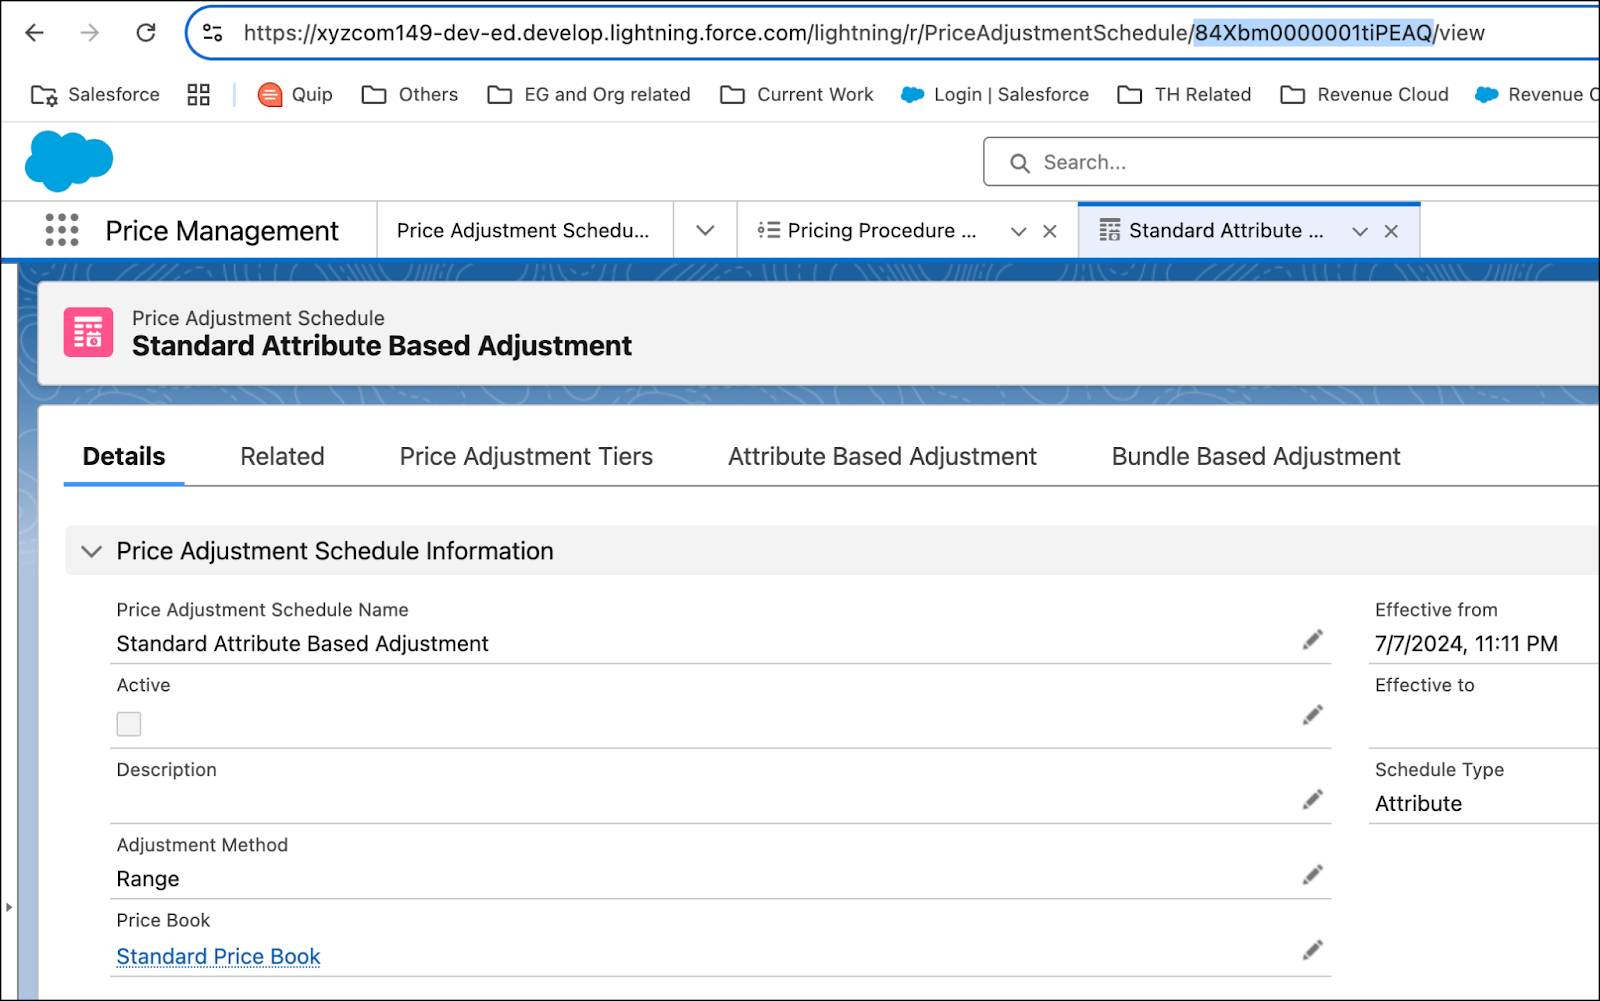
- On the Price Management home page, click the Price Adjustment Schedules tile.
- Change the list view to All Price Adjustment Schedules. All the standard price adjustment schedules are listed.
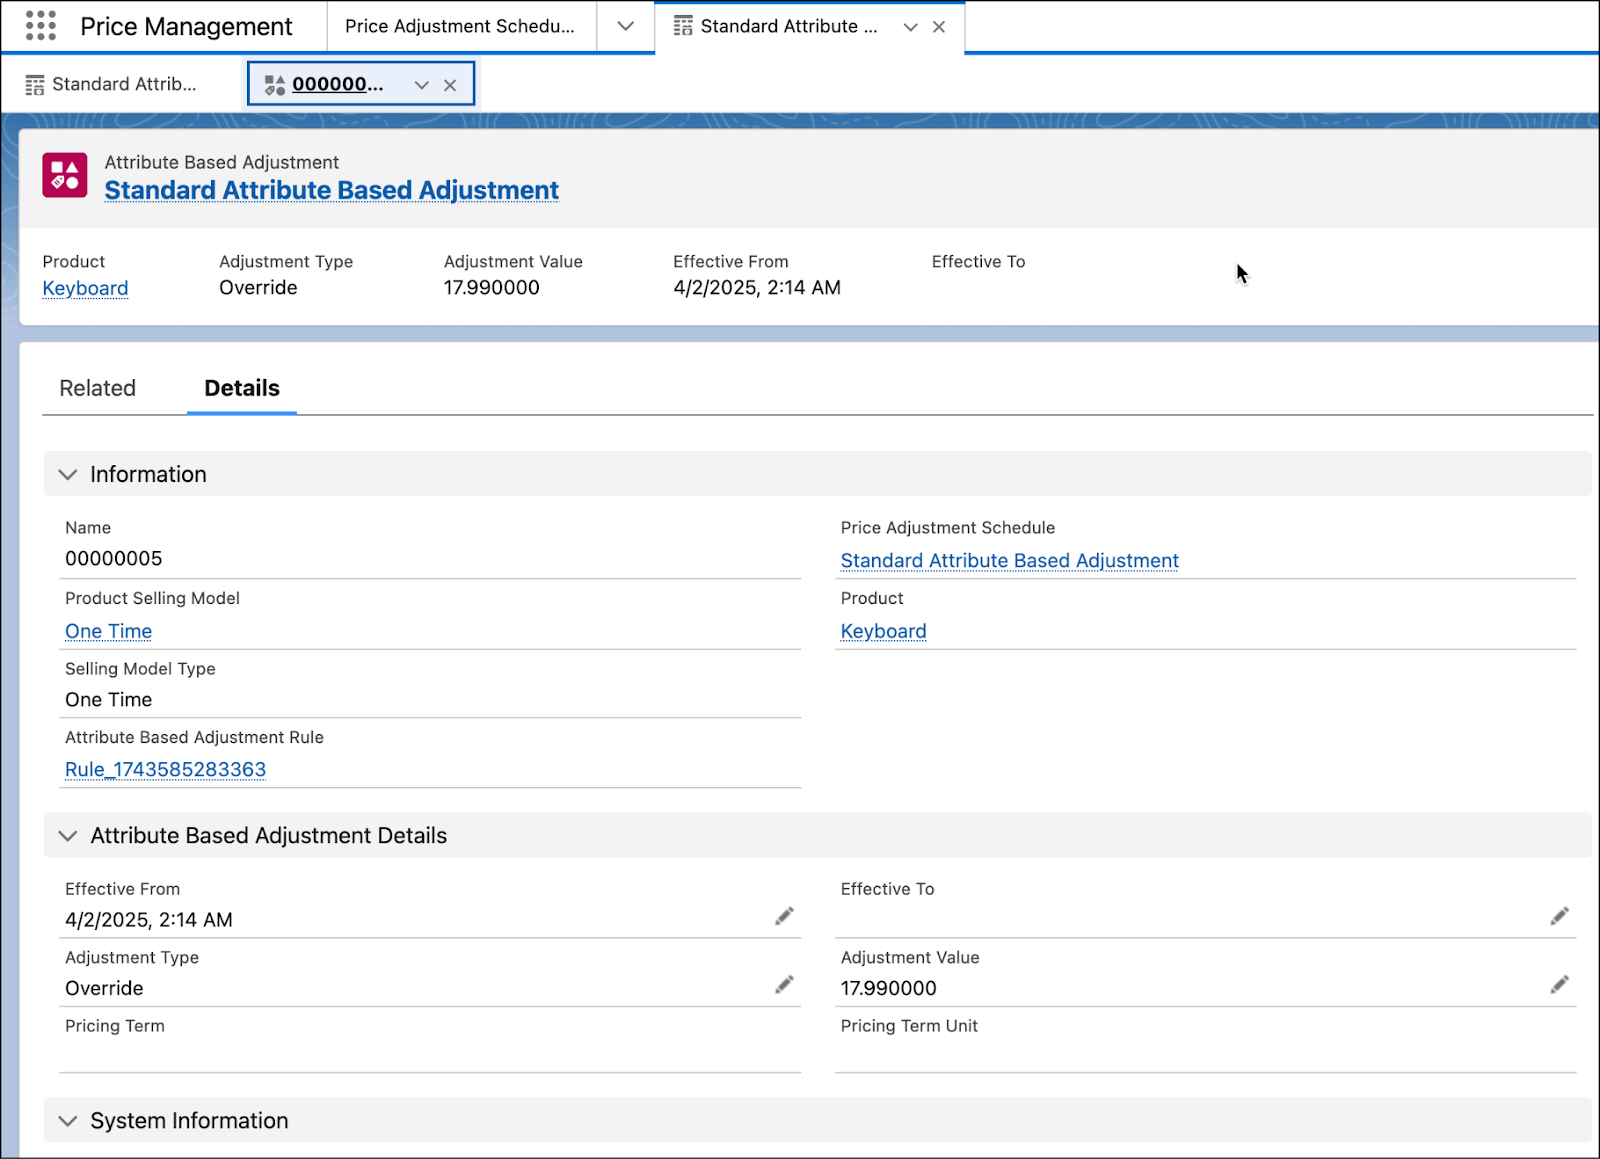
- Click Standard Attribute Based Adjustment.
- In the Details tab, uncheck the Active checkbox. Salesforce Pricing requires deactivating a price adjustment schedule before adding new attribute-based adjustments.
- Click the Attribute Based Adjustment tab.
- Click New.
- Add these details:
- Product: Keyboard
- Product Selling Model: One Time
- Adjustment Type: Override
- Adjustment Value:
17.99 - Effective From: Today’s date
- Click Next.
- For Operator, select Equals.
- For Value, select true.
- Click Save.
- On the Price Adjustment Schedule page, navigate to the Details tab.
- Next to the Active checkbox, click the Edit icon.
- Select the Active checkbox, and click Save.
With the attribute-based adjustment for the Keyboard product now set up, your next step is to refresh the Attribute Discount Entries decision table in your org. Follow the same steps that you used earlier.
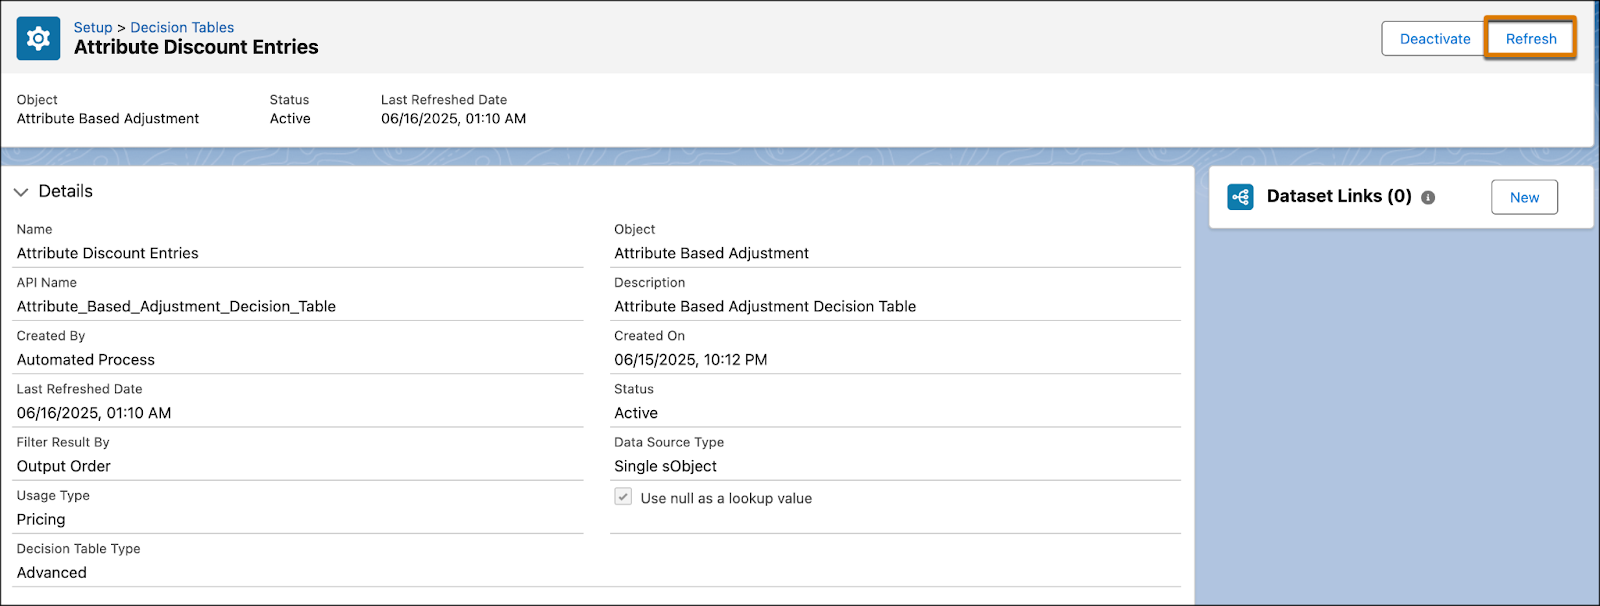
This ensures that the latest pricing data is available in the Attribute Discount Entries decision table. You can validate this by navigating to App Launcher and opening the Lookup Tables page. Here, search for and open Attribute Discount Entries.
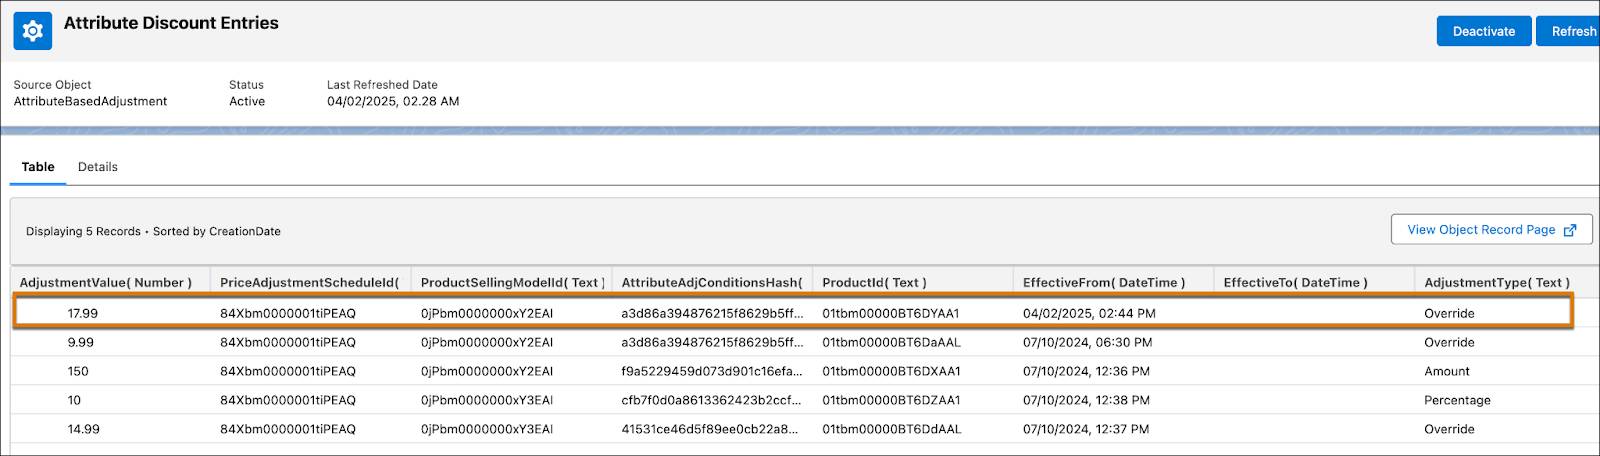
Notice that your newly created attribute-based adjustment is now populated in this table. The Attribute-Based Price element uses this lookup table for its price calculations. More on this in the next section.
Add the Attribute-Based Price Element
Now it’s time to add the Attribute-Based Price element to your pricing procedure.Start by creating a constant to store the Id of the price adjustment schedule, which is the Standard Attribute Based Adjustment. Pricing procedures typically use constants to define elements not included in the context definition.
Create a Constant
- Open the pricing procedure you used in the last unit.
- Under Pricing Procedure Versions, click Pricing Procedure Demo V1. This opens the Pricing Procedure Builder in a new browser tab.
- On the left panel of the Pricing Procedure Builder, click
 .
.
- Click Add Resource.
- In the Add New Resource window, add these details:
- Resource Type: Constant
- Resource Name:
AttributePAS - Data Type: Text
- Default Value: Enter the price adjustment schedule Id from your org browser, as shown here.
- Select Done.
Add the Attribute-Based Price Element
Your pricing procedure currently contains these four pricing elements: Pricing Setting, List Price, Volume Discount, and Manual Discount. Next, add the Attribute-Based Price element to it.
- Under the Manual Discount pricing element, click the + symbol.
- Search for and select Attribute-Based Price from the Add Element menu.
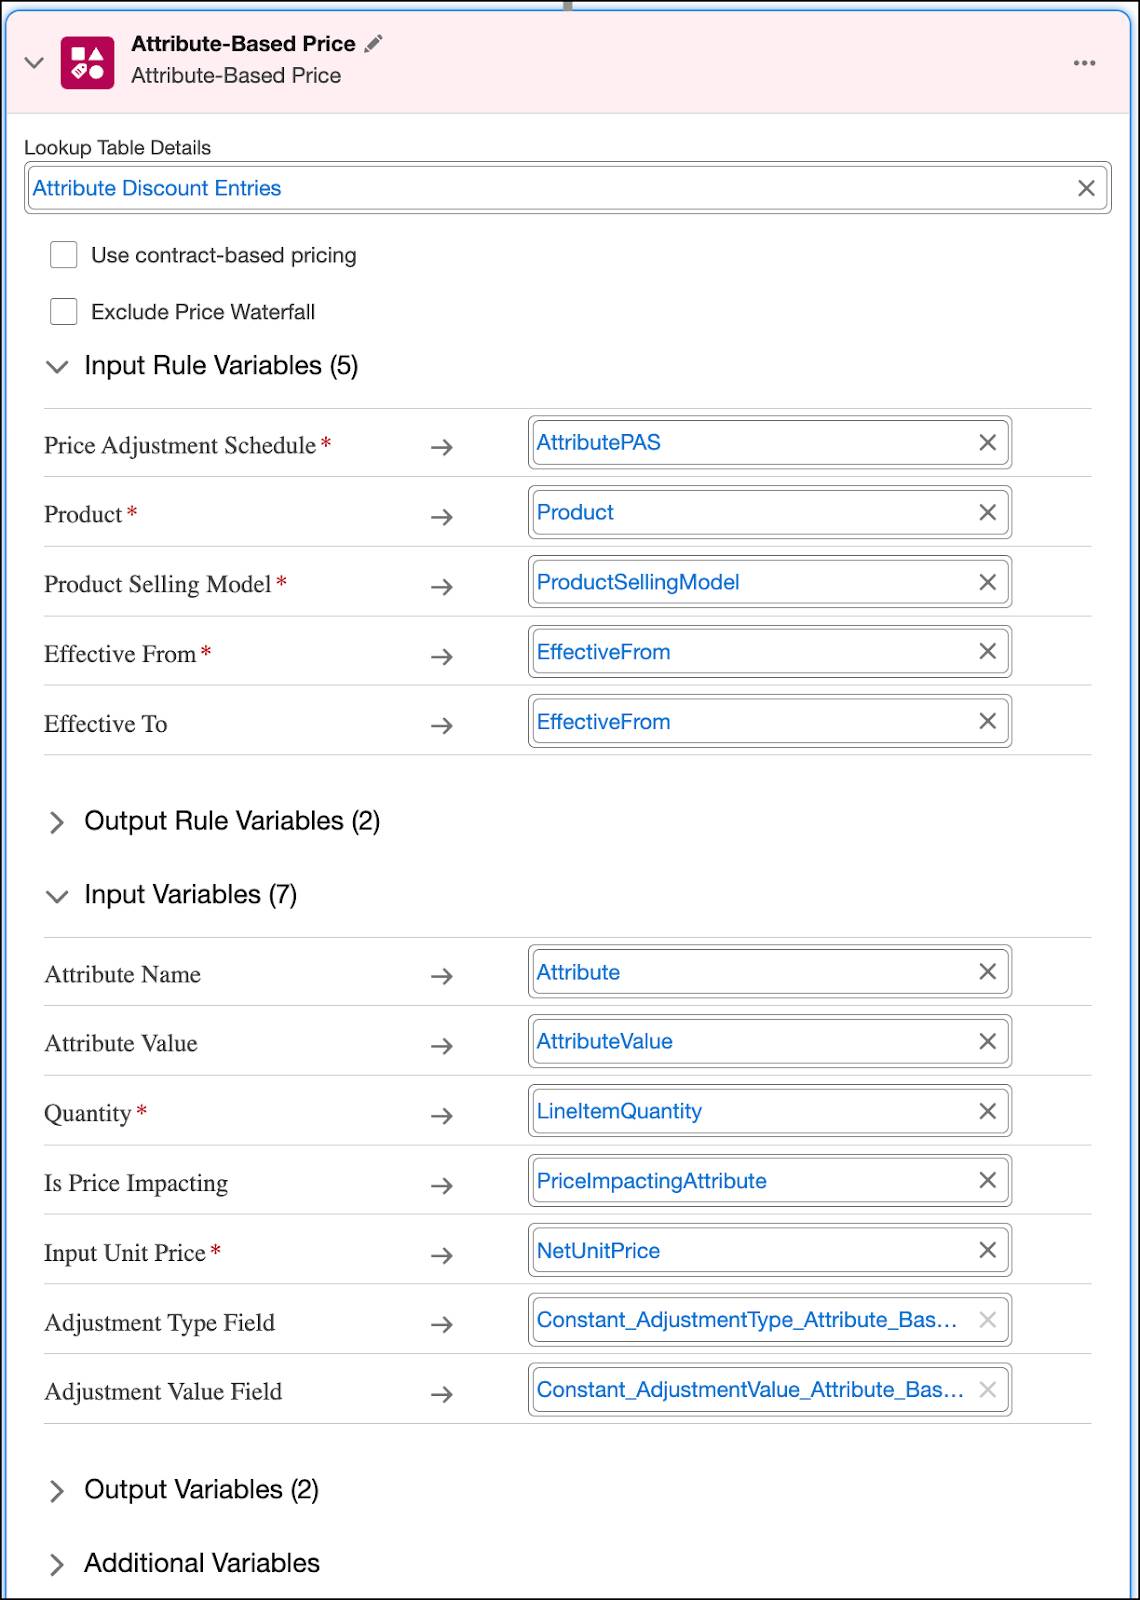
- Under Lookup Table Details, search for and select Attribute Discount Entries.
- Expand the Input Rule Variables section and map the variables to these context tags:
- Price Adjustment Schedule:
AttributePAS - Product:
Product - Product Selling Model:
ProductSellingModel - Effective From:
EffectiveFrom - Effective To:
EffectiveFrom
- Next, expand the Input Variables section and map the variables to these context tags:
- Attribute Name:
Attribute - Attribute Value:
AttributeValue - Quantity:
LineItemQuantity - Is Price Impacting:
PriceImpactingAttribute - Input Unit Price:
NetUnitPrice
- On the left panel of the Pricing Procedure Builder, click
 .
.
- Select the Include in Output checkbox.
- Click
 and under Rank, enter
 1.
- Click Save.
- Click Activate.
Here’s how your Attribute-Based Price element should look.
You’ve now added the Attribute-Based Price element to your pricing procedure.
Test the Pricing Procedure on a Quote
As best practice, it’s important to try everything out. Richa tests the pricing procedure on a quote to confirm it works in real-time. To prepare, she updates the pricing procedure name in her org setup, which involves changing it in two specific locations.
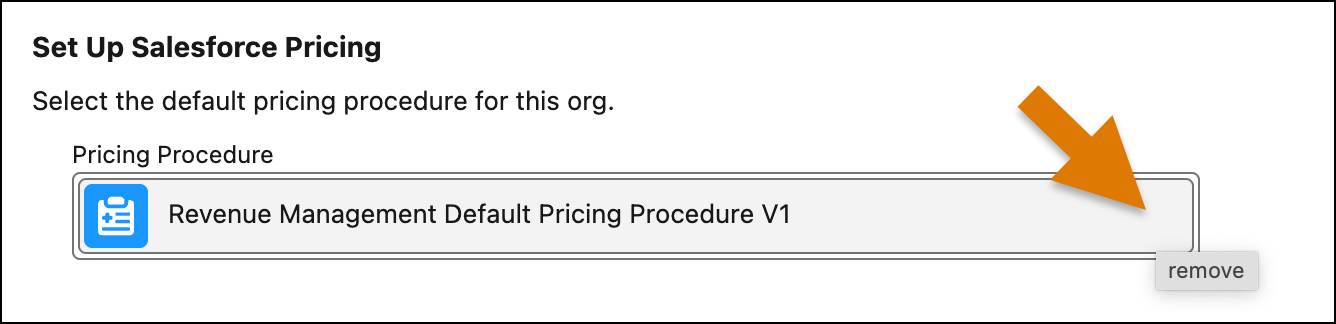
- From Setup, in the Quick Find box, search for and select Revenue Settings.
- Under Set Up Salesforce Pricing, click the remove icon on the default pricing procedure. The remove icon might not always be visible, but it’s there.
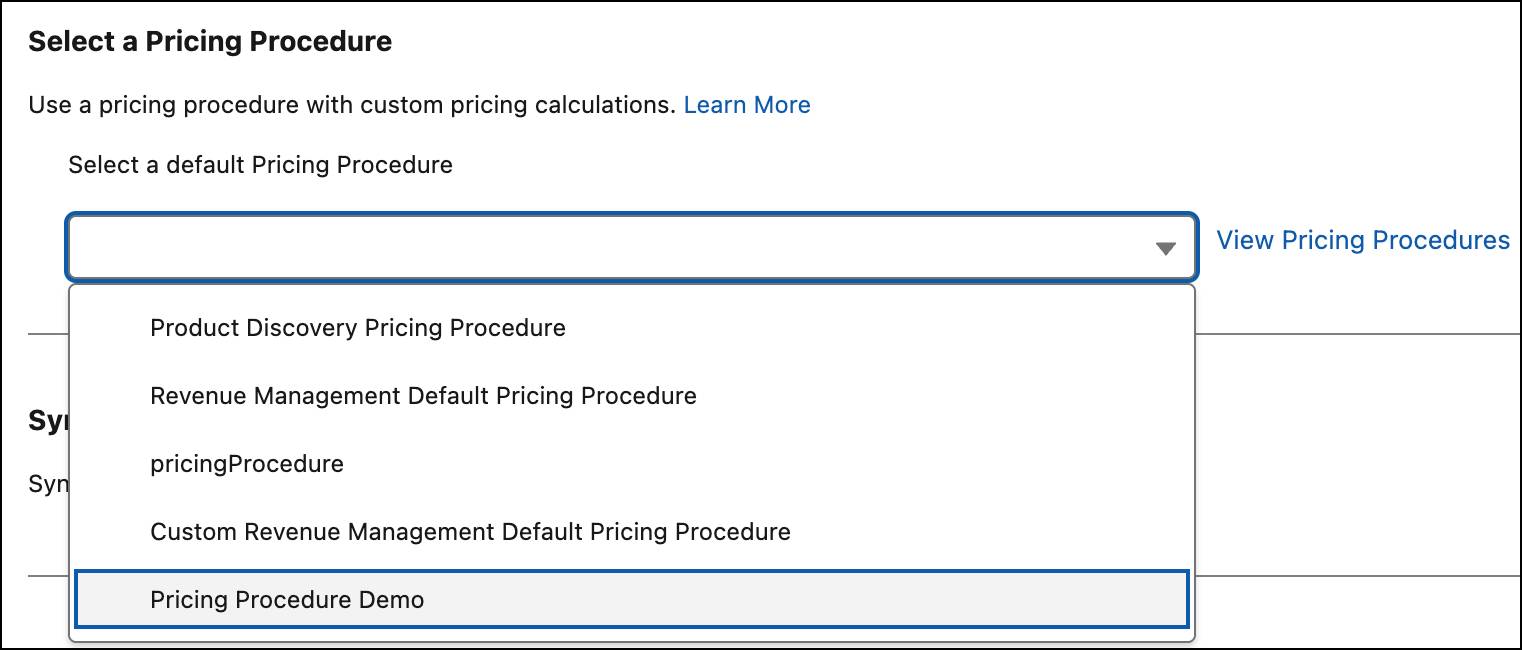
- From the dropdown menu, select Pricing Procedure Demo.
- Next, from Setup, in the Quick Find box, search for and select Salesforce Pricing Setup.
- Under Select a Pricing Procedure, remove the existing default pricing procedure.
- From the dropdown menu, select Pricing Procedure Demo.
Now you are all set to test your product pricing on a quote.
- From the App Launcher, find and select Quotes.
- Change the list view to All Quotes.
- Click Pricing Demo.
- From the Pricing Demo quote page, click Browse Catalogs.
- In the All Catalogs list, select Hardware Catalog, and click Next.
- Under Categories, click Laptops.
- From the displayed products list, select Laptop, and click Add.
- Select the Accessories category.
- On the Keyboard product, click
 . The product configuration page opens.
- For Connection Type, select Wireless.
- Click Save & Exit to add the customized Keyboard directly to the quote.
- Click Save Quote.
- Increase the quantity of the Laptop product to 150.
Here’s how your quote should look.
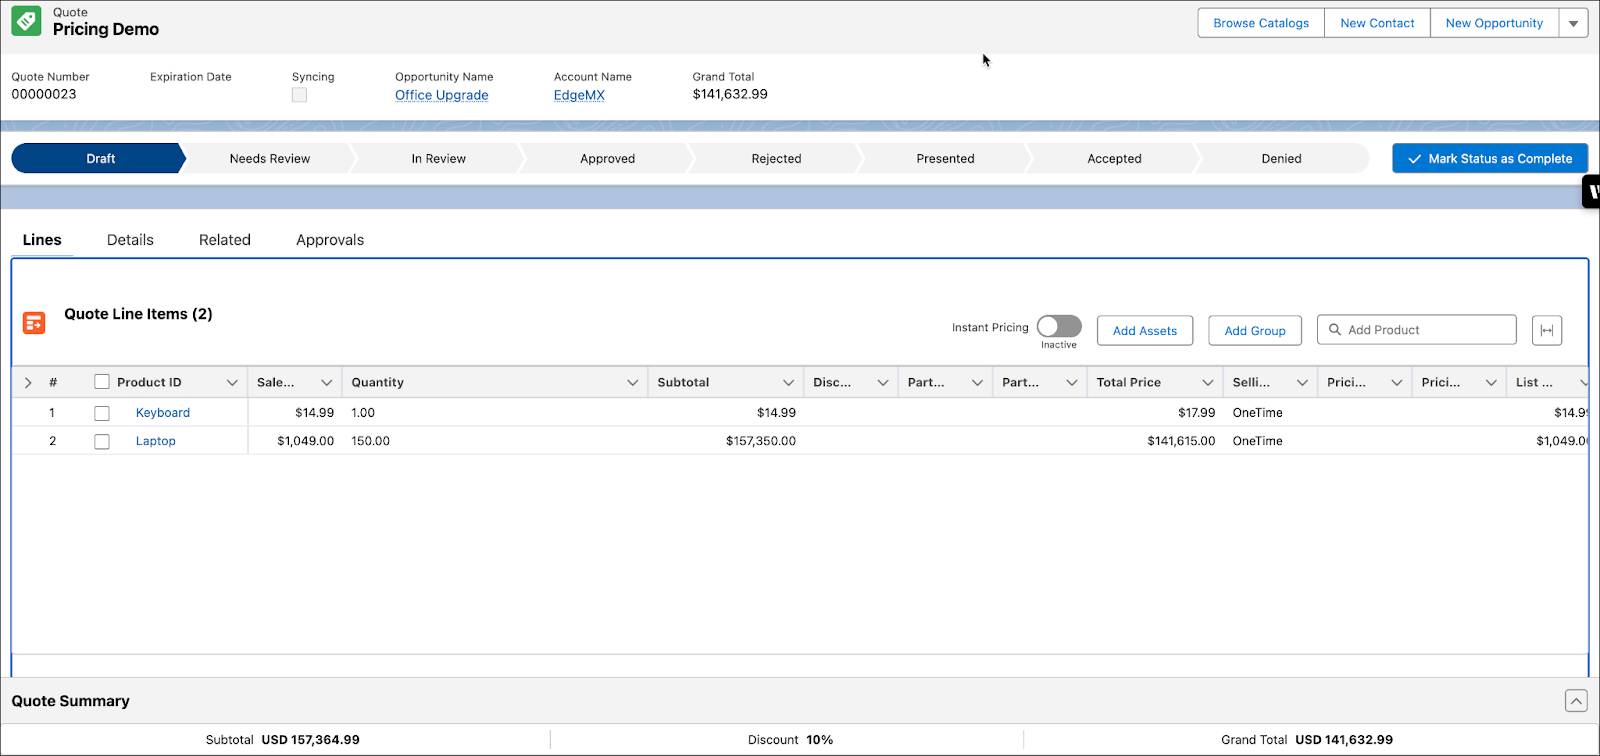
Now, it’s time to validate the attribute and volume-based pricing that you set up. Hover your mouse over the Net Unit Price field for the Keyboard product, to see its price waterfall.
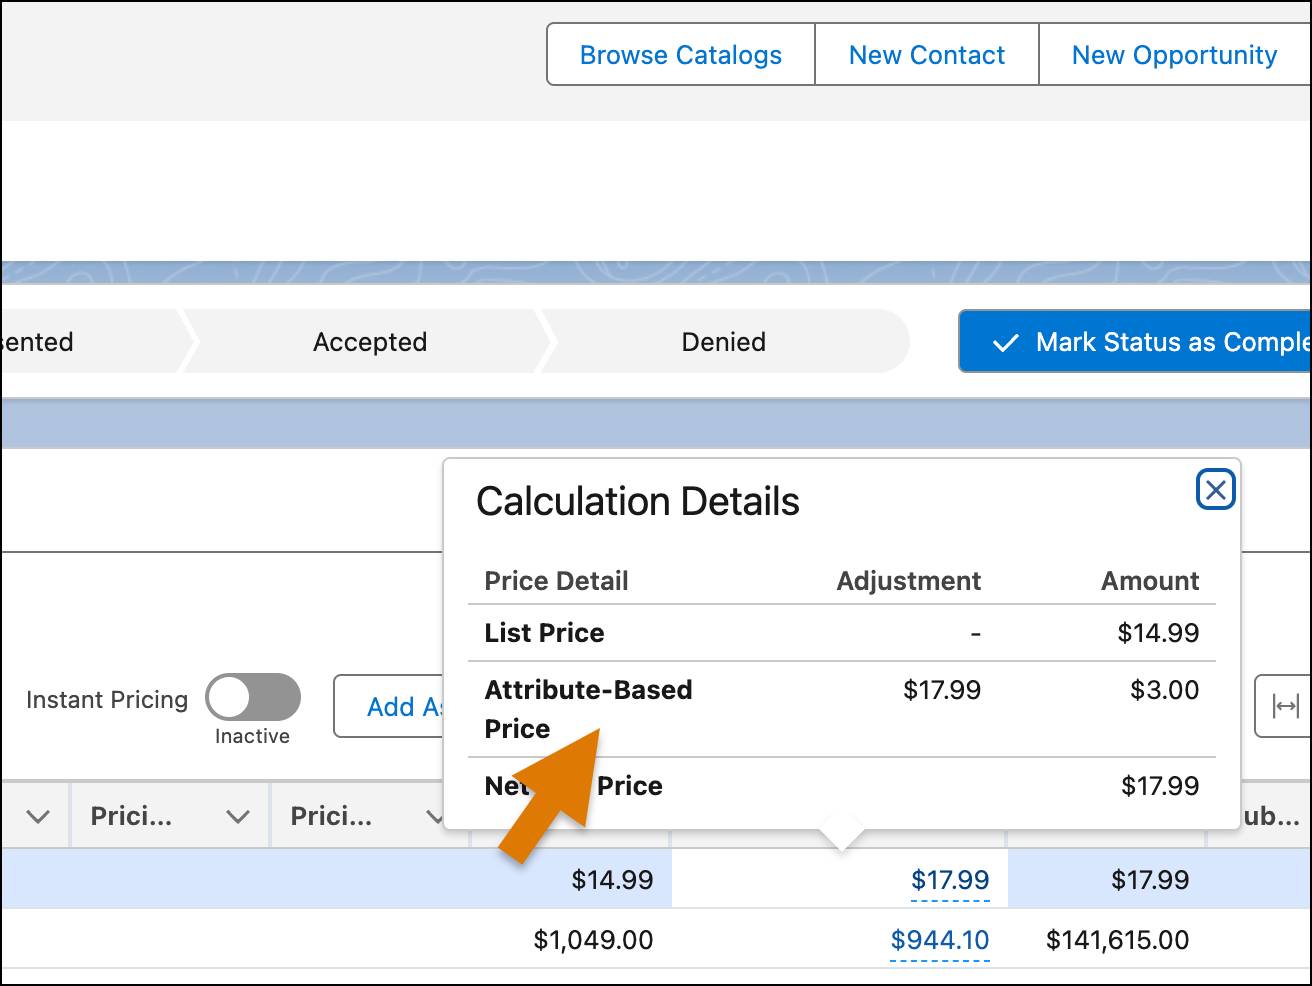
The Attribute-Based Price step shows that the net unit price for the Wireless Keyboard product is updated to $17.99.
Next, hover your mouse over the Net Unit Price field for the Laptop product.
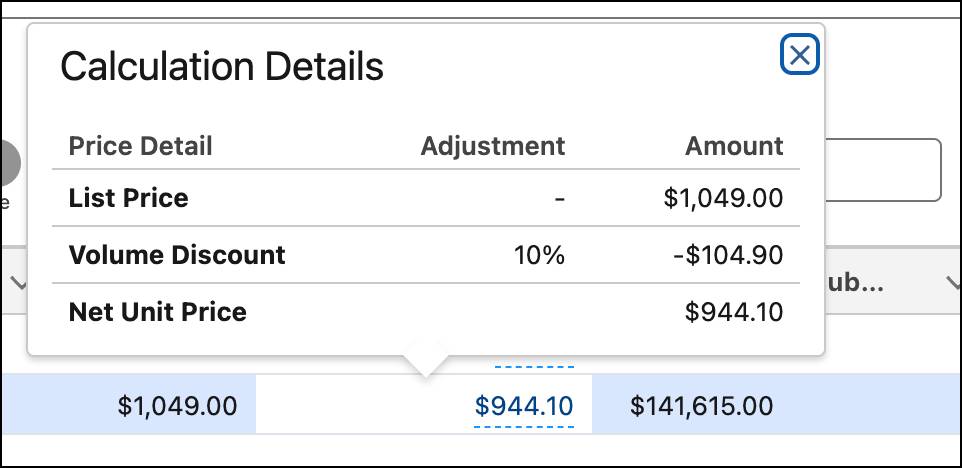
The price waterfall shows a 10% volume discount on the Laptop product. This discount is applied as the purchase quantity is 150.
Congratulations! Your attribute and volume-based pricing are working as expected.
Moving On
This unit covered price-impacting attributes and attribute-based adjustments, enabling you to calculate product prices based on configurable characteristics. You also added and configured the Attribute-Based Price element in your pricing procedure. Next, you explore bundle-based pricing.