Get Started with Predictions
Learning Objectives
After completing this unit, you’ll be able to:
- Explain predictions, including top predictors and recommendations.
- Explain actionable variables.
- Explain different ways to act on predictions.
Before You Start
Before you get started, consider completing this recommended content.
AI to Action
Before you embark on building a model, learn how to interpret and act on your predictions. In this unit, we break down a predictive output from Model Builder and explore different ways to put your AI into action.
Predictions for Explainability and Actionability
Predictions from no-code models aren’t just an outcome; they’re also explainable and actionable. This means that you learn why you got that predictive outcome and can take actionable steps to improve the results.
Let’s uncover how to better understand your predictive results. Here’s an example of a predictive result.
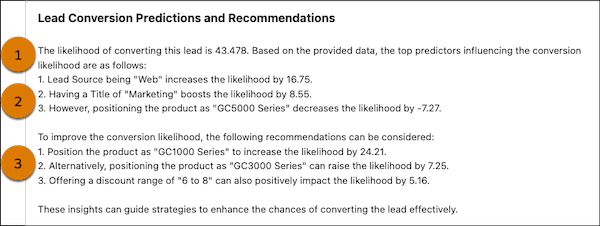
Predictive Score (1)
This value is the predictive score that a model predicts. The value can be a number such as a percentage or amount, or a binary such as true or false.
For example, you have a model that predicts lead conversion and a lead named Andy Doe. The model predicts that he’s only 43% likely to convert. You want to know why Andy’s not likely to convert into a lead and how to improve his prediction score. That’s where top predictors and recommendations can provide additional insights.
Top Predictors (2)
Top predictors are the most influential variables that impact a predictive outcome. They’re record-specific and explain why you got a specific outcome, and the impact of each variable.
For example, the Positioned Product field is one of Andy’s top predictors. A positioned product is a product that is strategically marketed as having unique benefits for its audience. Having GC5000 Series as the positioned product decreased Andy’s likelihood to convert by 7.27%! Looks like we need to change our marketing strategy for Andy.
Recommendations (3)
These are actionable steps you can take to improve a predictive outcome. To get recommendations, you need to designate actionable variables when building your model. Recommendations are sometimes called prescriptions because they prescribe measures that you can take to improve an outcome.
For example, let’s look at a recommendation for Andy. You can change Andy’s positioned product to GC1000 Series, which increases his likelihood to convert by 24.2%. Now you know what actions you can take to increase Andy’s chances of conversion.
What Are Actionable Variables?
An actionable variable is a variable that you can control, such as a marketing strategy or discount to use for a particular customer. When you designate an actionable variable, the model provides recommendations for how you can change that variable to improve a predictive outcome. You learn how to set actionable variables later in this module.
Act on Your Prediction
Now that you understand how to interpret predictions from your model, let’s look at different ways to put a prediction to work.
Predict Jobs
Use a predict job from Model Builder to get predictions from an active model and add the results to a new Data Model Object (DMO). You can choose from two types–a streaming or batch job. A streaming job automatically updates predictions when the data on specific input variables changes. It’s ideal for use cases that benefit from real-time data predictions using data that continually flows into Salesforce, such as for predicting fraud detection. On the other hand, a batch job requires a manual data refresh and is suitable for processing large datasets that don’t require continuous data updates. After successfully running a predict job, the predictions you get can be used anywhere in Salesforce. Learn more in Use Predict Jobs to Get Predictions.
Batch Data Transforms
Use a batch data transform to enrich a DMO with predictions and prescriptions. You can use the DMO to run calculations, build data visualizations, and more. For example, to improve lead conversion, you can add predictions and prescriptions to a Lead DMO. You can see the top factors contributing to a predicted outcome and what actions can improve conversion. Learn more in Transform Data with Predictions and Prescriptions.
Prompt Builder
Use Prompt Builder to transform the raw output from your model into readable text. Use the transformed prediction in Flow Builder to initiate actions such as sending an email or displaying a prediction on a record page. Learn more in Create a Prompt Template.
Flow Builder
Use Flow Builder to create flows and automate actions using predictions from your models. Screen flows can be used to display predictions on a record page. Use a record-triggered flow to automate an action when a prediction changes. For example, if a predicted churn score exceeds the model’s threshold value, the customer is likely to churn. To minimize the chances of churn, you can set a flow to take an action such as automatically emailing a promotion to the customer. Learn more in Use Predictions in Flow Builder.
Lead Conversion Process
Let’s go over what actions you’ll complete in this module.
- Build a model that predicts lead conversion.
- Transform the prediction with Prompt Builder.
- Display the prediction on a record page with Flow Builder.
The final product is a readable paragraph on every lead record page that includes the prediction, top predictors, and recommendations for how to improve the outcome. Your sales agents can see which leads are most likely and least likely to convert. They can proactively change their strategies for certain leads to improve their conversion likelihood without doing extra research. This will result in higher conversions, higher efficiency for your sales agents, and higher revenue.
But first, sign up for an org.
Sign Up for a Developer Edition with Data 360
Click Create Playground to receive a special, limited-time custom playground that includes Data 360 and our sample data.
- Click Create Playground.
- Your new org is automatically attached to your Trailhead account!
- Make note of your org's expiration date and complete this badge before then.
- Click Launch to open your new org.
Next, set up your org.
Set Up Your Org
To build and train a model, you need a data model object (DMO) in your org that contains attributes about leads. You’ll create a data stream to bring the Lead Data for Training DMO into your org.
First, create a data stream and ingest your data models.
- From the App Launcher, search for and select Data Cloud.
- Click on the Data Streams tab.
- Click New.
- Click Salesforce CRM and click Next.
- Click the LeadsforTrainingModels custom bundle. Click Next.
- Leave the fields as they are and click Next.
- Click Deploy. This may take a few minutes.
Add mappings between the data stream and the Lead Data for Training DMO.
- From the Data Streams tab, click on the Lead_Home data stream.
- Under Data Mapping, click Start.
- Click Select Objects.
- Click the Custom Data Model tab.
- Click the + icon next to the Lead Data for Training DMO (you may have to scroll to the right to see this option) and click Done. There may be DMOs with similar names, so make sure you select the correct DMO.
- Confirm that Annual Revenue in the the left and right panels are mapped automatically. If not, map the fields manually.
- Repeat step 6 to map Discount Offered, Employees, Industry, Lead ID, Lead Source, Positioned Product, Status, and Title.
- Click Save & Close.
You may need to refresh the data stream to process records. If the Last Run Status is None, follow these steps to process records.
- Click Refresh Now.
- Select Incremental Refresh, then click Refresh Now. Wait a few minutes.
- Refresh the page. Don’t click Refresh Now again because it may reset your progress.
- Confirm that the Last Run Status is Success. If not, wait a few minutes and refresh the page again.
In the Check Challenge section below, we’ll be checking to make sure you’ve completed the steps to get your org ready. Once you pass, you’ll be ready to start working with predictions using Model Builder. In the next unit, you build a model that predicts lead conversion.