Build a Predictive Model in Model Builder
Learning Objectives
After completing this unit, you’ll be able to:
- Build a no-code predictive model in AI Models that predicts the conversion of a lead.
- Train and activate a model.
- Set actionable variables for a model.

Predict Lead Conversion
In this unit, you build a no-code predictive model in AI Models (formerly Einstein Studio) that predicts lead conversion. Your model also provides top predictors and recommendations.
Define Your Goals
Before you start building, it’s important to define your goals. We use the lead conversion example as we go through the questions.
Question |
Description |
Example Answer |
|---|---|---|
What do you want to predict? |
Define the purpose of your model. |
The likelihood that a lead converts. Depending on the goal, you can create a binary (yes or no) or regression (percentage or numeric) prediction. |
What’s your training dataset? |
Models learn from historical data to provide predictions. Your training dataset should typically be high-quality historical data. Learn more in the Data Quality module. |
Lead Data for Training Data Model Object (DMO) |
What field in the DMO are you predicting? |
The field in the DMO that your model is predicting values for. |
Status |
What value are you maximizing or minimizing? |
Define if you want to minimize or maximize the chances that the field contains a certain value. This helps a model understand your desired outcome. For our example, you want leads to convert. You want to maximize the chances that the Status field contains the Closed - Converted value. For an example that uses ‘minimize’, you want to minimize customer churn. Because you don’t want customers to churn, you set a goal to minimize the chances that the Churn field is True. |
Maximize, Closed - Converted |
Build Your Model
With your goals clearly defined, let’s get started and build a model. Follow these steps in your org. We’ll be checking these steps to make sure you created a model correctly.
- From the App Launcher, search for and select Data Cloud.
- In Data Cloud, click the AI Models tab to access Model Builder.
- Click Add Predictive Model. Model Builder opens.
- Select Create a binary model. Then click Next.
- Leave the default data space selected and select the Lead Data for Training DMO. This DMO contains historical lead data that your model will use for its training set. Then click Next.
- Select Filtered Set of Records.
- Leave ‘All Conditions Are Met’ in the Use Filter When field.
- Search for and select the Status field, the In operator, and the Closed - Not Converted and Closed - Converted values. This creates a filter that only includes closed leads in the training data. Then click Next.
- To set the outcome goal of your model, search for and select the Status field. This is the field you want the model to predict values for.
- Select the Closed - Converted value and Maximize (Increase is Favorable) option. The model will predict the likelihood that leads convert to business opportunities. Then click Next.
- Manually select these fields: Annual Revenue, Discount Offered, Employees, Industry, Lead Source, Positioned Product, and Title. Then click Next.
- Leave Automatic Selection enabled to automatically select the best algorithm for the lead conversion use case. Click Next.
- Review the settings and rename the model to
Predicted Conversion. Leave the description blank.
- Click Save.
Your model is being trained. This can take a few minutes. When training is complete, the model appears in the Predictive tab list view. This is a perfect moment to take a break and come back later.
Evaluate Your Model
Once training is complete, you can see metrics related to the model’s performance. If you’re not already seeing the training metrics screen, follow these steps to get there.
- On the AI Models tab, click the Predicted Conversion model.
- Click View Training Metrics.
Let’s look at some key metrics to determine if your model is performing well. Your results might vary slightly, but will still be performant.
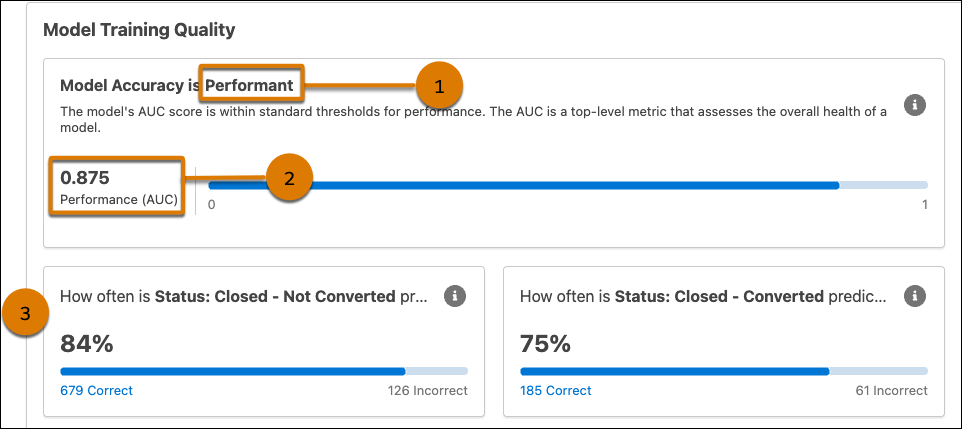
[Alt text: Training metrics page in Model Builder, including the performance, performance score, and prediction accuracy percentages.]
-
Performance (1): Model Builder provides these metrics based on how the model performs against the threshold.
-
Performant: Your model is accurate and performing well. Activate when you’re ready.
-
Too low: Your model isn’t performing well. This can mean that your training data doesn’t have adequate patterns because the data points are too similar or different from each other.
-
Too high: Your model is too close to perfection. This can indicate data leakage or overfitting. Overfitting means that your model is too closely aligned with your training data. As a result, it won’t provide accurate predictions for new data.
-
Performant: Your model is accurate and performing well. Activate when you’re ready.
-
Performance Score (2): Model Builder uses mathematical formulas to give you an area under the curve (AUC) score between 0 and 1 for binary classification models. Model Builder uses R-Squared for regression models.
-
Prediction Accuracy Percentages (3): This is how often your model predicts results correctly.
Great news! Your model is performant and ready for activation.
Activate Your Model
You must activate the model for it to begin making predictions on your leads.
- On the Training Metrics page, click Activate.
- Click Activate Model.
- Click the back arrow to go to the Predicted Conversion model overview page.
Set Actionable Variables
Set actionable variables. You need actionable variables to get recommendations for how to optimize those variables and improve your predicted outcome. We don’t validate this step in the challenge, so make sure you follow these steps closely.
- Click the Integrations tab.
- Click the + icon next to Set Up Variables For Prescriptions.
- Select Discount Offered and Positioned Product.
- Click Apply.
Fantastic! Your model’s working on providing predictions and recommendations for the new leads. In the next unit, you learn how to interpret the predictive outputs and process them with a prompt in Prompt Builder.