Create an Engagement Studio Program in Account Engagement Lightning App
Learning Objectives
After completing this unit, you’ll be able to:
- Create an engagement program.
- Test and launch your engagement program.
- Explain engagement program reports.
Introduction
In the Explore Strategies That Engage Customers module, we discussed lead nurturing and the importance of marketing the right message at the right time to the right prospect. Now let’s take a look at Engagement Studio, a tool designed to help you do just that.
Engagement Studio lets you build, test, and report on engagement programs that send targeted emails based on prospect behavior and critical qualifying values. See how.
Engagement Studio is flexible, so you can work the way you work best. There’s no set order of operations. For example, you can create the steps within your program logic first, and then create the assets (emails, lists, assigned users, and so on) that support the logic later. Engagement Studio requires the assets only once you are ready to start the program.
As a marketer, you’ll always be iterating on this process, but the basic sequence of steps you take to build an engagement program are as follows.

- Build: Create and edit your logic.
- Test: Test out your logic by simulating the program as a prospect.
- Report: See how your program has performed.
- Activity: Track when changes were made in your program.
Now let’s see how to do it in Engagement Studio.
Build an Engagement Program
- Navigate to Automations | Engagement Studio.
- Click + Add Engagement Program.
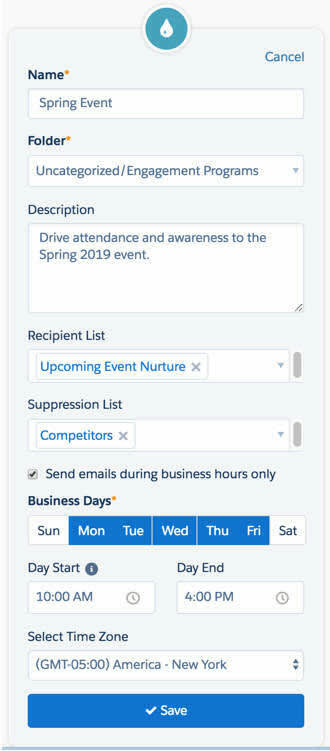
- Enter
Spring Eventfor the name of the program.
- Select the Engagement Programs folder.
- Enter
Drive attendance and awareness to the Spring 2019 eventas your description.
- Select Upcoming Event Nurture as your Recipient List.
- Select Competitors as your Suppression List.
- Select Send emails during business hours only.
- This functionality is specific to each program, not the account, so it is possible to have different business hours on different programs.
- Define your Business Days as Monday through Friday and your business hours as 10:00am to 4:00 pm.
- Set the time zone of choice for your program.
- Click Save.
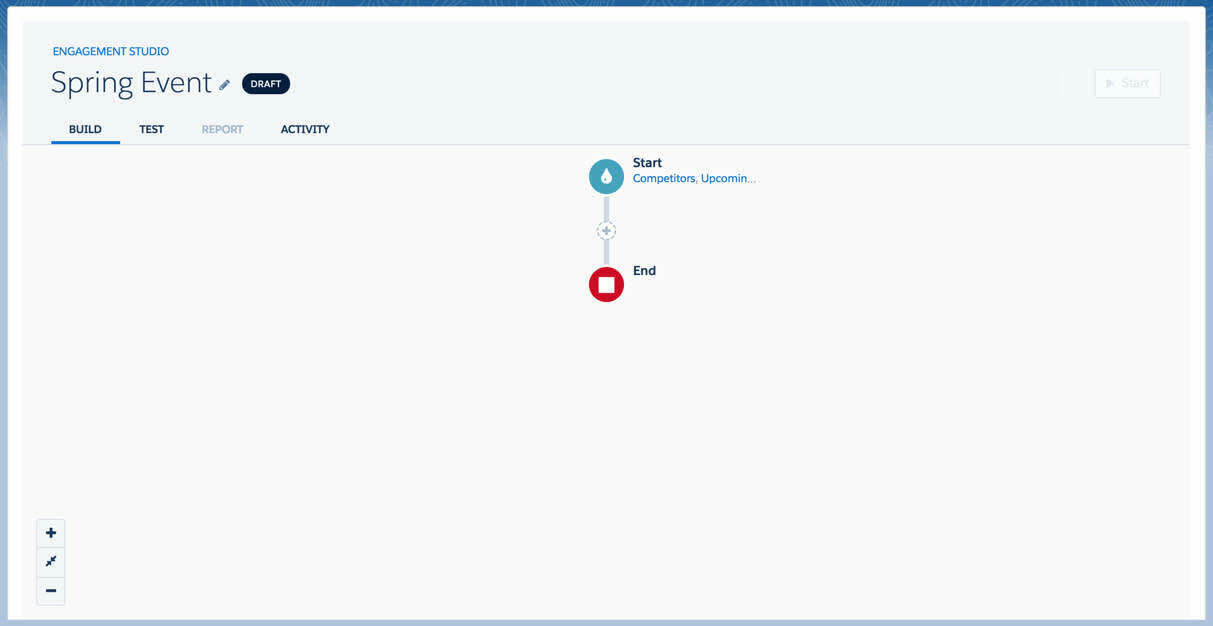
Once you create your engagement program, you access the canvas. Using the (+) icon, you can begin to build the individual steps in your program.
Branching Logic
When you use an action, trigger, or rule option as a step in your logic, Account Engagement provides “yes” and “no” branches. The branches let you build out different paths for prospects who take different actions.
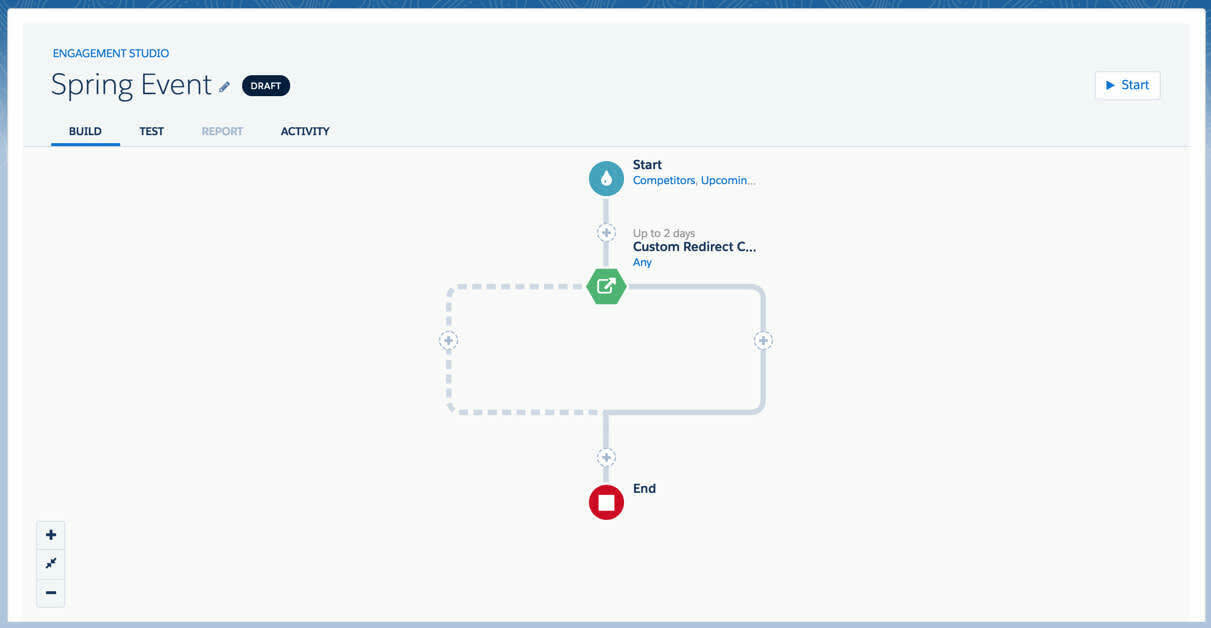
For example, if a prospect clicks a link in an email, your engagement program might tell Account Engagement to notify the sales rep. If they don’t, the program tells Account Engagement to send them a second email to try to get them to engage. Branching logic enables you to create all of these custom journeys within the same program.
You have three logic options: actions, rules, and triggers.
|
|
|
|
|---|---|---|---|
Actions take an action on a prospect at a given point in time. |
Triggers listen for an event like an email open or form submission to occur within a specified period of days. |
Rules check for specified criteria or values in the system. |
The end step designates the end of the program path. |


We’ll discuss these steps in depth in a later unit. For now, just know that you use the logic options to create customized paths based on prospect interactions. And note that engagement program logic looks only at the actions, rules, or triggers that occur after the prospect joins the program.
When you are done building out your logic, you’ll see the red end step at the bottom. It signifies that prospects who reach this point cannot progress further in the program. If you plan to add steps to your program in the future, make sure to include a buffer wait step before the end step.
Test Your Engagement Program
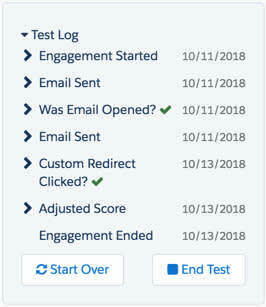
Engagement Studio’s interactive testing experience takes you through your program steps, and lets you check that your program works as you intended. The test log provides dates to help you understand the timeline of the program and visualize a prospect’s possible paths.
Adjust any steps that don't work the way you expected, and be sure that your program is perfect before you send the first email.
To start your test:
- From the program, click the Test tab.
- Follow the prompts to move through the steps.
- Optional: Use the Test Log to restart from a step or preview assets.
As you test, you’ll select dates when prospects join the program and dates they take actions defined by triggers.
Launch Your Program
Once you’re ready to begin, press Start to launch your engagement program.

You are given the option to schedule start and end dates. If you do that, safety checks will alert you to missing assets. If you’d like to make changes after you start your program, you must pause it in order to access the Build tab for edits. If you schedule emails to send on a specific date, prospects who reach the step after that date will skip the step.
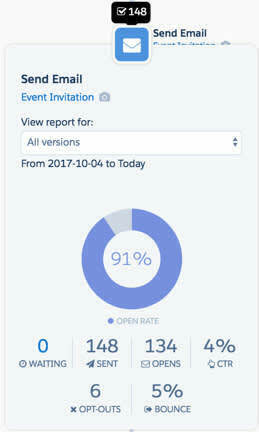
Report on Your Program
Tracking metrics throughout the life of your engagement program will help you establish benchmarks for your marketing team and allow you to share your program’s success with stakeholders.
Once you’ve officially started an engagement program, you can view data on your program in the Reporting tab.
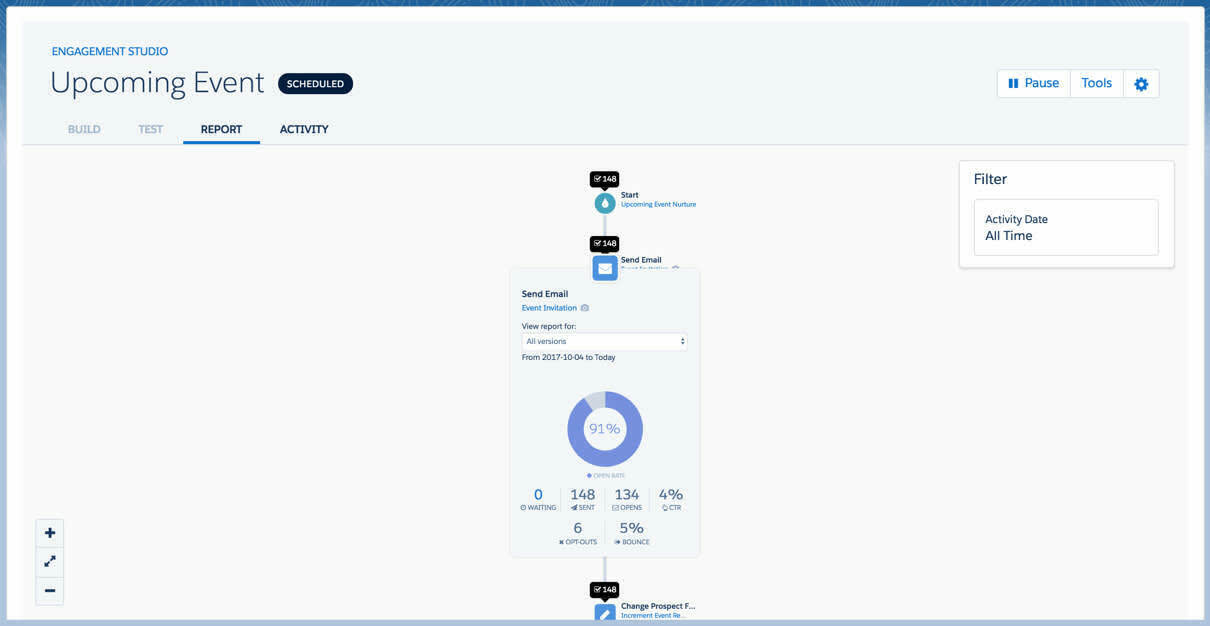
Account Engagement aggregates high-level program-wide data as well as data on specific actions, rules, and triggers used inside your program to help you determine the success of your engagement program.
Tooltips containing high-level reporting statistics display above each step in your program. Click an individual step icon to open a report card and see more in-depth data about that step.
See the Engagement Studio Program Reporting documentation in the Resources section to learn more about Engagement Studio reporting metrics.
Resources