Learn Administration Basics
Learning Objectives
After completing this unit, you’ll be able to:
- Access and describe Account Engagement account settings.
- Set up users
- Configure single sign on with Salesforce.
- Set up custom prospect fields.
All About Administration

Meet Leung Chen, the Marketing Manager at Cloudy Consulting. She’s been tapped to implement Account Engagement at Cloudy Consulting thanks to her great performance review last quarter. She's got lots of experience organizing in-person events and client nurture programs and is ready to bring those skills to Account Engagement! She will be the Account Engagement Administrator.
Account Engagement Account Settings
Leung’s first task is to get under the hood of Account Engagement and review her account settings. Account Engagement account settings contain all sorts of helpful information for administering your Account Engagement account and are a natural place for Leung to start exploring.
Let’s take a stroll through account settings and check out some features along the way.
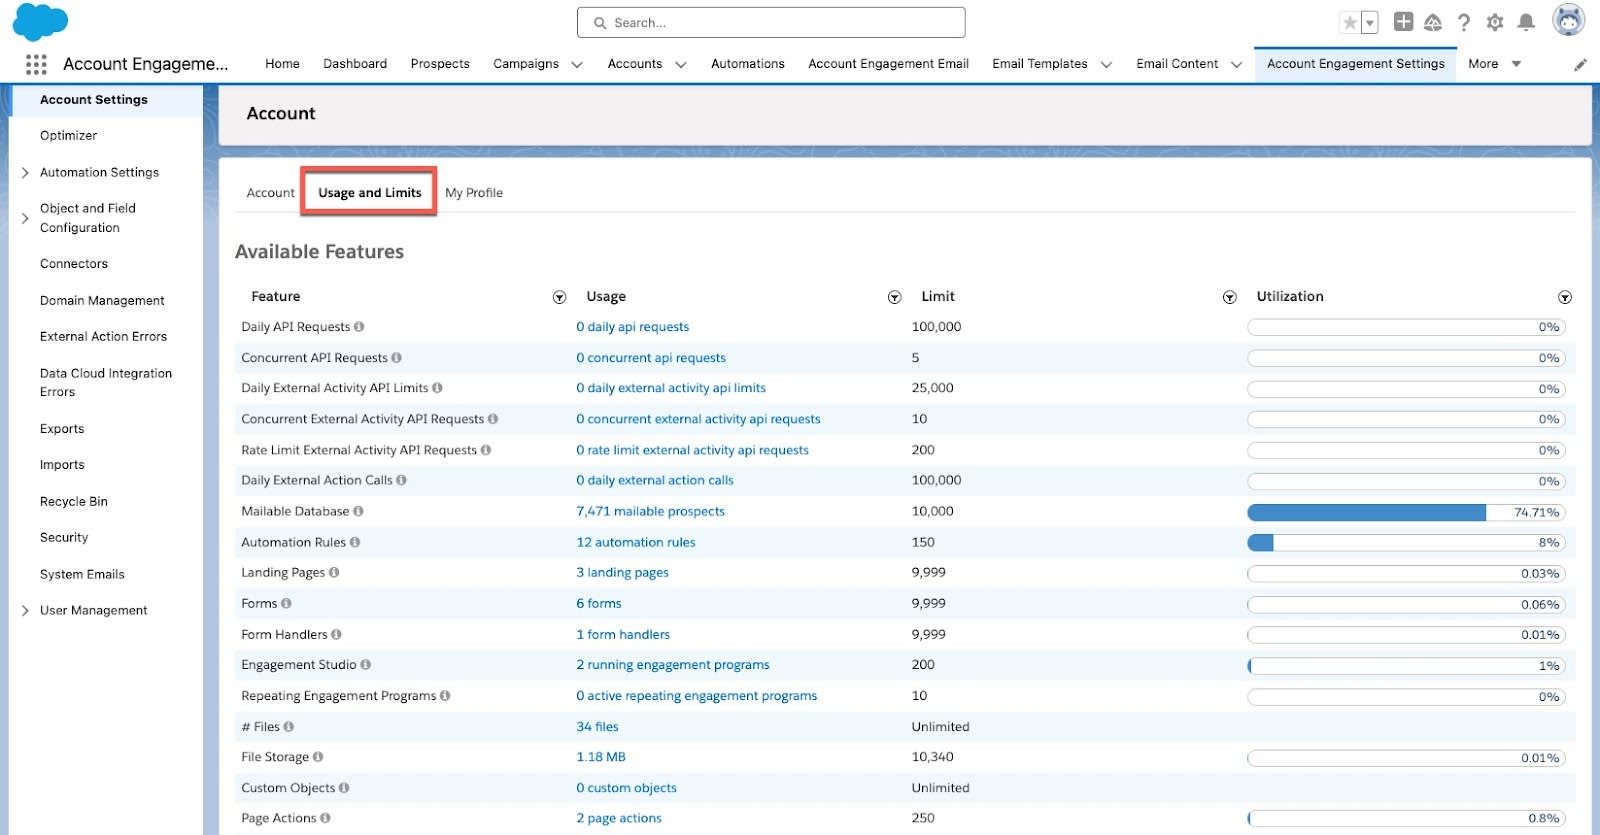
- Click the Account Engagement Settings tab. Here you see your account information as well as the contact information for the person who’s notified about changes to Account Engagement. The Product and Service Notifications table in your account settings lets you choose different points of contact for each type of notification. Click the Usage and Limits tab. This list shows all your account's available features, usage, limits, and utilization.
- Click the My Profile tab. This tab shows your profile information and user preferences. Click Edit to make changes to your user information. Click Edit My User Preferences to make changes to your email and app preferences.

- (If applicable) Click the B2B Marketing Analytics tab. The B2B Marketing Analytics tab is where you provision your B2B Marketing Analytics app.
Create an Account Engagement User
Leung is highly in demand at Cloudy Computing, so she’s juggling a lot of projects. She wants to add one of her teammates to Account Engagement as a user to help her manage this account. The Cloudy Computing marketing team has several content creators and Leung’s tapped one to help with Account Engagement. She decides to give them the Marketing role, one of Account Engagement’s default user roles. Every Account Engagement account comes with four user roles: Administrator, Marketing User, Sales Manager, and Sales User. This makes it easy for Account Engagement Administrators like Leung to create new users and grant them the correct permission sets.
Let’s look at how Leung can easily create a new Account Engagement user with the Marketing role.
- Navigate to Account Engagement Settings | User Management | Users.
- Click + Add User.
- Enter the user’s first and last name.
- Enter the user’s email address. The email address must be unique across all Account Engagement accounts.
- To send an activation link to the user, select Send Activation Email. This email prompts the user to choose a password and security question. The activation email expires after 48 hours.
- Select the Marketing user role.
- When finished, click Create User.
The Recycle Bin
When you delete an asset, it’s moved to the recycle bin in your Account Engagement account. You can restore most assets from the recycle bin but let’s look at a few things to consider when using the recycle bin. Let’s take a look at those real quick before moving on.
- Items in the recycle bin don’t count toward usage limits.
- If you delete a campaign, the prospects associated with the campaign remain in the system tagged with the deleted campaign. Before deleting, Account Engagement warns you if elements associated with the campaign, such as lists, rules, and landing pages, are in use. You can then delete the assets or associate them with another campaign.
- Admins can permanently delete prospects in the recycle bin. Account Engagement no longer tracks prospects when they’re permanently deleted.
- A deleted prospect is restored when the Salesforce record it’s syncing with is undeleted. When you permanently delete a prospect in Account Engagement, you must delete associated leads and contacts in Salesforce.
- Tags are deleted permanently and don’t appear in the recycle bin.
When a prospect is deleted, the record is moved to the Account Engagement recycle bin. From the recycle bin, you can either permanently delete or restore the prospect. Certain activities that either you or the system initiates also restore a prospect. If you feel you want to permanently delete a prospect in the recycle bin, you should consider a few things before doing that.
- When a prospect is permanently deleted, the prospect is deleted from the recycle bin, and Account Engagement doesn’t retain any information about the prospect. There is no way to tell which prospects have been deleted, and data cannot be restored.
- Associated leads and contacts must be deleted from Salesforce before deleting the prospect in Account Engagement.
- Deleting prospects removes all associated engagement data and impacts all reporting.
- If the prospect is associated with a person account, all personally identifiable information is removed from the Account Engagement account record.
- Deleting a prospect doesn’t prevent the prospect from being created again. For example, a prospect can submit a form or be re-created manually.
- Admins can permanently delete prospects in the recycle bin. Account Engagement no longer tracks prospects when they’re permanently deleted.
It can take up to 24 hours for a deletion to complete. Account Engagement will email you once the process is finished.
Add Custom Fields
Account Engagement comes with a large number of ready-to-use default fields, but you may need to capture other types of information. For example, you may have some fields in Sales Cloud that you want to also have in Account Engagement, and then sync the data between the two systems. To do this, activate your Salesforce connector, and then create a custom field in Account Engagement for each Sales Cloud field you’d like to map. Custom fields are available across all your Account Engagement forms, automation and segmentation rules, and dynamic lists.
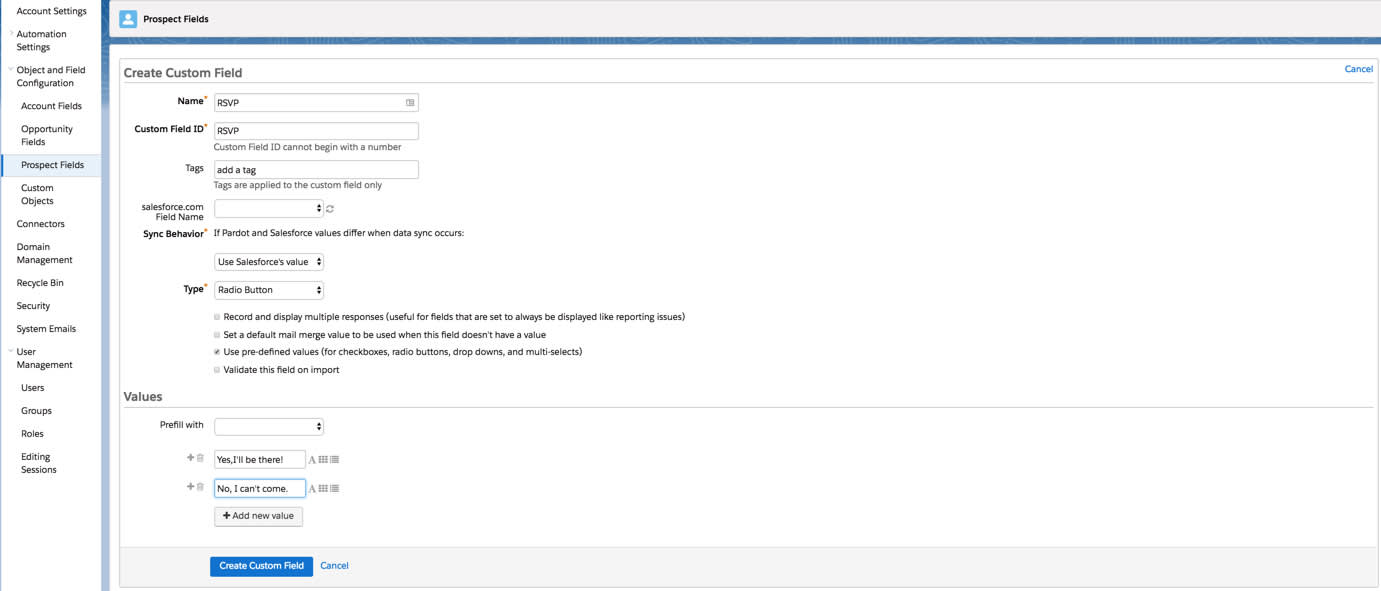
Leung is planning a client event and needs to create a custom field at the prospect level to record RSVPs, but does not need to sync this information back to Salesforce. She’ll use the responses later to send out thank you emails.
To create a custom field:
- Navigate to Account Engagement Settings | Object and Field Configuration | Prospect Fields.
- Click + Add Custom Field.
- Enter the RSVP into the Name field.
- Leave the Custom Field ID as automatically generated.
- Leave Sync Behavior as is. For a full list of field settings, see the Prospect Field Settings Reference.
- To limit responses, change the field type to Radio Button.
- Under Values, enter the following values for the field:
-
Yes, I’ll be there!
-
No, I can’t come.
- When finished, click Create Custom Field to save your new field.

Throughout this unit, you've helped Leung get set up as an Account Engagement administrator. You've set up Log In with Salesforce, created a new user, and created a custom field. All in a day's great work!
Resources
- Salesforce Help: Connecting Salesforce and Account Engagement
- Salesforce Help: Extending Account Engagement with Connected Apps
- Salesforce Help: Prospect Field Global Settings
- Salesforce Help: Account Engagement User Roles
- Salesforce Help: Engagement History Implementation Guide
- Salesforce Help: Managing Account Engagement Business Units