Test and Deploy Changes
Learning Objectives
After completing this unit, you’ll be able to:
- Create a manifest file (
package.xml) that lists the components to be deployed. - Explain the commands used to deploy changes to your org.
- Describe how to speed up deployments with Quick Deploy.
Create the Release Artifact
Now that they’ve finished their development tasks, Juan and Ella move their changes to an environment they share with the rest of the development team. They transition to the build release phase to integrate their changes in a Developer Pro sandbox.
After they’re done with these tests, Juan builds the final release artifact: a manifest file (package.xml) that lists the components to be deployed to sandbox and production orgs. You can also use a manifest file to retrieve components. Juan then uses the manifest file to perform user-acceptance testing in a Full sandbox. Juan and Ella run a final verification to make sure that everything looks good. Finally, they plan and execute the deployment to production.
Pull the Changes from the Repo
Juan knows the source of truth (all the changes for this release) now lives in their GitHub repo.
- In VS Code, click the Source Control icon (1).

- Click the More Actions icon (2), then select Pull from (3).
- Select origin.
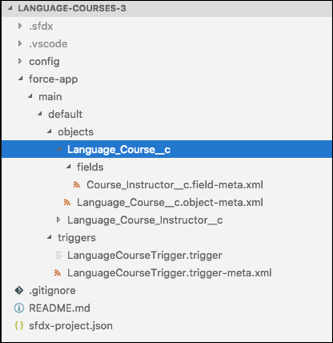
- The repository contains the new custom object, custom field, and triggers. All of Ella’s and Juan’s changes are here.
Authorize the Developer Pro Sandbox
- In VS Code, log in to the Developer Pro sandbox. Select SFDX: Authorize an Org.
- Select Sandbox for the login URL (test.salesforce.com).
- Enter an alias for the sandbox, for example,
dev_pro_sandbox. - Log in with the sandbox username and password.
Build the Release Artifact
Juan’s first task is to build the release artifact so he can deploy the changes to the Developer Pro sandbox. Juan decides to create a manifest file, typically called package.xml, which lists the metadata components he wants to deploy.
- From a command window, make sure you’re in the Salesforce DX project directory.
- On the command line, view the help for the
project generate manifestcommand.sf project generate manifest --help
The--helptells Juan the format for the command. Juan wants to deploy only the new metadata components, so he determines he needs the--metadataflag. - Run the
project generate manifestcommand and specify the components to be deployed, such as the new Language Course Instructor custom object and the other changes in his change list:sf project generate manifest --metadata CustomObject:Language_Course_Instructor__c --metadata CustomField:Language_Course__c.Course_Instructor__c --metadata ApexTrigger:LanguageCourseTrigger --metadata ApexClass:TestLanguageCourseTrigger
The command generates the manifest file calledpackage.xmlin the current directory. - Test the
package.xmlfile in the Developer Pro sandbox to make sure it deploys all the components.sf project deploy start --manifest package.xml --target-org dev-pro-sandbox
Let's pause a second and contemplate the package.xml file. Open the one you just generated in a text editor if you want. The file simply lists the metadata components to deploy; it doesn't contain the actual Apex code or the full structure of the custom object. When you deploy using this manifest file, the deploy command uses the source files it currently finds in your local project. If you run the command from a different VCS branch, or you change the local source files for these components, then those files are deployed instead. In sum, be aware of the actual source files you deploy when you use a manifest file.
You can also use a manifest file to delete components during a deployment. Use the --type flag of the project generate manifest command to generate a destructive changes manifest file that lists the components to delete. Then specify this file with one of the delete flags of project deploy start|validate, such as --post-destructive-changes.
Test the Release Artifact in the Test (Partial) Sandbox
Juan once again uses a command window or terminal to run a Salesforce CLI command to deploy the changes to the test sandbox. Juan deploys his changes using the same command as before: project deploy start.
- Authorize to the Partial sandbox.
- Make sure you’re in the Salesforce DX project directory.
- On the command line, view the help for the deploy command.
sf project deploy start --help
The--helptells Juan the format of the command, and which flags to include, in particular--manifestto deploy using thepackage.xmlmanifest file. - Run the deploy command that mimics what you’ll deploy to production:
sf project deploy start --manifest package.xml --target-org partial-sandbox --test-level RunSpecifiedTests --tests TestLanguageCourseTrigger
- Run your UI tests, such as selenium tests, if needed.
- Open the sandbox:
sf org open --target-org partial-sandbox
- Perform user-acceptance tests.
At this stage in the process, Juan cares only about the tests related to the application or changes being deployed. He runs only the tests for the code that is in the release artifact.
If Juan’s testing passes, he moves to the test release phase, where he conducts regression tests in the staging sandbox.
Test the Release Artifact in the Staging (Full) Sandbox
If Juan makes no changes based on the integration testing, the next step is to stage the changes in a Full sandbox. Juan follows a similar process to deploy the changes to the Full sandbox. This phase includes regression testing and mimics how Juan will release the changes to production.
Because Juan doesn’t find any errors during the test phase, he uses the same package.xml file and makes sure he deploys from the same branch as when he tested. If he found errors during the test phase, he’d fix them and try again.
First he runs a regression analysis by doing a validated deploy to the org that executes all tests. A validated deploy enables you to verify the results of tests that would be executed in a deployment, but doesn’t commit any changes. Validation also ensures that you didn't forget a metadata component that another component depends on and that you don't have invalid metadata. After he runs all the regression tests, he runs a quick deploy to mimic exactly the steps he’ll take to deploy to production. He does this all using Salesforce CLI.
By validating the components successfully in the staging environment, Juan has a shorter maintenance window that blocks user access to the system when the customizations get deployed to production.
- Authorize to the Full sandbox.
- Run all local (regression) tests to validate the deployment without saving the components in the target org.
sf project deploy validate --manifest package.xml --target-org full-sandbox --test-level RunLocalTests
This command returns a job ID that you’ll need to reference in the quick deploy. A successful validation means that all the Apex tests have passed and the tests cover at least 75% of the code being deployed. - Next, complete the quick deploy on the full sandbox using the job ID returned from the previous step. This quick deploy mimics what later happens in production.
sf project deploy quick --job-id <jobID> --target-org full-sandbox
Release to Production
Juan and his team are in the home stretch. Now that all their tests have passed in the Full sandbox, they are ready to deploy to production. The Sales team is very excited to see their vision become a reality.
Juan checks the deployment run list and sees that he doesn’t have any pre-deployment tasks to complete. He’s good to go. After he runs the validation deploy, he has 10 days to perform the quick deploy to production, as long as he doesn't perform another deployment or make major changes to the org. Juan sets up the validation deploy for the production org to guarantee there aren’t any issues caused by differences with the staging sandbox. Juan runs the validation deploy during business hours so if anything goes wrong, he is available to troubleshoot it. When the validation succeeds, and to minimize customer impact, he deploys to production that evening using the quick deploy.
- Authorize to the production org.
- First validate and set up the quick deploy by running
project deploy validate:sf project deploy validate --manifest package.xml --target-org production-org --test-level RunLocalTests
This command returns a job ID that you’ll need to reference in the quick deploy. - Run the quick deploy:
sf project deploy quick --job-id <jobID> --target-org production-org
- Open the production org to ensure your changes are there.
Perform Post-Deployment Tasks Listed in Deployment Run List
Juan looks at the deployment run list again to review which post-deployment tasks to perform in the production org.
| Stage (Pre- or Post-) | Entity/Component | Notes | Steps |
|---|---|---|---|
| Pre-deployment | N/A | No tasks required | N/A |
| Post-deployment | Sales profile | Update permissions so Sales team can view custom object and custom field. | In Setup, edit the Sales team profile. Provide Read access for Language Course Instructors. |
Another Successful Rollout!
Calvin does a quick sanity check in the production org. He adds an instructor to one of the courses and validates that the notification email arrives in his inbox.
With all changes reflected in the source control system, the team can provide Calvin with a definitive list of changes to document in the release notes.
Calvin tells the Sales team that the new notification feature is ready to go. He congratulates Ella and Juan on the successful rollout of a key feature that will help the Zephyrus Sales team stay informed with the latest course information. He’s pleased that changes are now stored in a repository, and sees the benefits the repo provides as the team takes on more work.