Customize Order Headers
Learning Objectives
After completing this unit, you’ll be able to:
- Explore the order page header for an advanced order.
- Sign up for a Developer Edition org with Agentforce Consumer Goods.
- Customize the order page header of an advanced order record.
- Customize the order details page.
Get Ready to Start
To recap, advanced orders in Agentforce Consumer Goods and Online Order Extensibility give you a way to customize order pages. By tailoring the ordering experience so it’s just right, you can improve usability, enhance productivity, and foster stronger customer relationships.
Fatima’s all set to explore the advanced orders feature of Agentforce Consumer Goods and optimize the order pages for NTO store managers. To follow along with Fatima and get hands-on practice, you need a Developer Edition org.
Sign Up for a Developer Edition Org with Agentforce Consumer Goods
To complete this module, you need a special Developer Edition org that contains Agentforce Consumer Goods and our sample data. Get the free Developer Edition and connect it to Trailhead now so you can complete the challenges in this module. This Developer Edition is designed to work with the challenges in this badge, and may not work for other badges.
Always check that you’re using the Trailhead Playground or special Developer Edition org that we recommend.
- Sign up for a free Agentforce Consumer Goods Developer Edition org.
- Fill out the form:
- For Email, enter an active email address.
- For Username, enter a username that looks like an email address and is unique, but it doesn’t need to be a valid email account (for example, yourname@example.com).
- For Email, enter an active email address.
- After you fill out the form, click Sign me up. A confirmation message appears.
- When you receive the activation email (this might take a few minutes), open it and click Verify Account.
- Complete your registration by setting your password and challenge question. Tip: Save your username, password, and login URL in a secure place—such as a password manager—for easy access later.
- You’re logged in to your Developer Edition.
Now connect your new Developer Edition org to Trailhead.
- Make sure you’re logged in to your Trailhead account.
- In the Challenge section at the bottom of this page, click the org name and then click Connect Org.
- On the login screen, enter the username and password for the Developer Edition you just set up.
- On the Allow Access? screen click Allow.
- On the Want to connect this org for hands-on challenges? screen click Yes! Save it. You’re redirected back to the challenge page and ready to use your new Developer Edition to earn this badge.
Now that your Developer Edition org is ready, follow along with Fatima as she proceeds with configuring the order pages.
The Order Page Header
The Order Page Header is the first section in an order record, making it a critical touchpoint for key order details.

This panel provides an at-a-glance view of basic details, including the customer name, order ID, type of order template, the user who initiated the order, and the order value.
Fatima learns that NTO store managers need more visibility into the order-capture phase to track the current status of their orders. To this end, she adds a Phase field to the Order Page Header so it’s easier for store managers to monitor progress without digging into additional tabs or details.
Here’s how she customizes the Order Page Header in the template to add the Phase field. For practice, sign into your Developer Edition org and follow along.
- From the App Launcher, find and select Field Sales Execution.
- Go to the Advanced Orders tab.
- Change the list view to All.

- Find and select order O-00141 to open the Advanced Order record. It may take a few seconds for the record to open.
- In the Order Page Header, Order Template field, click Standard. The Standard Order template opens in a new tab. You can also open the Standard Order template from the App Launcher, Order Templates app.
- In the Identification section, find the Custom JSON for Order Page Header field, and click
 .
.
- Scroll down to the end of the JSON code. You can expand the field to enlarge it using the corner expansion icon.
- At the end of the last line of code, place your cursor right after
"Order__c"}so that the cursor is between the second-to-last curly bracket and the square bracket.
- Type a comma and press Enter to place the square bracket and the last curly bracket on a new line.
- Copy and paste the following code in front of the square bracket:
{"fieldApiName":"Phase__c","objectApiName":"Order__c"}The final code should be as follows:{"fieldApiName":"Phase__c","objectApiName":"Order__c"}]}
The image shows the final code line, which specifies the addition of the Phase field to the order template.

- Save the template changes.
- Show the Advanced Orders tab, and return to the O-00141 order record.
- Refresh the browser page, and in the Order Page Header, confirm that the Phase field is visible. This order is in the Initial phase, which is helpful for tracking the order progress.

Once the order template is saved, the change becomes visible in any new or pending orders based on this template. To verify the update, you can open a pending order or create a new advanced order.
By adding the Phase field, Fatima helps NTO store managers track orders, making their workflow smoother and more efficient.
Next, you’ll explore additional customizations for other advanced order components.
Modify the Order Details Page
After customizing the Order Page Header to include the Phase field, Fatima turns her attention to another critical area: the Details section of the Order Header tab.

This section provides detailed information about an advanced order, such as delivery dates, notes, and the person responsible for the order.
During her collaboration with NTO store managers, Fatima learns that managers rely heavily on the Delivery Note field in the Order Details tab, while they rarely use the Invoice Note field. To simplify the interface and remove unnecessary elements, Fatima removes the Invoice Note field from the Order Details tab.
Here’s how she does it. Complete the steps in your Developer Edition org to follow along.
- From the App Launcher, open the Field Sales Execution app, and show the Advanced Orders tab.
- Open the order record O-00141.
- Show the Order Header tab, and notice the Invoice Note field, which is blank. You remove this field in the next few steps.
- Click Standard on the Order Page Header.
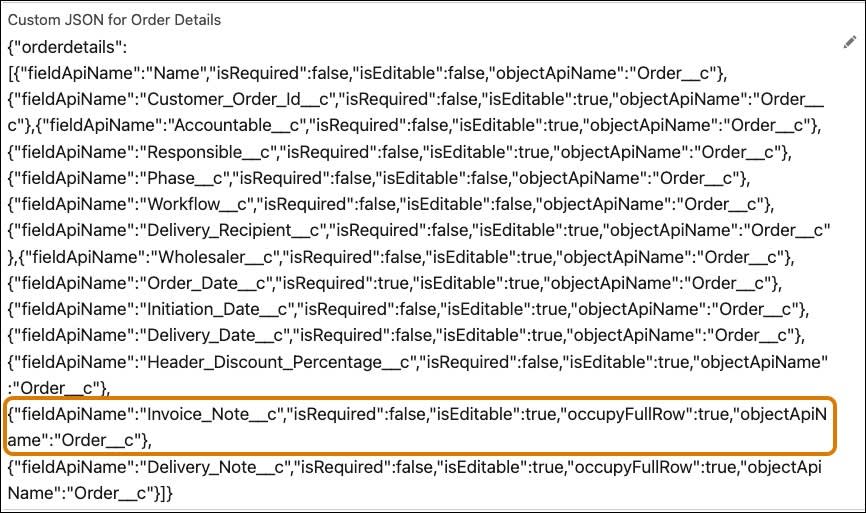
- Find the section Custom JSON for Order Details, and click
 .
.
- Locate and delete this JSON code for the Invoice Note field:
{"fieldApiName":"Invoice_Note__c","isRequired":false,"isEditable":true,"occupyFullRow":true,"objectApiName":"Order__c"}, - Delete this line from the JSON code. Be sure to remove the trailing comma to maintain valid syntax.
The image shows the field you need to remove.
- Save your work.
- Return to the O-00141 order record, and refresh the browser tab.
- Show the Order Header tab, and confirm that the Invoice Note field is no longer there.

Voila! By removing the unused Invoice Note field, Fatima keeps the order details relevant, ensuring they align more closely with NTO’s business model.
In this unit, you explored how to customize the Order Page Header and Order Details. Next, dive into other advanced order pages, including those for managing order items and product details.