Build Simple Integration Procedures
Learning Objectives
After completing this unit, you’ll be able to:
- Describe where Integration Procedures fit within the data flow in Omnisutdio for Managed Packages.
- Build a simple Integration Procedure to get data for an Omniscript.
- Build a simple Integration Procedure to save updated data to Salesforce.
Where Integration Procedures Fit Within the Data Flow
In the previous unit, you designed a few Integration Procedures based on scenarios. In this unit, you build an Integration Procedure that passes data from the Account object to an Edit Account Omniscript. Then, you will build another Integration Procedure that saves this data that was added or changed in the Omniscript back to the Account object.

First, let’s see where an Integration Procedure fits in the data flow for the edit account Omniscript example from the last unit.
- When the edit account Omniscript launches from an action on a Flexcard, it passes the RecordId for the account—called
AccountIdin this example—from a JSON node to an Omnistudio Data Mapper Extract.
- The Edit Account Omniscript saves this RecordId in a variable called ContextId. AccountId is an arbitrary name for the RecordId. You can call the RecordId anything you like. The name must, however, be the same in each of the elements for the data to flow properly between them and Salesforce. It’s best practice to label the ContextId with a description of what kind of ID it is.
- The Omniscript passes the AccountId variable to an Integration Procedure, which passes AccountId to a Data Mapper Extract.
- The Data Mapper Extract uses the AccountId in Salesforce Object Query Language (SOQL) to retrieve data from Salesforce. This includes not only the AccountId but also data from the Account record. The Data Mapper Extract sends the data, in JSON format, back to the Integration Procedure and then to the Omniscript.

- The user and other Omniscript actions manipulate the data.
- An updated data JSON, including the AccountId, is then passed to an Integration Procedure, which passes it to a Data Mapper Load.
- The Data Mapper Load uses the AccountId to identify the original account record and updates the data in Salesforce.

Build an Integration Procedure to Get Data
In the first scenario in the previous unit, you designed the Integration Procedure to get data for an edit account Omniscript. You chose the Data Mapper Turbo Extract Action to call a Data Mapper Turbo Extract to get Account data from Salesforce. Then you chose the Response Action to send that data back to the Edit Account Omniscript from the Integration Procedure.
How do you configure all this in the Integration Procedure itself?
- Drag a Data Mapper Turbo Action from the Available Components panel to the Structure panel.
- Give it a name that describes its purpose, such as
DRGetAccountDetails.
- In the Data Mapper Turbo Action’s Properties panel, select the Data Mapper Turbo Extract you want to use in the Data Mapper Interface field.
- Under Input Parameters, enter
AccountIdfor both the Data Source and Filter Value.
Remember, AccountId is an arbitrary name for the RecordId, but must be the same in each of the elements for the data to flow properly.
- Configure the Response Action (1) to tell the Integration Procedure what data to send back to the Edit Account Omniscript. To trim the data and return only what the Omniscript needs, enter
DRGetAccountDetailsin the Send JSON Path (2) field.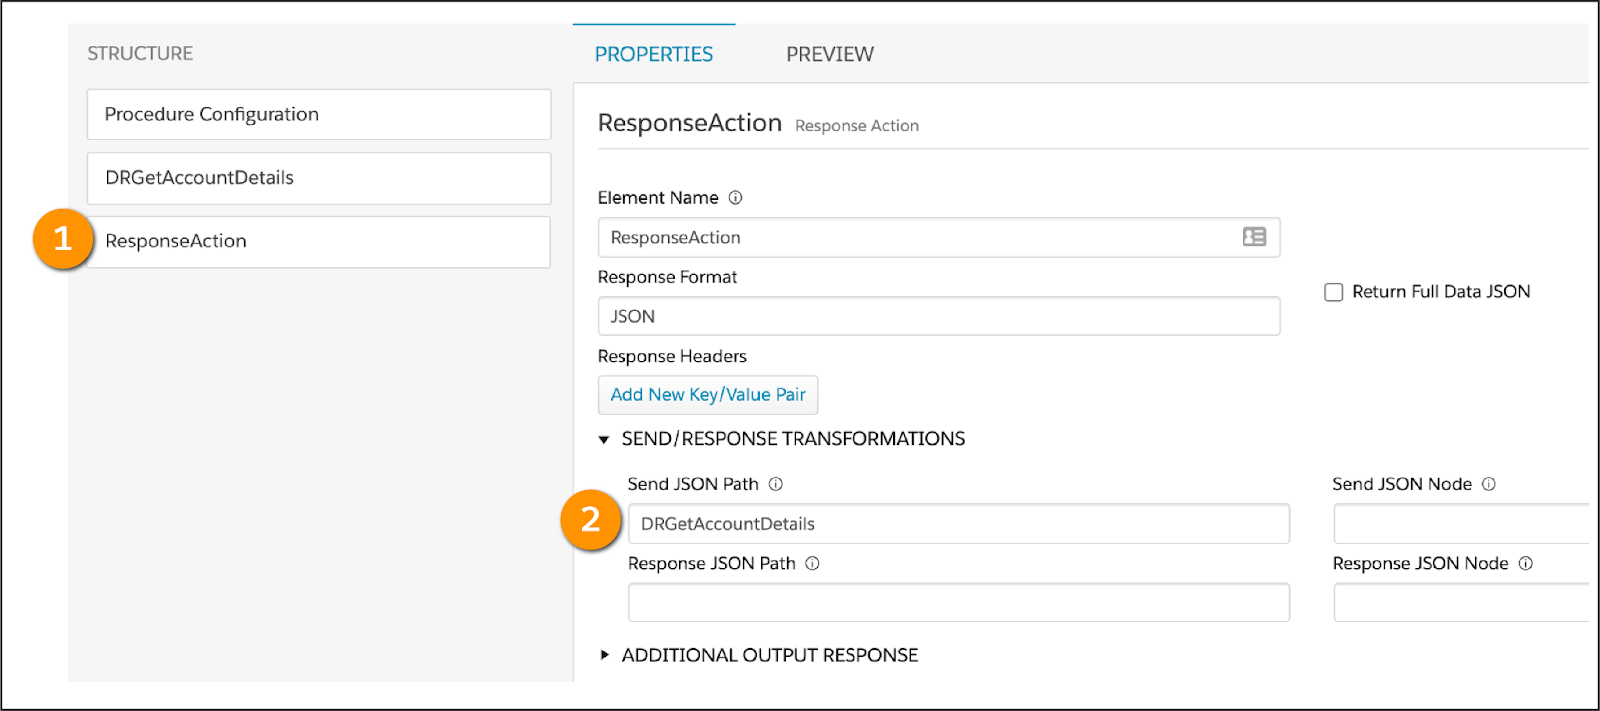
Way to go! You’ve configured the Integration Procedure, but now you want to test if it’s working.
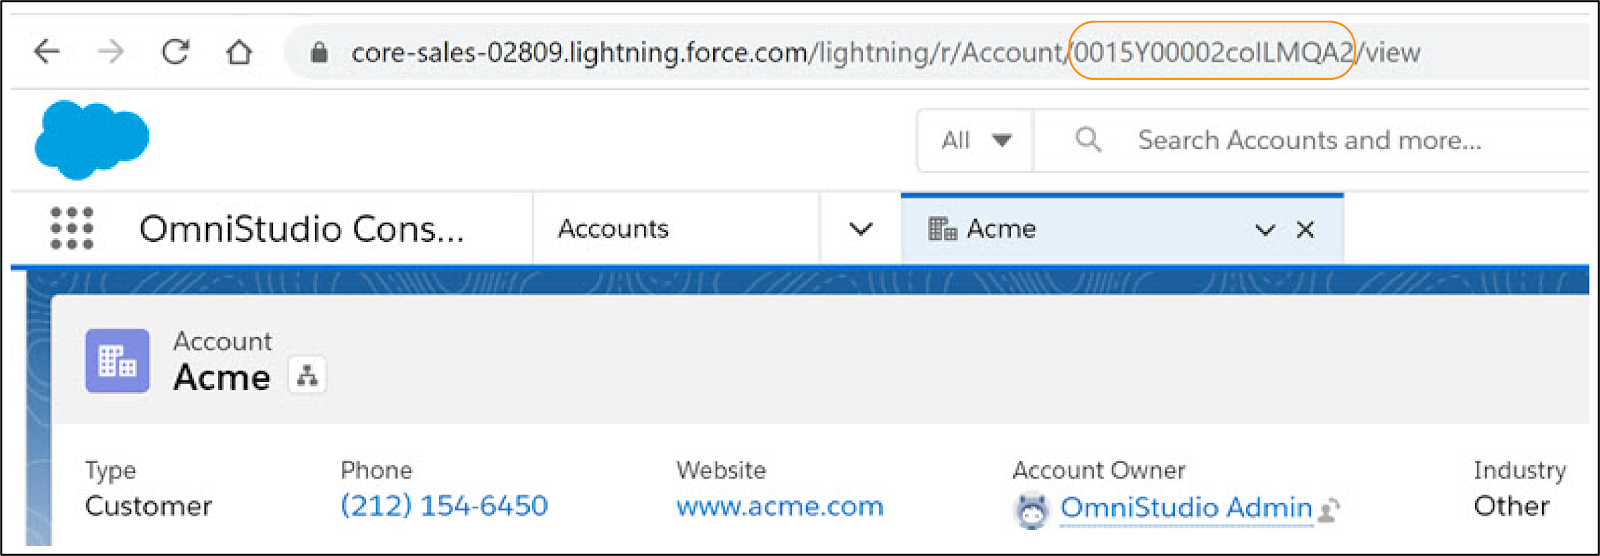
You need the RecordId of an account to do this. All records in Salesforce have a unique RecordId. To find a RecordId for an account, open any Account record in your Salesforce org and copy the RecordId from the URL.
Now that you have an AccountId, you’re ready to test.
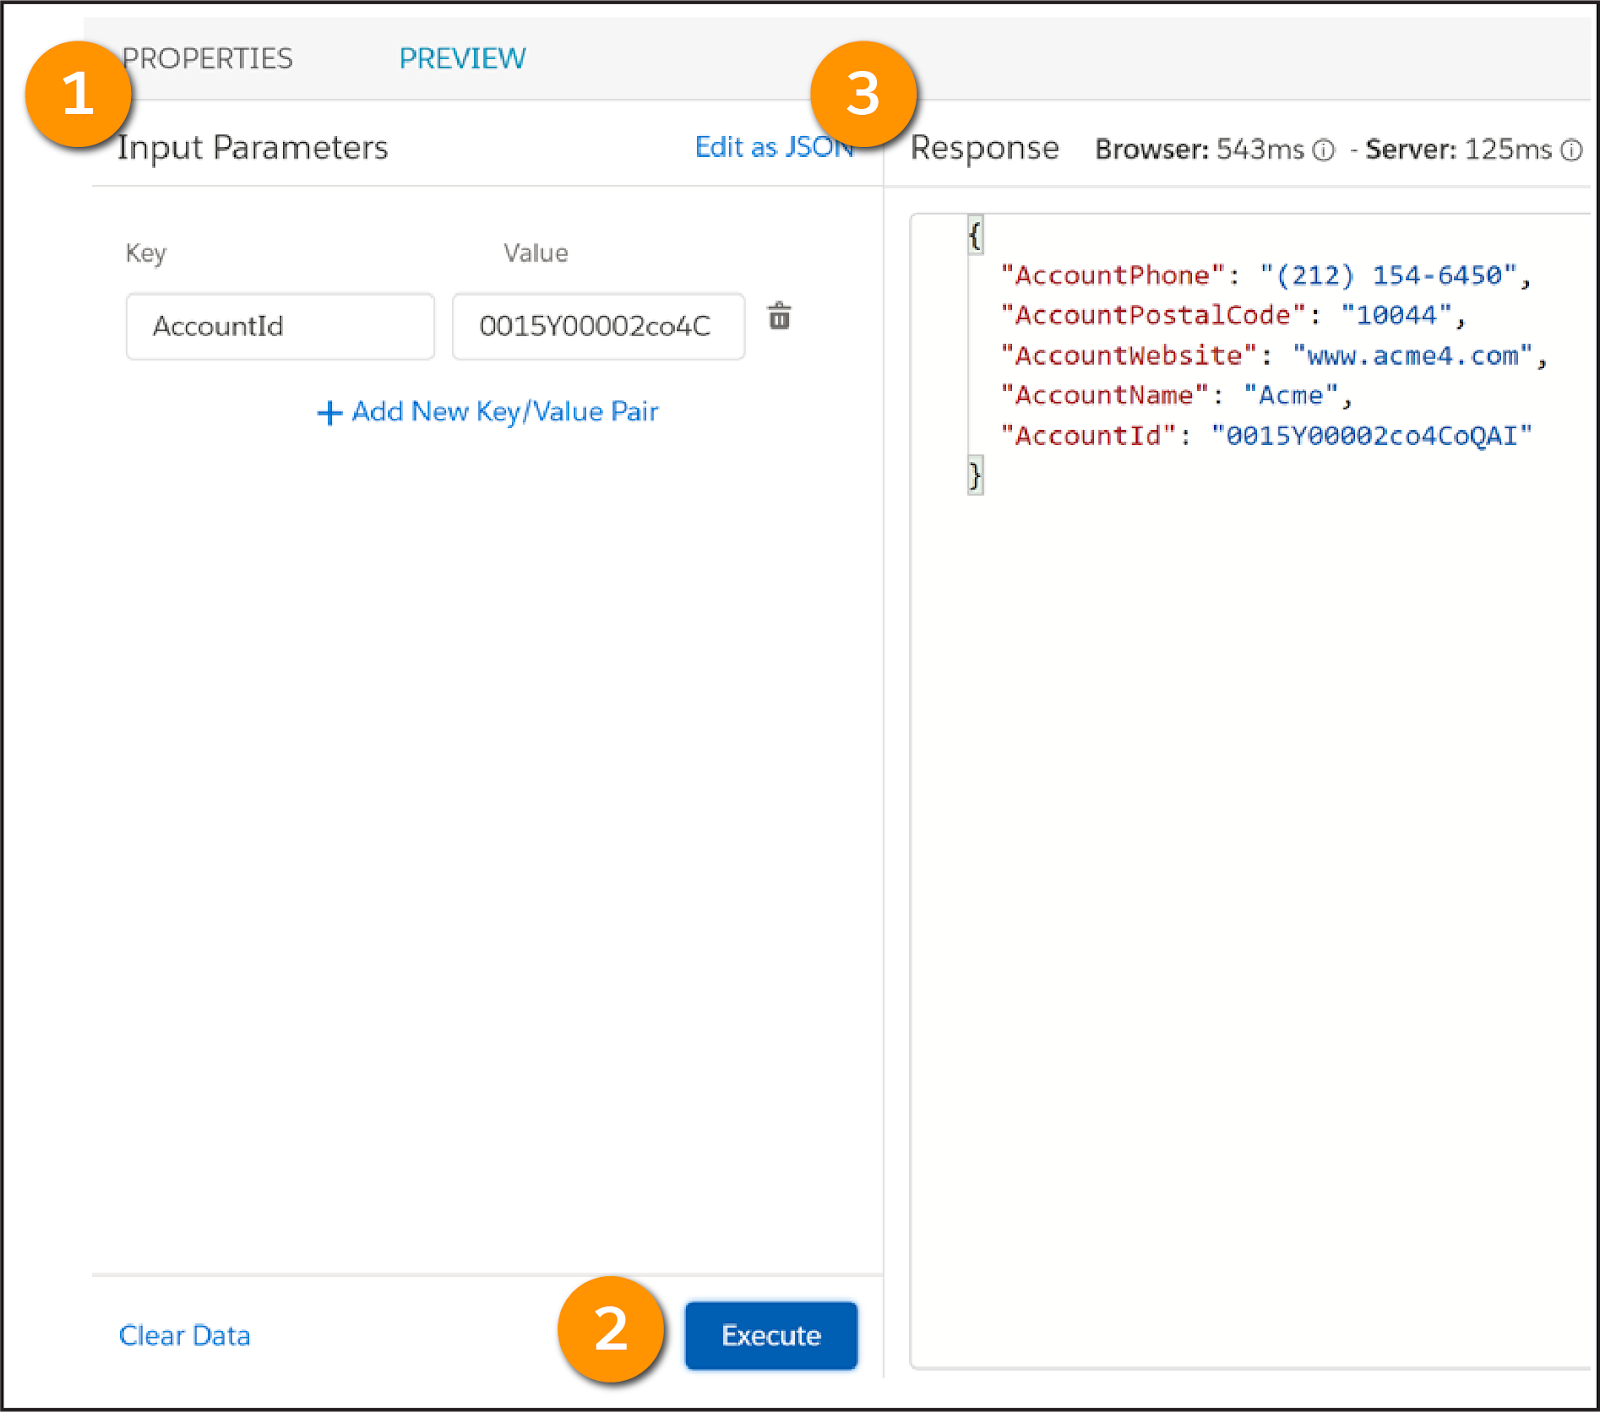
On the Integration Procedure's Preview tab, enter a Key and Value pair in the Input Parameters panel (1). For example, enter AccountId for the Key and an Account's RecordId for the Value.
Select Execute (2) to run the Integration Procedure. The Response pane (3) returns results to confirm it's extracting data correctly.
How do you check for errors?

The Preview tab includes a Debug Log (1), which helps you identify and work through any issues with the output and input for each element in the Integration Procedure. To make sure the Data Mapper is connected to the Integration Procedure in this example, select DRGetAccountDetails (2) and confirm that the Account information displays.
In the Debug Log dropdown, Original Input is what you expect to pass to the Integration Procedure. The Debug Log includes two entries for each element. NAME displays the output and NAMEDebug shows the input for the step. If you don't see expected outputs, review the debug entry to find out what's wrong with the input data.
Everything seems correct and in order, so you’re ready to activate this version of the Integration Procedure.
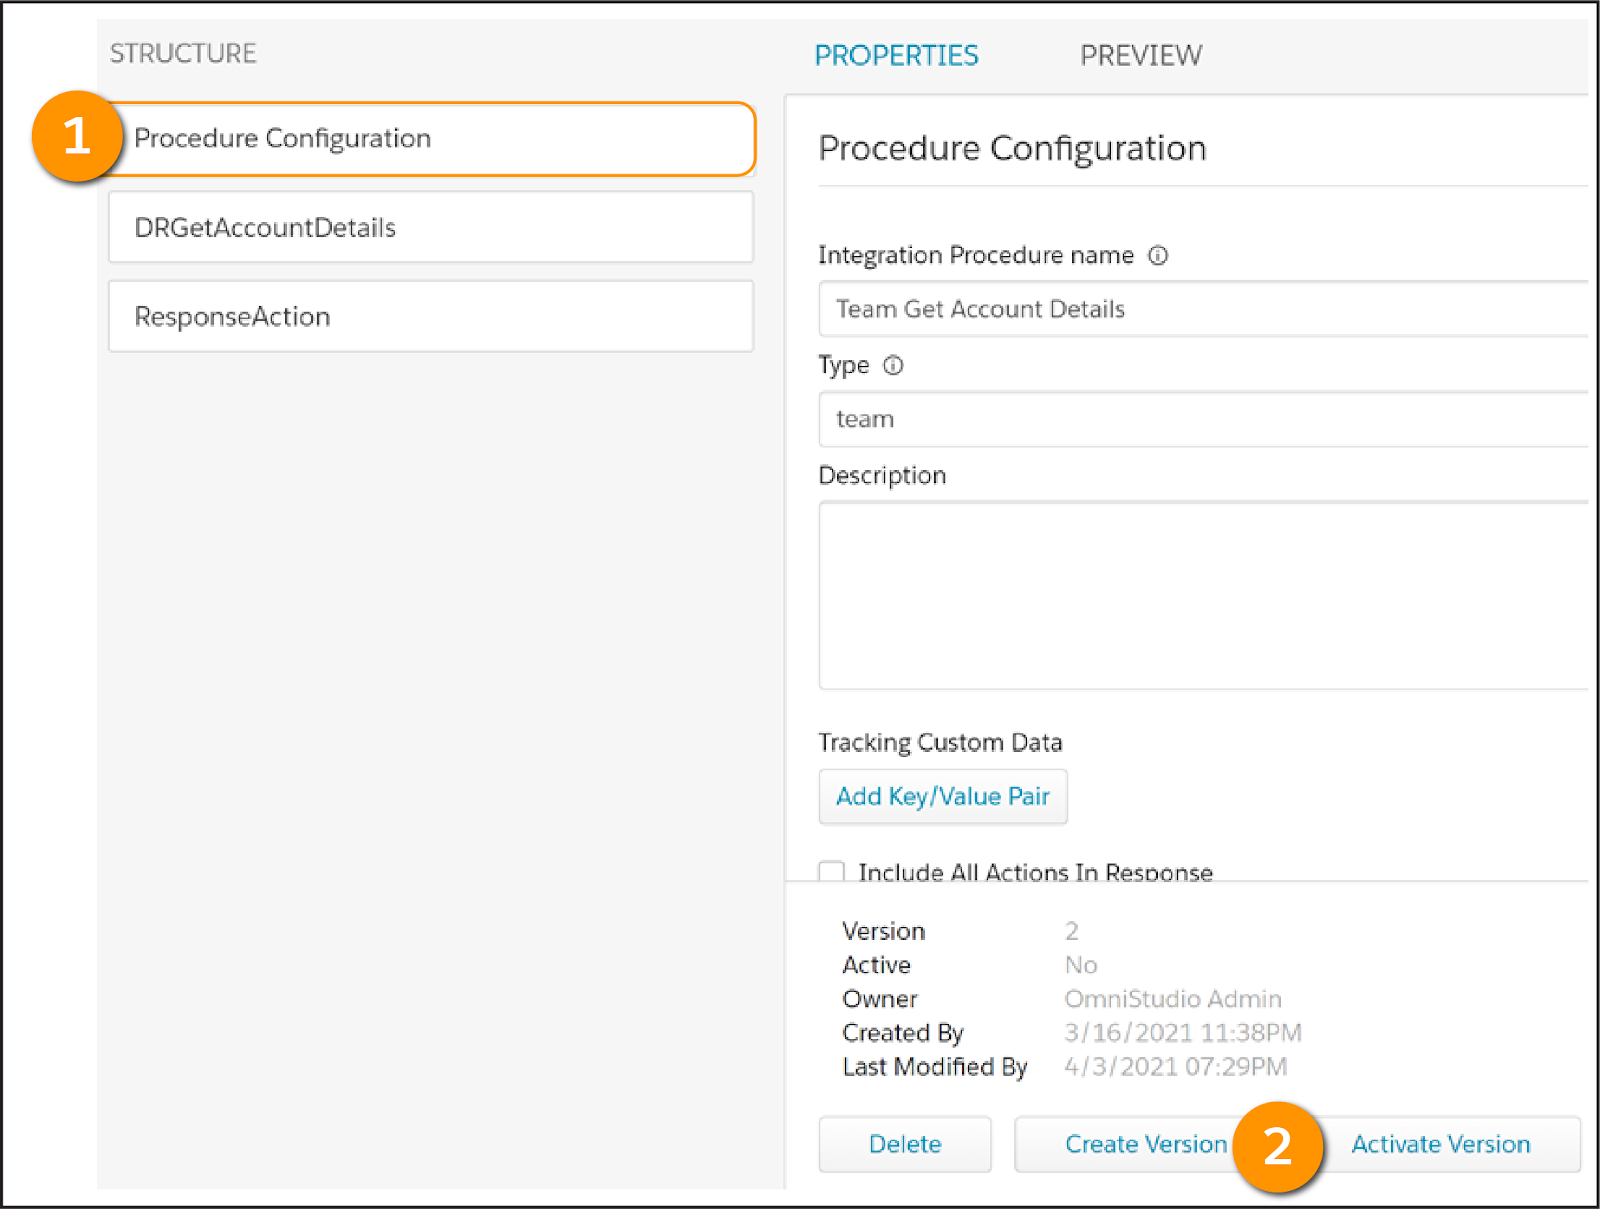
In the Procedure Configuration (1) element properties, select Activate Version (2).
Do a final test to make sure the Integration Procedure works in the edit account Omniscript. The Integration Procedure can only be used in the Omniscript if it is active.
The edit account Omniscript includes Integration Procedure Actions that you can configure to link Integration Procedures to the Omniscript.
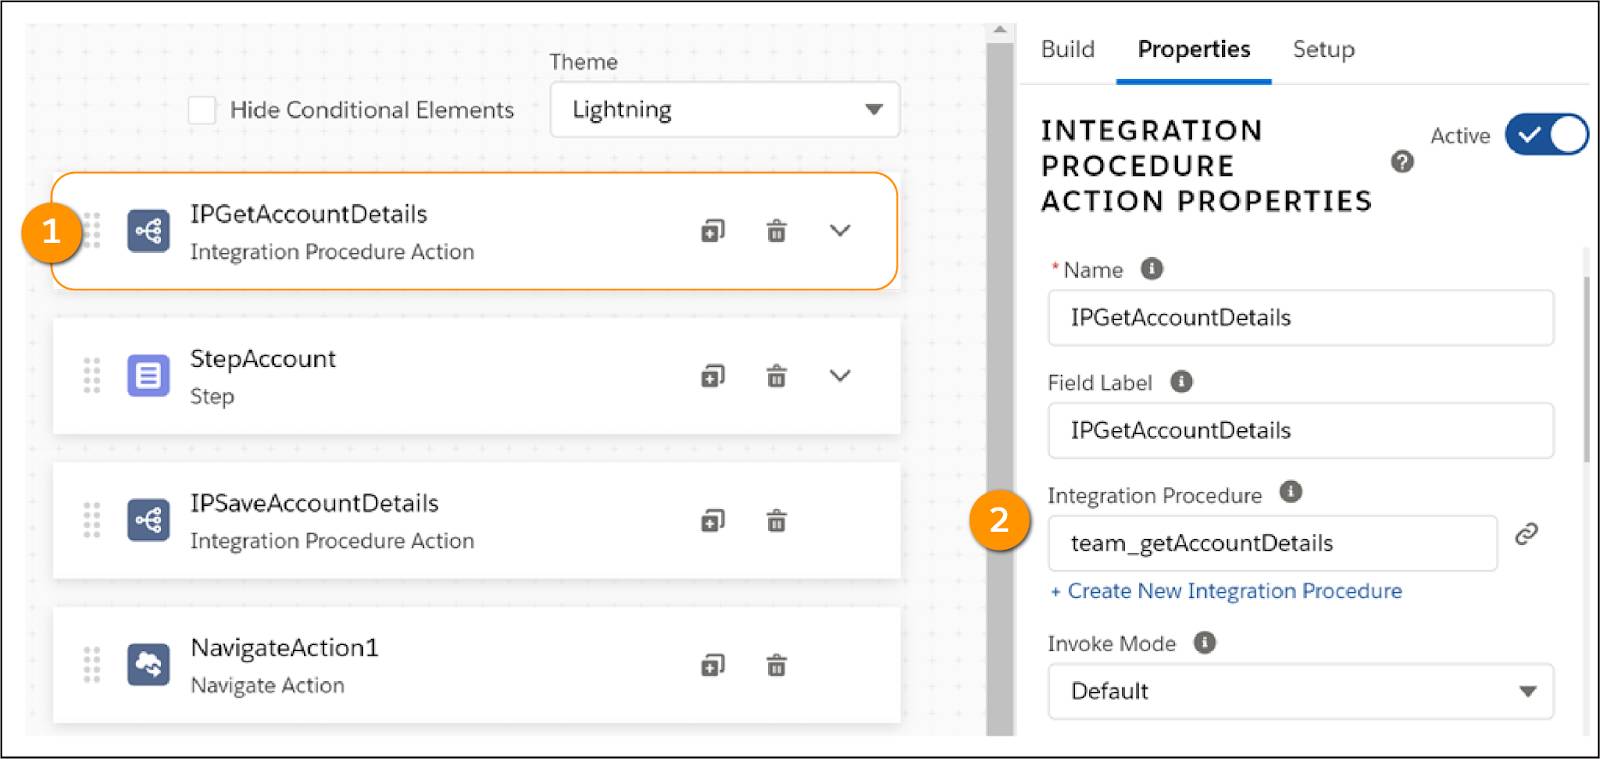
The IPGetAccountDetails Integration Procedure Action (1) shows team_getAccountDetails selected in the Integration Procedure field (2).
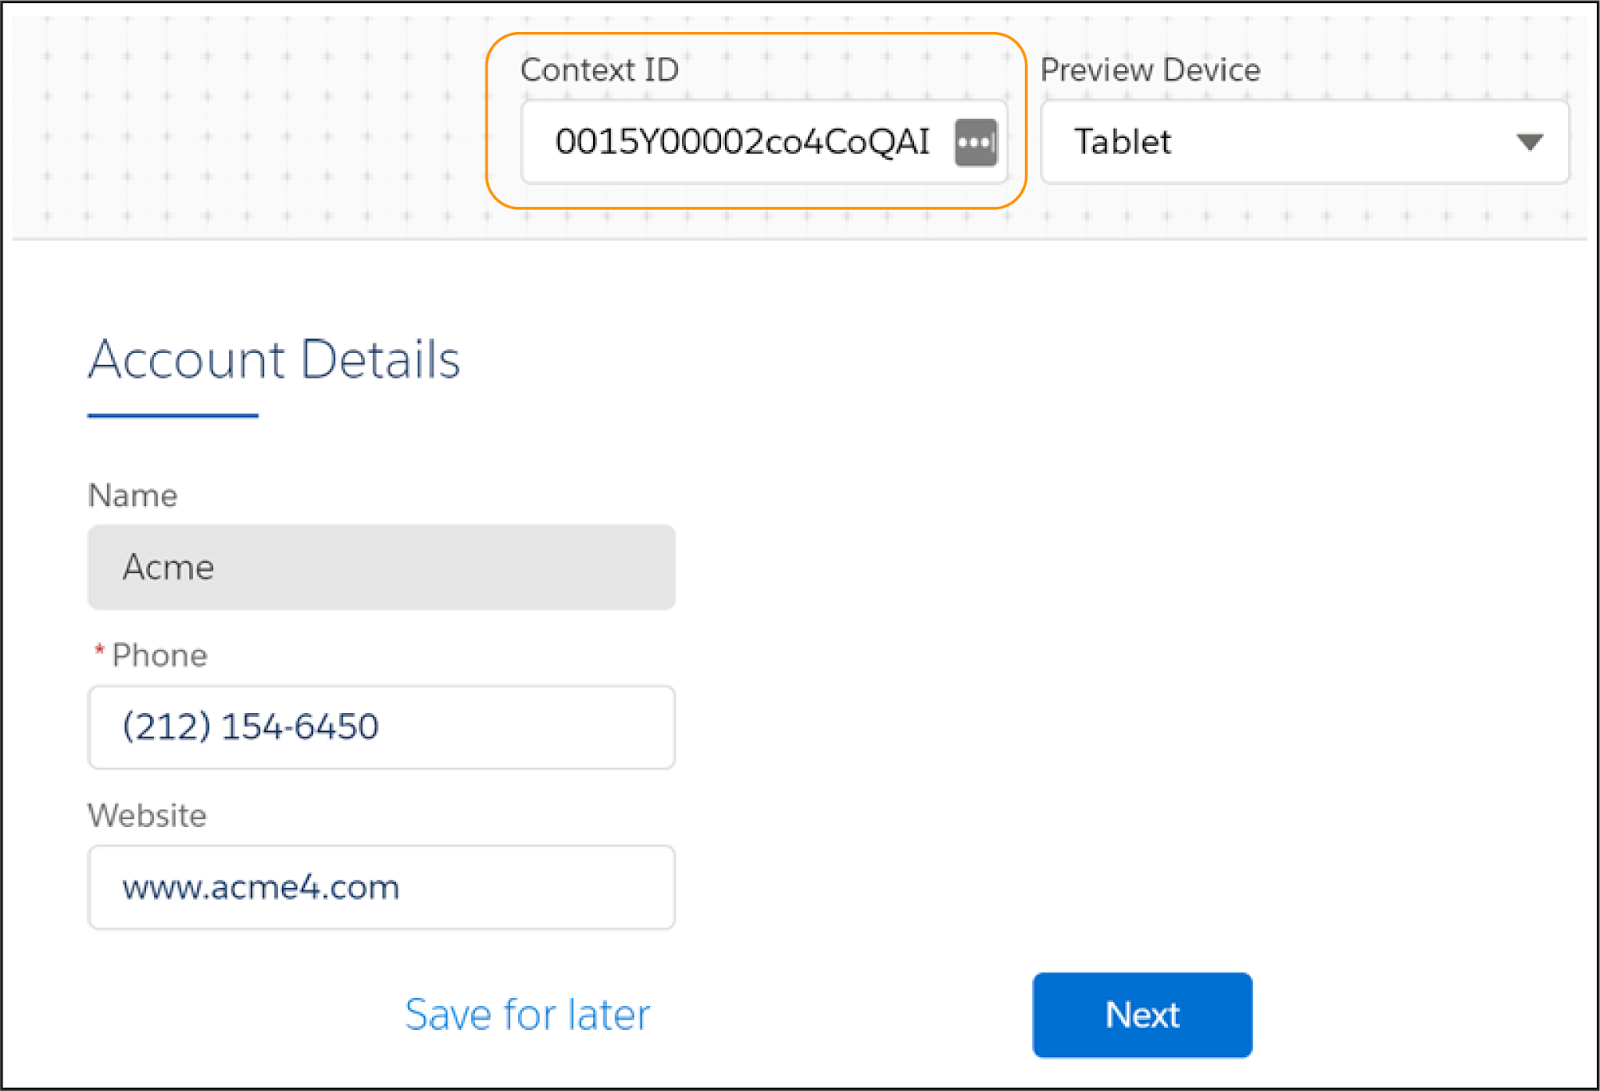
From the Edit Account Omniscript’s Preview tab, enter your RecordId into the Context ID field. The Preview displays data retrieved by the Integration Procedure.
Congratulations! You learned how to create an Integration Procedure that gets data for an Omniscript.
But what if you want to change a value or edit a record? Let’s turn our attention to an Integration Procedure that saves data from an Omniscript.
Build an Integration Procedure to Save Data
When you designed the Integration Procedure for this scenario, you chose the Data Mapper Post Action element to save updated data from the Edit Account Omniscript to Salesforce.
Let’s configure it.
- Drag a Data Mapper Post Action from the Available Components panel to the Structure panel.
- Give it a name that describes its purpose, such as
DRSaveAccountDetails.
In the Data Mapper Post Action’s Properties panel, select the Data Mapper Load you want to use in the Data Mapper Interface field.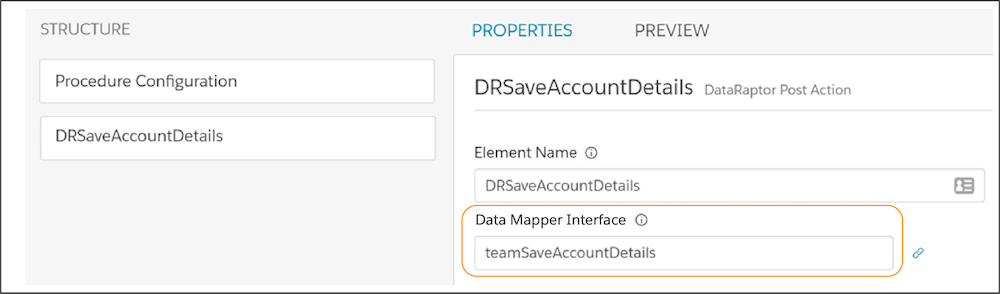
Now, activate this Integration Procedure to make it available for use in the Edit Account Omniscript.
Test if the Integration Procedure is working in the edit account Omniscript.
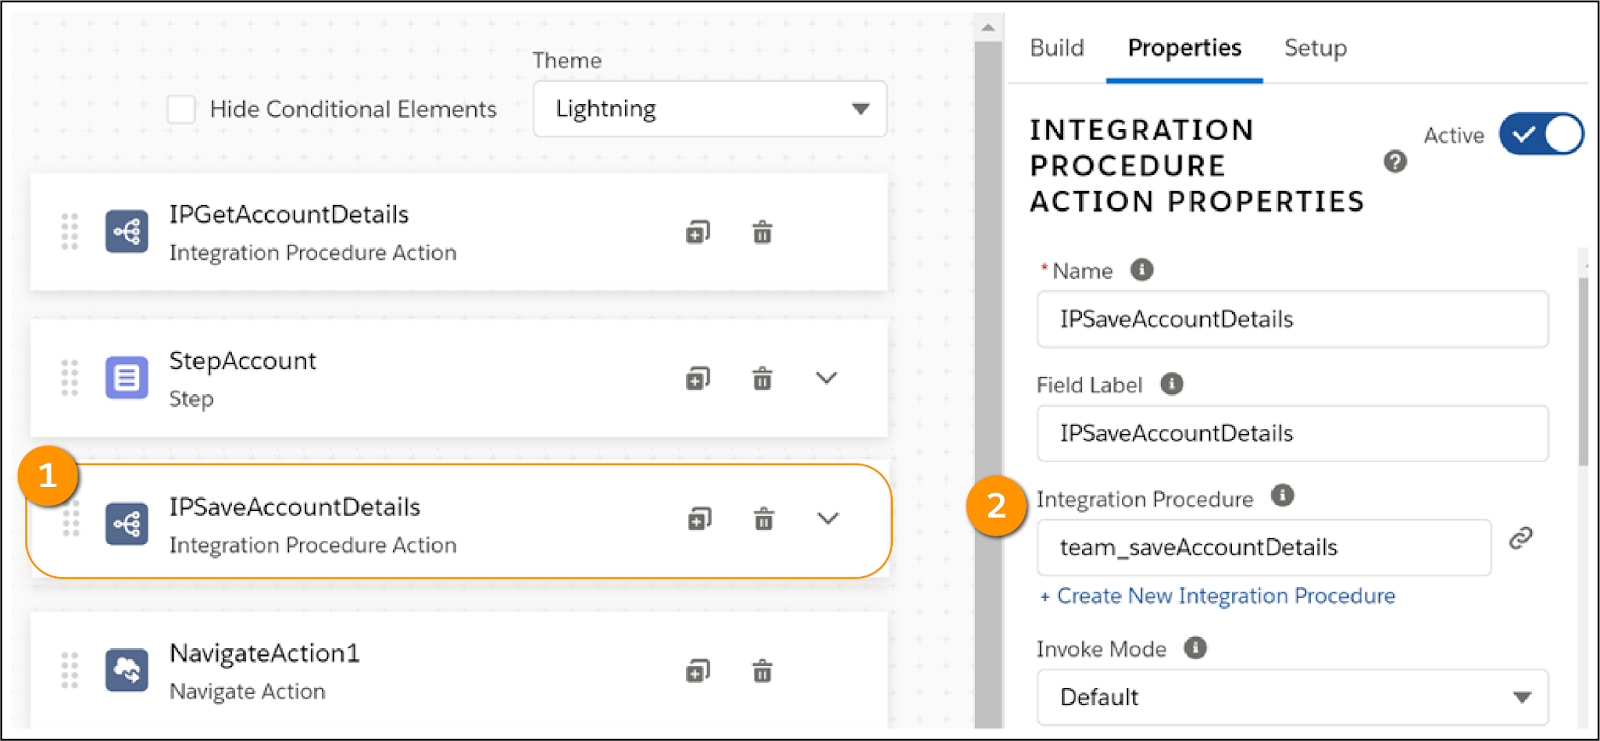
- In the edit account Omniscript, link the Integration Procedure Action (1) to an Integration Procedure (2). In this case, link IPSaveAccountDetails to team_saveAccountDetails.
- From the edit account Omniscript’s Preview tab, enter your RecordId into the Context ID field. The Preview displays data retrieved by the first Integration Procedure you built.
- To test if the second Integration Procedure works, make a change to the data. In this example, the www.acme4.com website is changed to
www.acme.com(1). Then lick Next (2).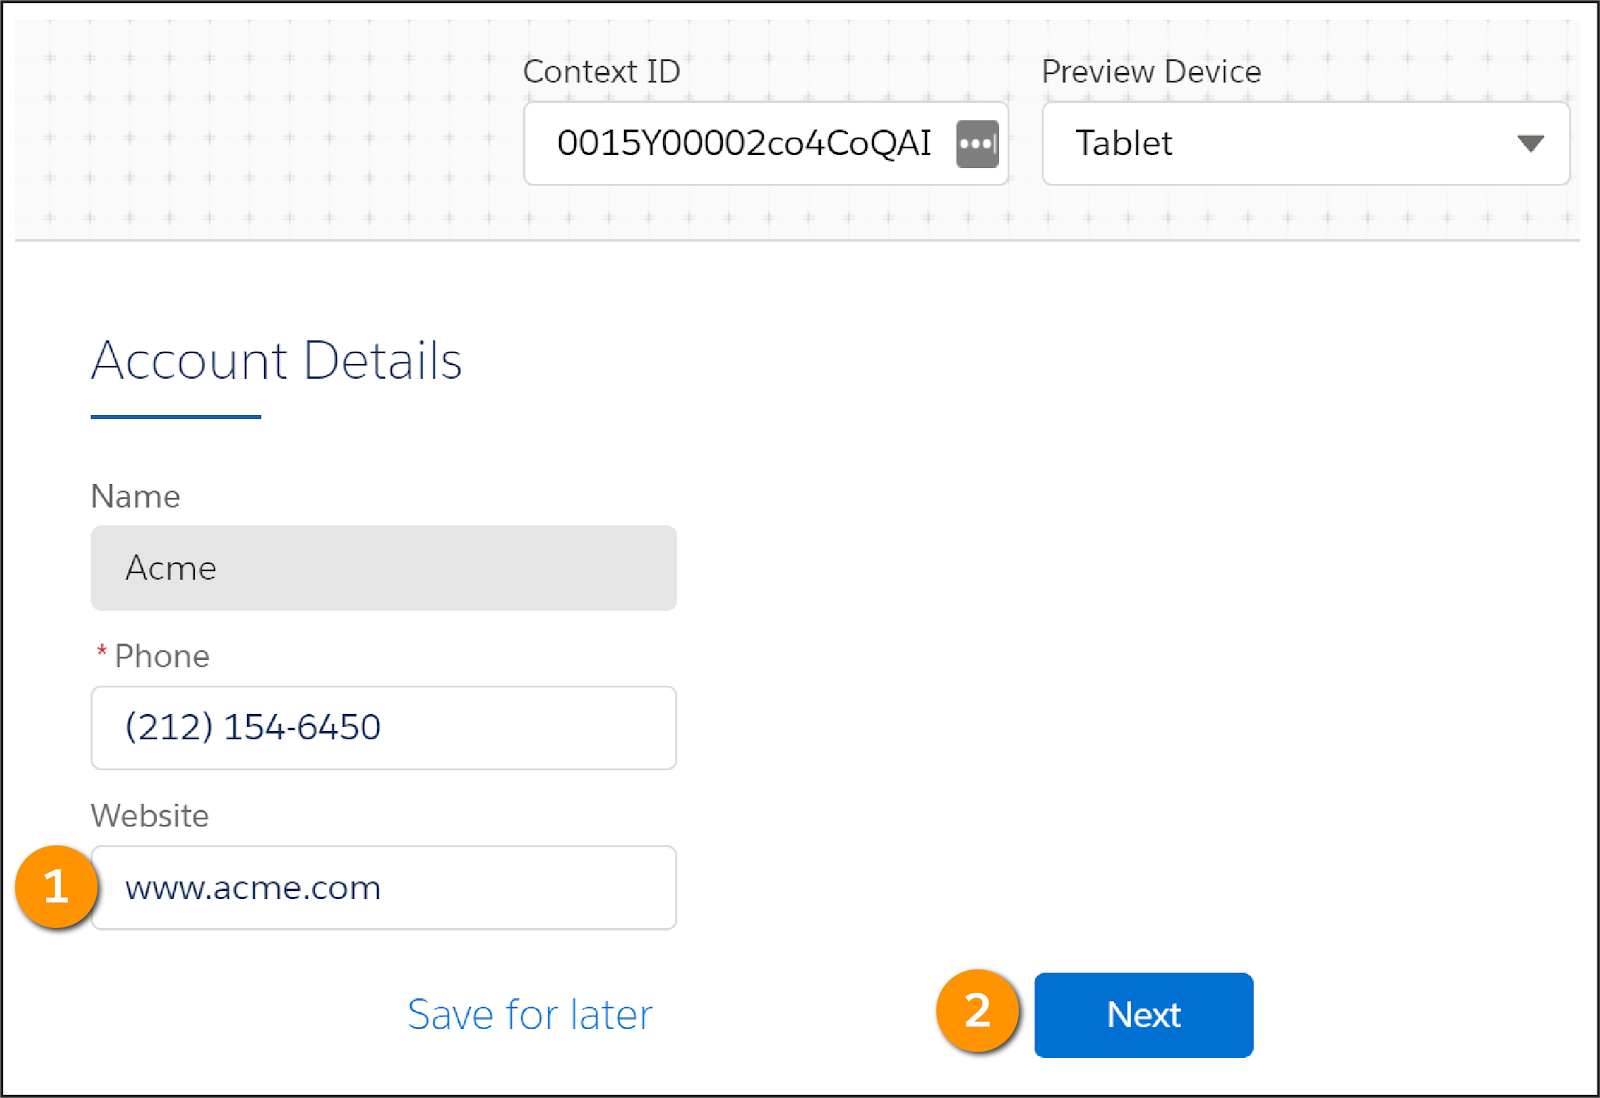
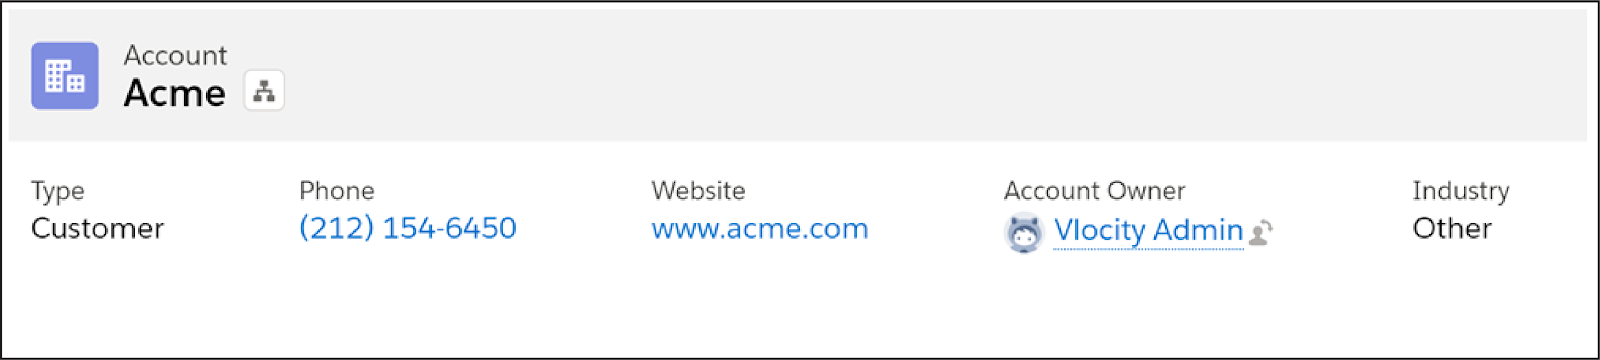
- Open the Account record to confirm the data was updated successfully.
We hope you feel confident about your Integration Procedure skills now. Remember, if you need to get, save, and manipulate data behind the scenes, Integration Procedures are your go-to tools.