Configure Your Integration Procedure
Learning Objectives
After completing this unit, you’ll be able to:
- Explain the Properties panel options in the Integration Procedure Designer.
- Describe the purpose of Send and Response Transformations.
- Describe the best practices on how to use Integration Procedures.
Explore the Properties Panel
In the last unit, you covered the various elements available in the Integration Procedure Designer. In this unit, you learn how to edit the details of your Integration Procedure.
You use the Properties panel to edit the details of your Integration Procedure. You can also track custom data, configure the cache, or set chain limits.
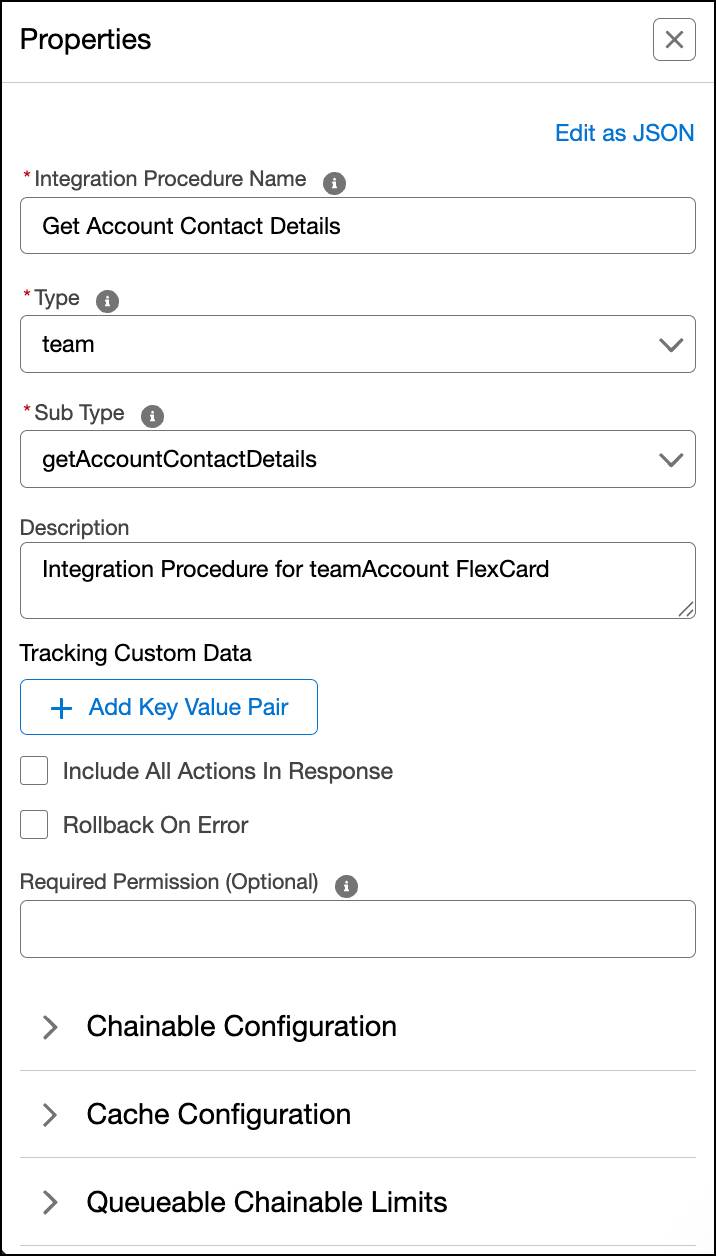
Let’s go over some of the options available in the Properties panel.
Integration Procedure Name
The name of the Integration Procedure that appears in the list view of the Integration Procedure Designer home page.
Type and Sub Type
Type and Sub Type define the unique identity of the Integration Procedure. There can be only one Integration Procedure with the same Type and Sub Type active simultaneously.
Chainable Configuration
You can run multiple Integration Procedures one after another in a single transaction as Chainable Integration Procedures. Think of them as a way to break down a complex process into smaller, reusable steps and call them in sequence. Pass the output of one Integration Procedure as input to the next, which helps you enable modular and maintainable designs.
A long-running Integration Procedure is complex and takes a long time to execute. Use chainable configuration settings to avoid hitting Salesforce governor limits when invoking chainable or long-running Integration Procedures. You can also chain one or more long-running steps. So you break down complex procedures and then stitch them together to avoid governance limits.
Consider the example of generating a car insurance quote. You set up separate child Integration Procedures for fetching customer profiles from Salesforce, calling an external API for driving history, and calculating the premium based on business rules. And then you chain these smaller Integration Procedures together in a parent Integration Procedure, which makes it easier to maintain and update. If the premium calculation logic changes, you only modify that specific child procedure, not the entire process.
Queueable Chainable Limits
Queueable Integration Procedures operate asynchronously, and process tasks in Salesforce's queue without requiring the user to wait. This enables efficient handling of long-running or resource-intensive operations, and prevents timeouts. Queueable Chainable settings also help you avoid hitting Salesforce governor limits.
Queueable Integration Procedures offer a solution for complex, time-consuming processes. For instance, when a user renews a policy and submits their details, the system typically performs several actions: updates records, communicates with external systems, and generates documents. Instead of making the user wait for these tasks to complete, a Queueable Integration Procedure enables these processes to run asynchronously in the background. So the user gets an immediate confirmation, such as "We're processing your renewal," and a smoother renewal experience.
Cache Configuration
Use a cache to store frequently accessed, infrequently updated Integration Procedure data. This saves round trips to the database and improves performance.
Test Configuration
An Integration Procedure that performs a unit test is a test procedure. Select the Is Test Procedure checkbox to turn it on. You can use a test procedure to unit test almost anything an Integration Procedure can invoke, such as an Omnistudio Data Mapper, a Decision Matrix, an Apex class, or another Integration Procedure.
Now that you’re familiar with the Properties panel, take a look at how you can manipulate the data in Integration Procedure actions.
Send and Response Transformations
In Omnistudio Integration Procedures, the Send and Response Transformations setting serves as an essential mechanism for manipulating JSON data as it flows in and out of an action. You get precise control over the JSON data's structure and content within the Integration Procedure. This granular control is vital for managing intricate integrations and maintaining data consistency. Most of the action elements where you perform any kind of data operation have this feature.
- Send Transformations format data before it's sent to an action. You use properties like Send JSON Path to select a specific part of the data and Send JSON Node to rename the root of that data. This is useful for matching an action's required input structure.
- Response Transformations format data after it's returned from an action. You use properties like Response JSON Path to extract only the necessary data from the response and Response JSON Node to rename the output node. This helps keep your data clean and organized.
These transformations help you restructure data, improve performance by trimming large payloads, and simplify complex data structures within your Integration Procedures.
Next, let’s review some best practices for Integration Procedures.
Integration Procedure Best Practices
To make the most out of Integration Procedures, we recommend you follow these best practices.
Design and Creation
- In Integration Procedure names, the Type value must start with a lower-case letter for Lightning Web Component compatibility, and Type and Sub Type should not contain special characters or spaces.
- Element names must be unique in an Integration Procedure with no spaces or special characters.
- For Type, Sub Type, and element names, use camelCase to facilitate reading. Use a descriptive name format like
prefixVerbObjectDetail. For example,serviceGetAccountDetails.
Performance
- Use Integration Procedures to group one or more actions from the server side to improve performance. Adding elements and creating a new version of an existing Integration Procedure have no impact on the tool that calls it, which makes it easier to maintain.
- When invoking an Integration Procedure, use Send Transformations to trim the JSON input that the Integration Procedure receives from calling components to what it needs. Use Response Transformations to trim the Integration Procedure JSON output to only what the calling components need.
Response Actions
- Always have a Response Action at the end of your Integration Procedures, even if it's just a success or failure message. This process helps the calling component to provide status or results that you can use to confirm with the users in the UI or for reuse later.
- Be cautious with using multiple response elements in an Integration Procedure. When you use a Response Action in the middle of the steps and the condition for execution is true, the rest of the Integration Procedure won't execute. If not done carefully, you risk sending invalid or missing response data to the calling component and causing some actions to not fire. Using multiple responses can be useful to reduce execution steps for some conditions.
- Ensure the conditional execution criteria are mutually exclusive for each Response Action. You can also use Conditional Blocks with mutually exclusive conditions. Reorder the response actions so they're the last step. This ensures all elements are executed and it's clear where the execution sequence ends.
Duplicate Transforms
- When making an Integration Procedure reusable, think about how you reuse and transform it elsewhere, especially with callouts to other systems.
- If you want to transform an Integration Procedure differently for each use case, avoid doing an additional transform as part of the reusable Integration Procedure.
- Focus on transforming for the calling component only, unless the transformation you need is more than a relabeling effort.
Set Values
- Avoid using a Set Values element for creating objects or transforming data.
- When there are special characters in the merge tag fields used inside the Set Values, it can cause unexpected errors or results.
- Use Set Values elements mainly for calculations, conditional setting of values, or setting a static value.
Similar Integration Procedures
- Review similar Integration Procedures and consider consolidating them into one Integration Procedure.
- Consider using only one Integration Procedure and either pass a different variable, or add some conditional execution steps to accommodate the differences. This reduces the number of Integration Procedures and the requirement to update in more than one place for similar changes.
Debugging Items Before Production Deployment
- If you’re using any debug statements in your components, or debug parameters, ensure they are removed or turned off before migrating your components to production.
- Keeping those debug statements during migration can introduce a security risk for sensitive data in debug logs and impact the performance of the system.
Long-Running Integration Procedures
- When working with a lot of data in an Integration Procedure, remember that all the steps execute by default within the same transaction. This means all transactional governor limits apply to all steps.
- However, you can set an Integration Procedure to be chainable to split the transaction into multiple transactions when it gets close to those governor limits.
- Additional options include chunking an Integration Procedure into multiple Integration Procedures or allowing the Integration Procedure to execute a queueable job. Note that doing this can reduce overall performance for the Integration Procedure.
What's Next
In this unit, you learned how to configure your Integration Procedure settings and covered some best practices.
In the next unit, explore how Integration Procedures work with other Omnistudio components and Agentforce to build efficient solutions.