Meet IDX Build Tool
Learning Objectives
After completing this unit, you’ll be able to:
- Explain the roles of IDX Workbench and IDX Build Tool in a development pipeline.
- Create a Property file and a Job file for migrating data using IDX Build Tool.
- List the commands used by IDX Build Tool for data migration between two orgs.
Another Metadata Migration Tool? Why?
Earlier in this module, you learned about the developer tools used to migrate OmniStudio component changes between environments—IDX Workbench and IDX Build Tool. Vijay is comfortable using IDX Workbench, but what about IDX Build Tool? He wants to know more about it to help him be a star in his role.
Let’s help Vijay learn even more about both tools.
IDX Workbench and IDX Build Tool use the same functionality to export and deploy metadata fast, but IDX Workbench is a UI that works on top of the Build Tool. When you look at the tools in the context of an actual deployment pipeline, you can see the differences. For example, the way you commit changes to source control is different for each tool.
Developers like Vijay, who prefer a command-line tool, enjoy IDX Build Tool because it’s more configurable than IDX Workbench. With IDX Build Tool, they can run automation in environments like Jenkins. Other less technical users prefer the handy UI of IDX Workbench because they can use clicks to send commands to IDX Build Tool for processing.
The Tools in Practice
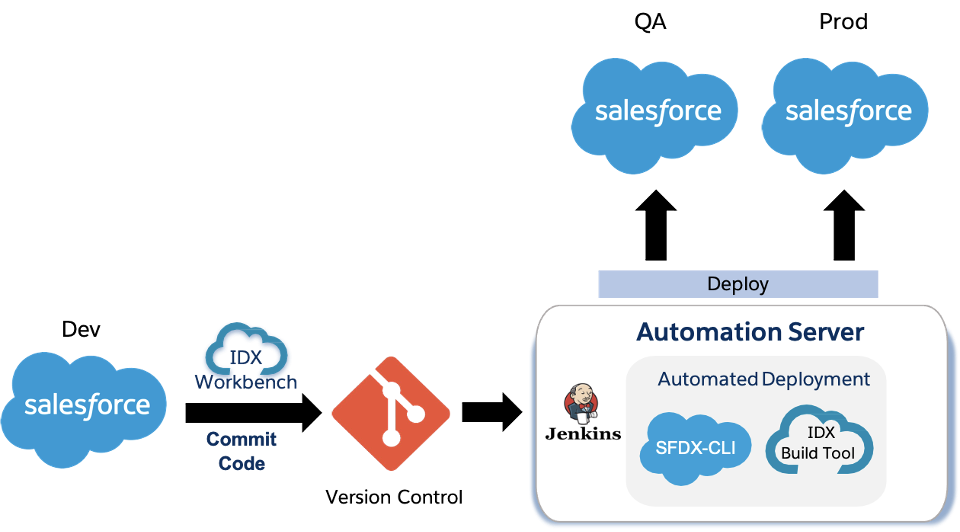
In an actual project lifecycle, developers use Salesforce metadata and OmniStudio DataPacks to write the project code in a development org. Next, they use IDX Workbench to commit the code to a version-management system, such as a Git repository. Once all the code is checked into the repository, an automation server, such as Jenkins, helps deploy the changes. The automation server uses IDX Build Tool and the SFDX-CLI (Salesforce Command Line Interface) for automated deployment. Depending on the product release, the automation server deploys code changes to different testing and production environments.
Both IDX Workbench and IDX Build Tool are powerful metadata migration tools that support code deployment in their own unique way. IDX Build Tool gives Vijay super-strength to commit changes to source control, while a business consultant in another team uses the IDX Workbench desktop application to point and click to deploy an application. In addition, IDX Build Tool is great for developers who prefer performing migrations from their PC or DevOps teams who need to integrate code with their CICD (Continuous Integration and Continuous Deployment) applications.
The light shines on Vijay, as he now understands the role of the data migration tools. Now he’s ready to get hands-on with IDX Build Tool. So, without further delay let’s help him get started.
Get Started with IDX Build Tool
IDX Build Tool is a Node.js command-line tool that Vijay can use to export and deploy OmniStudio DataPacks and Salesforce metadata in a source-control-friendly format through a YAML (YAML Ain’t Markup Language) manifest describing his project. The main purpose of IDX Build Tool is to enable continuous integration of OmniStudio metadata to source control.

To get started with IDX Build Tool:
- Download and install Node at https://nodejs.org/. The tool requires Node Version 10+.
- Install IDX Build Tool through NPM. NPM is the package manager for the Node JavaScript platform, which you use to publish, discover, install, and develop Node programs.
Use this command to install IDX Build Tool:
npm install --global vlocity
Once you’ve successfully installed the tool, it’s time to use it. First, let’s understand the main file types you need to work with.
Property File
Just like any other data-migration tool, IDX Build Tool requires you to define the source, target, and components you want to migrate. You define these elements using a Property file and a Job file.
A Property file contains the credentials of the org you want to use. You need to save the file using the .properties extension.
You can create your own Property file using the following syntax.
sf.username = < Salesforce Username >
sf.password = < Salesforce Password + Security Token >
sf.loginUrl = < https://login.salesforce.com or https://test.salesforce.com for Sandbox >
When migrating data between two orgs, you should have two named Property files, for example, build_source.properties and build_target.properties.
Job File
Use a Job file to define the project location and the various settings required to export and deploy DataPacks. You need to save a Job file using the .yaml extension.
A Job file contains two parts.
- projectPath
- queries
The projectPath specifies the folder that contains your project. It can be the absolute path to a folder or the relative path from where you run the project set-up command. The queries part is a Salesforce SOQL query that returns the Ids of the records you want to export.
Let’s look at a simple example of a Job file used to set up a project.
projectPath: ./Exportfile1
queries:
- VlocityDataPackType: Data Mapper
query: Select Id from %vlocity_namespace%__DRBundle__c where Name LIKE '%Team' LIMIT 1
This explicit query exports a Data Mapper OmniStudio DataPack by querying the SObject table for Data Mapper DRBundle__c and also supports the LIMIT 1 and LIKE syntax.
Salesforce has defined full queries for all supported DataPack types, which export all currently active Vlocity metadata. To export all Data Mappers and OmniScripts from an org, use this predefined query.
projectPath: ./Exportfile1
queries:
- Data Mapper
- OmniScript
This syntax is defined in lib/querydefinitions.yaml and loads the following explicit queries.
queries:
- VlocityDataPackType: Data Mapper
query: Select Id, Name from %vlocity_namespace%__DRBundle__c where %vlocity_namespace%__Type__c != 'Migration'
- VlocityDataPackType: OmniScript
query: Select Id, %vlocity_namespace%__Type__c,  %vlocity_namespace%__SubType__c, %vlocity_namespace%__Language__c from %vlocity_namespace%__OmniScript__c where %vlocity_namespace%__IsActive__c
= true AND %vlocity_namespace%__IsProcedure__c = false
Using predefined queries is the simplest way to define your Job file queries.
DataPack Key-Based Export
You can export DataPacks using their unique VlocityDataPackKey, which is the same as the name of the folder to which you export the DataPacks. For Product2 DataPacks, the VlocityDataPackKey is built using the vlocity_namespace__GlobalKey__c.
Let’s look at this Product2 example.
{
"%vlocity_namespace%__GlobalKey__c": "7e0b4fa5-4290-d439-ba96-f1a1c3708b0b",
"Family": "Phones",
"IsActive": true,
"Name": "iPhone 6s Plus",
"VlocityDataPackType": "SObject",
"VlocityRecordSObjectType": "Product2"
}
Here, the VlocityDataPackKey is:
Product2/7e0b4fa5-4290-d439-ba96-f1a1c3708b0b
The key is the same as the folder name of the Product2 DataPack when saved to the file system. The GlobalKey__c of Product2 must be a unique field, and the folders must also have unique names.
The Job file supports some additional Vlocity Build options available to the DataPacks API, such as the Manifest option. You can use the manifest section of the Job file to create a collection of DataPacks for export or deployment. Manifests are based on the VlocityDataPackKey of each DataPack.
By using the VlocityDataPackKey in the Manifest of the Job file, you can export the product along with all its dependencies.
projectPath: ./Exportpath1
manifest:
- Product2/7e0b4fa5-4290-d439-ba96-f1a1c3708b0b
For more details on a Manifest-driven export, refer to the Resources section of this unit.
IDX Build Tool Commands
IDX Build Tool uses a number of commands to run various processes. To view a list of available commands, use vlocity help. This command displays the installed IDX Build Tool version along with all the commands.

In this section, we look at some of the commands used during data migration.
|
Command |
Description and Syntax |
|---|---|
|
packExport |
Retrieves all Vlocity Metadata from an org in Vlocity DataPacks, as defined in the Job file, and writes it to the local file system in a version-control-friendly format. SYNTAX:
|
|
packDeploy |
Deploys all contents in the projectPath of the Job file to a Salesforce org. SYNTAX:
|
|
cleanOrgData |
Runs a script to find and eliminate bad data in an org. It adds a Global Key to any SObject without one and deletes stale data records that are missing data to clean it and make it more usable SYNTAX:
|
|
validateLocalData |
Finds and fixes issues in the local data files, such as missing and duplicate Global Keys. SYNTAX:
|
|
packRetry |
Restarts the job that was previously running and sets all errors back to ready to deploy again. SYNTAX:
|
|
packGetDiffsAndDeploy |
Finds all files that are different locally from the target org and then deploys only the DataPacks that have changed or are new. SYNTAX:
|
|
refreshProject |
Rebuilds folders for the data in the projectPath. Additionally, resolves any missing references between the files to ensure they deploy in the correct order. SYNTAX:
|
Use the following commands to prepare, export, and deploy your data.
# Source Org
vlocity -propertyfile <filepath>-job <filepath> cleanOrgData
vlocity -propertyfile <filepath>-job <filepath> packExport
vlocity -propertyfile <filepath>-job <filepath> packRetry # If any errors
# Target Org
vlocity -propertyfile <filepath> -job <filepath> cleanOrgData
vlocity -propertyfile <filepath> -job <filepath> packDeploy
vlocity -propertyfile <filepath> -job <filepath> packRetry # If any errors
Once you’ve run the commands with success, you’re finished migrating the data.
Conclusion
This unit showed Vijay how to use IDX Build Tool, including the basic features and commands. For more in-depth knowledge on IDX Build Tool commands and advanced features, see the Resources section of this unit.
No licenses are required to use IDX Workbench or IDX Build Tool. Developers, like Vijay, can take full advantage of the tools for seamless metadata migration between environments.