Extract Data from Salesforce Objects
Learning Objectives
After completing this unit, you’ll be able to:
- Build a Data Mapper Extract with relationship queries in Omnistudio for Managed Packages.
- Build an Integration Procedure to get data from a parent sObject.

Before You Start
Before you start this module, consider completing this recommended content.
-
Omnistudio Data Mappers in Omnistudio for Managed Packages
-
Integration Procedures in Omnistudio for Managed Packages
-
Branching Omniscripts in Omnistudio for Managed Packages
Get Internal Data for an Omniscript
Imagine that you design a guided interaction for customer service reps to update, change, or create a primary contact for an account. You also want it to show different fields when the customer service rep selects different options. The interaction might look something like this.
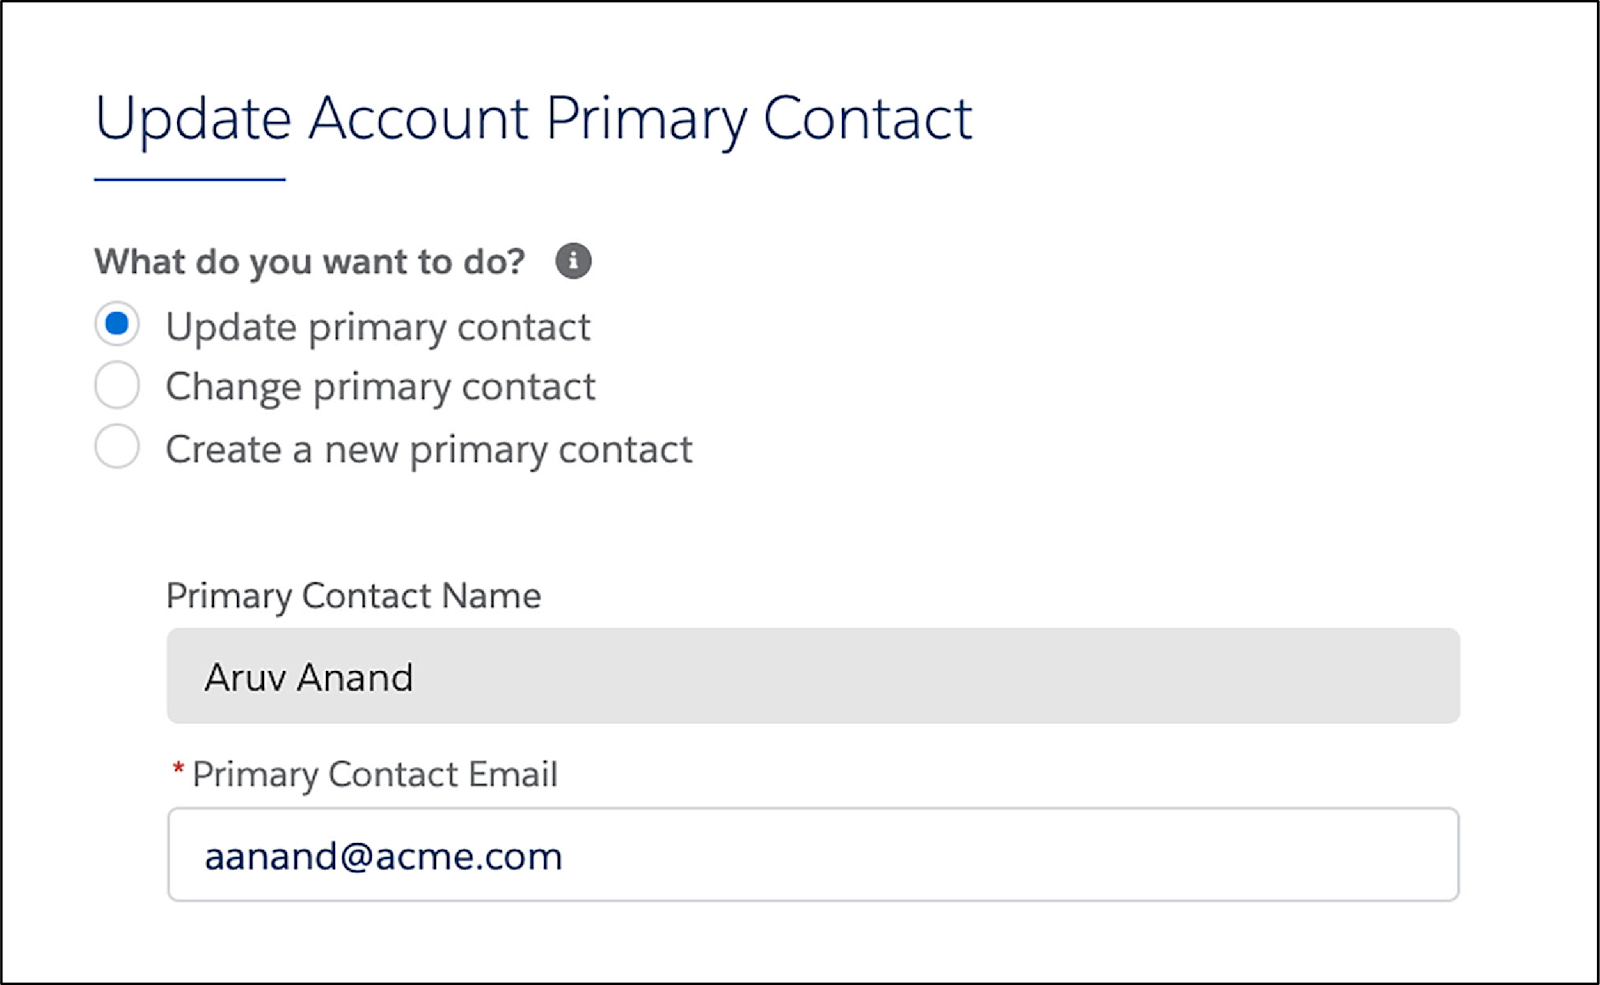
How does the data appear in the fields shown in this interaction? And how is the data saved once it is updated?
This is where Omnistudio Data Mappers and Integration Procedures enter the Omnistudio for Managed Packages story.
One of the main characters in this story is the Data Mapper Extract. In this example, a Data Mapper Extract retrieves data from the Account and Contact objects in Salesforce. Then, one of three different Data Mapper Loads saves the data updates to these objects. An Integration Procedure uses conditional actions to determine which of the Data Mapper Loads to execute.
A basic Data Mapper, such as a Data Mapper Turbo Extract, pulls data from one Salesforce object (sObject) in your org at a time. The more powerful Data Mapper Extract does this, too. However, a Data Mapper Extract can also pull data from multiple sObjects.
In our example Omniscript, you want to pull primary contact data from both an account and a contact. This data is stored in two sObjects: Account and Contact. To pull data to this Omniscript, you need to use a Data Mapper Extract.
You do that in the next section, then later in this module you’ll learn other ways to get data from Salesforce and save changes back to your org.
Build a Data Mapper Extract with Relationship Queries
Client applications often need to query more than a single object at a time. SOQL provides syntax to support these types of queries, called relationship queries, against standard objects and custom objects. Relationship queries traverse parent-to-child and child-to-parent relationships between objects to filter and return results.
Here’s to build a Data Mapper Extract with relationship queries.

- When creating the Data Mapper Extract, enter a descriptive name for the Data Mapper Interface Name field (1). Here are some best-practices for naming Data Mappers:
- Follow a prefixVerbObjectDetail format, such as
teamGetPriContactDetails.
- Begin with a lowercase letter for Lightning web component compatibility
- Use camelCase to facilitate reading.
- Select Extract as the Interface Type (2).
- Select JSON (JavaScript Object Notation) for the Input Type (3) and Output type (4) because you’re pulling data for an Omniscript.
Next, use tabs in the Data Mapper Designer to specify what you want the Extract to do. Here are the tabs you’ll use.
- Extract
- Output
- Preview
Let’s explore these tabs in more detail.
Extract Tab
In the Extract tab, specify the sObject you want the Data Mapper to query, set the filters that determine the data retrieved from the object, and specify the fields to extract.
In the example Omniscript, you want to extract data from the Account object.

- The Extract Output Path (1) specifies the top-level JSON node in the output. Because this is typically the same as the source object, select Account.
- Create a filter to determine the data to be read. A filter consists of three fields. The first field (2) refers to a field of the source object, the second field (3) is a comparison operator. The third field (4) is a quoted literal value, input parameter, or another field of the same source object. To retrieve data for the Update Account Primary Contact Omniscript example, the filter would be
Id = AccountId.
Output Tab
In the Output tab, you map data from the extract step JSON to the output JSON.

- Click the grey plus icon (1) to add an empty mapping to the list.
- In the Extract JSON Path field (2), select the source field from the extract step JSON.
- In the Output JSON Path field (3), specify the output path you want.
This Data Mapper now extracts data from the Account object. Extracting data from a single object type requires only one extract step. However, the Data Mapper also needs to extract primary contact data—such as the contact’s name, email address, and phone number—from the Contact object.
To do this, instead of adding Contact as a second sObject in the Data Mapper’s Extract tab, use relationship notation in the Extract JSON Paths for the parent sObject’s fields.
Relationship notation in Data Mappers is based on relationship queries in Salesforce. Using them to filter and return results improves the performance of Data Mappers that retrieve data from objects related to the primary sObject.
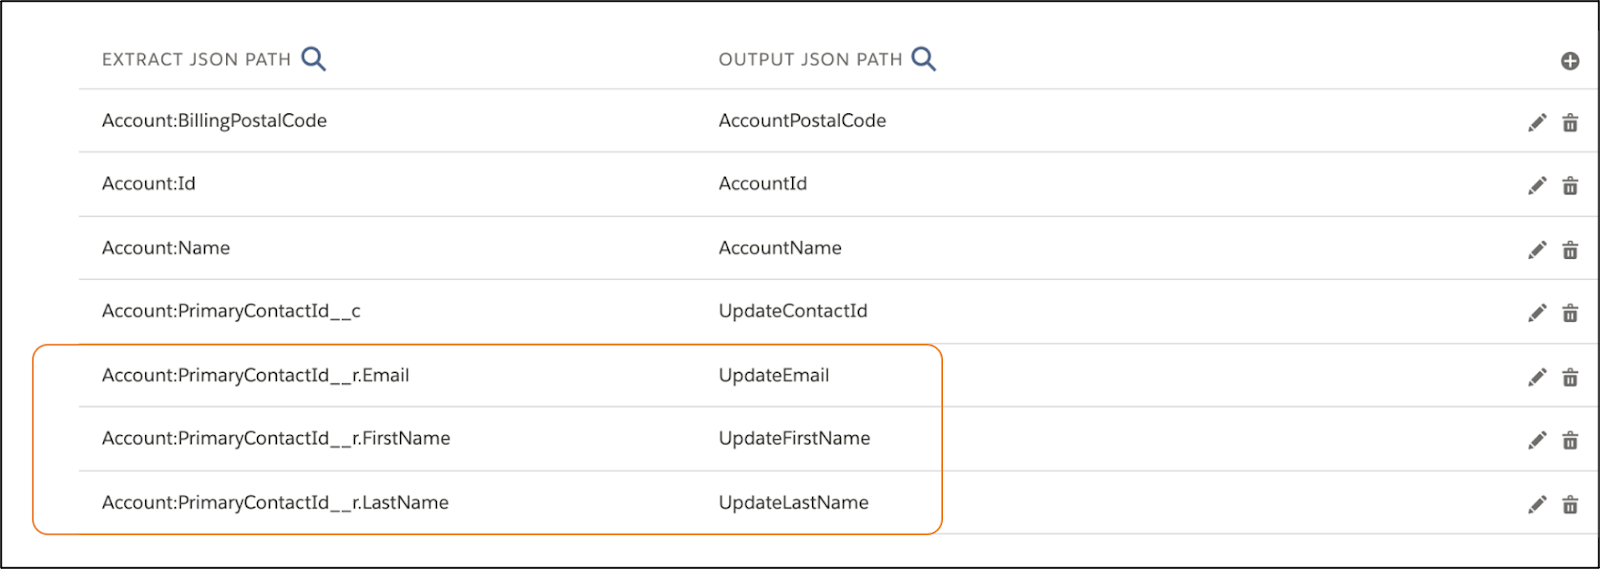
Let’s look at how to configure relationship queries in a Data Mapper. The Primary Contact ID field appears four times in the Extract JSON Path.
- The first reference is
Account:PrimaryContactId__c, the Primary Contact field on the Account object.
- The other three references are fields in the Contact object:
Account:PrimaryContactId__r.EmailAccount:PrimaryContactId__r.FirstNameAccount:PrimaryContactId__r.LastName
The r. creates a relationship query within the Salesforce Object Query Language (SOQL) query of the Data Mapper to pull any field of the related Contact sObject.
Preview Tab
You can test the input and output of the Data Mapper using the Preview tab.
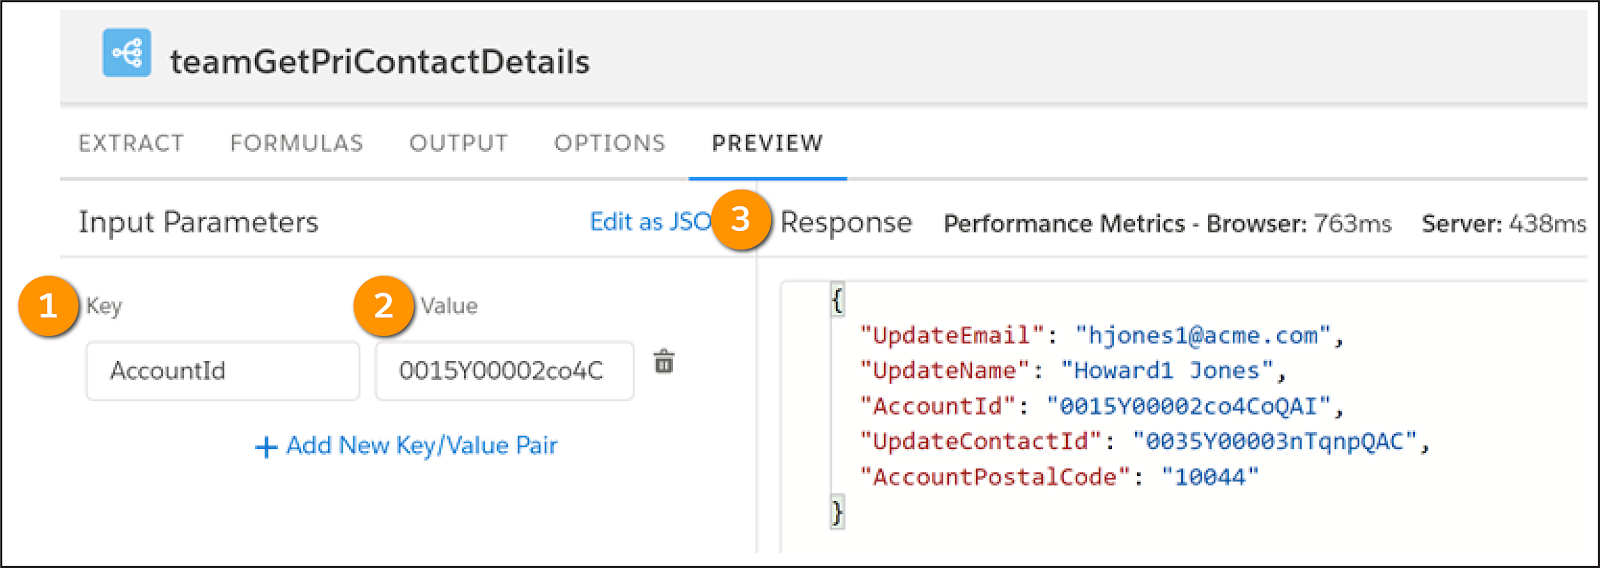
Specify a key-value pair in the Input Parameters panel (1), such as AccountId for the Key and an account’s RecordId for the Value (2). When you execute the Data Mapper Extract, the Response pane (3) returns results to confirm it's extracting data correctly.
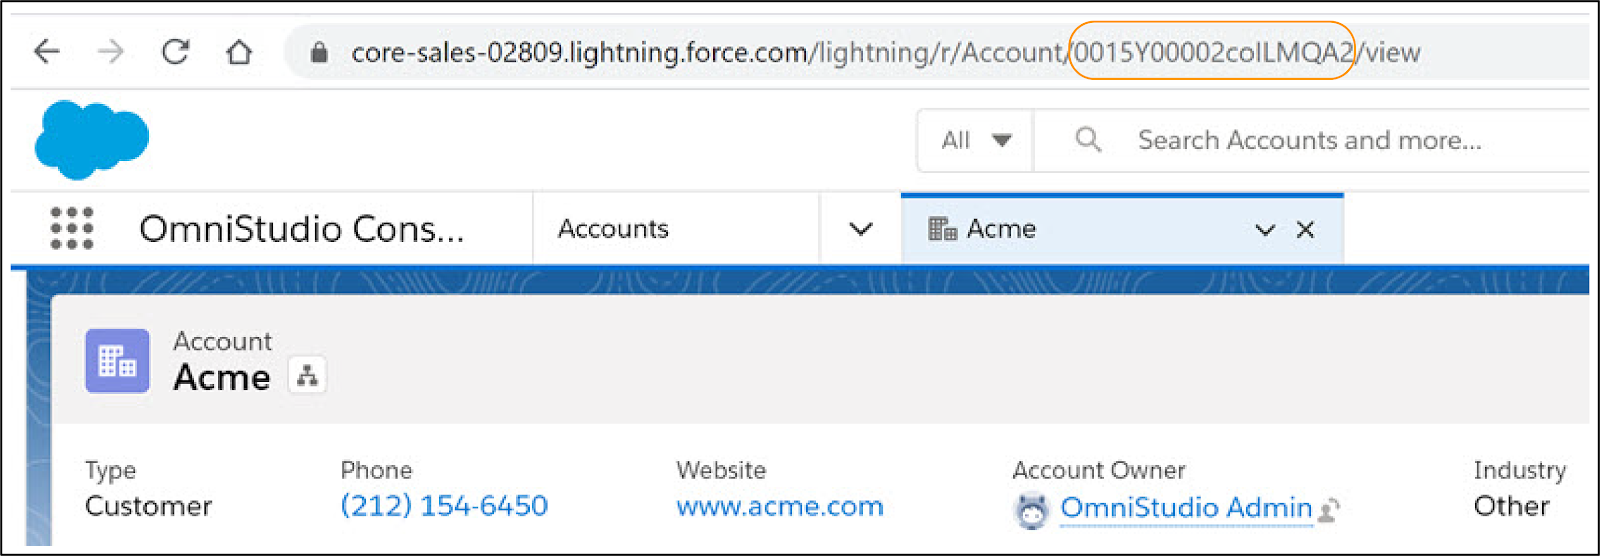
All records in Salesforce have a unique RecordId, which you need to preview the Data Mapper. To find a RecordId for an account, open any Account record in your org and copy the RecordId from the URL.
Now that you built a Data Mapper Extract, connect it to an Integration Procedure, which is connected to the Update Account Primary Contact Omniscript.
Get Data from a Parent sObject with an Integration Procedure
After building your Data Mapper Extract, the next step is to build an Integration Procedure that passes data from the Data Mapper to the Omniscript.

- In the Integration Procedure, drag a Data Mapper Extract Action from the Available Components panel to the Structure panel.
- Give it a name that describes its purpose, such as
DRGetPriContactDetails(1).
- In the Data Mapper Extract Action’s Properties panel, select the Data Mapper Extract you want to use in the Data Mapper Interface field (2).
- Under Input Parameters (3), add
AccountIdas the Data Source and Filter Value. AccountId is an arbitrary name for the RecordId, but it must be the same in each of the elements in order for the data to flow properly between them and Salesforce.
After you add a Response Action to tell the Integration Procedure what data to send back to the Update Account Primary Contact Omniscript, you’re ready to test the Integration Procedure.
In the Integration Procedure’s Preview tab, follow the same steps you took in the Data Mapper’s Preview tab.

- In the Input Parameters panel, specify AccountId for the Key (1) and an account’s RecordId for the Value (2).
- Click Execute (3) to run the Integration Procedure.
- The Response pane (4) returns results to confirm it's extracting data correctly.
The Preview tab includes a debug log, which identifies any issues with the output and input for each element in the Integration Procedure. To make sure the Data Mapper is connected to the Integration Procedure, select DRGetPriContactDetails and confirm that the account information displays.

If everything is correct, you can activate this version of the Integration Procedure. This makes it available for use by the Update Account Primary Contact Account Omniscript.
After you add the Integration Procedure to the Omniscript, use the Omniscript’s Preview tab to confirm it’s working.
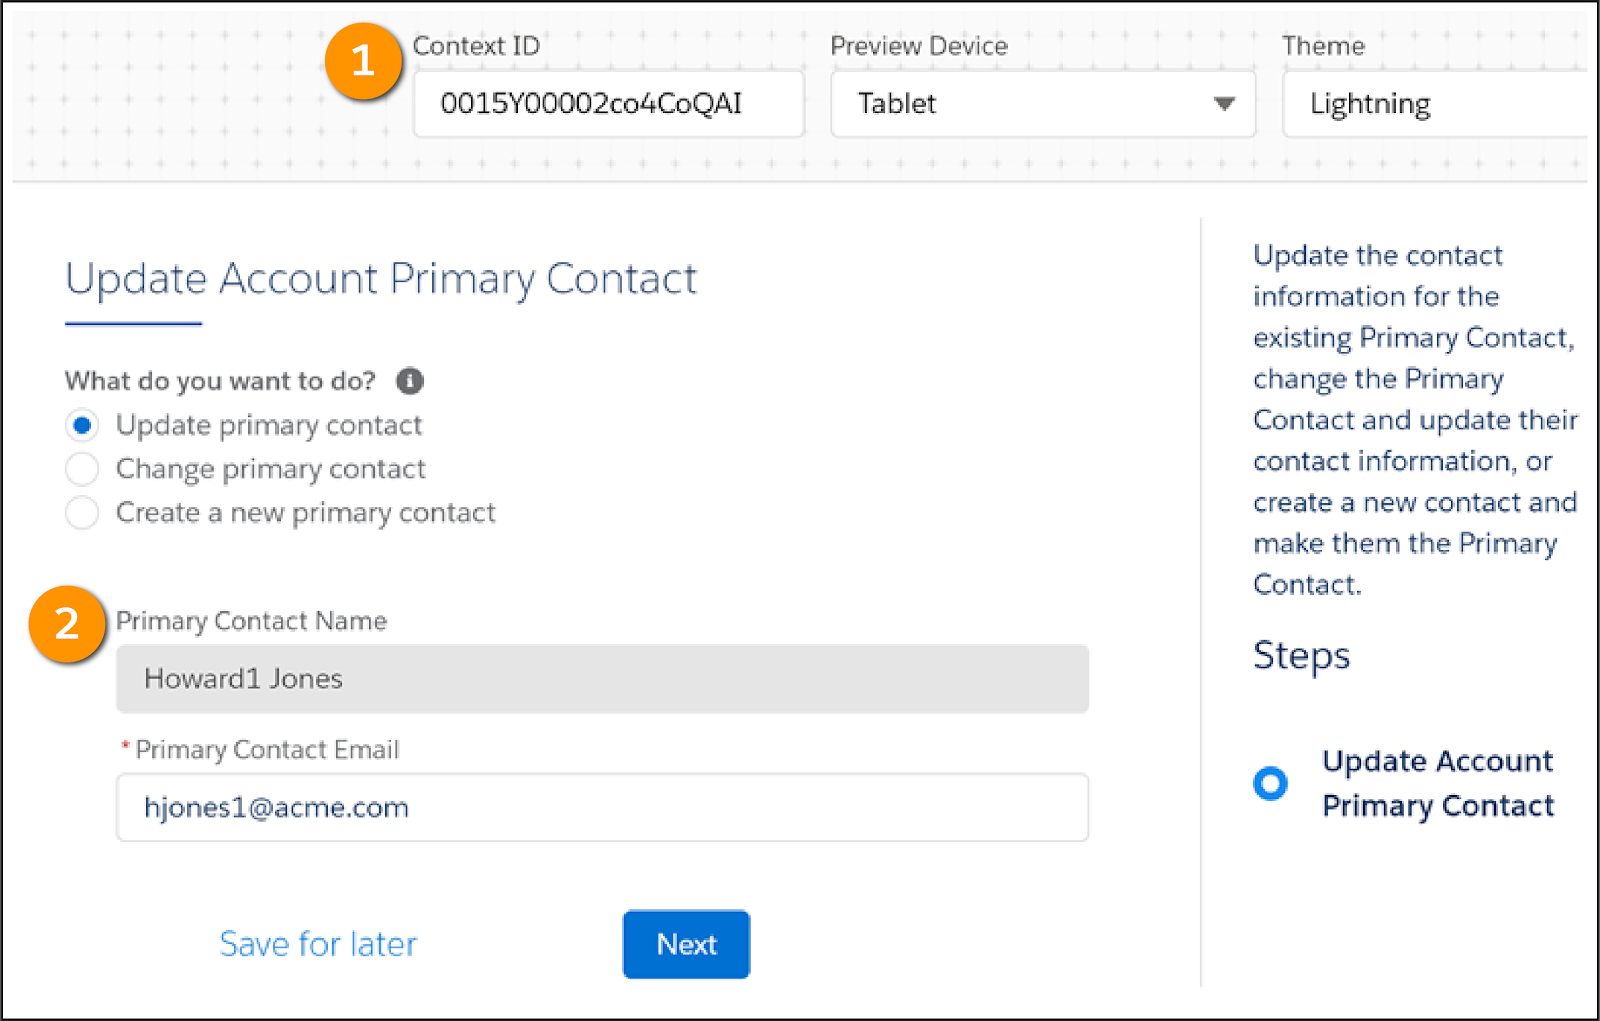
Enter the RecordId into the Context ID field (1). The existing Primary Contact is displayed (2).
Now that you know how to extract Primary Contact data from Salesforce for an entire Omniscript, head to the next unit to learn how to extract data for a Type Ahead Block within the Omniscript.
Resources
- Salesforce Developers: Relationship Queries
- Salesforce Help: Omnistudio Data Mapper Extract Overview (Omnistudio for Managed Packages)
- Salesforce Help: Omnistudio Data Mapper Extract Action for Integration Procedures (Omnistudio for Managed Packages)
- Trailhead: Omniscripts in Omnistudio for Managed Packages
- Trailhead: Integration Procedures in Omnistudio for Managed Packages
- Trailhead: Omnistudio Data Mappers in Omnistudio for Managed Packages
- Trailhead: Branching Omniscripts in Omnistudio for Managed Packages