Combine Internal Data for Flexcards
Learning Objectives
After completing this unit, you’ll be able to:
- Describe the data sources for Flexcards in Omnistudio for Managed Packages.
- Describe JSON nodes and subnodes.
- Build with multiple nodes in the JSON output.
Data Sources for Flexcards
For the most part, Flexcards work with Omnistudio data tools in the same way that Omniscripts do. Plus, it’s possible to connect the same Integration Procedure or Data Mapper to more than one Omnistudio component. In this unit, we show how these Omnistudio data tools combine data for more than one Flexcard.
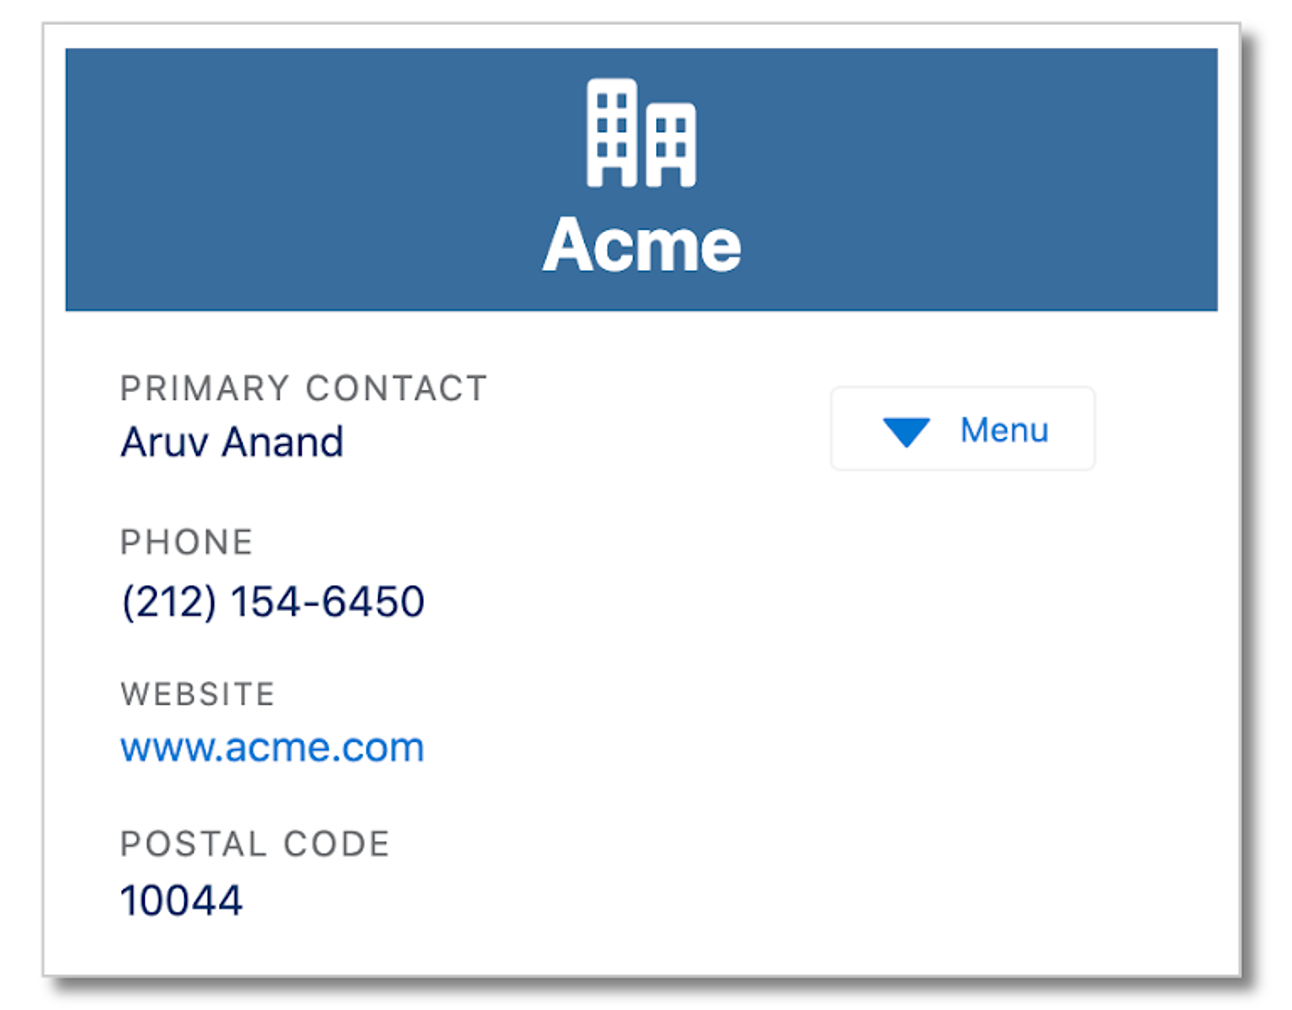
Here’s an account Flexcard that displays the account’s name, primary contact, phone number, website, and postal code.
And here’s a contact Flexcard that displays the account’s related contacts, including their names, email addresses, and phone numbers.

How can you retrieve data for both of these Flexcards using a single Integration Procedure?
Let’s start by examining the data sources available for Flexcards. There are several data input options for a Flexcard. When it comes to inputting data, using an Integration Procedures is best practice because Integration Procedures separate the data configuration from the Flexcard configuration. You can learn more about this in the Integration Procedures in Omnistudio for Managed Packages module.
However, there are a few scenarios where using an Integration Procedure isn't the recommended data source.
Data Source |
When to Use This Data Source |
|---|---|
Streaming API |
For automatic updates when data changes |
Salesforce Object Search Language (SOSL) |
For text field searches across Salesforce objects |
Sample |
For display or testing of static data |
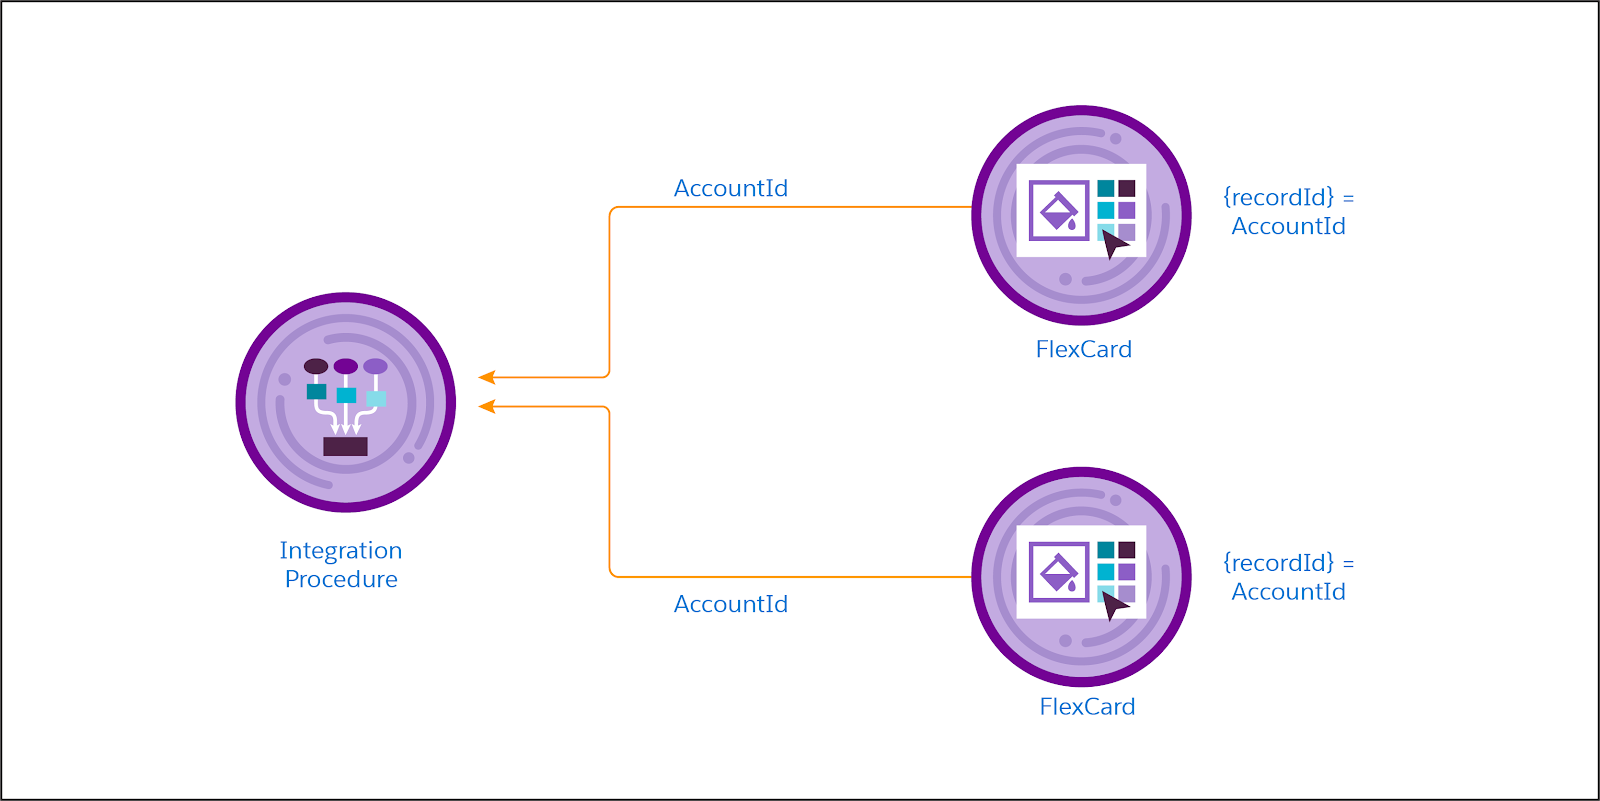
When an account-based Flexcard displays on a console, the account RecordId passes to the Flexcard on a variable called {recordId}. You pass this to an Integration Procedure via a variable named AccountId. All of these variable names are arbitrary but must match for the data to flow correctly.
The Integration Procedure passes the AccountId to a Data Mapper Extract. The Data Mapper Extract then uses the AccountId to identify a unique Salesforce record, and through a series of Salesforce Object Query Language (SOQL) queries, requests data from Salesforce. These queries return the AccountId and other fields from the Account record and other fields from associated Contact records.
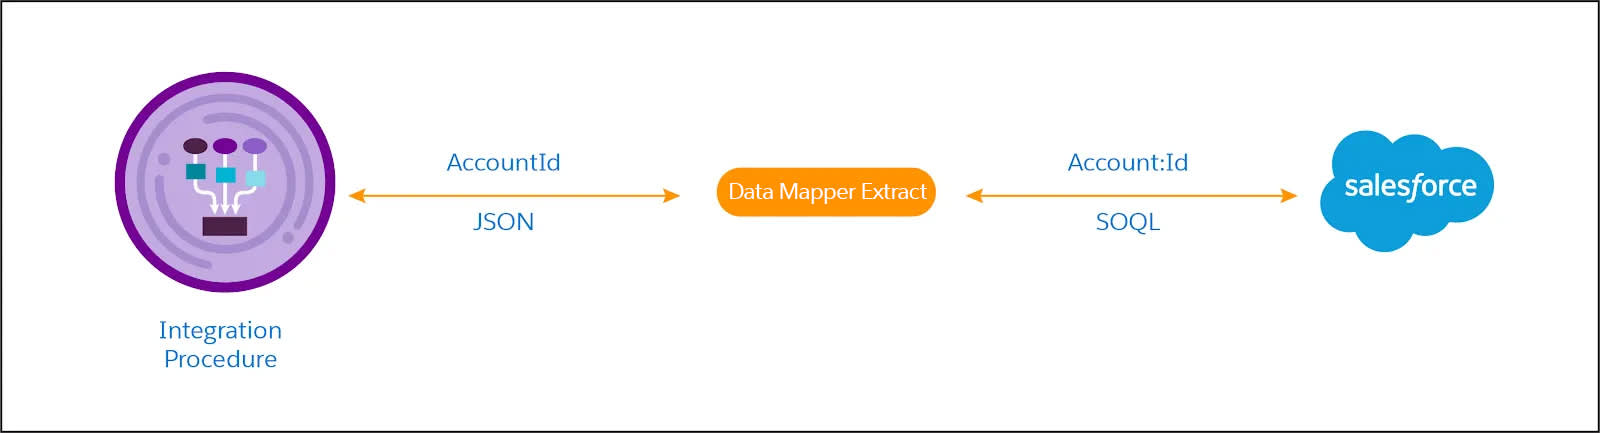
The Data Mapper maps and returns the data to the Integration Procedure, which then passes it back to the Flexcard. This JSON populates the Flexcard and any child Flexcards with the data that end users see on the console.

What Are JSON Nodes and Subnodes?
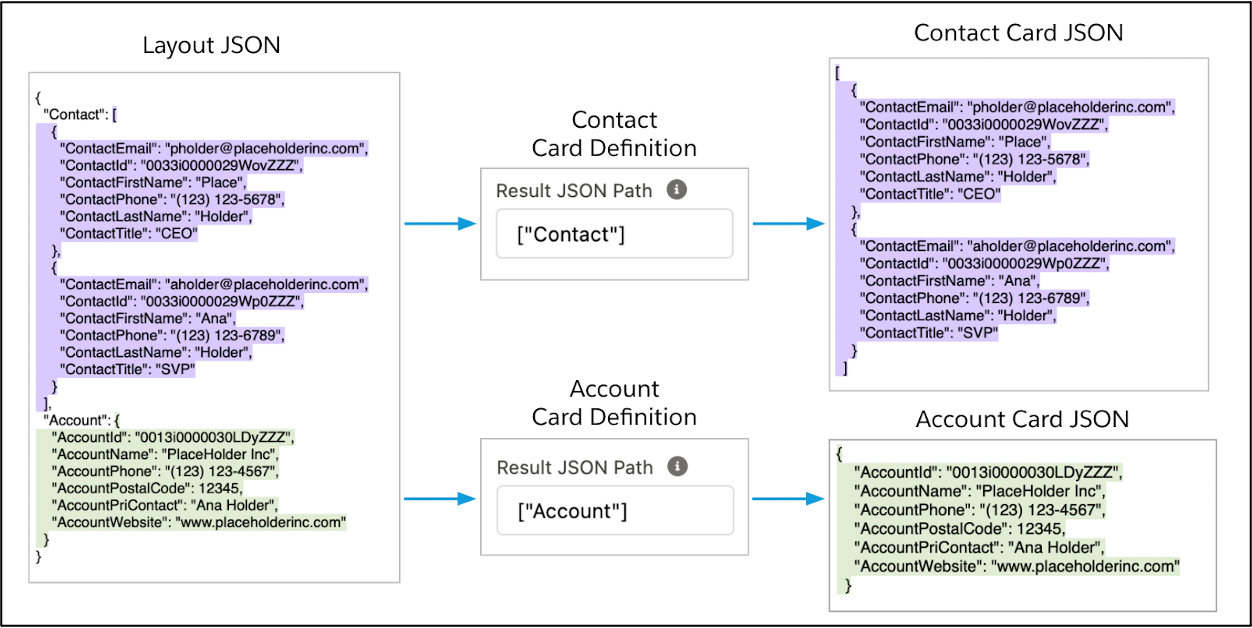
Data in a JSON is divided into nodes and, sometimes, subnodes.

The JSON data below has two nodes: Account data (1) and Contact data (2). Each node is set off by a colon (:) and curly brackets ({ }). Additionally, the Contact node has two subnodes—one for each Contact (3). Each of these is set off by a curly bracket.
The JSON structure that best supports use on multiple Flexcards uses parent nodes for each Flexcard. Filtering the Result JSON Path trims the data and pulls only relevant data to the Flexcard.
Build with Multiple Nodes in JSON Output
Now that we’ve walked through Flexcard data sources and JSON nodes and subnodes, let’s start with the example Data Mapper Extract with multiple nodes.
The order of extract steps in a Data Mapper is important to refer to data from another step. In this Data Mapper’s Extract tab, you execute the following steps.
- Retrieve the account data.
- Retrieve contact data related to the account.
- Filter using a particular field on the account, in this example, the Primary Contact field. In a Data Mapper, you can use filter criteria from an object used in an earlier Extract step.
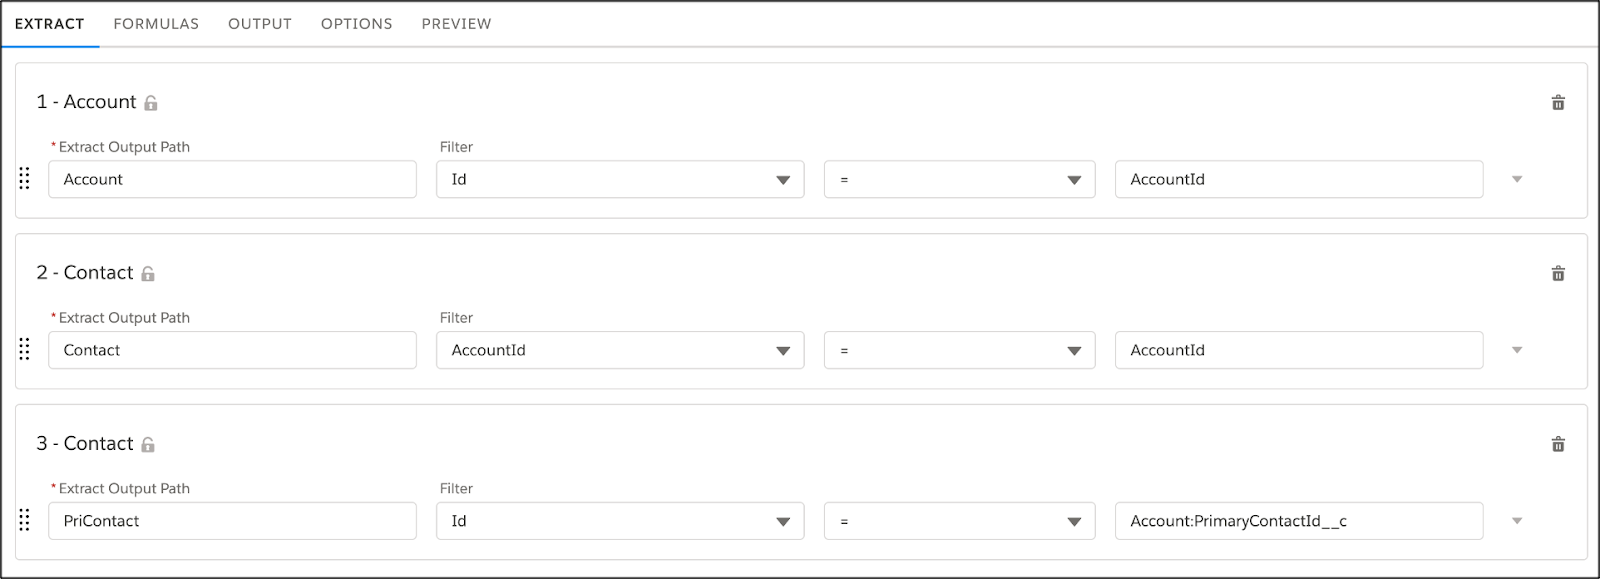
In the Output tab, create the mappings between the extract step JSON to the output JSON for both the Account and Contact objects.
To create a subnode, use a colon when mapping the Output JSON Path. For example, Account:AccountName and Account:AccountWebsite creates an Account node that lists the AccountName and AccountWebsite fields.

Now let’s take a look at how you configure the Integration Procedure.
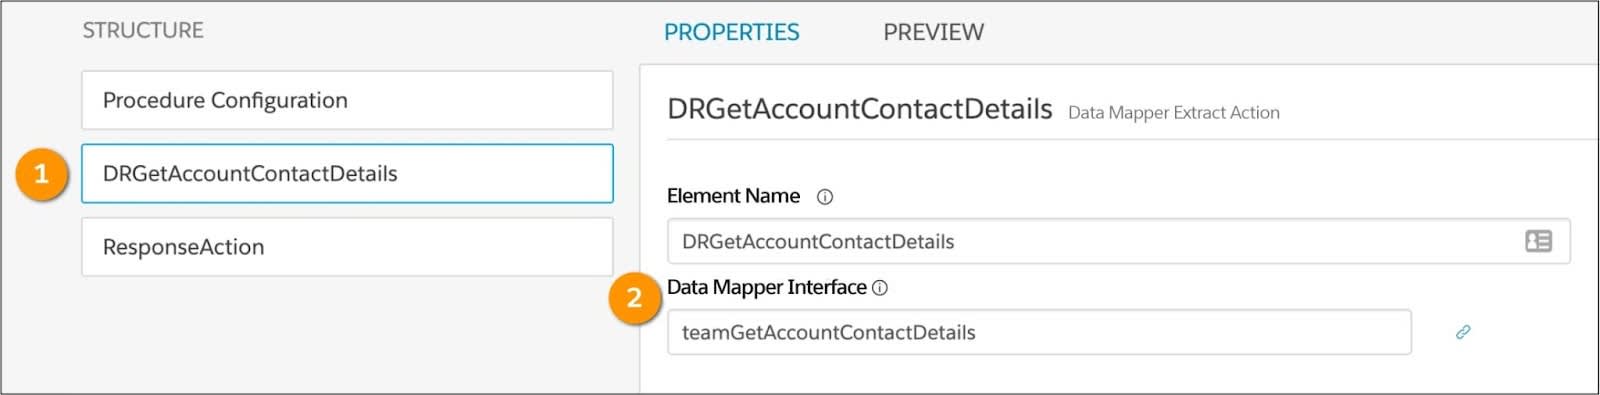
When you create an Integration Procedure, add a Data Mapper Extract Action (1) to the Structure panel. Use the Data Mapper Interface field (2) to connect the Integration Procedure and the Data Mapper.
Set the Integration Procedure as the data source for the Account and Contacts Flexcards, and now you have a single Integration Procedure that retrieves data for both the Account and Contacts Flexcards. Way to go!
You’re now familiar with how Omnistudio data tools handle internal data. To learn how these tools work with data from external sources, head to the Omnistudio for Managed Packages External Data Tools module.
Resources
- Salesforce Help: Configure an Integration Procedure Data Source on a Flexcard (Omnistudio for Managed Packages(
- Trailhead: Flexcards in Omnistudio for Managed Packages
- Trailhead: Omnistudio Data Mappers in Omnistudio for Managed Packages
- Trailhead: Integration Procedures in Omnistudio for Managed Packages
- Trailhead: Omnistudio for Managed Packages External Data Tools