Extract External Data with an Integration Procedure
Learning Objectives
After completing this unit, you’ll be able to:
- List potential external data sources for Flexcards and Omniscripts.
- Summarize how data flows in an Integration Procedure that extracts external data.
- Build a URL to pull external data with an API key.
- Add external data to an Integration Procedure.

Use External Data in Omnistudio
External data includes all data from outside a Salesforce org. When you need data that is not in Salesforce using Omnistudio for Managed Packages, you use an external data source. Displaying external data on a Flexcard or an Omniscript is a common need for most implementations.
External data sources include:
- Legacy data sources
- On-premises data sources
- API integrations
- Other third-party data and applications
Using a weather API is a great way to practice getting data via a web API. There are lots of use cases for weather because severe weather is an important factor for many industries. Examples include weather damage to homes for insurance companies and service outages due to inclement weather in the energy industry.

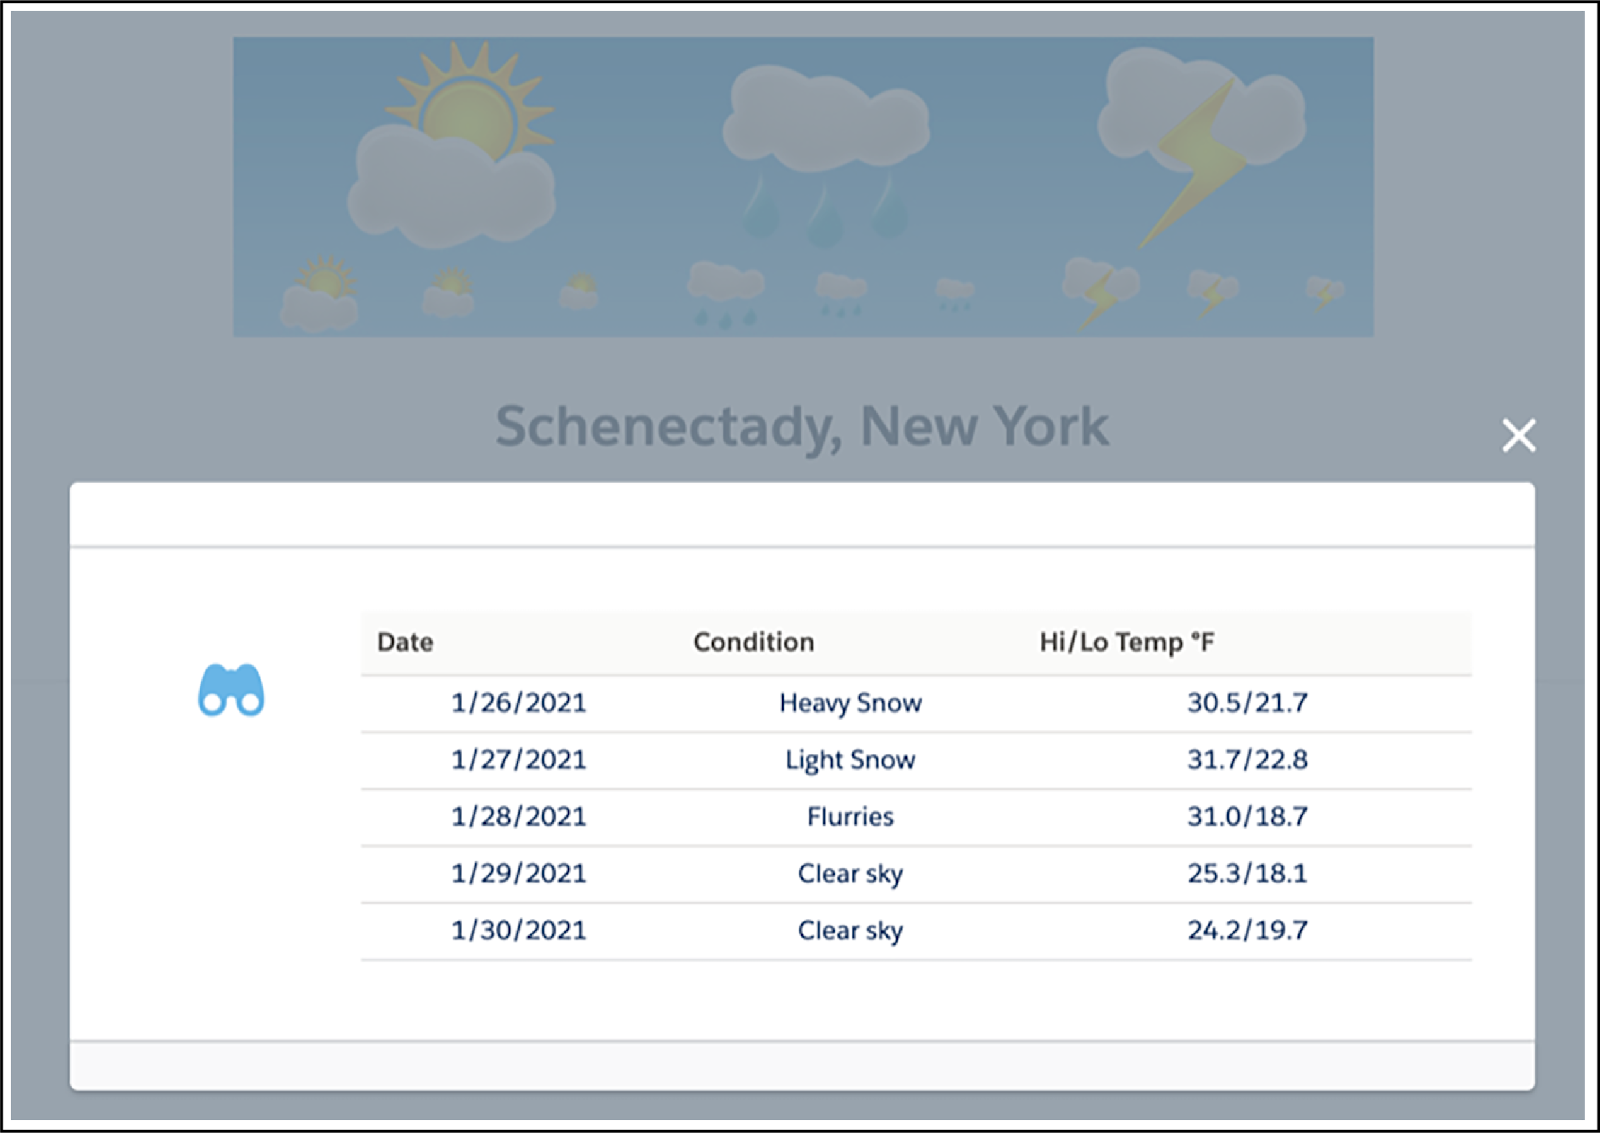
For example, the Flexcard here contains the current and forecasted weather for an account’s location, determined by the billing postal code. The current temperature and location displays on the parent Flexcard, and a flyout displays the forecast for the next 5 days.
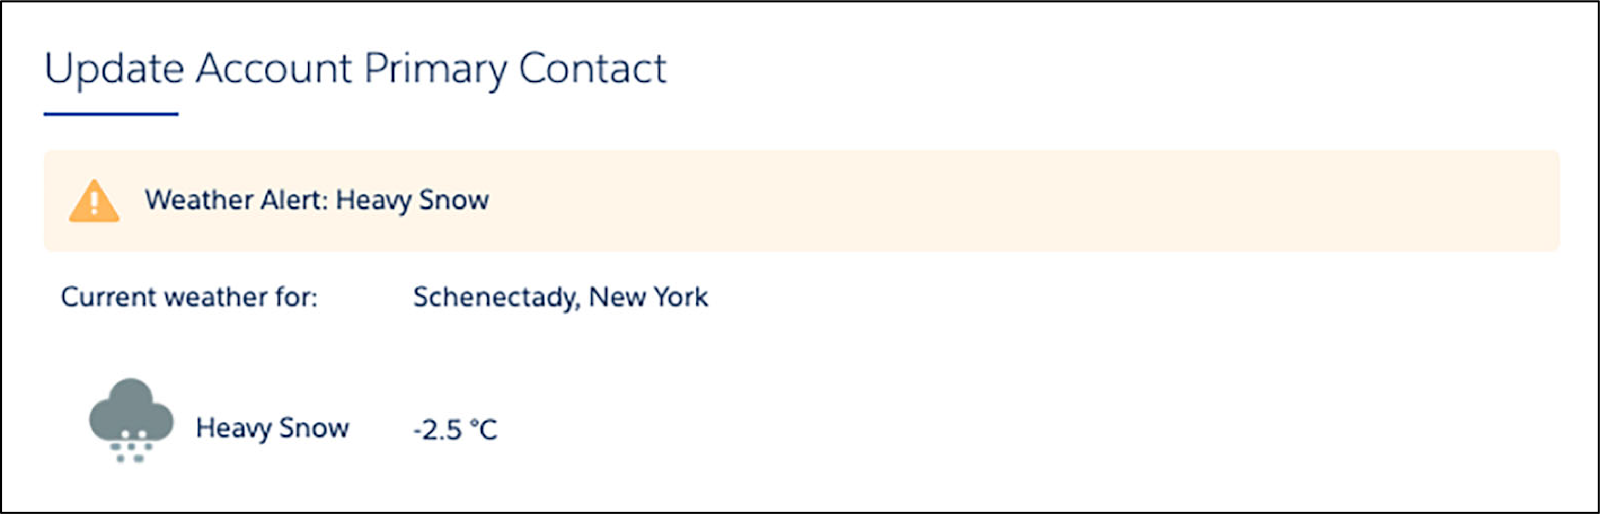
Also, the example Omniscript here displays the current weather for the account’s location and shows alerts if there are any hazardous weather conditions.
You know what’s cool? Both the example Flexcard and the example Omniscript use the same Integration Procedure. What’s more, the same Integration Procedure retrieves both internal and external data for the Flexcard and the Omniscript.
One of the reasons using Integration Procedures is a best practice for retrieving data is their ability to extract data from multiple sources. For example, you can extract data from your Salesforce org with one Integration Procedure element, then extract data from an external source with another Integration Procedure element.
When you want to extract data from an external source, use an API key to pull the data and then transform it before it returns to the tool (Flexcard or Omniscript) that called the Integration Procedure. In the weather example, you pull the account postal code, send it to an API to request both current and forecast data, then edit and trim that data.
The Data Flow for Extracting External Data
How does this work? Let's look at how data moves from a Flexcard or Omniscript to an Integration Procedure. Then, let’s examine how the data moves through the Integration Procedure and back to the Flexcard or Omniscript.
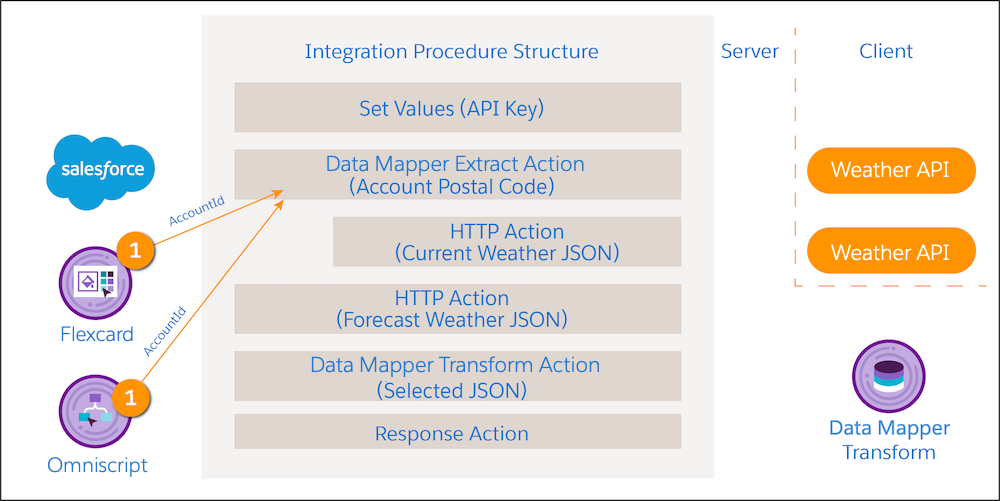
A Flexcard or an Omniscript sends an AccountId (1) to an Integration Procedure.
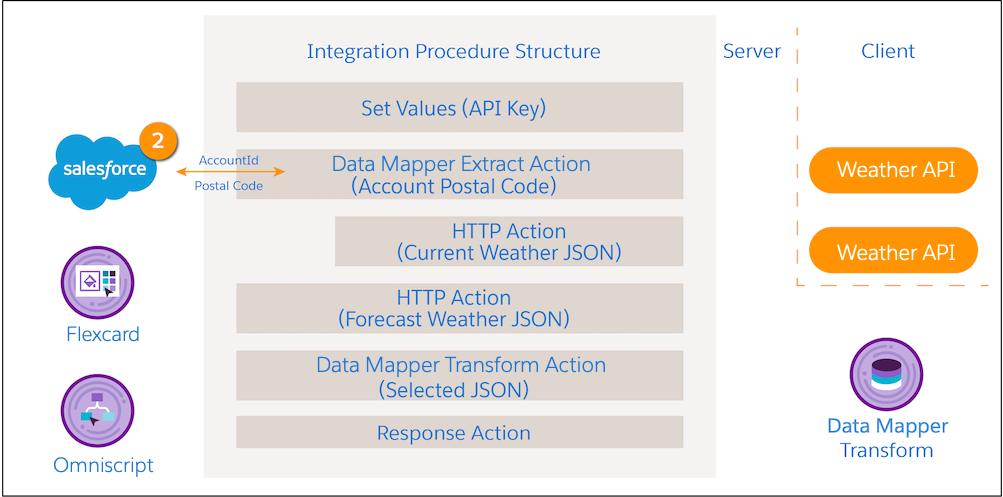
The Integration Procedure passes the AccountId to a Data Mapper Extract Action element that uses a Data Mapper Extract to extract the Account Postal Code from Salesforce and return it to the Integration Procedure (2).
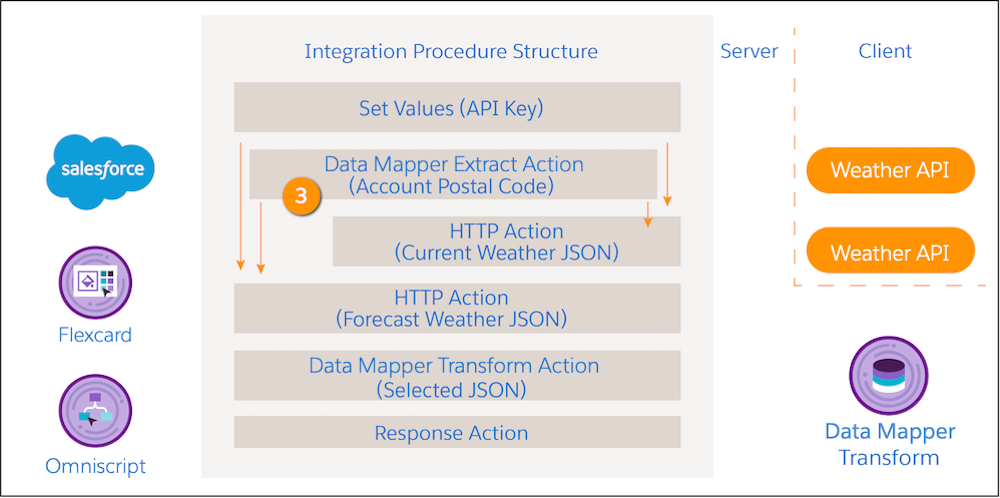
The Integration Procedure uses a Set Values element to hold an API Key. The Set Values element shares an API Key with two Hypertext Transfer Protocol (HTTP) Action elements. The Data Mapper Extract Action element shares the Account Postal Code with the two HTTP Action elements (3).
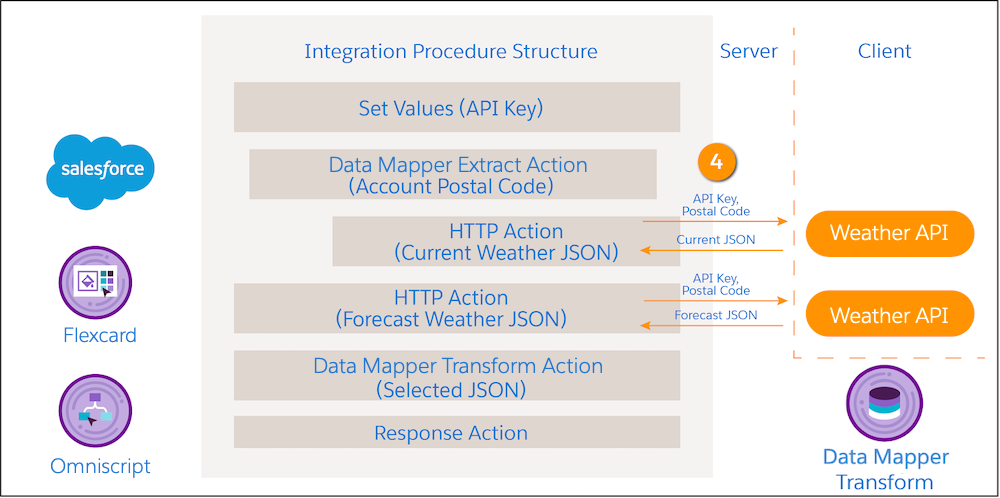
Both HTTP Action elements send the Account Postal Code (the account’s location) and the API Key to the weather API site. One Action receives a JavaScript Object Notation (JSON) with the current weather, and the other receives a JSON with five days of forecast weather data (4).
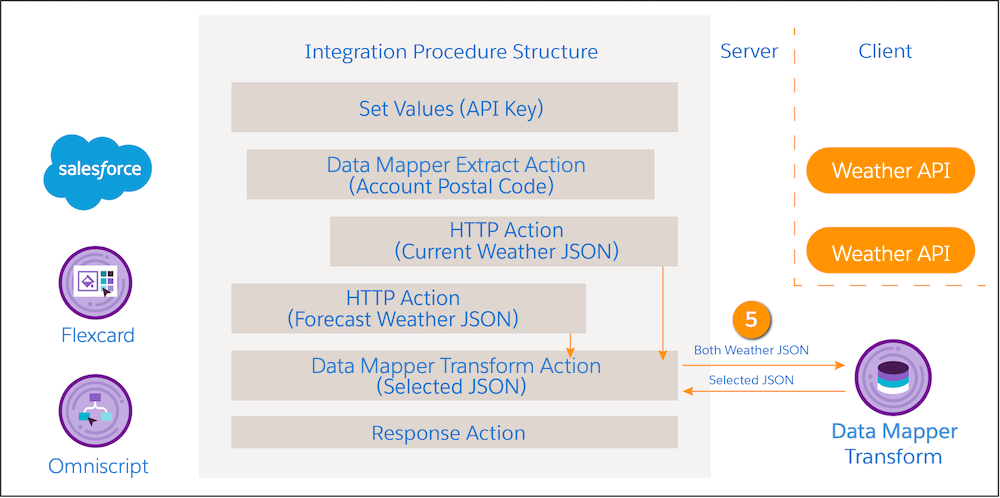
Both the current and forecast weather JSON are sent to a Data Mapper Transform (5), which trims and transforms the data, returning only a selected JSON.
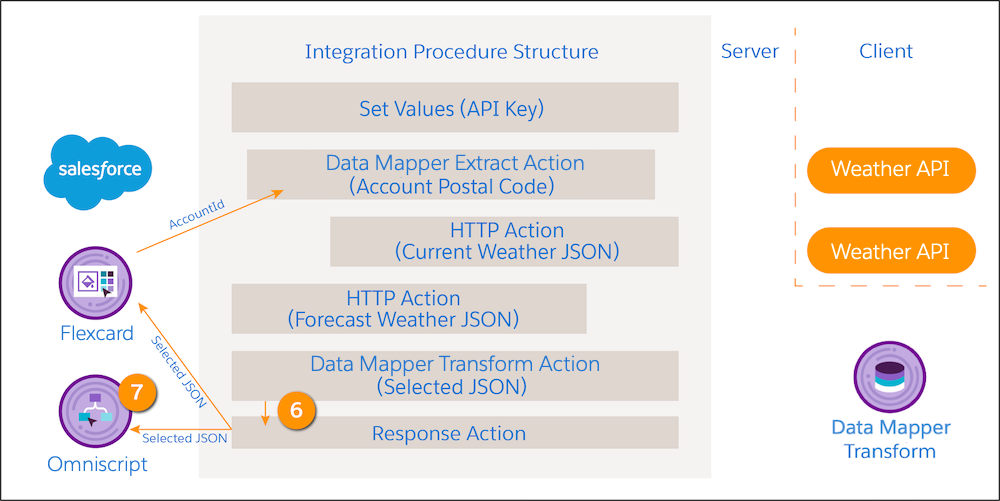
The selected JSON is sent to a Response Action element (6), which returns the selected JSON data to the Flexcard or Omniscript that called the Integration Procedure (7).
Pretty nifty, right?
Configure the Integration Procedure to Extract External Data
Before you build URLs to pull weather data, you must get an API key. Each site is different, so check with the API documentation to see how to configure your URL.
Then, as you set up your Integration Procedure to get data, use some of the other features in this powerful Omnistudio data tool. For example, you can:
- Use a Set Values element to store the API key.
- Configure the properties of the HTTP Action element to trim the JSON response.
It’s good practice to place the API Key in a Set Values element where it’s more visible, reduces calls to the client, and makes the Integration Procedure easier to maintain. Here’s how to add a Set Values element to store the API key.

Add a Set Values element (1) to the Structure panel of your Integration Procedure. Then use the Element Value Map section to save the API Key (2).
After you save the key here, replace the actual API key in the HTTP Action elements with %SVWeather:APIKey%, the name of the component and the element in that component.
This way, if the API key ever changes, you can edit only the one Set Values element. This makes it easier to maintain your Integration Procedure.
Speaking of making this easier, did you know you don’t need to pass on the entire JSON response that is sent from an API? That’s right! You can use the properties of the HTTP Action element to trim the data response.
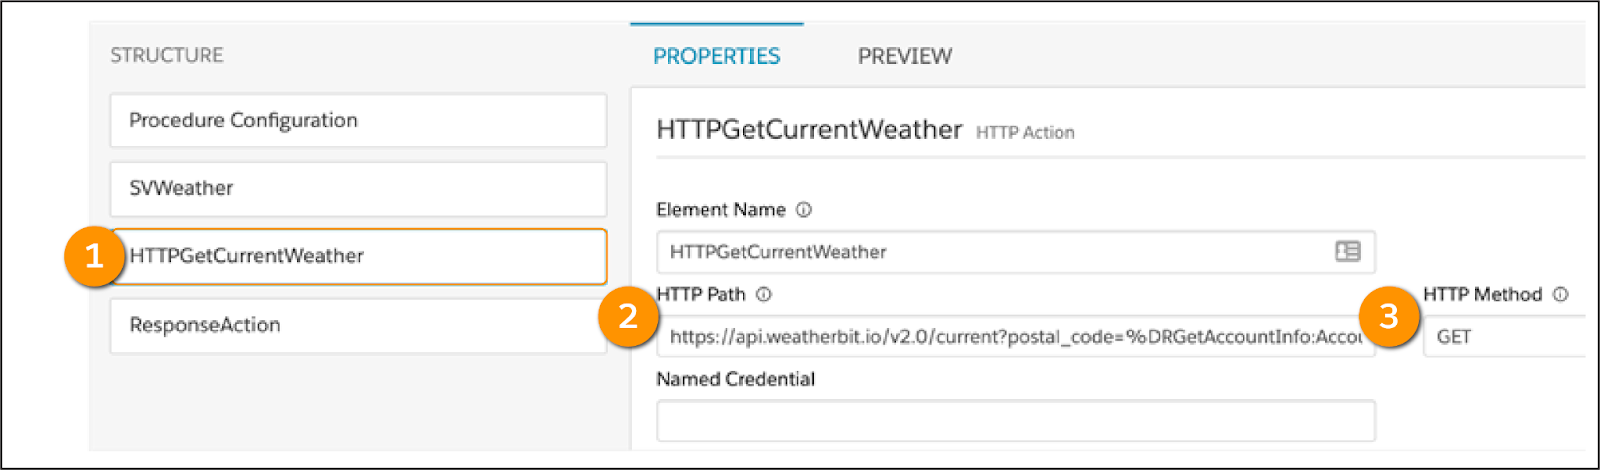
First, drag an HTTP Action element (1) to the Structure panel. Then, in the HTTP Path field (2), add the Request URL you built to get external data, and in the HTTP Method field (3) enter GET.
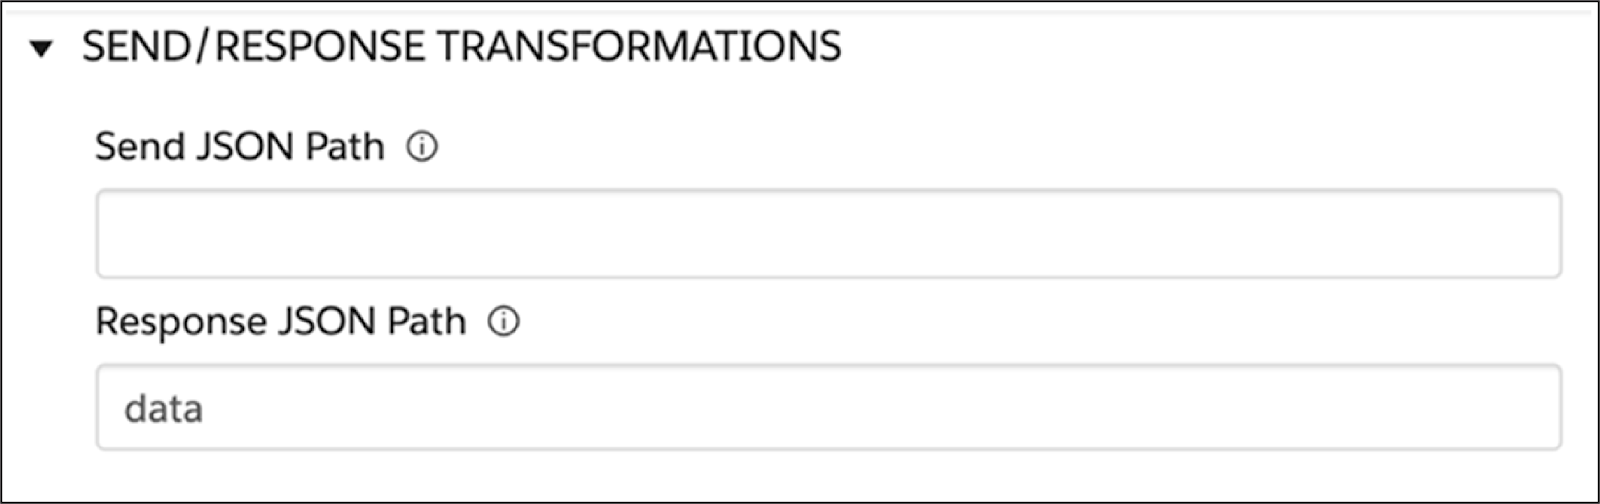
After defining the HTTP Path and Method, use the Response JSON Path field to trim the JSON response to share only the data node. Why? Because it focuses the Response JSON to only send the information in the data node to the next elements in the Structure panel.
You’ve now simplified the data that is received in the HTTP Action elements. Keep on reading to learn how to trim and transform this external data into the format that you need and send it back to the Flexcard or Omniscript.
Resources
- Salesforce Help: Integration Procedures (Omnistudio for Managed Packages)
- Salesforce Help: Set Values for Integration Procedures (Omnistudio for Managed Packages)
- Salesforce Help: Omnistudio Data Mapper Extract Action for Integration Procedures (Omnistudio for Managed Packages)
- Salesforce Help: HTTP Action for Integration Procedures (Omnistudio for Managed Packages)
- Salesforce Help: Omnistudio Data Mapper Transform Action for Integration Procedures (Omnistudio for Managed Packages)
- Salesforce Help: Response Action for Integration Procedures (Omnistudio for Managed Packages)