Extend a Standard Lookup Component to Display Accounts and Cases
Learning Objectives
After completing this unit, you’ll be able to:
- Configure an Omniscript standard Lookup component.
- Extend the functionality of a standard Omniscript component with a custom Lightning web component.
- Describe the purpose of the code in the JS and XML files.
- Describe the purpose of the OmniscriptBaseMixin.
Explore Account Selection
Now that Vijay has defined the structure of the Case Management Omniscript, he’s ready to configure the components one by one. First is the standard Lookup component, which gives Omniscript users a way to select an account from a list of accounts.
Hold on, though, there’s a twist to the story.
Vijay wants to display the related cases for an account as soon as the Omniscript user selects the account. Can he pull it off?
Let’s look first at what Vijay configures in the Lookup to select an account and then move on to how he modifies the component’s behaviour.
Omniscript Lookup Component Basic Configuration
An Omniscript Lookup runs a query to get Salesforce data based on parameters you configure in the Lookup properties. The records return in Value/Label pairs and display in a dropdown list for an Omniscript user to select.
Let’s examine the Lookup properties.

First, configure the Lookup.
- Enter
SelectAccountfor Name (1) andSelect Accountfor Field Label (2).
- Set Data Source Type (3) to SObject to get data from a Salesforce object.
Then configure the Lookup Query.
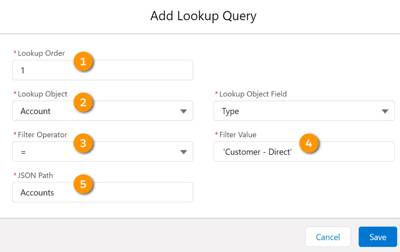
- For Lookup Order (1), enter
1to set the priority if there are multiple queries.
- For Lookup Object (2), select Account as the SObject to run the query against.
- Select = for Filter Operator (3) to return an exact match.
- In Filter Value (4), enter
‘Customer - Direct’to return matches for this account type.
- In JSON Path (5), enter
Accountsto set the return path for the filtered value.
- Save your work. The Lookup Query Configuration window is shown.
Next, set the label for the dropdown list of a Lookup component to a JSON value returned by the query. When a user selects a label, the value populates in the JSON node of the Lookup.
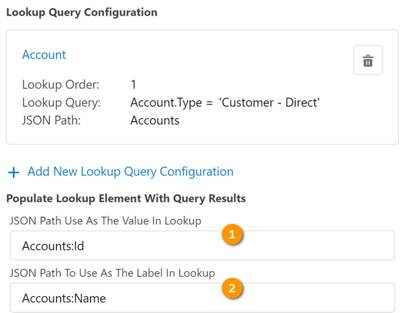
- Go to the Populate Lookup Element With Query Results section.
- Set
Accounts:Idas the JSON Path to use as the value in the lookup (1).
- Set
Accounts:Nameas the JSON Path to use as the label in the lookup (2).
Lookup Component Configuration to Get Cases
Vijay previews his work so far on the Omniscript, and it’s looking good. He sees that accounts display in a dropdown list, and it’s possible to select an account. Next up, he wants to display the cases for a selected account.
Vijay knows that his caseSelectableItemLWC custom Lightning web component contains the logic to get cases for the account. But this Lightning web component needs to be notified when the user selects an account. Setting up this kind of notification isn’t straightforward with a standard Omniscript component, because it’s hard to determine when the lookup completes.
It’s time for Vijay to create a Lightning web component called accountLookupLWC. Its purpose is to send a message to notify the component that gets and displays cases when the user selects an account.
Custom Lightning Web Component for Account Lookup
When Vijay creates the accountLookupLWC Lightning web component, he uses the functionality of the Lookup component but makes a small change. He doesn’t rewrite the whole Lookup component. Instead, he just overwrites a single function, which keeps the code short and maintainable.
First, he imports the Omniscript Lookup component and extends it to become a custom component with an export statement. Now the component has all the functionality of the Omniscript Lookup. Next, he modifies the standard functionality slightly with a selectOption method. This way, each time a user selects an account, it triggers the selectOption event handler. The handler uses a pubsub statement to notify the caseSelectableItemLWC that the user has selected a new account.
Pubsubs are the default way to communicate from a Flexcard to an Omniscript. Pubsub is short for publish and subscribe and is the standard way to publish (send) messages between Lightning web components. Use pubsubs and events to communicate from one Lightning web component to another.
You can use imports and extensions when you make small changes to functionality. Lightning web components can only extend one element at a time, but they can import many elements at once, such as actions or pubsubs.
Account Lookup JavaScript
Here’s an example of the accountLookupLWC JavaScript file that modifies the standard Lookup.
import { LightningElement } from 'lwc';
import pubsub from 'Omnistudio/pubsub';
import { OmniscriptBaseMixin } from 'Omnistudio/omniscriptBaseMixin';
import OmniscriptLookup from 'Omnistudio/omniscriptLookup';
export default class accountLookupLWC extends OmniscriptBaseMixin(OmniscriptLookup) {
selectOption(event) {
let attr = event.target.getAttribute('data-option-index');
const inputIndex = parseInt(attr, 10);
this.setSelected(inputIndex).then(()=> {
pubsub.fire("newAccountSelected", 'data', {"AccountId": this.lookupValue});
});
this.hideOptions();
}
}
This table shows code highlights.
Line |
Description |
|---|---|
1 |
Imports the Add this import anytime you create a new component to use in Omniscripts. |
2 |
Imports the |
3 |
Imports the |
4 |
Imports the |
5 |
Replaces the standard Lookup Use the |
6-9 |
Overrides the Note: The function gets an attribute and target before the pubsub fires (see Line 12). |
10 |
Fires the pubsub event to communicate to the Selectable Item LWC that the user has selected an account |
Let’s explore the OmniscriptBaseMixin a little further.
Explore OmniscriptBaseMixin
Import and extend the OmniscriptBaseMixin when you build a custom Lightning web component for use inside an Omniscript. This helps keep the codebase simple, which saves build and maintenance time. The imported functions from the extended basemixin component eliminate the need to write new code.
Think of the basemixin as a middle layer that helps the Lightning web component interact with the Omniscript. For example, when you need data from the JSON, the OmniscriptBaseMixin gives you methods to update an Omniscript’s data JSON and to pass parameters. Various functions are available, including validation functions, navigation functions, and next and previous actions.
Account Lookup XML
Here’s an example of the AccountLookup JS-meta.xml file, followed by code highlights. This configuration file defines the metadata values for the Lightning web component.
<?xml version="1.0" encoding="UTF-8"?>
<LightningComponentBundle xmlns="http://soap.sforce.com/2006/04/metadata">
<apiVersion>47.0</apiVersion>
<isExposed>true</isExposed>
<runtimeNamespace>Omnistudio</runtimeNamespace>
<targets>
<target>lightning__AppPage</target>
<target>lightningCommunity__Page</target>
<target>lightningCommunity__Default</target>
</targets>
</LightningComponentBundle>
This table shows code highlights.
Line |
Description |
|---|---|
4 |
Sets the metadata tag Without this metadata tag, other components can’t access your Lightning web component, and when you try to preview the Omniscript, this callback error displays: “Cannot use runtime namespace if not exposed in module” |
5 |
Adds the namespace of your managed package to the runtimeNamespace metadata tag You need to match the namespace, because all of the components stay inside a managed package. Otherwise this error message displays: “Cross namespace module error” Don’t use the runtimeNamespace if Lightning Web Security (LWS) is enabled in the org.
|
6-10 |
Sets targets to use a Lightning web component on an App page or Community page Without these targets, the Lightning web component isn’t available for use on these pages. |
Lightning Web Component Deployment
After you deploy the custom Lightning web component to your org, select it in the LWC Component Override field, which is in the Lookup properties.

To set up custom components so they deploy and display correctly in the Omniscript in your org, consider these tools:
- Salesforce DX
- IDX Workbench
You can use both tools to compare the source and target files. When you use IDX Workbench with Visual Studio Code, you can migrate Omnistudio components from one org to another.
The Account Lookup component is complete. Next, Vijay works on the cases related to the account. Follow along in the next unit.
Resources
- Salesforce Help: Working with Lookup Query Configurations (Omnistudio for Managed Packages)
- Salesforce Help: Create a Custom Lightning Web Component for Omniscript (Omnistudio for Managed Packages)
- Salesforce Help: Add Custom Lightning Web Components to an Omniscript (Omnistudio for Managed Packages)