Display and Submit Case Comments
Learning Objectives
After completing this unit, you’ll be able to:
- Configure a Datatable element in a Flexcard.
- Link the callback logic from a Flexcard back into an Omniscript.
Get Started on Case Comments
Vijay is finally ready to take on the second page of the Case Management Omniscript, where users view and create case comments. He reviews the requirements for this step.
As a customer service rep, when I select a case, I want to move to a second page where I can:
-
View existing case comments in tabular format.
-
Submit new comments that appear immediately in the table of existing comments.
Vijay already added a second step called Manage Case Comments to the Case Management Omniscript. Next, he needs to complete these tasks.
- Use the Omniscript designer to:
- Add a Text Area component for case comments.
- Add a Data Mapper Post Action, and display it as a button.
- Link the Post Action to a Data Mapper Load that saves case comments.
- Use the Flexcard designer to create a Flexcard with a Datatable element.
- Create a custom Lightning web component that contains the Datatable Flexcard.
- Link the custom Lightning web component to the Case Management Omniscript.
Follow along as he completes the project.
Manage Case Comments Step Configuration
Let’s review the structure of the Manage Case Comments step.
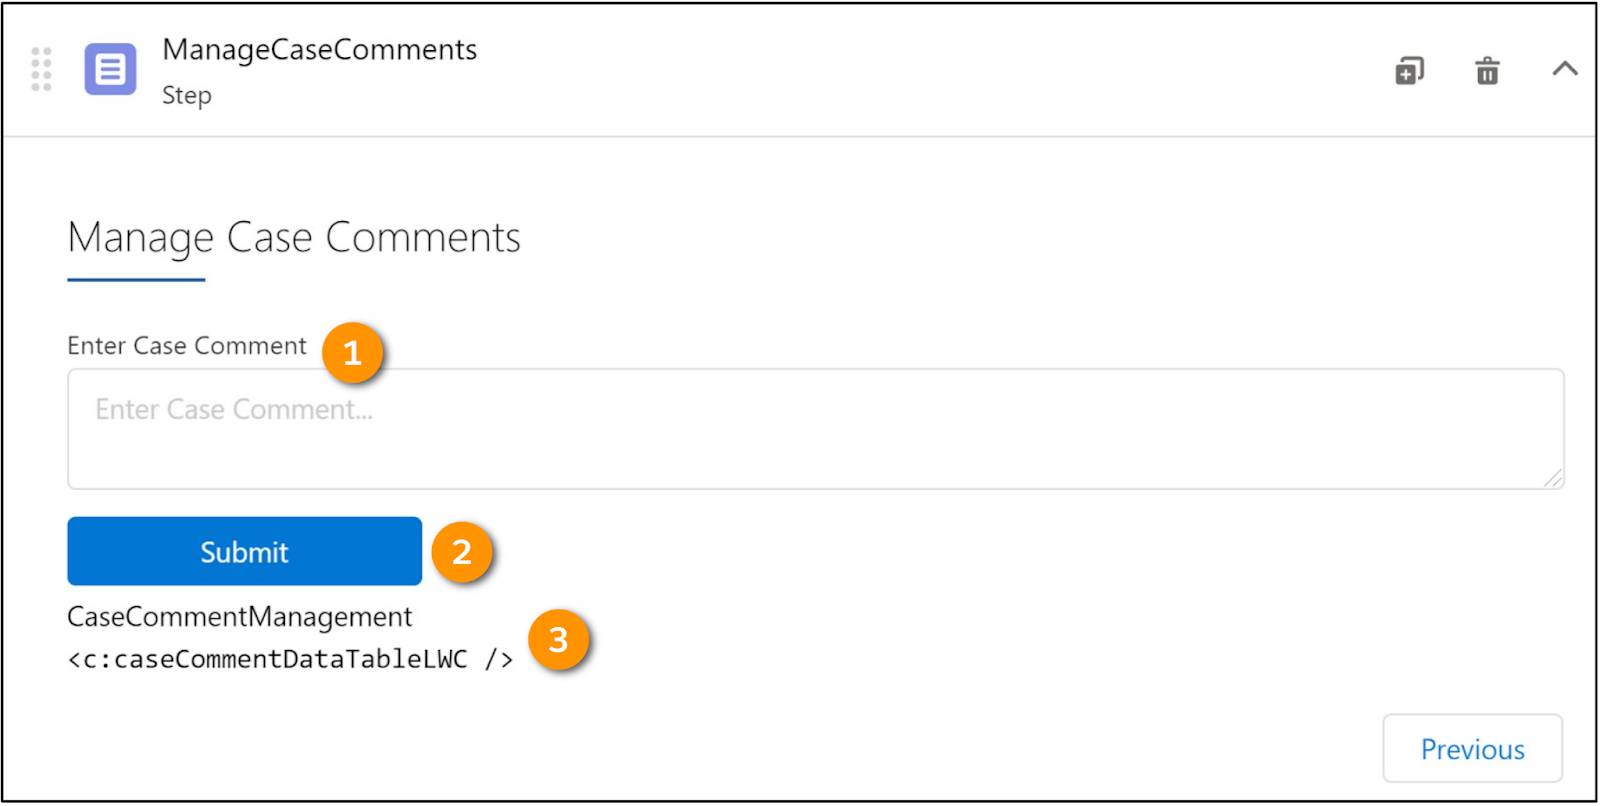
The Manage Case Comments step contains these components.
- A Text Area input element to enter a case comment (1)
- A Data Mapper Post Action to submit and save the comment (2)
- A Custom LWC (3) element to link the custom Lightning web component to the Omniscript
First, configure the Text Area properties.

- Enter
CaseCommentsin the Name field (1).
- Specify
Enter Case Commentas the Field Label (2).
- Enter
Enter Case Comment…as the Placeholder (3). This is the text the users see by default to prompt them to enter a comment.
Next, configure the Data Mapper Post Action properties.
- Enter
CreateCaseCommentas the Name.
- Enter
Submitas the Field Label.
- Select sampleCreateComment in the Data Mapper Interface field. This is the Data Mapper Load that saves case comment data.
In the Data Mapper Post Action properties, expand the Messaging Framework section.
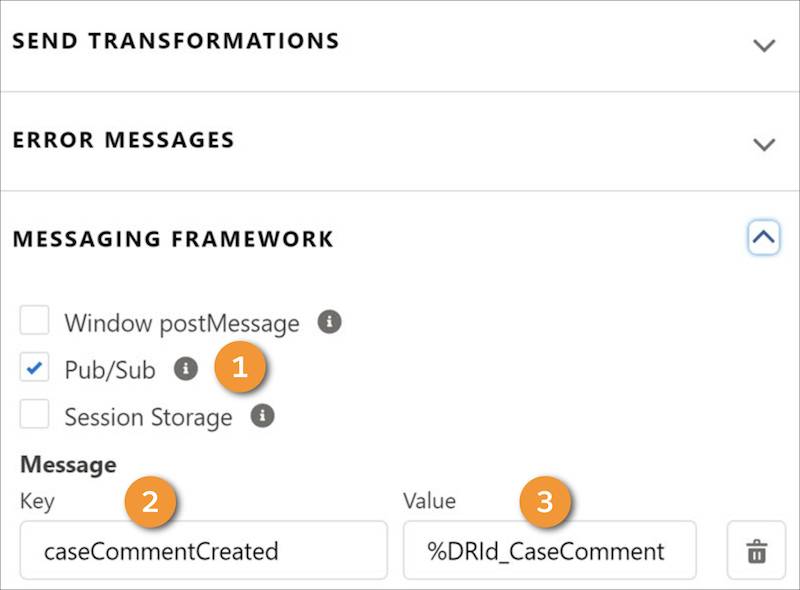
- Select Pub/Sub (1) to enable the Omniscript and a custom Lightning web component to communicate.
- Set up a key-value pair for the message as follows. Enter
caseCommentCreatedfor the Key (2) and%DRId_CaseComment%for the Value (3).
Vijay opens the Flexcard designer to create the Datatable Flexcard.
Datatable Flexcard for Case Comments
The Case Comment Datatable Flexcard contains a standard Flexcard Datatable element with three columns.

Configure the Data Source
When Vijay creates the Flexcard, he chooses Data Mapper as the data source type and selects a Data Mapper Turbo Extract that retrieves case comment data.
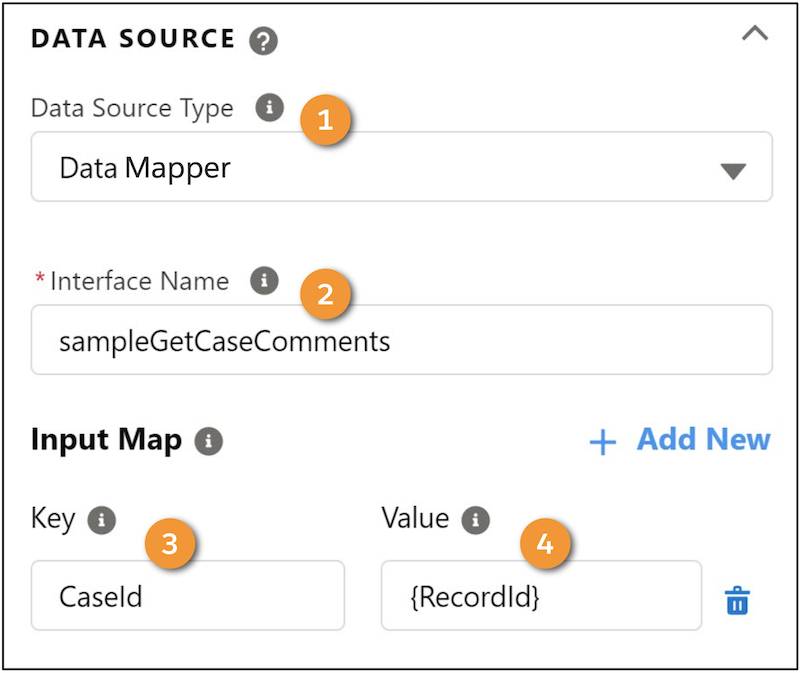
- Select Data Mapper as the Data Source Type (1), and select the sampleGetCaseComments Data Mapper to fetch case comment data (2). The data includes the comment, the date it was created, and whether it’s published.
- For the Key/Value pair, enter
CaseIdfor the Key (3) and{RecordId}for the Value (4).
Configure the Datatable Column Properties
After you add the Datatable element to the canvas, configure the column properties.
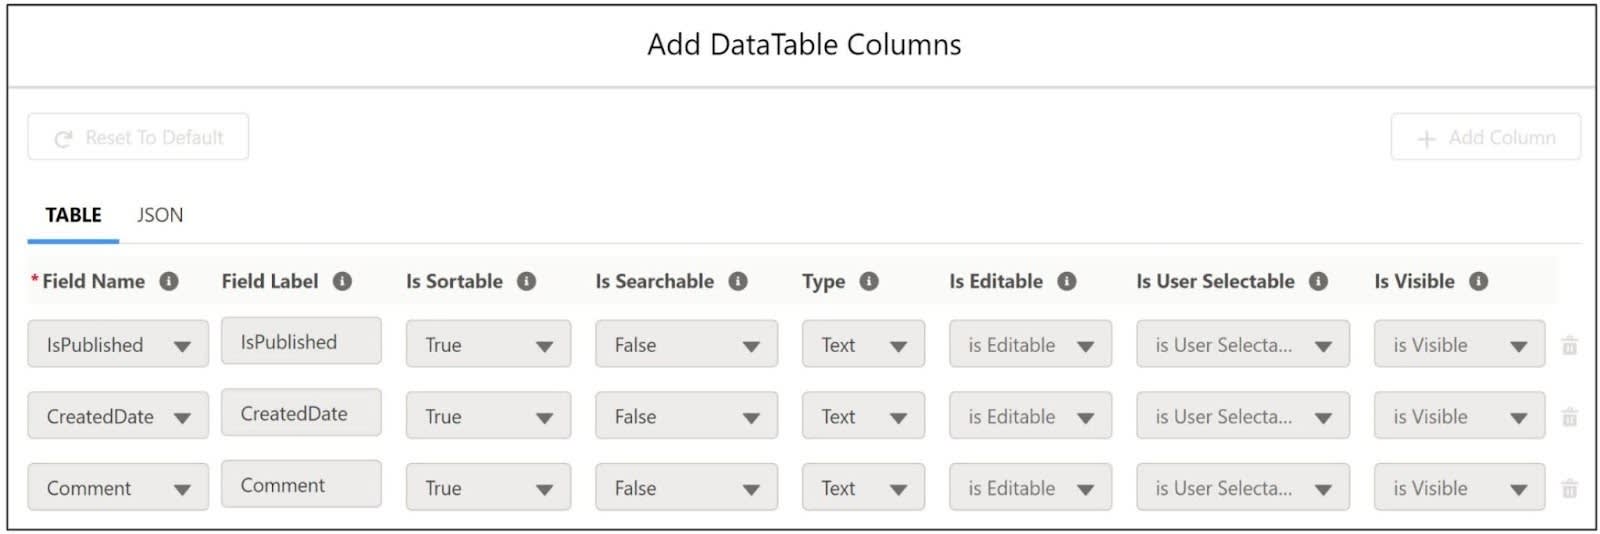
This table describes the column properties.
Column |
Description |
|---|---|
Field Name |
Select the field column to show. |
Field Label |
Update the name of the field column. By default, the field label is the Field Name. |
Is Sortable |
Select which fields are sortable. Enable Is Sortable under Attributes in the Properties panel. |
Is Searchable |
Select which fields are searchable from the search form. Enable Is Searchable under Attributes in the Properties panel. |
Type |
Select the type of data the field column displays. |
Is Editable |
Select which field column users can edit. Enable Cell Level Edit under Attributes in the Properties panel. |
Is User Selectable |
Select which field columns users can hide or show. Enable User Selectable Column under Attributes in the Properties panel. |
Is Visible |
Select which field columns are hidden or visible by default. Use with Is User Selectable to enable users to show hidden field columns. |
Now configure a couple more Datatable properties.
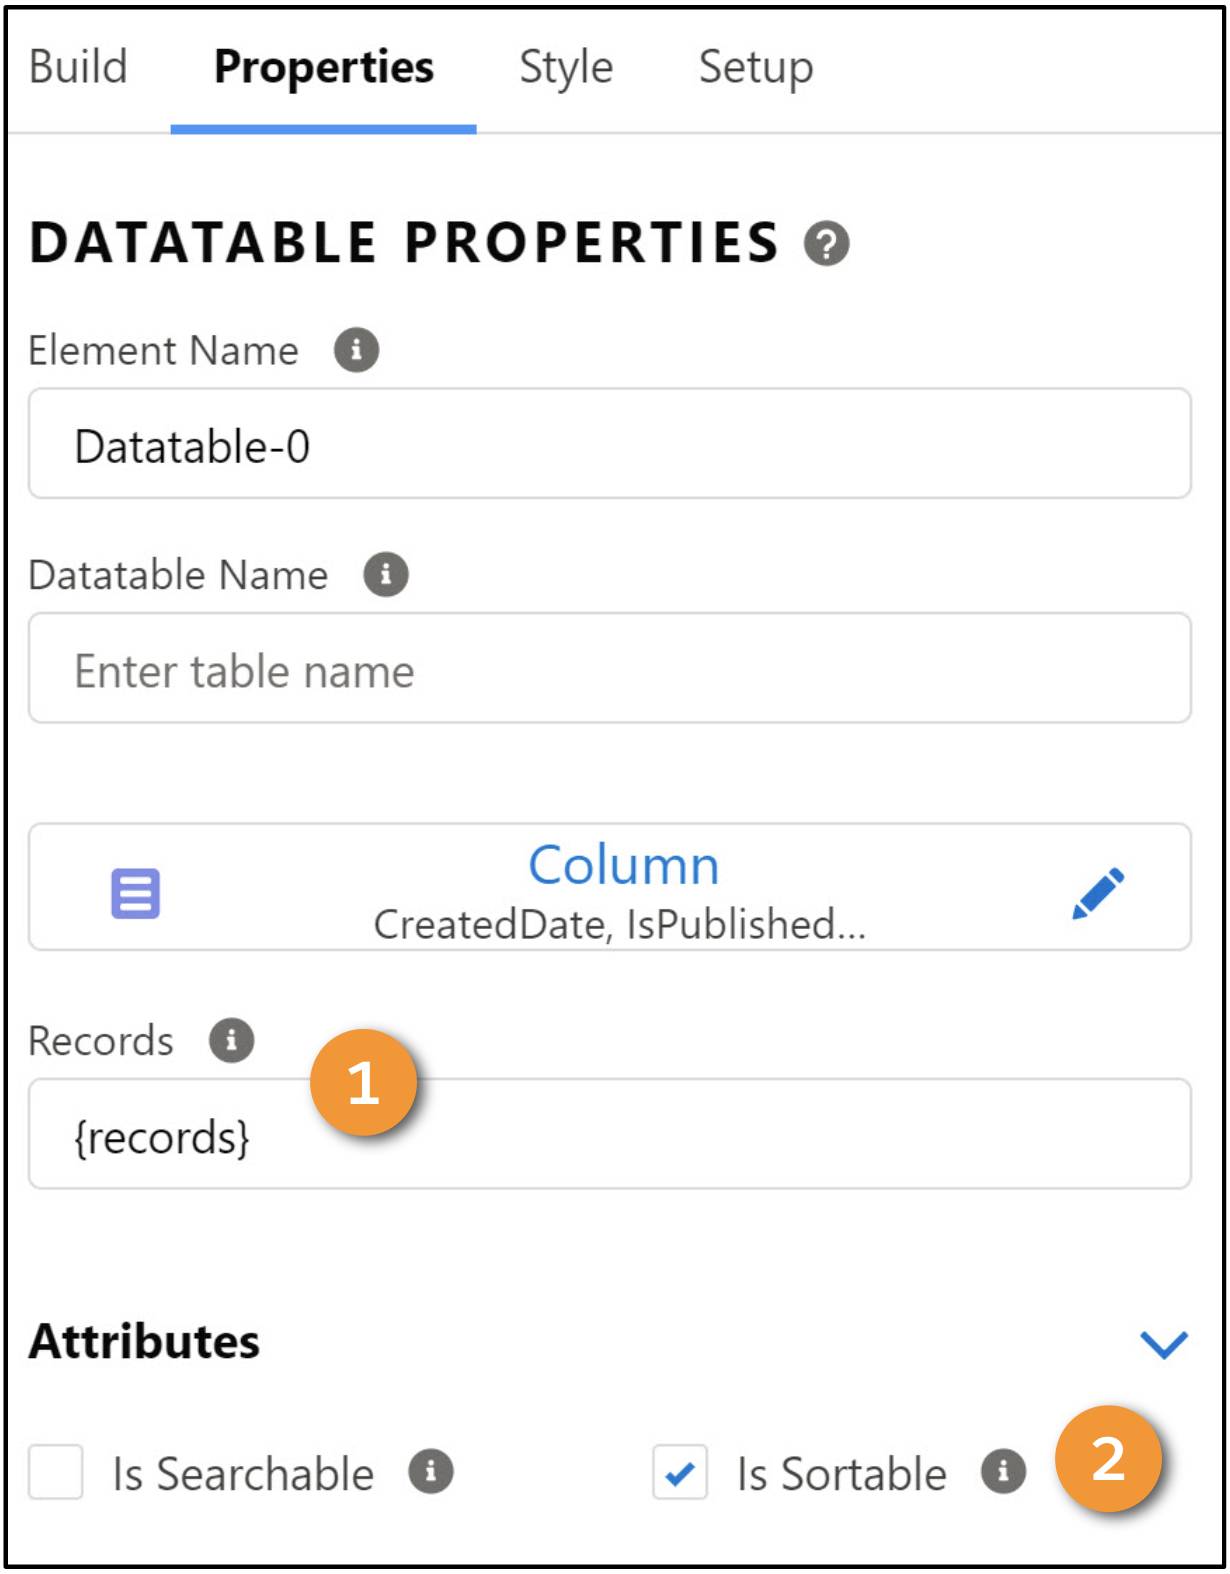
- Enter
{records}in the Records field (1).
- Select Is Sortable in the Attributes section (2).
Configure an Event Listener
This pubsub event listener causes the Flexcard to reload and refresh the data in the table when a user adds a new case comment.
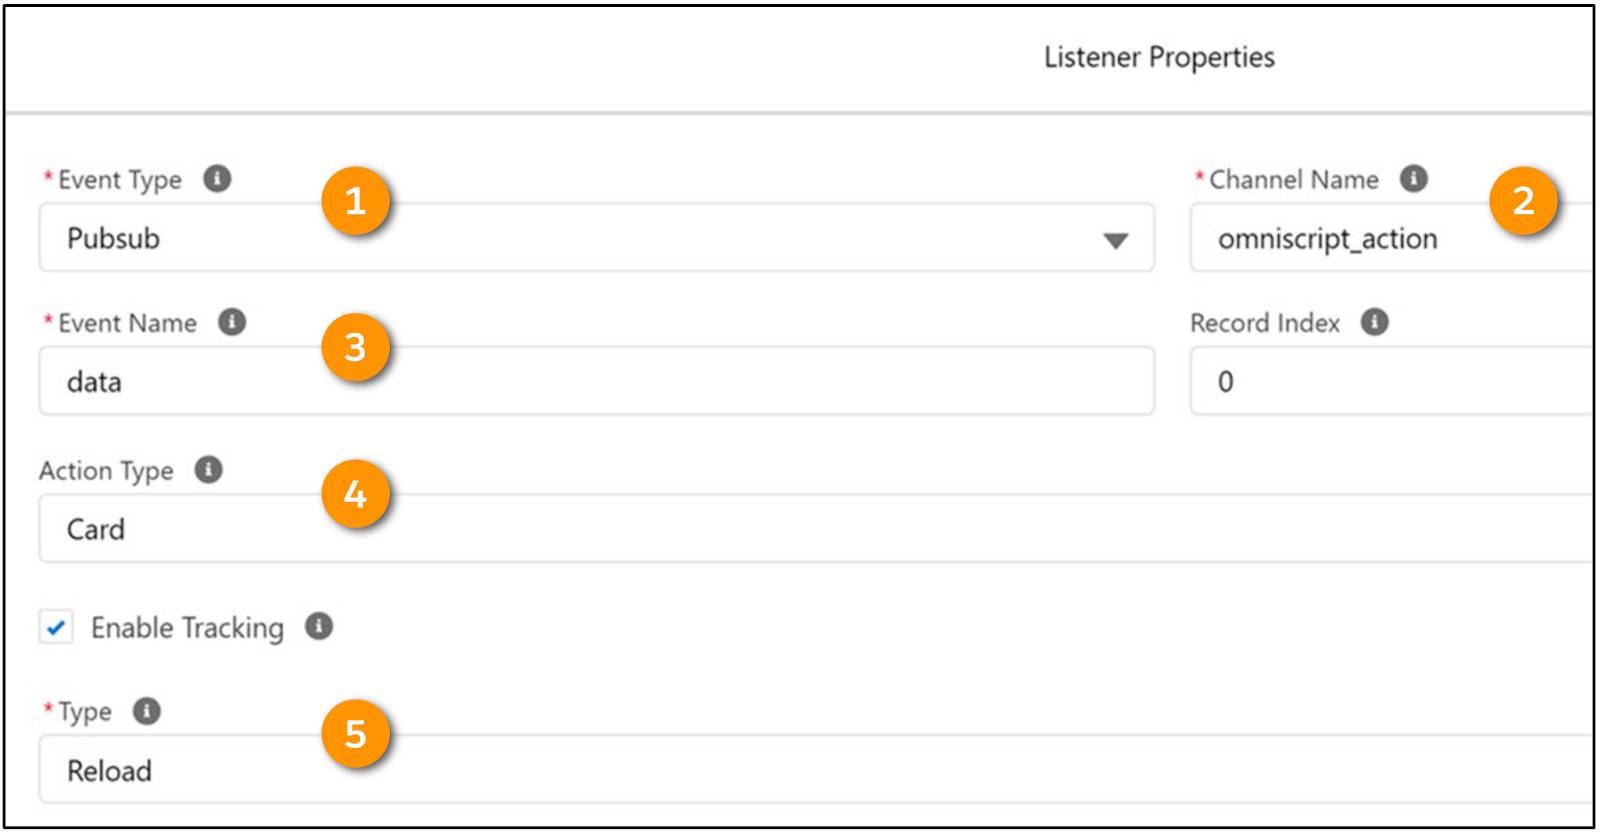
- Select Pubsub as the Event Type (1).
- Enter
omniscript_actionas the Channel Name (2). This is a default out-of-the-box Omniscript pubsub event that triggers whenever an Omniscript action is run.
- Enter data as the Event Name (3). When you use omniscript_action as the Channel Name and data as the Event Name, you allow the Flexcard to catch any action in the Omniscript and help it to trigger any additional actions when it receives that event.
- Select Card as the Action Type (4).
- For Type (5), select Reload.
Enable the Flexcard to Interact with an Omniscript
Select Omniscript Support, because you embed this Flexcard in a custom Lightning web component that is part of the Case Management Omniscript.
Activate the Flexcard
Activate the Flexcard to compile and deploy it as a standalone Lightning web component.
Vijay makes a note of the component name so he can embed the active Flexcard in the custom Lightning web component he builds next.
Custom Lightning Web Component for Case Comments
Vijay creates a CommentDataTableLWC custom Lightning web component and embeds the Case Comment Datatable Flexcard in the HTML. The HTML file only contains the embedded Datatable Flexcard. Here’s sample code.
<template>
<c-cf-sample-case-comment-data-table lwc:if={caseId} record-id={caseId}></c-cf-sample-case-comment-data-table>
</template>
Use the Lightning web component name of an active Flexcard to embed a Flexcard inside another custom Lightning web component. An active Flexcard displays cf as the prefix.
In the JavaScript, Vijay needs the datatable in the Flexcard to refresh each time a user submits a new case comment.
To put the data source in the Flexcard, link the variables in the Omniscript to your two Flexcards, and then link the callback logic from the Flexcards back into the Omniscript. This completes the two-way linkage from the Flexcard to the Omniscript and from the Omniscript back to the Flexcard.
Vijay’s Case Comment Datatable JavaScript file contains:
- The Common Action Utility for the remote call to the Omniscript
- The caseId variable to enable the Omniscript to pass it
- The pubsub import statement so that the pubsub listeners and action events work
Here’s a sample of the JavaScript file.
import { LightningElement, api } from 'lwc';
import { OmniscriptBaseMixin } from 'Omnistudio/omniscriptBaseMixin';
import { OmniscriptActionCommonUtil } from 'Omnistudio/omniscriptActionUtils';
import pubsub from 'Omnistudio/pubsub';
export default class CaseCommentDataTableLWC extends OmniscriptBaseMixin(LightningElement) {
caseId;
connectedCallback() {
this.caseId = this.omniJsonData.SelectedCaseId;
}
}
This table shows code highlights.
Line |
Description |
|---|---|
1 |
Imports the |
2 |
Imports the |
3 |
Imports an instance of the OmniscriptActionCommonUtil for use in this class |
4 |
Imports the |
5 |
Extends the OmniscriptBaseMixin with the export statement to specify the functionality of the module the component uses This makes available all the elements and objects that come with the OmniscriptBaseMixin. |
6 |
Adds the |
7-8 |
Adds a |
Custom Lightning Web Component Properties
In the Omniscript designer, configure the properties of the Custom Lightning Web Component element that holds Vijay’s caseCommentDataTableLWC.
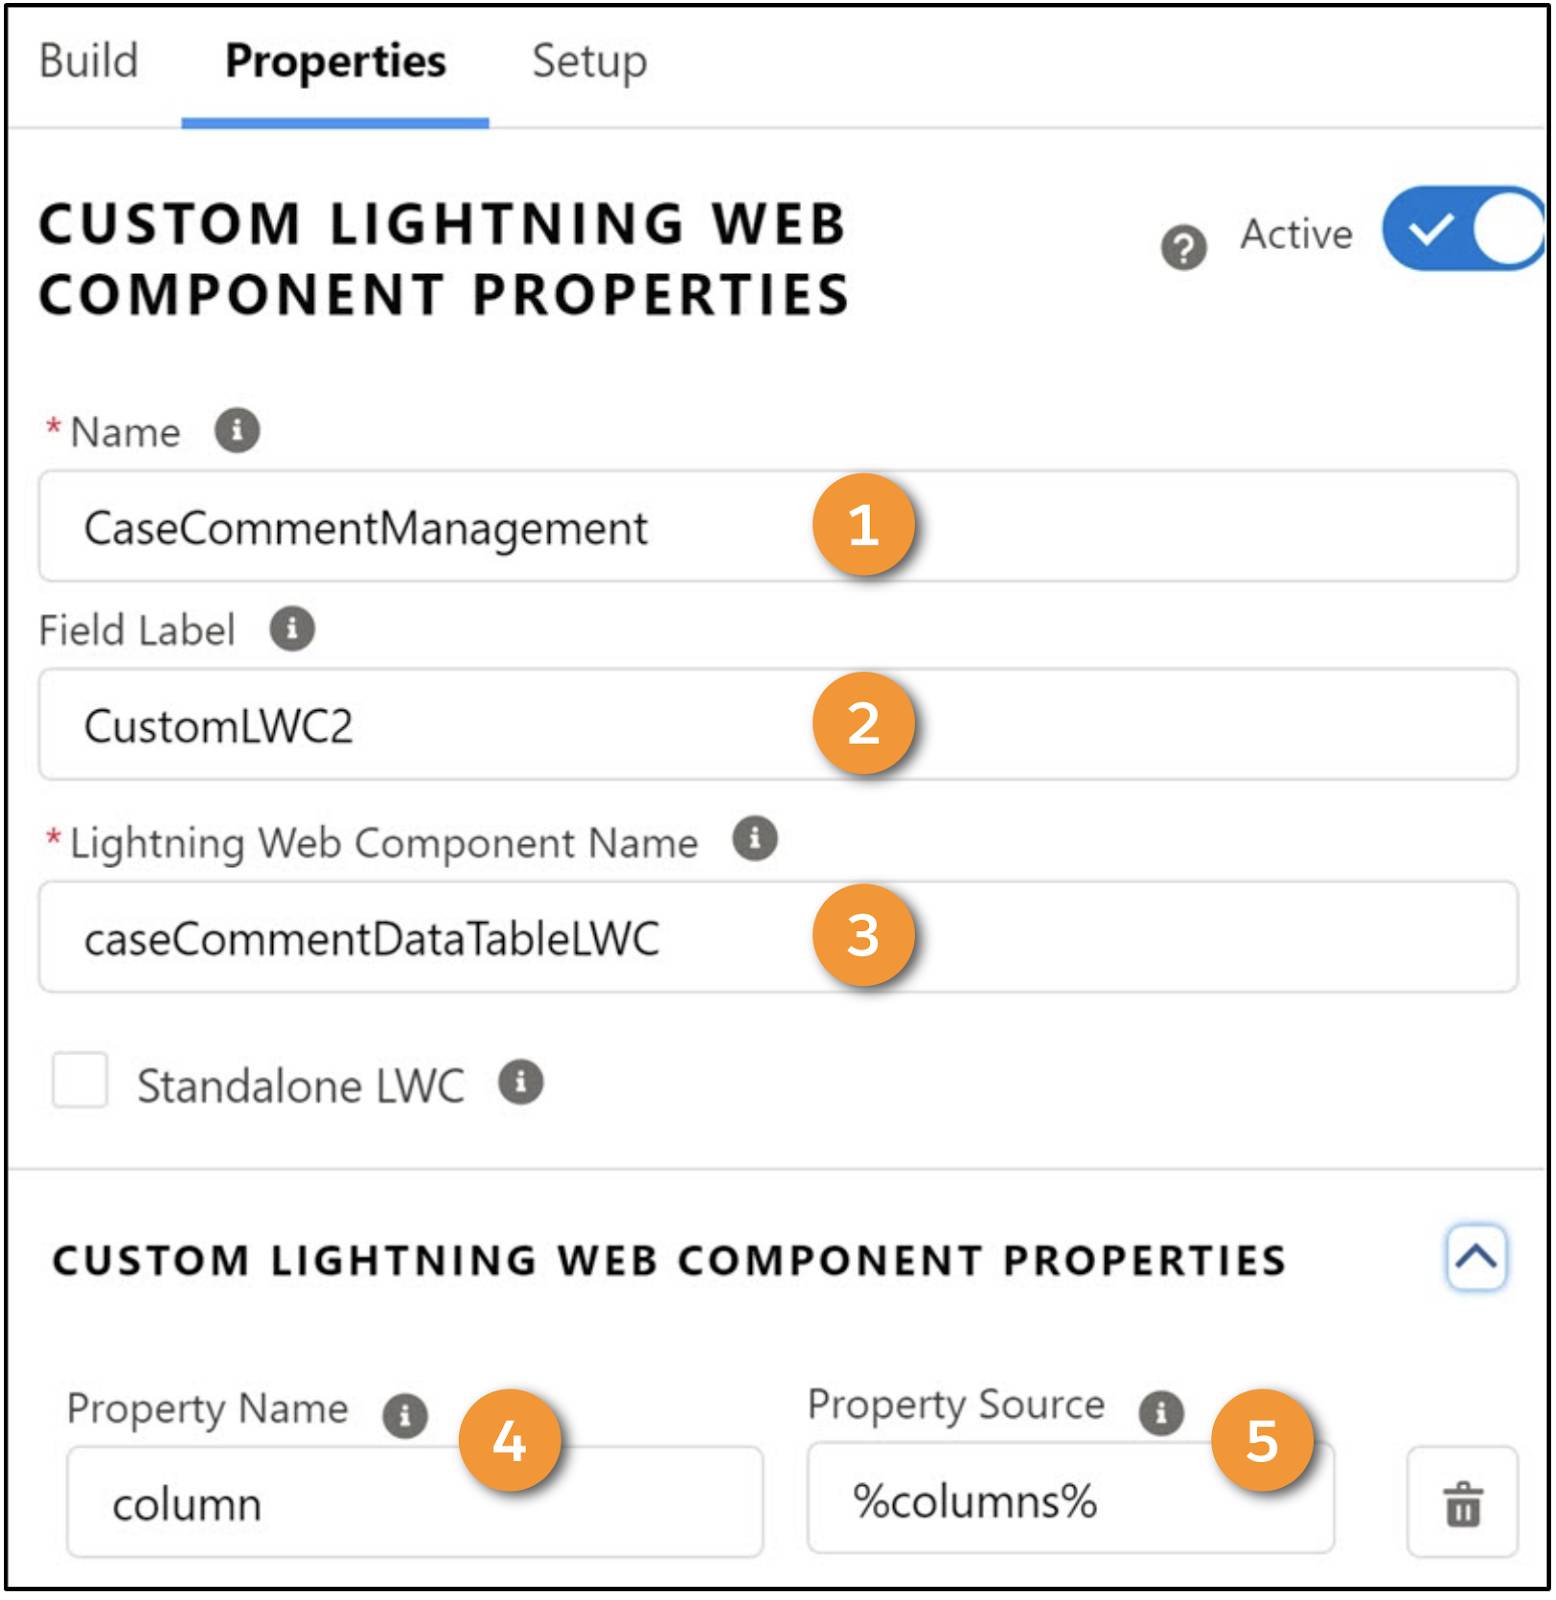
- For Name (1) and Field Label (2), enter a name and display name for the Custom LWC element.
- In the Lightning Web Component Name (3) field, enter the name of the custom Lightning web component. In this example, the name is
caseCommentDataTableLWC.
- Enter
columnfor Property Name (4) and%columns%for Property Source (5).
Wrap Up
That’s it! Vijay was able to meet his customer’s requirements for a new Omnistudio project.
You followed along with Vijay as he designed and built a two-page case management workflow within Omnistudio using custom Lightning Web Components. You explored best practices for Omnistudio Managed Packages, the use of component overrides and pub/sub messaging for intercomponent communication, Data Mappers for data retrieval and saving, and leveraging slots for extending standard components.
Now it's your turn to apply these techniques in your own Omnistudio for Managed Package projects, enhancing your workflows and improving their maintainability.
Resources
- Salesforce Help: Display Flexcard Data in a Tabular Structure (Omnistudio for Managed Packages)
- Salesforce Help: Enable Omniscript Support on a Flexcard (Omnistudio for Managed Packages)
- Salesforce Help: Custom Lightning Web Component Properties (Omnistudio for Managed Packages)