Build Omnistudio Components for Cases
Learning Objectives
After completing this unit, you’ll be able to:
- Configure the Custom Lightning Web Component properties in an Omniscript.
- Set Messaging Framework properties for an Omniscript.
- Add a PubSub Event action to a Flexcard.
- Create a PubSub Event Listener in a Flexcard.
Display and Create Cases
Vijay is ready to tackle how to display and create new cases in his Case Management Omniscript.
To do this, he must:
- Create a new Omniscript to create cases.
- Create a Flexcard to display cases.
- Embed both components in a new custom Lightning web component.
- Configure how all these components communicate with each other.
This is arguably Vijay’s most complex requirement, so settle in with your beverage of choice and follow along as this unit and the next describe how he handles it.
Omniscript for New Cases
Vijay creates a second Omniscript called Create Case. When a Case Management Omniscript user clicks the Create Case button, the Create Case Omniscript opens in a modal window.
Configure the Field Elements and Button in the Step
Let’s examine the components that comprise this one-step Omniscript.

The Omniscript contains:
- Two text inputs inside the step: Case Subject (1) and Case Details (2).
- A Create Case button (3) inside the step.
- A Data Mapper Post Action (4) outside the step. This action calls a Data Mapper Load to create the case.
Step Properties include a Button Properties section.

In Button Properties:
- Enter
Create Casein the Next Label property (1).
- Set the button width to 3 in the Next Width property (2).
Configure the Data Mapper Post Action
In Data Mapper Post Action Properties, link to the Data Mapper Load that saves the new case data.
In Data Mapper Post Action Properties:
- Enter
CreateCasefor Name andCreate Casefor Field Label.
- In Data Mapper Interface, select the sampleCreateCase Data Mapper Load. This is the Data Mapper that saves the new case.
The Data Mapper Post Action properties include a Messaging Framework section.
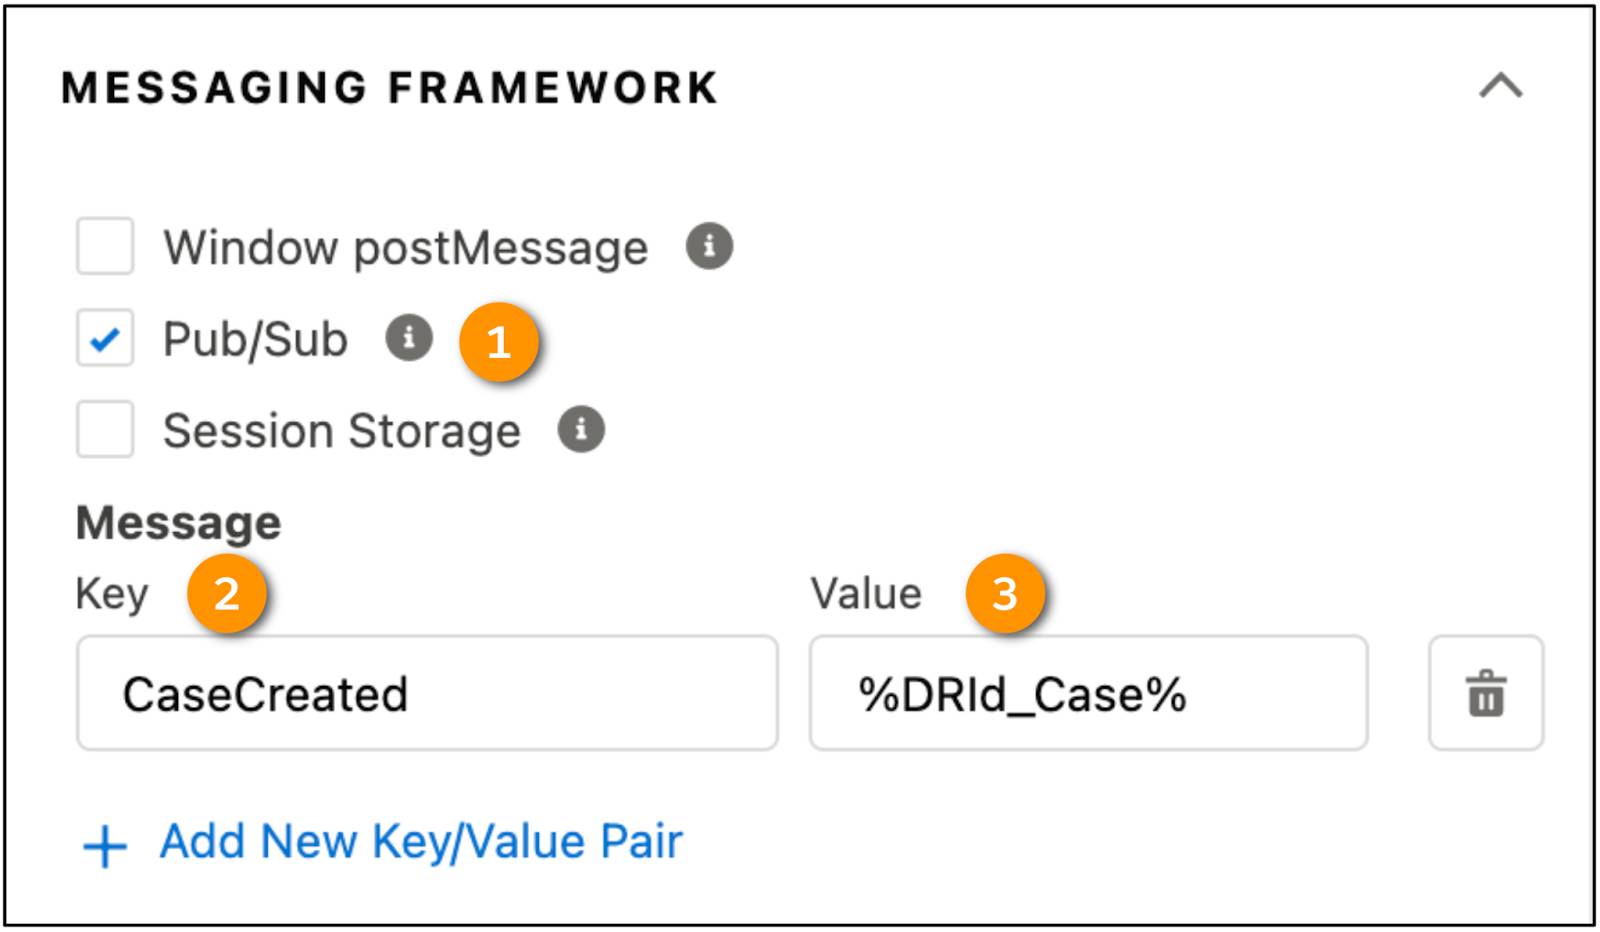
- In Messaging Framework properties:
- Select the Pub/Sub checkbox (1) to enable the Omniscript and a custom Lightning web component to communicate. Key/value pairs pass events that trigger custom behavior in the component.
- Enter
CaseCreatedfor Key (2) and%DRId_Case%for Value (3).
- Activate the Omniscript to compile and deploy it as a standalone Lightning web component.
- Once the Omniscript is active, open the How To Launch window to copy the component tag.
- Embed this tag in the custom Lightning web component. We’ll return to this step in the next unit.
Now that Vijay has an Omniscript to create new cases, he turns to the Flexcard Designer to display and select cases.
Flexcard to Select Cases
Vijay has a clear idea of what his Selectable Item Flexcard should look like for each case.

The Selectable Item Flexcard displays Subject and Status fields (1) and a Select Case button (2).
Configure the Data Source
When Vijay creates the Flexcard, he chooses Integration Procedures as the data source type, and he selects an Integration Procedure that retrieves case data.

The Data Source Type (1) is Integration Procedures, and the Name (2) of the Integration Procedure is sample_getCaseList.
Configure the Field Elements
Subject and Status are Field elements. The output for each field comes from the data source, which is the sample_getCaseList Integration Procedure.

Configure the Subject field properties like this:
- Enter
Subjectfor the Label (1), and select Text for the Field Type (2).
- Select CaseSubject for Output (3).

Finally, configure the Status field properties.
- Enter
Statusfor the Label (1), and select Text for the Field Type (2).
- Select CaseStatus for Output (3).
Configure the PubSub Event Action
The Select Case button triggers a pubsub event action. Pubsubs are the default way to communicate from the Flexcard to the Omniscript.
When a user clicks the button, the event communicates to the Omniscript that the user has selected a case. This prompts the Case Management Omniscript to navigate automatically to step two, which is Manage Case Comments.
Let’s review the action properties you need to set.

Configure the Select Case action properties.
- For Action Type, select Event (1) as the type of action to run. Use this action type when you want to fire a pubsub event to notify another component on a page or application when an event occurs.
- Enter
Select Caseas the action label (2), which is visible to end users.
More properties are available to configure for the action.

- Select PubSub from the Event Type dropdown list (1).
- Enter
newCaseSelectedas the Channel Name (2), which updates the channel where the event posts.
- For Event Name (3), enter
dataas the name of the event. Don’t use the namesreload,updatedatasource, orremovefor events, because they’re reserved words.
- To pass contextual data as a key-value pair, click + Add New (4).
- Enter
CaseIdas the variable name in the Key field (5), and enter{CaseId}as the variable value in the Value field (6).
- Select the Display As Button checkbox to display the action as a button.
Configure the Event Listeners
An event listener listens for an event that a component fires and performs an action in response.
- A Pubsub event listens for an event from another component, such as another Flexcard on the same Lightning page.
- A Custom event listens for an event that a child Flexcard fires or for an event from an element on the Flexcard.
The Selectable Item Flexcard has two event listeners.
The first event listener listens for when the Create Case Omniscript adds a new case, and then the event listener reloads the Flexcard.

Configure this event listener.
- Select Pubsub for Event Type (1).
- Enter
omniscript_actionfor Channel Name (2).
- Enter
datafor Event Name (3).
- Enter
Reload Cardfor Action Name (4)
- Select Card for Action Type (5).
- Select Reload for Type (6).
The second event listener listens for when the user selects a new account. This event listener has two actions.
The first action listens for a data source update. A user creates a new case from the Flexcard, which triggers an update of the data source for the account’s case list.
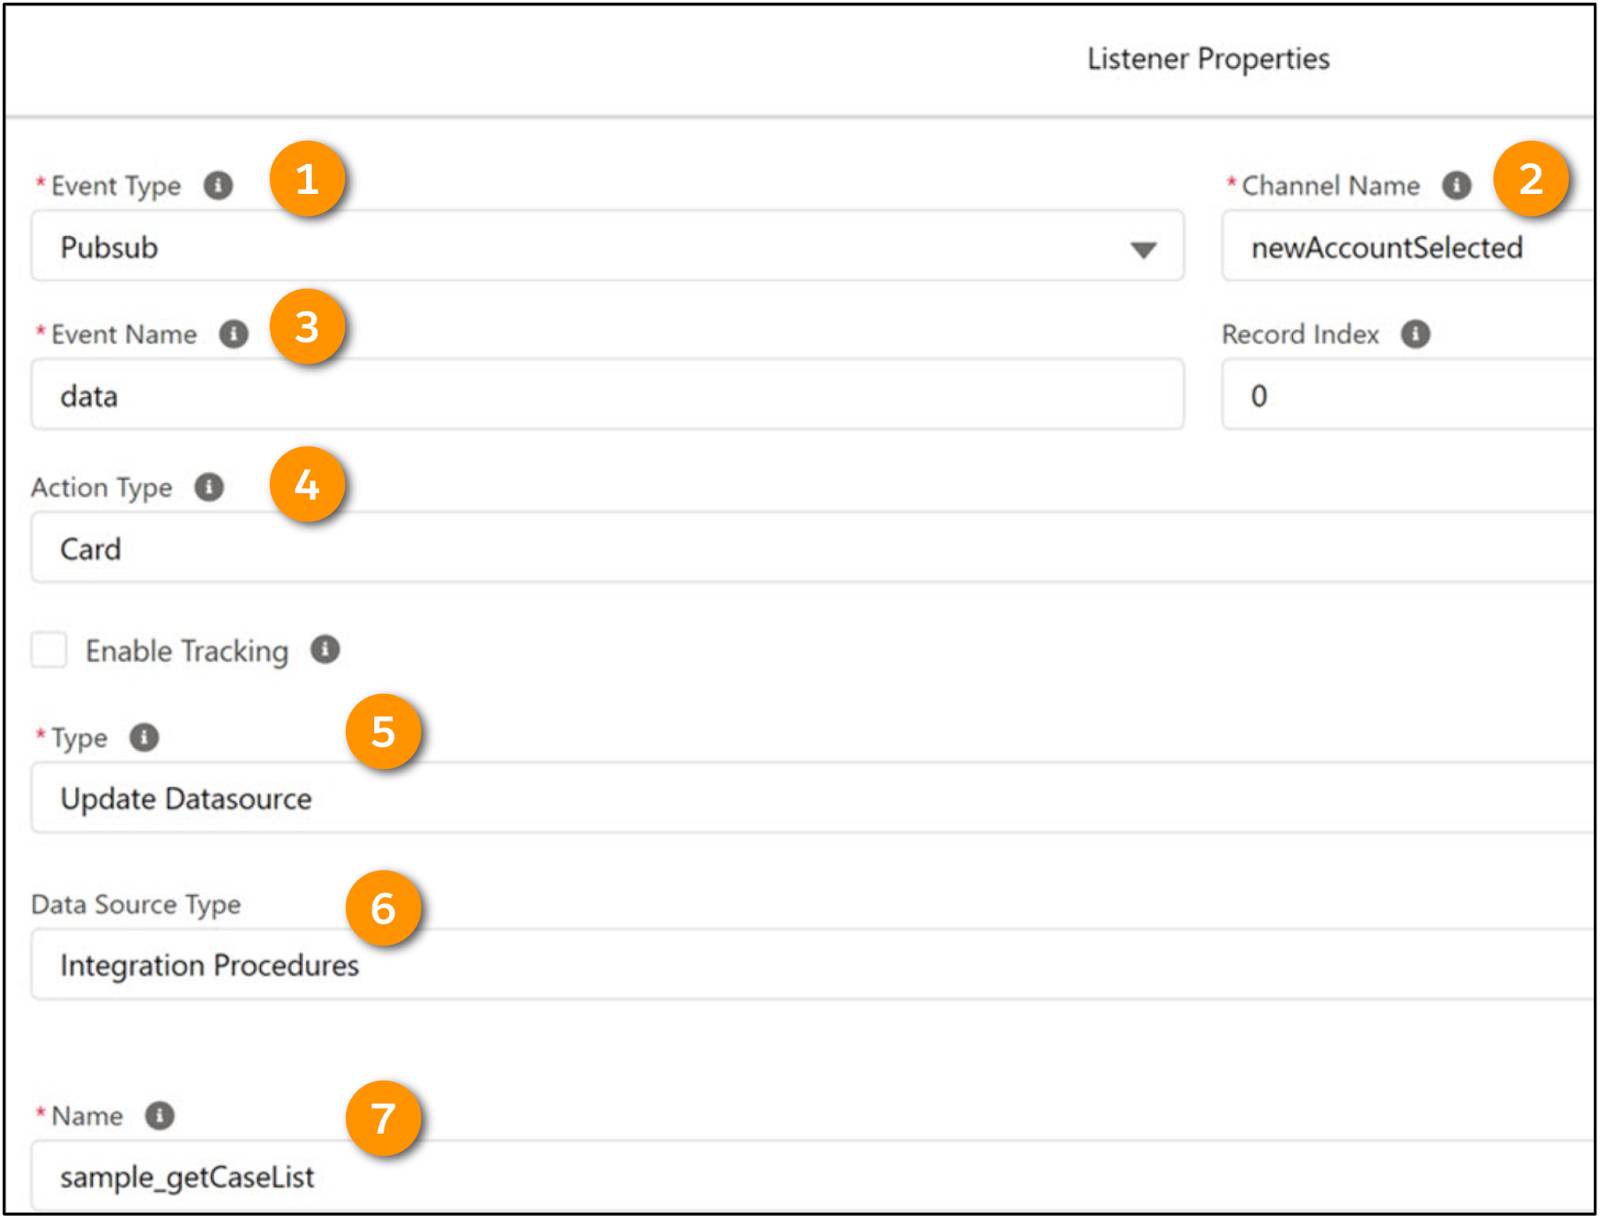
Configure the Update Datasource event listener.
- Select Pubsub for Event Type (1).
- Enter
newAccountSelectedfor Channel Name (2).
- Enter
datafor Event Name (3).
- Select Card for Action Type (4).
- Select Update Datasource for Type (5).
- Enter
Integration Proceduresfor Data Source Type (6).
- Select sample_getCaseList as the Name of the Integration Procedure (7).
The second action reloads the Flexcard. After the data source updates, the case list data for that account reloads immediately to show the new case for the selected account.

Configure the properties for the second event listener action. Enter Reload for Type. Because this isn’t an Update Datasource type, no properties show to configure a data source.
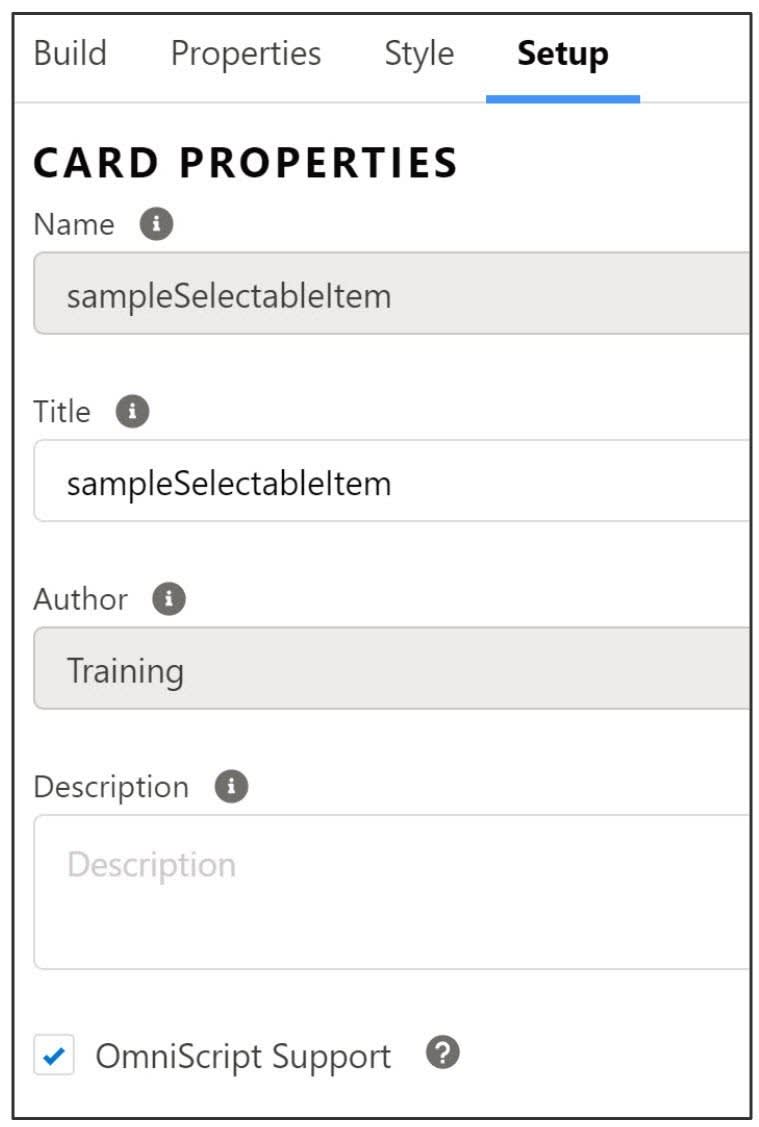
Allow the Flexcard to Interact with an Omniscript
Vijay has one last configuration task before he activates this Flexcard.
In the Setup panel, select the Omniscript Support checkbox to allow the Flexcard to interact with an Omniscript Lightning web component.
Activate the Flexcard
Activate the Flexcard to compile and deploy it as a standalone Lightning web component. When you create a Lightning web component from a Flexcard, it activates with the namespace cf, which makes the full prefix <c-cf-. Everything after this prefix is the component name with dashes between each word of the name. Use this tab syntax when you embed an active Flexcard in a Lightning web component. We’ll return to this topic later.
Vijay now has the standard Omnistudio Lightning web components he needs to display, select, and create cases. However, his work isn’t done. Carry on with this module to see how Vijay embeds these new components in a custom Lightning web component.
Resources
- Salesforce Help: Add Elements to a Flexcard (Omnistudio for Managed Packages)
- Salesforce Help: Add a Field to a Flexcard (Omnistudio for Managed Packages)
- Salesforce Help: Omnistudio Data Mapper Post Action (Omnistudio for Managed Packages)
- Salesforce Help: Trigger a Pubsub Event from an Action on a Flexcard (Omnistudio for Managed Packages)
- Salesforce Help: Enable Omniscript Support on a Flexcard (Omnistudio for Managed Packages)