Design and Build a Branching Omniscript
Learning Objectives
After completing this unit, you’ll be able to:
- Build branches into Omniscripts in Omnistudio for Managed Packages.
- Add conditional branching to an Omniscript.
- Use element properties to change the UI and UX of an Omniscript.
- Manipulate and inspect Omniscript JSON.

Before You Start
Before you start this module, make sure you complete this content. The work you do here builds on the concepts and work you do in that content.
Build Branches into Guided Interactions
Omniscripts in Omnistudio for Managed Packages help you easily create customized, guided user paths through business processes, without complicated coding. They’re a fantastic solution for meeting user interaction requirements and providing seamless and engaging customer experiences.
These guided interactions are most successful when they present end users with a clear, compliant, and direct path through a process. Omniscript branching is one way to provide just that. In this module you learn the ins and outs of Omniscript branching by exploring a simple example.
There are a few ways to create branching in Omniscripts. You can create branches that display specific steps in an Omniscript based on certain conditions. For example, an Omniscript could have two branches that trigger based on customer age. If the customer is under 18, the branch only allows them to edit their contact information. If they're over 18, the branch allows them to edit their contact information, select a new service plan, and receive offers.
Or you can create branches that display blocks of fields based on conditions. For example, an Omniscript that displays certain fields when the user checks a box. If, while updating their billing address, an end user selects a checkbox to indicate they also want to update their mailing address, the mailing address fields appear.
Let’s get acquainted now with the Omniscript branching example in the module.
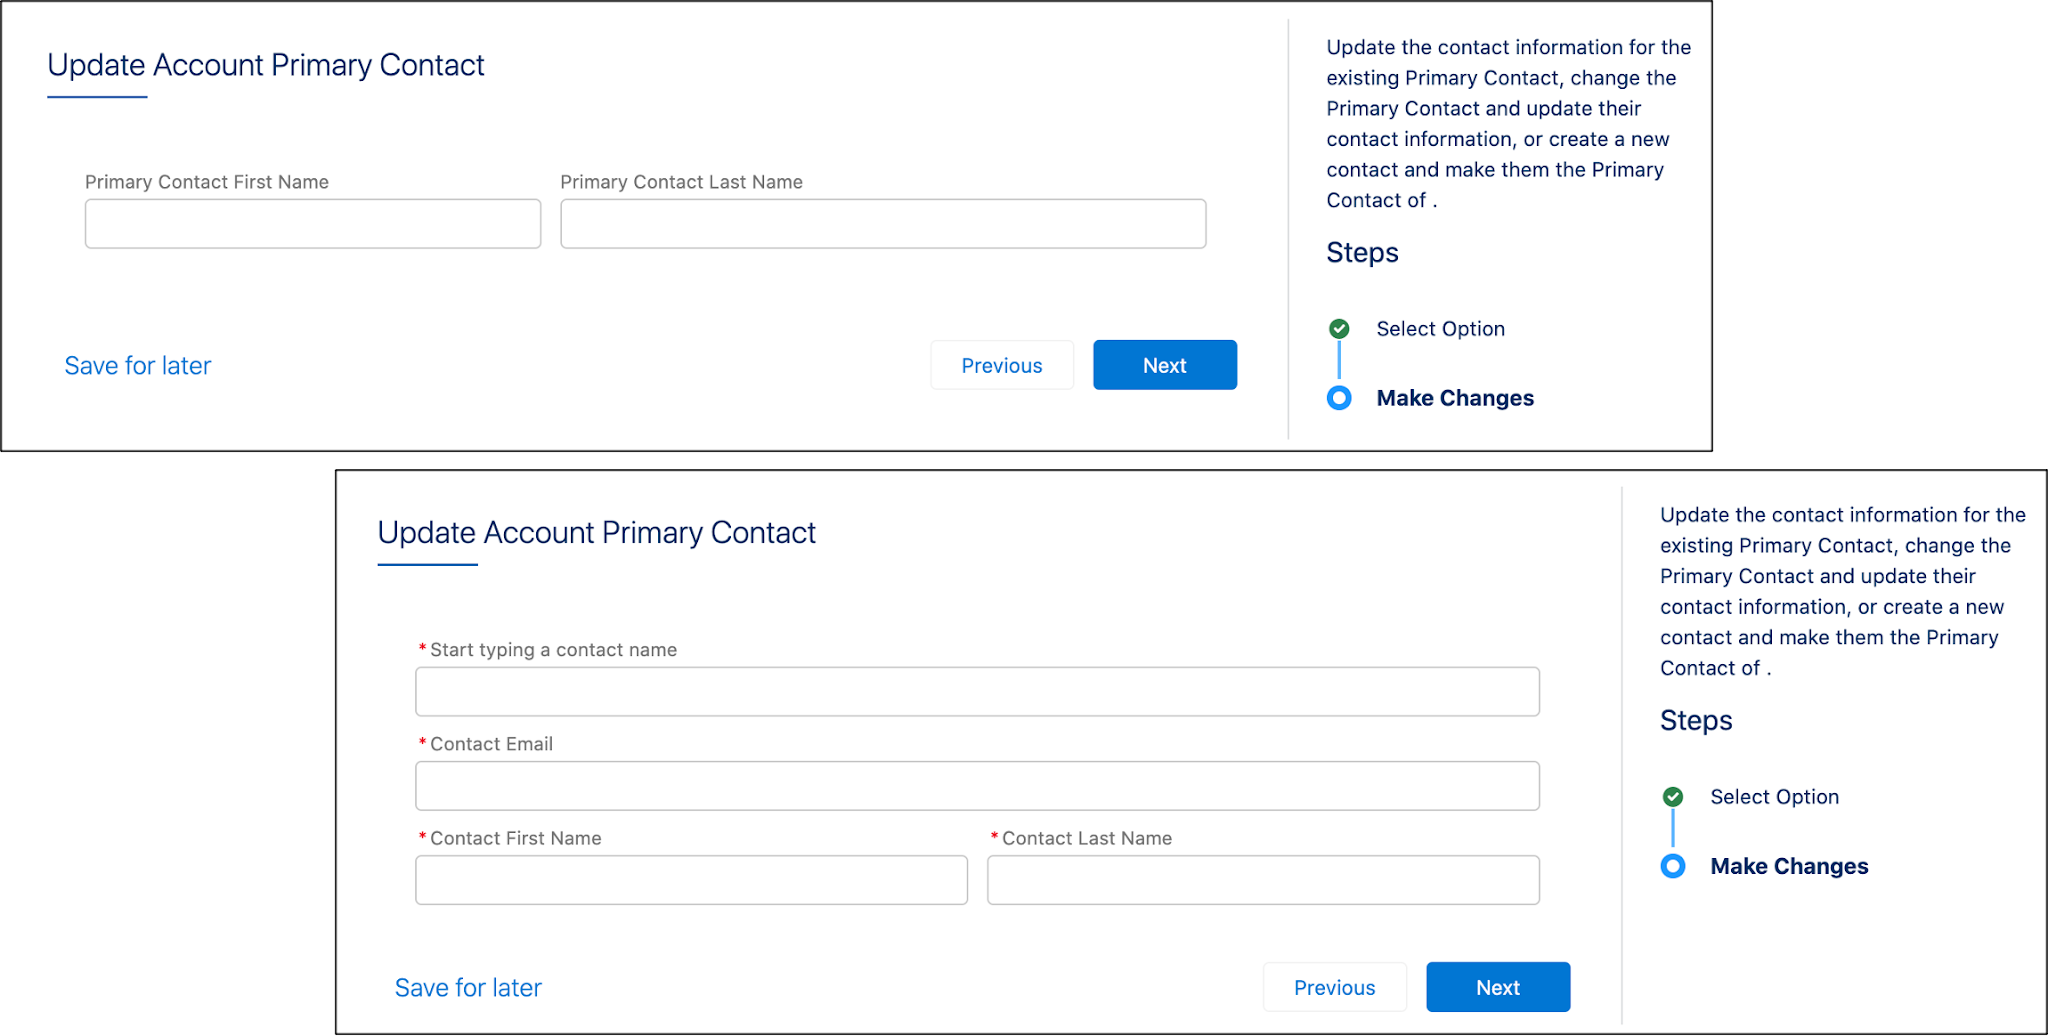
You want to design an interaction that helps customer service agents change an account’s primary contact details.
Consider this user story.
As a customer service rep, I want a guided interaction for an account that provides me with options to:
-
Update the contact information for the existing primary contact
-
Change the primary contact to another existing contact I can easily look up and edit their contact information
-
And create a new contact and assign them as the primary contact.
Here’s how this interaction would appear to service reps.
All Omniscripts require these elements:
- At least two data sources. The best practice is to use Omnistudio Integration Procedures.
- At least one Step to show inputs.
- A Navigate Action to direct the end user at the end of the interaction.
There are two requirements that add some complexity to our Omniscript example.
- A page that lets the service rep view and select options for what they want to do, but only one option at a time.
- A second page with groups of fields that conditionally display based on the option the service rep chooses.
Let’s see which Omniscript elements help you meet these two requirements.
For the first requirement, use radio buttons as Inputs elements. Unlike checkboxes, agents can select only one radio button at a time. This prevents the end user from accidentally selecting multiple options.
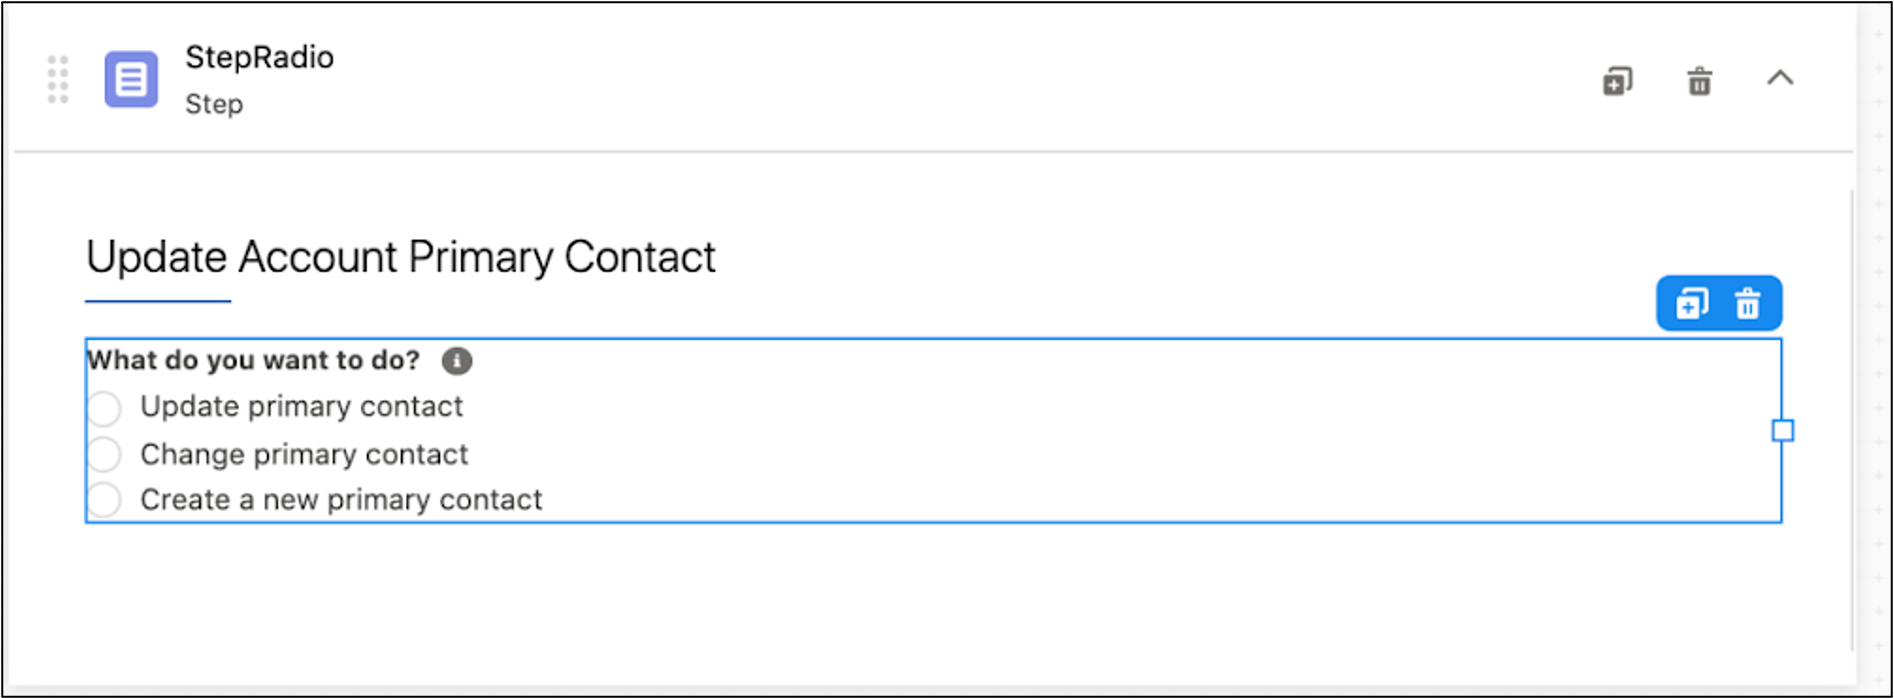
For the second requirement, Conditional Views applied to individual elements show groups of fields based on the radio button the service rep selects. You decide that the Omniscript has one Step that presents the choices and a second step that contains three different Blocks. This organizes different fields within each Block.
Branch 1: Update Primary Contact
Take a look at the example. Branch one, the Update branch, has three fields. Two show the first name and last name of the current primary contact and the other allows you to update that contact’s email address.
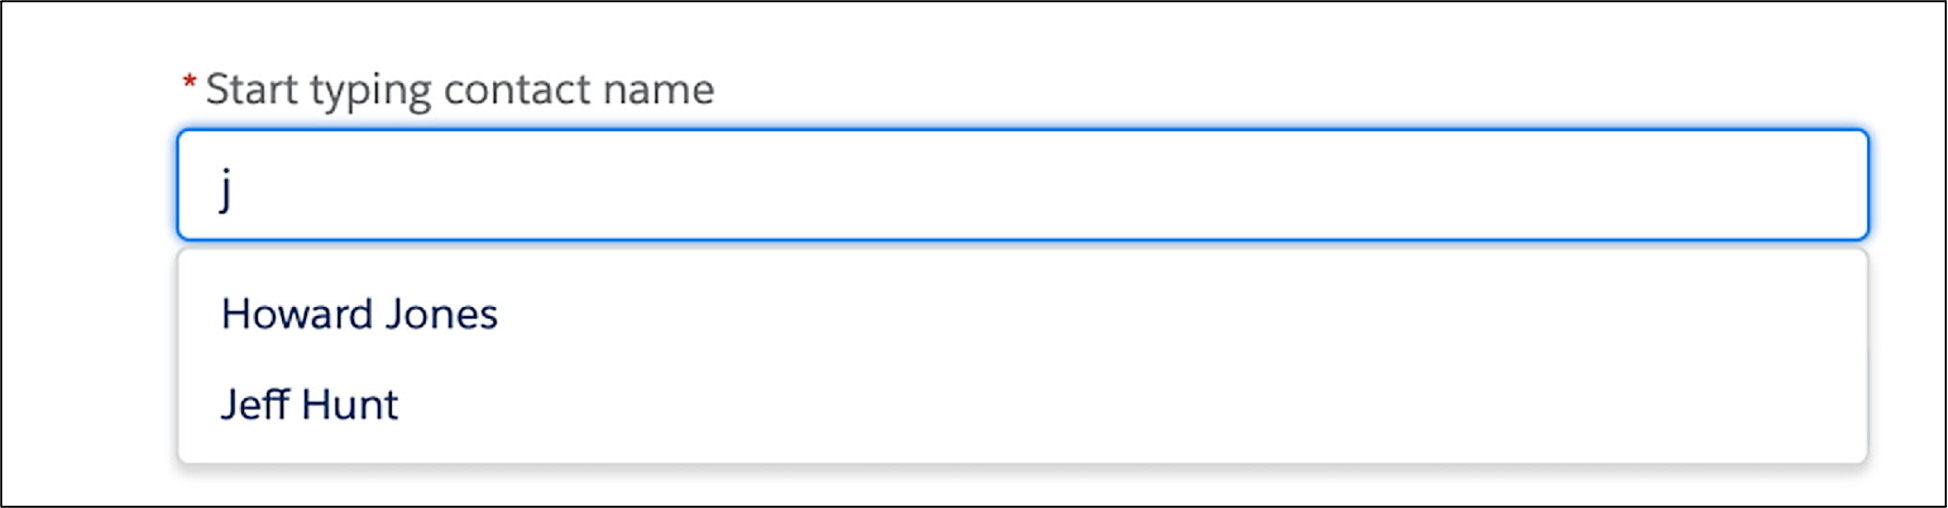
Branch 2: Change Primary Contact
Branch two, the Change branch, displays a field where you can search for and select a new primary contact. The search is limited to existing contacts linked to the account.
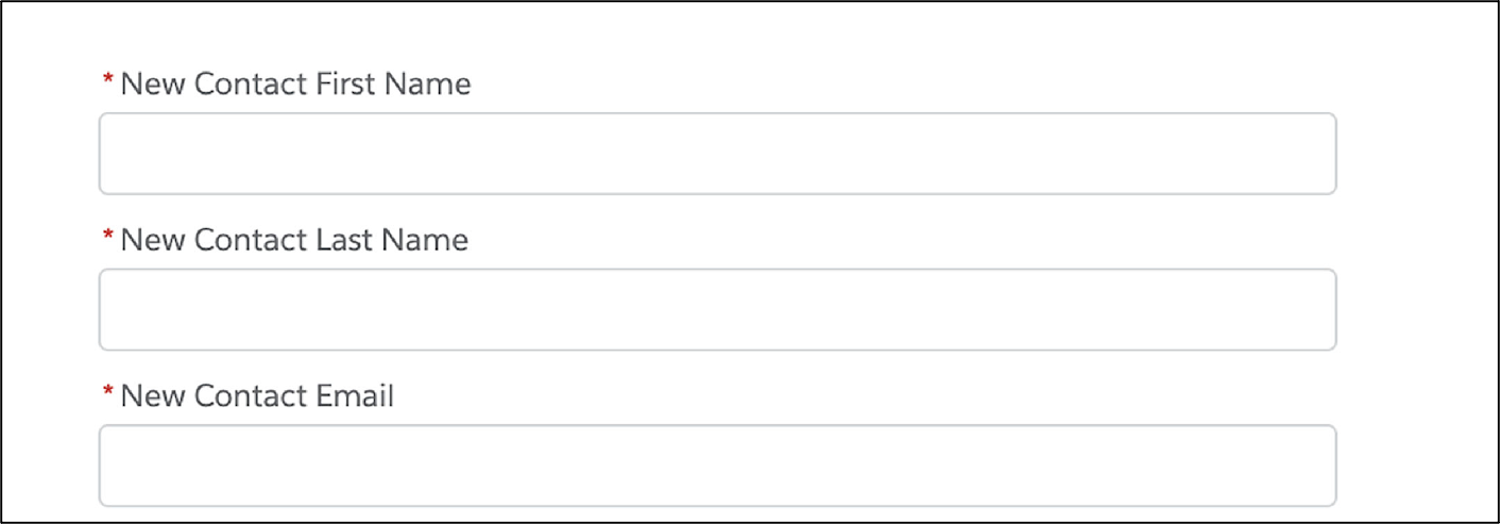
Branch 3: Create a New Primary Contact
Branch three, the Create branch, shows three fields that are the minimum needed to create a new contact and make them the new primary contact.
This Omniscript has multiple Blocks in one Step, but only displays one Block based on user input—the radio button they select. So, how do you configure the Omniscript so it branches like this? Link the radio buttons to their corresponding Blocks with a Conditional View.
By pairing radio buttons and Block elements via a Conditional View, you show a Block based on user input while hiding the others. The end user only sees one Block at a time. This makes the page user-friendly because it only displays fields related to the task at hand: updating, changing, or creating a new primary contact.
Now let’s explore how element properties can help you provide a better user interface (UI) and user experience (UX).
Use Element Properties to Change the UI and UX of an Omniscript
Have you ever walked away from an online interaction because poor design made a task time-consuming and difficult? The UI and UX of an interaction are critical to its success.
Fortunately, it’s easy to use element properties to enhance the UI and UX of an Omniscript!
Imagine you want the email field for a Primary Contact to show in an Omniscript, but don’t want end users to be able to leave this field empty. The solution? Make the field required. This simple adjustment of element properties ensures a seamless customer experience.
There are other UI settings you can configure easily with standard element properties.
- Adjusting the dynamic control width of a field, which is the relative width it has on the page.
- Making a field read-only so that the end user can't edit the field.
- Hiding fields from view that aren't meaningful to the end user but are needed on the backend.
- Providing tooltip help text so that end users can hover their cursor to discover what a field is for.
Omniscript Step elements have their own UI settings you can configure.
- Create clear and concise instructions that complement the information in the UI.
- Customize the Step Chart, which is what we call the list of steps that appear in the UI.
You’ve learned how to adjust element properties to improve UI and UX. There’s still more to discover!
Add Conditional Branching to an Omniscript
Imagine that you have the three Blocks we discussed earlier on the page, but only want to show one at a time based on end-user input: Update, Change, or Create. What’s the solution?
Enter conditional branching. You’re ready to add the radio buttons to the first Step. As you configure the properties, you link each of the Blocks in the second step to a different radio button or choice. Now your three Blocks will display one at a time based on end-user input.
How does this work? Remember, almost every element in an Omniscript lets you define conditional views. As mentioned earlier, when you set up the radio button element, you link each choice to a Block on your page via these conditional views. This is conditional branching in a nutshell.
After you’ve done this, add the data elements to bring in data. It’s also key to check this data is flowing into and out of the Omniscript by inspecting the JSON.
Manipulate and Inspect Omniscript JSON
You designed an example Omniscript using conditional branching that helps service agents update, change, or create a primary contact. Now it's time to add the data elements to bring in the data. Then, check that the data is flowing into and out of the Omniscript by looking at the JSON.
When you add elements that work with data, such as Integration Procedure Action elements, use the following properties to do more complex data mapping and manipulation.
Property |
Description |
|---|---|
Send JSON Path |
Send a specific node in the JSON to a data tool rather than the entire Omniscript’s JSON. |
Send JSON Node |
Relabel the JSON node that is sent to a data tool. |
Response JSON Path |
Trim the JSON data that is sent from a data tool to a specific node rather than return the entire JSON to the Omniscript. |
Response JSON Node |
Relabel the JSON node that is returned from a data tool. |
Pre-Transform Omnistudio Data Mapper Interface |
Call an Omnistudio Data Mapper Transform for more complex data mapping when sending data to a data tool. |
Post-Transform Omnistudio Data Mapper Interface |
Call an Omnistudio Data Mapper Transform for more complex data mapping when receiving data back from a data tool. |
When you’ve configured your Step and added elements to bring data into the Omniscript, use Preview to confirm the branching is working as expected. In Preview, you can see a preview of the Omniscript, inspect the JSON, and use the Action Debugger to confirm data is moving back and forth between the Omniscript and your data tools.
All of this branching business is pretty exciting, right? In the next unit, you learn how to add a Type Ahead Block to create the Change primary contact branch.
Resources
- Trailhead: Omniscripts in Omnistudio for Managed Packages
- Salesforce Help: Block (Omnistudio for Managed Packages)
- Salesforce Help: Use the Conditional View Property to Conditionally Display Elements (Omnistudio for Managed Packages)
- Salesforce Help: Integration Procedure Action (Omnistudio for Managed Packages)