Deploy OmniOut Projects
Learning Objectives
After completing this unit, you’ll be able to:
- Run a project in development mode.
- Compile the dist folder and deploy to a CMS, including AEM.
- Build the connection back to Salesforce.
Run a Project in Development Mode
Robert is nearing the finish line with his OmniOut projects in Omnistudio for Managed Packages. As a consummate professional, Robert sticks to best practice and runs each project in development mode to check for any glitches.
First, Robert runs a project in development mode.
- Using the source-code editor, in the .src folder’s index.html file, locate the function
JSForceConnectionExample().
- In the const connection object, enter the Salesforce Connected App's access token and the org’s instance URL.
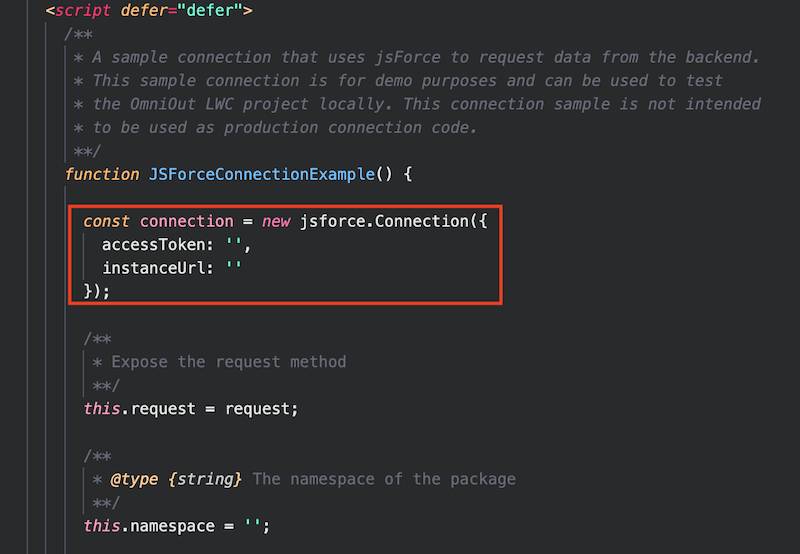
- For
this.namespace = 'NAMESPACE'replace NAMESPACE with the namespace of the package.
- Save the file.
- In the terminal console, run the command
npm run watchto restart the server and view the project locally.
- Check for errors, resolve, and test again as needed.
Robert runs all four projects in development mode, and everything looks good. Let’s move on to the next steps.
Deploy an App to a CMS
Robert needs to compile and deploy the apps to their respective platforms. Each customer has a standard CMS. His Healthy Benefits project uses the Adobe Experience Manager (AEM) CMS specifically, which requires additional steps.
These steps give you an example procedure for compiling and deploying an app to a CMS.
Use a Standard CMS
For a standard CMS, compile the dist folder.
- In the source-code editor, run the command
npm run build. The command compiles OmniOut into a dist folder.
- In the dist folder, confirm these files and folders are present as appropriate.
File/Folder
Required?
Description
app.js files, including numbered files, such as 0.app.js
Yes
The JavaScript files required for your Flexcard or Omniscript.
vlocityresources
Yes
The static resources required for your Flexcard or Omniscript.
index.html
Optional
A sample index.html file that shows how to run the OmniOut project.
newport
Optional
This file is required if you’re using the default Newport theme.
slds
Optional
This file is required if you’re using the Lightning theme, if your Omniscript contains an Image or File element, or if your Flexcard contains an Image element.
OmniscriptDocuSignReturnPage.html
Optional
This file is required if the Omniscript contains a DocuSign Action.
OmniscriptLwcDocuSignViewPdf.html
Optional
This file is required if the Omniscript contains a DocuSign Action.
- From the index.html file, select and copy the script tags that reference app.js files into your app’s index.html file.
- From the index.html file, select and copy the Omniscript or Flexcard component tag into your app’s index.html file. Here’s an example of a Flexcard component tag:
<flexcards-energyPlan run-mode="localScriptDef"> </flexcards-energyPlan>.
You’re finished compiling and deploying the app to a CMS. To deploy to AEM, you need to complete additional steps.
Use the AEM CMS
Deploying an app to the AEM CMS—as Robert’s client Healthy Benefits is doing—requires setting the resource paths in the OmniOut project to load Lightning and Newport styles into AEM.

First, create the connection to the Salesforce connection in AEM, then confirm it.
Next, set the resource paths in your project.
- In the source-code editor, locate and open the ./src/index.js file of the OmniOut project.
- Uncomment this line:
import { setSldsResourcesUrl, setNewportResourcesUrl } from 'c/salesforceUtils'.
- Locate and uncomment the setSldsResourcesUrl and the setNewportResourcesUrl functions.
- Save the file.
Then add credentials to and deploy the app.
- In the source-code editor, open the ./aem.ui.apps/pom.xml file.
- Edit the tags as follows.
In this tag
Replace this value
With this value
<crx.host>YOURHOST</crx.host>
YOURHOST
The AEM server hostname
<crx.port>PORT</crx.port>
PORT
The AEM server port
<crx.username>USERNAME</crx.username>
USERNAME
The AEM server username
<crx.password>PASSWORD</crx.password>
PASSWORD
The AEM server password
<publish.crx.host>HOST</publish.crx.host>
HOST
The AEM server hostname
<publsh.crx.port>PORT</publish.crx.port>
PORT
The AEM server port
<publish.crx.username>USERNAME</publish.crx.username>
USERNAME
The AEM server username
<publish.crx.password>PASSWORD</publish.crx.password>
PASSWORD
The AEM server password
- Run this command to deploy the application:
npm run deploy:aem:clean:full.
Now the OmniOut component has been added to AEM. Next, add the Omniscript to an AEM page.
- Enter the name of the Omniscript using the component tag name without brackets. For example, enter the tag for an Omniscript with Type = doc, Subtype = test, and Language = English, such as in this example:
vlocityomniscript-doc-test-english.
- Test the updated AEM site.
Robert can now view Flexcards and launch Omniscripts on the AEM page, so he’s nearly finished. The last task is to connect the app back to Salesforce.
Connect Back to Salesforce
Robert knows he needs to configure a connection object to connect his OmniOut projects to the Salesforce connected app he created earlier. A connection object exposes the instance URL, the namespace, and the request function. He knows each connection must be configured as required by each app. Luckily, Robert has a useful template to help him.
Connection Objects for OmniOut with Omniscripts
If your OmniOut project contains Omniscripts, create an event handler to pass the connection object after receiving OmniOut's omnioutcomponentready event.
Robert copies the correct format from his template to the ./src/index.js file. First, he creates an event handler and the connection object. He then configures additional connection options outside OmniOut for each app.
Connection Objects for OmniOut with Flexcards and No Omniscripts
If your OmniOut project has Flexcards and no Omniscripts, use the initializeDatasourceSdk method to connect your app.
Robert copies the correct format from his template to the ./src/index.js file. An event handler is not required if there are no Omniscripts. He then configures additional connection options outside OmniOut for each app.

Presto! Robert has successfully brought four different OmniOut projects to a close. Each client is pleased to offer Omnistudio for Managed Packages off-platform.
He’s excited to explore more of the advanced Omnistudio for Managed Packages capabilities. You now have the tools you need to better understand and use OmniOut, too. What projects can you use it for?
Resources
- Salesforce Help: OmniOut (Omnistudio for Managed Packages)
- Adobe Experience Manager Documentation: Integrating with Salesforce
- Salesforce Developers: OmniOut Connection Object Templates (PDF)