Explore MuleSoft RPA Builder Components
Learning Objectives
After completing this unit, you’ll be able to:
- Open MuleSoft RPA Builder and connect to a repository.
- Identify MuleSoft RPA Builder components.
- Explore the RPA Bot Task’s workflow structure.
Start Using MuleSoft RPA Builder

To start building RPA processes, open the MuleSoft RPA Builder executable file on your Windows system. This may be stored as a shortcut on your Windows desktop.
Recall from unit 1, to use MuleSoft RPA Builder you first log in to a MuleSoft RPA Manager account. The user must be assigned permission in a MuleSoft RPA Manager organization to use MuleSoft RPA Builder.
When MuleSoft RPA Builder starts, it prompts you to connect to an RPA repository, which is the same credentials you use to log in to an organization in MuleSoft RPA Manager
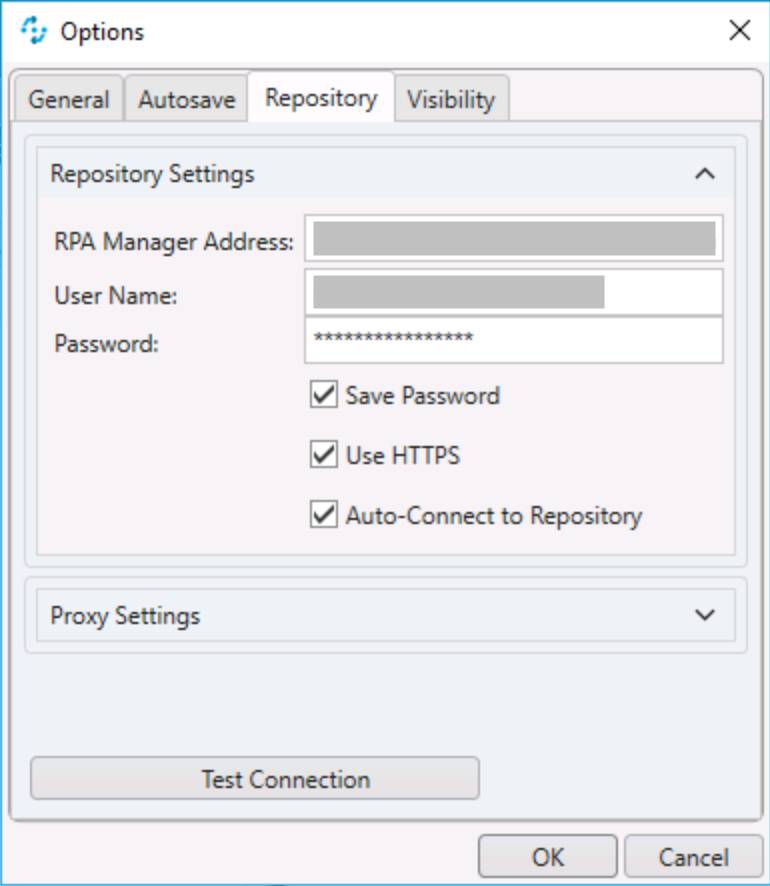
This table describes the repository settings.
| Setting | Description |
|---|---|
|
RPA Manager Address |
The URL of the RPA Manager instance RPA Builder connects to. Omit the protocol (https://) from this value. |
|
User Name |
The RPA Manager username that RPA Builder uses to log in. |
|
Password |
The RPA Manager password that RPA Builder uses to log in. |
|
Proxy Settings |
Configure the proxy settings if you access the internet through a proxy. |
You can optionally check Auto-Connect to Repository to auto-connect to skip this login screen the next time you launch RPA Builder.
Identify MuleSoft RPA Builder Components
Now that you’re logged in, let’s explore the RPA Builder views and components.

MuleSoft RPA Builder has multiple adjustable panes or views.
- The menu bar stretches across the top of the window.
- The left window pane contains multiple tabs, which are discussed in detail below.
- The top-middle section is the Business Process Modeler pane. This is where the imported BPMN model appears and can be further edited.
- Clicking a MuleSoft RPA Bot Task in the Business Process Modeler pane adds a new tab to the MuleSoft RPA Builder workbench.
- In the workbench the workflow is divided into three main blocks: the Workflow Initiation action block, the Activity Workflow action block, and the Workflow Finalization action block.
- The menu bar under the workbench tab provides context-specific functionality.
- The right window pane displays the workflow’s properties.
- The bottom section is the Workflow Run Result view. This is where logs appear when you run the implemented workflow.
Working in the Left Window Pane
The left window pane is an adjustable view and is composed of five tabs.

| Left Window Pane Tabs | Description |
|---|---|
|
Project Explorer |
This tab shows the current workflows open in the workbench and recent projects. |
|
Repository Explorer |
This tab allows you to connect to an RPA repository and download RPA processes based on categories. |
|
Activity Library |
This tab is a repository (not to be confused with the Repository Explorer) that holds saved activities and triggers. Frequently used activities, such as opening a browser window, are saved in the activity library for reuse. |
|
Outline |
This tab shows a condensed view of the workflow currently in focus on the workbench. |
|
Toolbox |
This tab contains elements used for RPA Bot Task implementation. These elements can be dragged and dropped inside transactions, app sessions, and so on. |
Explore the Structure of an RPA Bot Task’s Workflow
Now let's look at the components that make up an RPA process flow and how they're linked together.
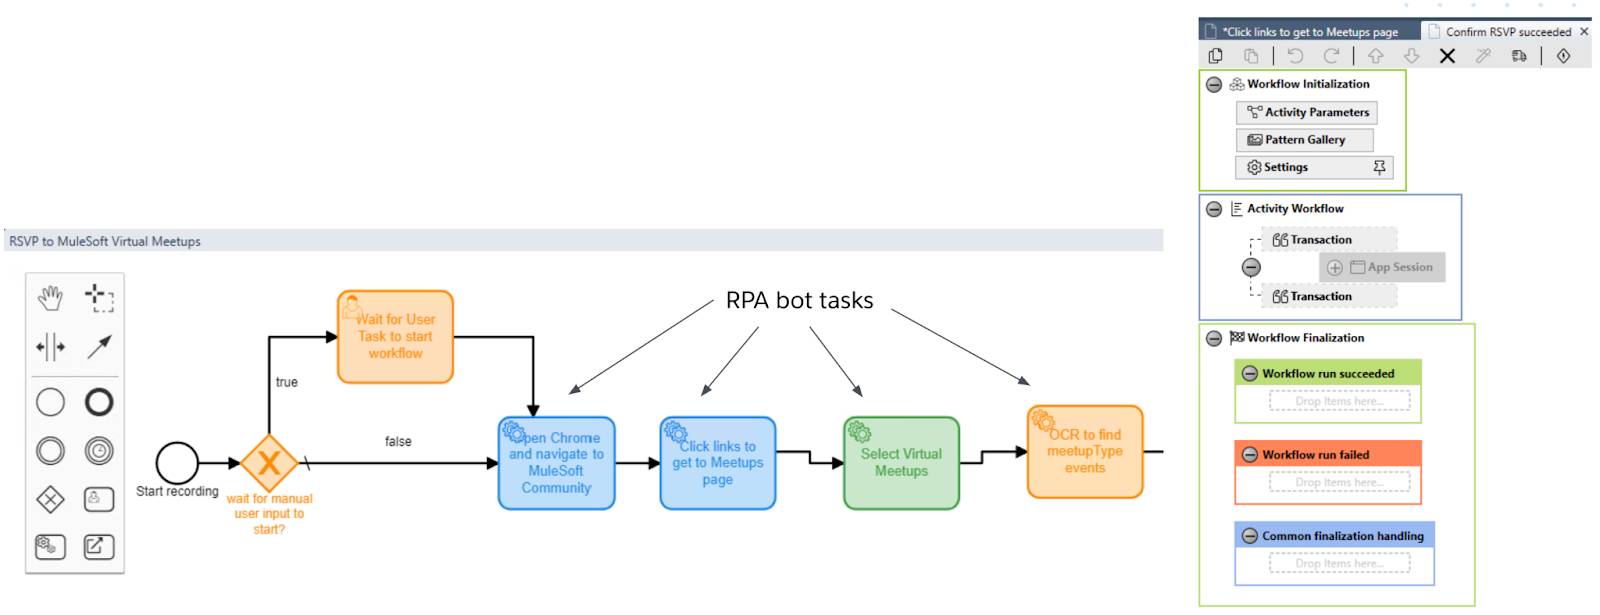
The activities in MuleSoft RPA Builder flows resemble those in the MuleSoft RPA Manager BPMN editor. After an RPA process is imported, you can further edit it here. There are two types of Tasks that make up an RPA process.
| Task Type | Description |
|---|---|
|
RPA Bot Task |
Task executed by a MuleSoft RPA bot. |
|
User Task |
Task executed by a user. |
Each RPA Bot Task is associated with its own workbench tab in MuleSoft RPA Builder. Use the workbench to implement a Bot Task’s workflow steps.
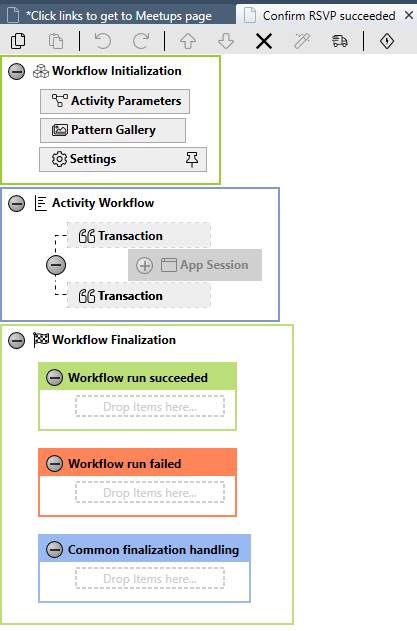
Each activity block starts with a Workflow Initialization Activity block and ends with a Workflow Finalization Activity block. The middle activity is an empty block called an Activity Workflow where you drag and drop elements from the Toolbox to "code" and configure the core functionality of the Bot Task.
| Activity Block | Description |
|---|---|
|
Workflow Initialization |
Block that runs before the workflow. |
|
Activity Workflow |
Block with one or more transactions. |
|
Workflow Finalization |
Block that runs after the workflow completes. |
|
Trigger Workflow |
Block for trigger workflows. |
Each block is composed of the following elements from the MuleSoft RPA Builder Toolbox.
- Action steps to automate human user actions
- Control blocks to route and test results
- Other logical programming elements
You use activity parameters, or variables, to pass data into the RPA flow and between flow activities. Activity parameters are initialized in the workflow initialization block.
Walkthrough
Now that you know your way around MuleSoft RPA Builder, take a look at the following video demonstration showing a user working with the tool. If you wish to follow along, check out the walkthrough instructions.