Visualize the Solicitation Process with Path, List Views, and Kanban
Learning Objectives
After completing this unit, you’ll be able to:
- Describe the benefits of both the Path and Kanban visualizations.
- Track a record’s stage or status in List Views.
- Update records, use filters, and view charts in the Kanban view.
Tracking Your Progress on an Opportunity
Moves management is all about getting the prospect or donor to the point where you feel ready to ask them to make a gift.
So far, you learned about engagement plans and activities related to moving donor prospects to deeper levels of engagement. But what about the ask?
The process of managing the solicitations and donations is tracked in NPSP through the Opportunity object. In this unit, you explore Path and Kanban view, two Salesforce features designed to help fundraisers effectively manage the solicitation process, and how to make smart use of List Views.
Track Your Solicitation Process with Path
Path shows you, at a glance, where a donor or grantmaker is in your solicitation process. It is a visual representation of your opportunity stages and process, or what Salesforce calls Sales Processes.
Path visualizes where you are and where you’re going with an opportunity. It can be customized by your organization to your own process, so your path might be different from our examples in this unit. Plus, Path can change depending on which Opportunity Record Type you have selected and can be customized to each.
NPSP comes with some default paths to help you get started. If you select the Grants record type on an opportunity, for example, the stages in your Path will include Prospecting (Open), LOI Submitted (Open), Application Submitted (Open), Withdrawn (Closed, Lost), and Awarded (Closed, Won).
Let’s take an example of Path from work NMH’s Development Director Aniyah is in the midst of on an opportunity that’s the Major Donor record type.
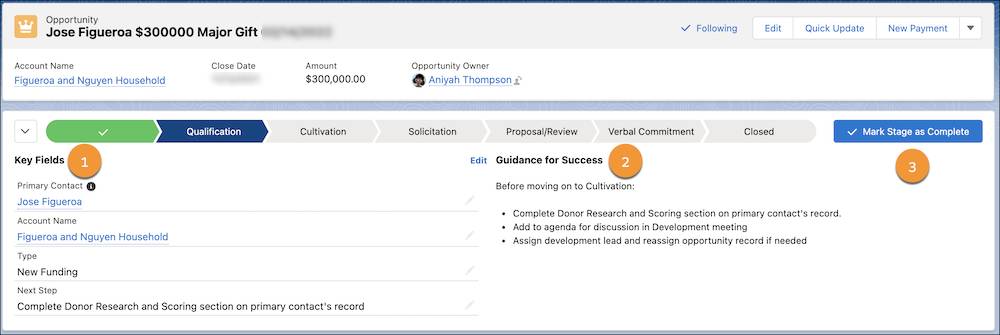 This example illustrates a few different features of Path
-
Key Fields (1) show the information you need most in each stage, putting critical data front-and-center. What appears there can be customized by your awesome admin.
-
Guidance for Success (2) helps you make sure you don’t miss any critical activities for a stage. This, too, can be customized by your admin to deliver specific guidance for your fundraising team or volunteers.
- Path can also be used to update a record’s status directly by clicking Mark Stage as Complete (3) to move the record to the next step on the path.
If you need to skip ahead to another stage — or retreat to one you thought was complete — click the stage on the path you’re moving to, then click Mark as Current Stage.

Work Your Active Donors and Prospects with List Views
Path is a great way to manage a single solicitation, but most fundraisers are working on multiple opportunities at once.
To review all of your open opportunities in one place, you can start with List Views. List Views help you sort, segment, prioritize, and analyze the records that are most important to you.
You access List Views from object home pages, like the Opportunities tab. Let’s start there.
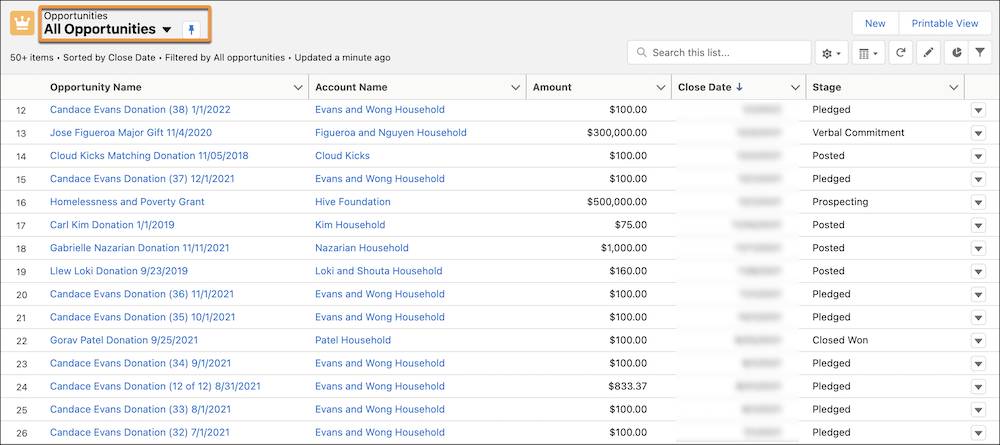
Click Opportunities to go to your Opportunities List View page.
There are several different list views on this page. To select another, click the menu arrow ( ) next to the List View name to access Standard and Custom List Views including views like Recently Viewed or Closing this Month.
If you want to set a particular List View as your default, click the pin icon ( ).
).
There are many ways to customize what you see in your list using the List View tools at the top of the page.

- Search field (1): Enter text to search your list view.
- List View Controls (2): Click to create, rename, clone, or share your list view. You can also choose which fields to show in the list and edit filters you’ve applied.
- Display as (3): Click to change from standard table view to Split View or Kanban view (more on that in a bit). The icon changes to match the selected view.
- Refresh (4): Click to get an updated view quicker than through a browser page reload.
- Edit List (5): Click to update fields on records from the list view. You move to the first editable field in the list. Changed fields are highlighted in yellow to remind you to save your changes.
- Charts (6): Click to create visualization of the list view to see percentages, trends, and other useful information.
- Filters (7): Click to narrow or expand the records that appear in a list view by adding, modifying, or removing filters.
Now let’s see how Aniyah puts these tools to work.
Create a List View
Aniyah wants to view all of her open major gift solicitations, so she sets up a custom List View to quickly find and manage those opportunities.
Let's follow Aniyah as she creates the List View:
- Click the Opportunities tab.
- Click the List View Controls menu (
 ) and then click New.
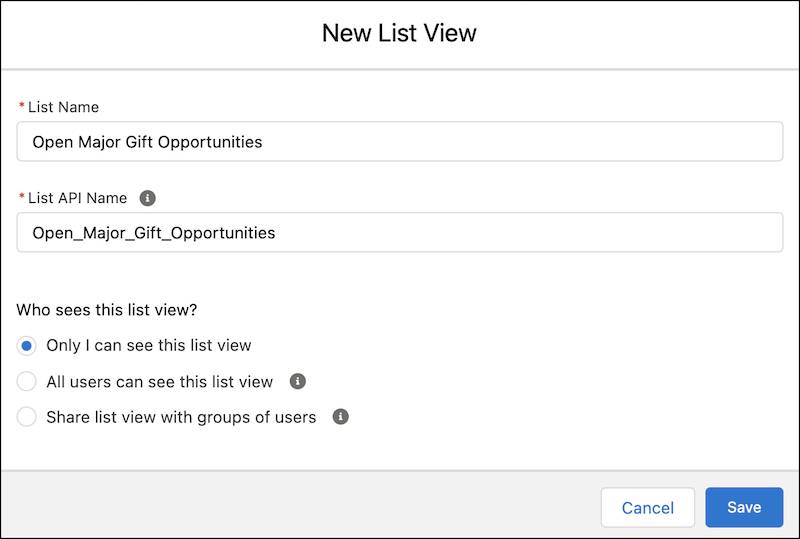
- Enter a List Name. Aniyah enters
Open Major Gift Opportunities.
- A List API Name will be generated automatically from the List Name. Leave this as the default.
- Select Only I can see this list view. Aniyah will change sharing settings later to share it with her group and executive director after it’s set up.
- Click Save.
The new List View is showing us all of Aniyah’s opportunities, regardless of type or campaign. Let’s set up some filters to segment for just open capital campaign opportunities.
- In the Filters area, which should already be open, click Filter by Owner.
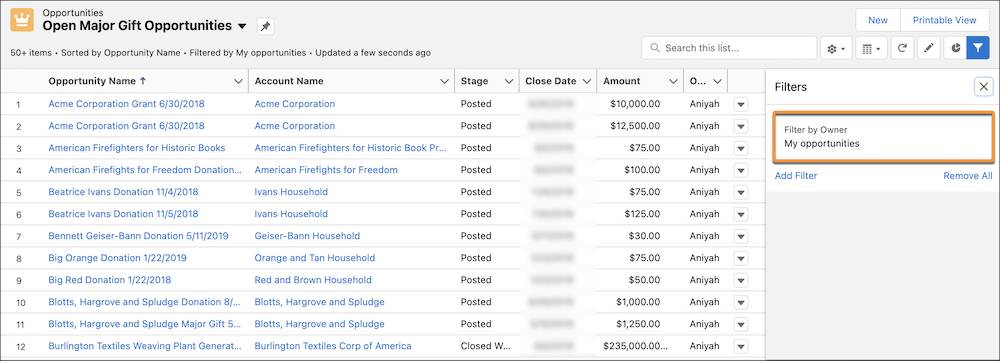
- Select All Opportunities.
- Click Done.
- Now let’s narrow this down. Click Add Filter.
- From the Field dropdown menu, select your field, operator, and value to filter. Let’s filter to only major gifts records.
- Select Opportunity Record Type in Field.
- Select equals, the default, in Operator.
- Select Major Gift in Value.
- Click Done.
- Now limit the list view to just open opportunities. Click Add Filter again.
- Select Stage in Field.
- Select not equal to in Operator.
- Select Closed Lost, Closed Won, and Posted in Value.
- Click Done.
- Click Save.

The list is now pared down to only open major gift opportunities. And the new view appears in the List View dropdown for later access for Aniyah. She can share it later with her team by changing the Sharing Settings. First, she wants to customize a few more things.
- Under the List View Controls gear, she’ll click Select Fields to Display to add, move, and reorder the information included on the list view. For example, she adds the Primary Contact and Probability (%) fields to the view.
- In the List View’s header row, she clicks a column header to sort that column. The arrow indicates which column is sorting the list view and in which direction.
Mass In-Line Editing via List Views
Sometimes, Aniyah finds that she needs to make quick updates to multiple records. For example, she spent most of her day meeting with prospects and she needs to update a few close dates and stages before her weekly check-in with NMH’s executive director.
The good news is that you can mass edit records right from List Views!
To update records from a list view, click the edit pencil icon ( ) in the field you want to change and make the update. The fields you change are highlighted in yellow until you click Save.

Manage Records in the Kanban View
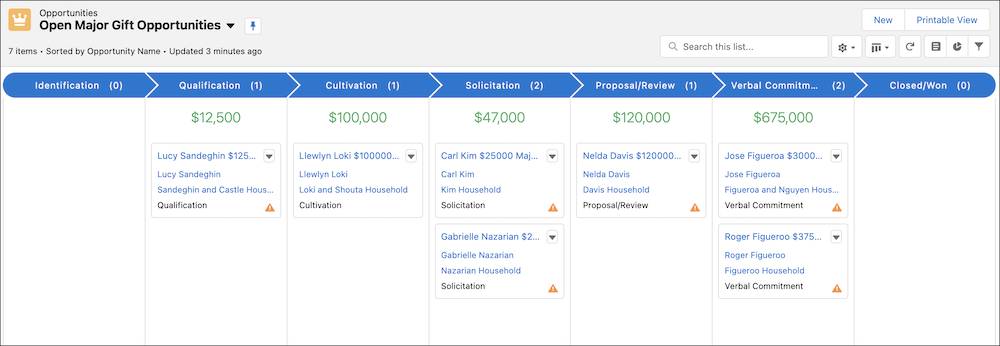
In Japanese, the word kanban means billboard or sign. In Salesforce, it's a way of displaying a List View’s records as cards in columns, making it easier to visually track and update work.
Kanban view gives you a big picture view of all your work and lets you easily sort, summarize, filter, and move opportunities between stages. The records in the Kanban view are based on List Views.
You can switch a List View to Kanban view by clicking the Display as button ( ) and selecting the Kanban view (
 ).
).
Aniyah finds that Kanban view is helpful when she meets with her team, her executive director, or her board committees. Everyone can use the Kanban view to quickly understand how things are going.
Let’s check out the Kanban view for Aniyah’s Open Major Gift Opportunities list view.
Use Kanban to Move an Opportunity to the Next Stage
By default, the Kanban view for opportunities is organized by the Stage field. Each column represents one stage. Let’s move an opportunity record to the next stage in this view.
- Click any record in the Identification column.
- While holding down the mouse, drag the opportunity card into a different column.
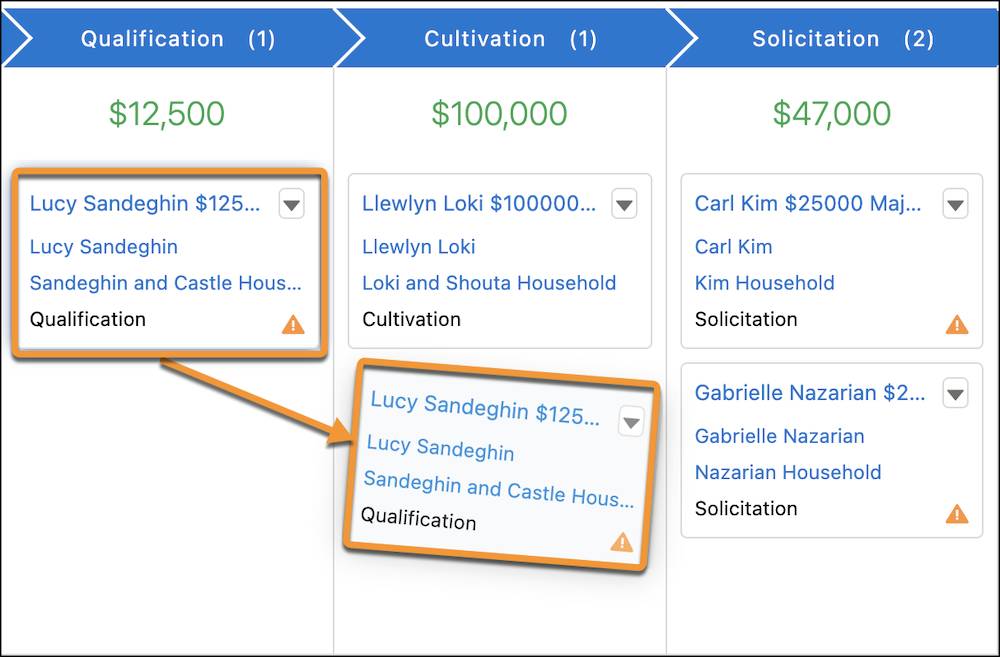
- Release the mouse button. Your totals in each stage automatically update.
Talk about moves management, right?
Take Action on Your Records
If you need to make edits on your opportunity records, you can do that in the Kanban view, too.
Just click the menu down arrow ( ) on a Kanban card, select Edit, and make whatever change you need in the pop-up interface without leaving the list view.
If an opportunity doesn’t have any upcoming Tasks or events, the Kanban card shows a warning symbol ( ) to let you know that you might need to set an activity so your solicitation doesn't lose momentum. Aniyah might have some work to do!
There is even more you can do with Kanban view including filtering and displaying charts. To dig deeper into the features of Kanban view, check out the resources below.
In the next unit, you learn how to collaborate with your colleagues to move opportunities forward.
Resources
- Salesforce Help: Guide Users with Path
- Trailhead: Lightning Experience Customization (includes unit on list views)
- Salesforce Help: Use Kanban to Work with Graphical Views of Your Records
