Access Salesforce Data via REST APIs
Learning Objectives
After completing this unit, you’ll be able to:
- Instantiate a REST request with the RestClient class
- Issue an asynchronous REST request with the RestClient and RestRequest classes
- Receive and process a REST response with the RestResponse class
Using REST APIs
When you’re ready to access Salesforce data in your app, you call Salesforce REST APIs. REST APIs, as a rule, are low-level enough that developers can access them manually through rudimentary network calls. However, you don’t have to do that—you have Mobile SDK to handle the messy grunt work for you.
Here’s a summary of the classes that handle REST API calls. All these classes live in the com.salesforce.androidsdk.rest package.
- ClientManager—Serves as a factory for RestClient instances. It also handles account logins and handshakes with the Salesforce server.
-
RestClient—Handles protocol for sending REST API
requests to the Salesforce
server.
Don’t directly create instances of RestClient. Instead, call the ClientManager.getRestClient() method.
-
RestRequest—Represents REST API requests
formatted from the data you provide. Also serves as a factory for instances of
itself.
- RestResponse—Contains the response content in the requested format. The RestRequest class creates RestResponse instances and returns them to your app through your implementation of the RestClient.AsyncRequestCallback interface.
Here’s an animated diagram that shows this flow in action.
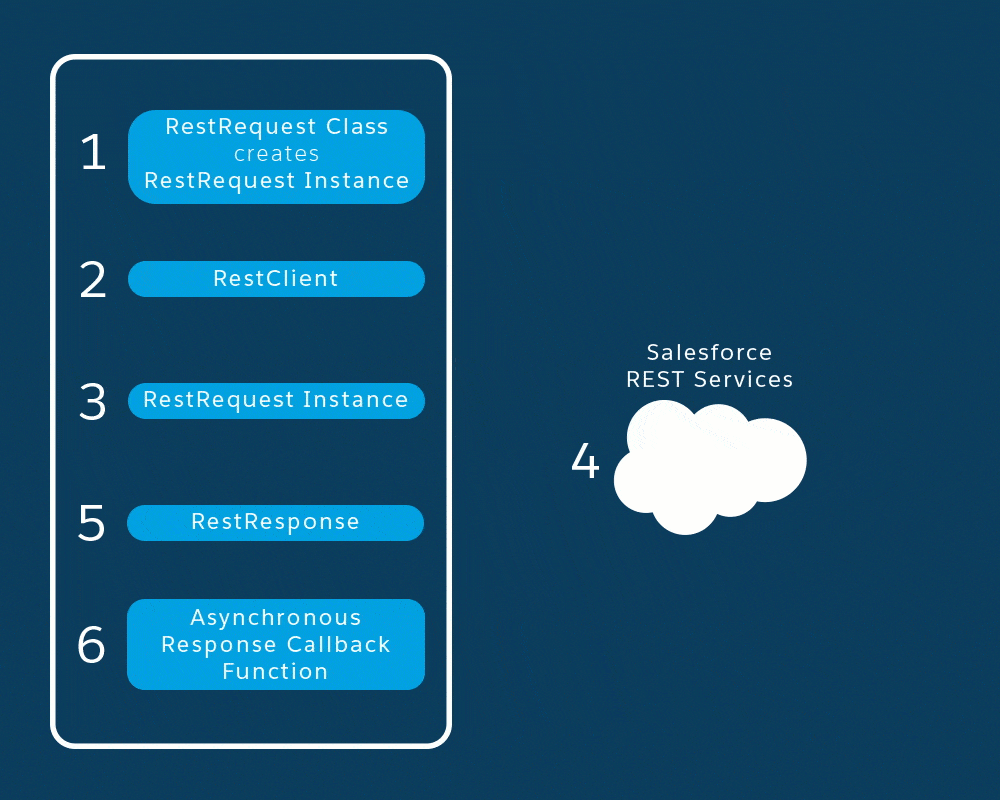
- The app calls a static method on the RestRequest class to create a configured RestRequest instance.
- The app passes the new RestRequest instance and an instance of the AsyncRequestCallback interface to the RestClient.sendAsync() method.
- Mobile SDK sends the REST request presented in the RestRequest object to the Salesforce cloud service.
- Salesforce processes the request and returns a JSON response to the app.
- Mobile SDK packages the JSON response in a new RestResponse object.
- Mobile SDK passes the new RestResponse object to the app’s AsyncRequestCallback implementation for consumption.
Still awake? Let’s move beyond the conceptual level and see this information at work in the real world of your app.
The sendRequest() Method
Your MainActivity class sends REST requests and
then uses the REST responses to populate its list view. Let’s dive back into the
MainActivity code to trace this flow.
- In Android Studio’s Project window, expand .
- Double-click MainActivity.
- Find the onFetchContactsClick method.
Notice that this tiny method calls a sendRequest() method with a SOQL statement.
public void onFetchContactsClick(View v) throws UnsupportedEncodingException { sendRequest("SELECT Name FROM Contact"); } - Right-click “sendRequest” and then select . Turns out that sendRequest() is a private method in your MainActivity class. That’s cool that it’s yours, because we’re going to change it later!
The sendRequest() method is where you see the
Mobile SDK REST
classes at work. The major players here are:
- client—A private, class-scoped instance of RestClient. This object is instantiated automatically during app initialization
- restRequest—A new RestRequest instance
- RestRequest.getRequestForQuery()—A static RestRequest factory method that creates the RestRequest instance
- AsyncRequestCallback—Your app’s implementation of the REST response callback interface
Creating the REST Request
In sendRequest(), the RestRequest.getRequestForQuery() factory method
takes a SOQL string and wraps it in a RestRequest
object.
The
advantage of using RestRequest factory methods
is that the generated object is network-ready—it already knows the HTTP
settings that the Salesforce server expects.
RestRequest restRequest =
    RestRequest.getRequestForQuery(
getString(R.string.api_version), soql); Sending the REST Request
To send the request to Salesforce, you pass the RestRequest object to the RestClient.sendAsync()
method.
Mobile
SDK code creates the client object for you
while it’s initializing your activity. The second parameter, of type AsyncRequestCallback, is an instance of a virtual
interface that’s designed to receive REST responses. In this example, AsyncRequestCallback is implemented and
instantiated inline.
client.sendAsync(restRequest, new AsyncRequestCallback()
    {
...The “async” prefix keeps showing up here. That’s got to mean something important, right? When you send a request asynchronously, it means that your app’s code doesn’t pause to wait for the response. When the response does arrive, Mobile SDK calls one of your callback methods, and the app briefly suspends whatever’s going on to process the response. You’re required to send requests asynchronously when your code’s execution is occurring on the main (UI) thread.
Capturing and Processing the REST Response
When Salesforce returns the REST response, the RestClient object forwards it to your AsyncRequestCallback implementation. In the AsyncRequestCallback interface, you define how your
app handles the REST response from Salesforce. You handle successful REST responses
in the onSuccess()
method:
and
you recover gracefully from failed requests in the onError()
method.
Notice
that the REST response arrives in JSON format, so it’s easy for code-writing humans
to parse. If the query succeeds, the app extracts Name field values to populate the
UI list view. If the query fails, the app displays a toast containing an error
message.
@Override
public void onSuccess(RestRequest request,
    final RestResponse result) {
    result.consumeQuietly(); // consume before going back to main thread
    runOnUiThread(new Runnable() {
        @Override
        public void run() {
            try {
                listAdapter.clear();
                JSONArray records =
                    result.asJSONObject().getJSONArray("records");
                for (int i = 0; i < records.length(); i++) {
                    listAdapter.add(
                        records.getJSONObject(i).getString("Name"));
                }
             } catch (Exception e) {
                 onError(e);
             }
        }
    });
}@Override
public void onError(Exception exception)
{
runOnUiThread((new Runnable() {
@Override
public void run() {
Toast.makeText(MainActivity.this,
MainActivity.this.getString(R.string.sf__generic_error,
exception.toString()),
Toast.LENGTH_LONG).show();
}
});
}