Collect Information to Quickly Help End Users
Learning Objectives
After completing this unit, you’ll be able to:
- Explain the benefits of adding pre-chat fields to your Enhanced Chat Deployment.
- Identify the privacy considerations for hidden pre-chat fields.
- Explain the building blocks of creating a pre-chat field and sending its data to the right place.
Now that you’ve decided whether to add user verification, it’s time to think about what data you want to collect from your end-users at the start of the chat conversation.
Creating Pre-Chat Fields
There are many reasons for collecting data from end users before the conversation starts, from asking their order number so you can look up the details to taking note of the items in their cart so you can speak to their interests. We include more examples below and illustrate the benefits of how collecting data earlier from your users can help their experience during the chat exchange and your customer support function.
You can use a pre-chat form to present fields that end users fill out before beginning the chat. Or you can automatically collect data using hidden pre-chat fields. Either way, it’s possible to send the field values to a destination that helps move the conversation forward. This destination can be as simple as storing the data in the messaging session record so an agent can reference it, or using a bot to assist the customer based on the data collected.
Here are some common examples of visible or hidden pre-chat fields and how they can help move a conversation forward.
|
Field Name
|
Visibility
|
Field Type
|
Purpose
|
|---|---|---|---|
First Name |
Visible, standard |
Text |
Build rapport and trust by using your customer’s name in conversation. |
Order Number |
Visible, custom |
Number |
Decrease time-to-resolution by gathering information that moves the interaction forward. |
Support Reason or Product |
Visible, custom |
Dropdown |
Route work to the agents best equipped to help. |
Page |
Hidden |
Text |
Create a proactive bot that tailors the outreach message to the page where the customer is. |
Browser or OS |
Hidden |
Text |
Collect information to decrease time-to-resolution on a technical support request. |
Privacy Considerations Come with Hidden Pre-Chat Fields
Hidden pre-chat fields aren’t displayed to your end-user. They can be a great tool for tailoring an interaction to your end user without burdening them with requests to send you data. However, customer trust is also built through transparency. Here are our recommendations for working with hidden pre-chat fields.
- Update your privacy policy to include what data you collect with hidden fields.
- Consider linking to your updated privacy policy from your pre-chat form.
Collect the minimum amount of data needed for an agent to do their job, and only store this data for as long as it’s needed to close the case.
Whether you’ve strategized how to balance transparency with efficiency using hidden pre-chat fields, charging ahead with visible pre-chat fields, or using a combination of both, let’s learn how these fields are created.
Create a Pre-Chat Field
Enhanced Chat pre-chat fields aren’t the same as the Salesforce traditional standard and custom fields that live on an object. Pre-chat fields are created differently. Let’s get familiar with the building blocks of this process to set you up for success.
There are four standard, visible pre-chat fields to choose from.
- First Name
- Last Name
- Email
- Subject
There are six custom visible field types to choose from.
- Email
- Number
- Phone
- Checkbox
- Dropdown
- Text
There aren’t standard hidden pre-chat fields, only custom hidden pre-chat fields. All custom hidden pre-chat fields are text fields.
While some of those field types might sound familiar, remember that these are built differently than the Salesforce custom fields that live on an object. This shows up in a few ways.
- When you pass pre-chat field data through a flow, the flow converts the field to a string field. While your end user will see the aforementioned field types on the pre-chat form, an agent will see that data rendered as a string if it’s passed through a flow.
- The building blocks for creating a custom pre-chat field are different from creating a custom Salesforce field on an object.
Here are the basic building blocks of how a custom pre-chat field is built:

The custom parameter maps the custom field to your messaging channel. It does this with a field called Channel Variable Name. Let’s look at a simple example: an Order Number field. In the next image, we can see how the channel variable name called Order_Number maps directly into a visible or hidden field when you create either one.

For the full set of step-by-step instructions for creating a custom field, check out Customize Pre-Chat for Enhanced Chat
Flows and Pre-Chat Data
Flows help you route the information collected from pre-chat fields to a desired destination. Let’s look at the three major flow elements that work with Enhanced Chat and how they can help you achieve your team’s goals.
|
Goal
|
Flow Element
|
|---|---|
Provide an agent with additional context when they begin a messaging session. Use pre-chat data to update an object. |
Update Records |
Use pre-chat data to tailor bot activity to customer needs. |
Route Work |
Use pre-chat data to route work to the agents best suited to assist. |
Route Work |
Use pre-chat data to search for and link the interaction to a record. |
Search for Records |
How Is Custom Pre-Chat Data Sent to Flows?
Now that you understand the building blocks of a custom pre-chat field, let’s see the additional magic that it can do when sending data into flows. We already know that a custom pre-chat field gets connected to a parameter mapping by the custom parameter.
That parameter mapping introduces a flow variable name that sends pre-chat field data to the flow.

Working with the previous example of an Order Number field, let’s explore how inputs from that field could travel to a messaging session record so the agent has that data available when chatting with the end-user. In this case, we’d create a separate Salesforce custom field called Order Number on the Messaging Session object. The flow is the vehicle sending data from the Order Number pre-chat field to the Order Number custom field on the Messaging Session object.
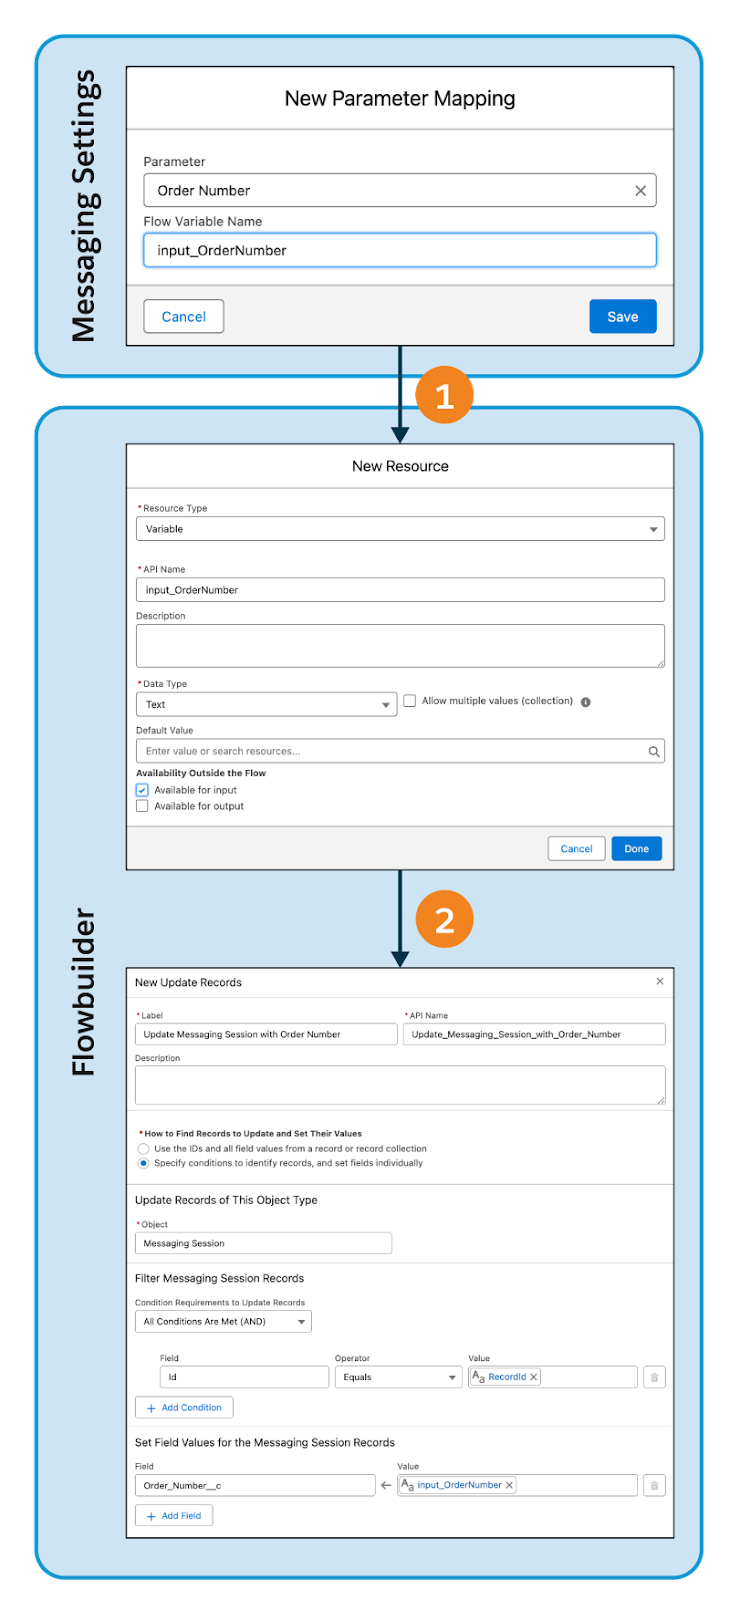
So how does it all come together in this example? We recall that the Order Number custom field was connected to a custom parameter called Order Number. Here, we’re using a parameter mapping to associate the Order Number parameter with a Flow Variable Name called input_OrderNumber. This flow variable name becomes the API name of a new flow resource by the same input_OrderNumber name (1). Then we use an Update Records flow element to map the input_OrderNumber resource to an actual Salesforce custom field on the Messaging Session object called Order Number (and known to your org as Order_Number_c).
When you’re ready to take these steps, check out Customize Pre-Chat for Enhanced Chat and Map Pre-Chat Values in Omni-Channel Flows.
Resources
- Salesforce Help: Add Terms and Conditions Acceptance to Your Pre-chat Form
- Salesforce Help: Create and Customize Retention Policies for Data and Storage