Design Your Data Model
Learning Objectives
After completing this unit, you’ll be able to:
- Identify your data sources.
- Specify the data you will store in Marketing Cloud Engagement.
- Design a data model to use in Contact Builder.
Before You Start
Before you start this module, make sure you complete Marketing Cloud Engagement Contact Management. The work you do here builds on the concepts and work you do in that badge.
Get Ready for Your Data Deep-Dive
As a developer, you are probably excited to begin incorporating your company’s data into Marketing Cloud Engagement, but you may not be sure where to start. Well, you came to the right place! Moving your data into Marketing Cloud Engagement is a lot like moving into a new house. Before you move, you need to do a few things.
- Decide what stuff you’re keeping.
- Label and box it up.
- Figure out where to put your things in your new place.
The same is true for data. Let’s dive in and get you ready for moving day!
Identify Your Data
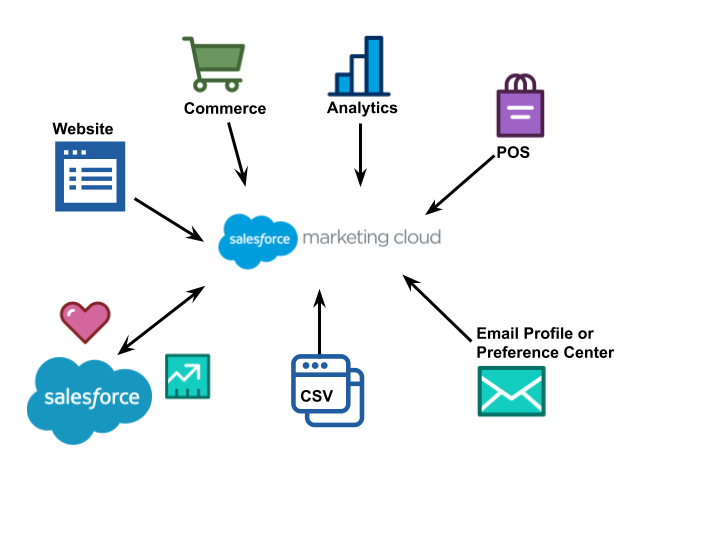
As you know, data can come from many sources, like web forms, web analytic services, preference centers, point-of-sale (POS) systems, social media, and so on. That’s why it’s a good idea to brainstorm and plot out all of your current and potential data sources. This step usually takes some teamwork, so if you haven't done it already, grab a whiteboard, round up your colleagues, and put your heads together. Don't worry, we'll wait.
Choose Your Database of Record
Once you’ve identified potential data sources, it’s time to choose your database of record (DBOR). A DBOR is the source of truth for subscriber opt-in status and general info about that subscriber. This is where you can find the most up-to-date information about your customers. Plus, this decision helps you determine what data needs to flow in or out of the Marketing Cloud Engagement and how often.
 Which Data Should Make the Move?
Now that you have a clear picture of your data, you can determine what you are moving to Marketing Cloud Engagement. Only select data you will use for campaign segmentation and personalization. For example, your POS system might have great data, like purchase date or description, but it also has info like SKU or wholesale price that you would never share with a customer. Just because you can import any type of data into Marketing Cloud Engagement, doesn’t mean you should. Additionally, only store sensitive and identifying data (like birthdate) if it is essential for segmentation or transactional messages.
Put a Label on It
With your essential data in mind, you can box it up and start labeling. First, label the data based on field types found in Marketing Cloud Engagement: number, text, date, Boolean, decimal, email, phone number, or locale. Then label and identify your keys. Which keys? Glad you asked. There are three types of keys to keep in mind.
- Foreign key: Marketing Cloud Engagement organizes data using a relational database, and in this type of structure, foreign keys are used to connect data between two unique tables or sources. For example, you might find CustomerID on a customer data extension, and PurchaserID on a POS data source. They may have different names, but these fields are the same customer. Therefore these fields become the foreign keys that connect these two pieces of data.
- Contact key: The contact key is a unique value you assign to identify a contact within your Marketing Cloud Engagement account. (You may know it as a subscriber key in Email Studio.)
- Primary key: A Marketing Cloud Engagement primary key is a unique field on a data extension that identifies a specific and, well unique, data point. Often this is the contact key, but it can be something unique to that data. For example, in a product catalog data extension, SKU can be a unique identifier (and therefore, a primary key).
If you haven’t decided on your key already, it is important to identify a consistent contact key for your model. Here’s a refresher on best practices.
| Contact Key Best Practices |
|---|
|
Design Your Data Model
You’ve wrangled your data (high five!), now where is it all going to go? Remember the Data Designer interface that you learned about in the Marketing Cloud Engagement Contact Management module? Yep, that’s where you head next!

Here’s what you can find in Data Designer.
- Data sources: This is where you identify and organize all your data sources, including synchronized and custom sources.
- Data extensions: This is where you build the placeholders for your data. You can also create data extensions in Email Studio.
- Attribute group: This is a way of organizing your data model. Within an attribute group you have attribute sets or data extensions, and the attributes are the fields within a data extension.
- Populations: These can be used to differentiate between groups of people or data models that have unique attributes or identifiers. Populations are beneficial for a company that has a different model or structure for communicating with customers vs. employees.
These are the basic tools you use to design your data model. So, how do they fit together? An attribute group is a collection of data extensions, with links to tie them together based on common data they share. Let’s review an example of a potential customer attribute group.
| Data Source | Associated Data Extension | Data Connection |
|---|---|---|
| External Preference Center | Master Customer | Master Customer DE identifies CustomerID as the primary key attribute. |
| Website Browsing Activity | Web Activity | Web Activity DE links to Master Subscriber DE via the foreign key attribute CustomerID. |
| Retail Purchase Data (POS) | Customer Purchases | Customer Purchases DE links to Master Subscriber DE via the foreign key attribute CustomerID. |
| Product Catalog CSV | Product Catalog | Product Catalog links to Customer Purchases via the foreign key attribute ProductID. |
As you can tell, determining your data extension structure is important. Here are some questions to consider.
- Do you need a data extension for every external data source?
- Will you create a master data extension to store subscriber info?
- How will you segment your audiences for sending individual campaigns?
- Will you use filtered data extensions?
- Can the content be used for sending or is it nonsendable content?
- How often will the data in the data extension be updated?
There isn’t a right or wrong way to design your data model in Marketing Cloud Engagement because every business has unique needs. Consult with your colleagues before making any final decisions on the structure of your data model and data extensions.
Whew! We’ve covered a lot, so here’s a checklist summary of the steps to design your data model and prep for your build in Contact Builder.
- List all pieces of data from all potential sources.
- Select your DBOR and determine what data needs to flow in and out of Marketing Cloud Engagement.
- Determine required data for campaign segmentation and personalization.
- Label the types of data you have and identify common fields across data sources.
- Finalize the data sources and data fields that you need to import into Marketing Cloud Engagement.
- Identify the data extensions that need to be created to store your data.
Next up, you begin to build your data model.