Navigate Around
Learning Objectives
After completing this unit, you’ll be able to:
- Use navigation bar shortcuts to access recent records and lists.
- Find and switch between Salesforce apps.
- Personalize the navigation bar for your Salesforce apps.
- Create favorites for important pages.
- Decide if your way of working is better suited to a Lightning console app.
Find Your Objects, Tabs, and Other Items
On the surface, navigating in Lightning Experience is so similar to Salesforce Classic that you should feel instantly at home. Use the navigation bar at the top of the page to access items like your org’s objects, the main Chatter feed, groups, reports and dashboards, and the other major features you use.
 If there are more items than fit in the navigation bar, the rest of them are tucked into the More dropdown menu.
But the navigation bar in Lightning Experience is so much more than a way to access pages. It’s loaded with shortcuts for creating records and jumping straight to specific pages, from wherever you are. See the  icon next to many of your items? Click it, and voila—an item menu arms you with a bunch of handy launchpads to the things you’re actively working with.
 Need to create an opportunity for the account you’re reviewing? Just pop open the Opportunities item menu and kick it off with a click. Or jump directly to a recent opportunity or your Closing Next Month list view.
Only standard and custom objects get an item menu. And the contents of item menus vary a bit for some objects. For Tasks and Notes, you can create records and access recent lists but can’t access recent records. For Dashboards and Reports, you see recent records only.
Find Your Salesforce Apps
If you work with more than one app in Salesforce, you probably know that a Salesforce app is a collection of items tailored to your specific work needs. And you know all about using the App Launcher in Salesforce Classic. Lightning Experience has an App Launcher too. And not to sound like a broken record, but the new version is so much more than just a way to switch between apps. Let’s take a closer look.
Open the Lightning Experience App Launcher by clicking  from the navigation bar.

Check out all the convenient ways to get to everything you need.
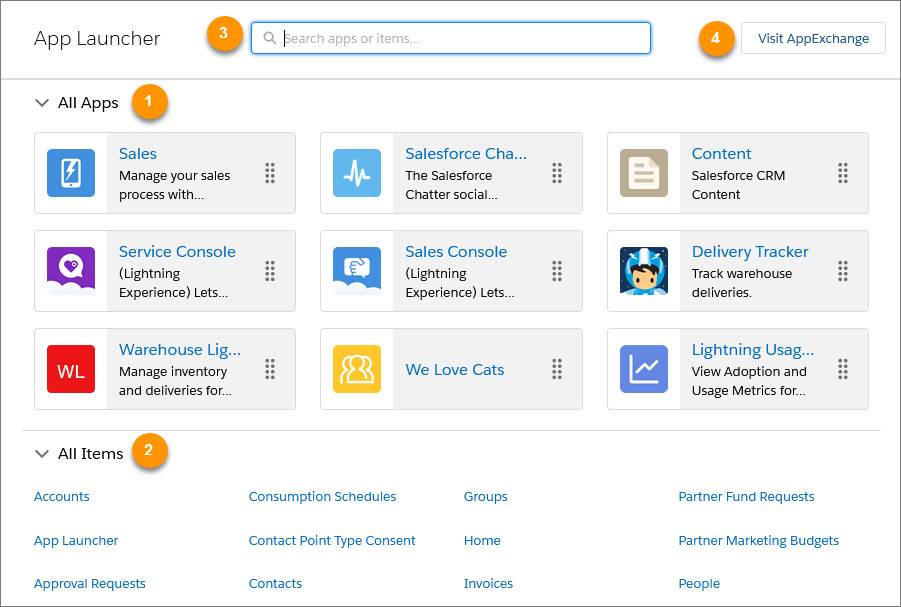
- Open Salesforce apps and connected apps like Gmail or Google Drive by clicking tiles in the All Apps section (1). It’s easy to identify the app you’re looking for because each tile is clearly branded with the app’s name, description, and logo.
- Need to work with an object or feature that’s not included in your current app? Jump right to it from the links in the All Items section (2). This section lists every item in Salesforce that you have permission to use.
- Find a specific app or an individual item even faster by searching for it by name (3). As you type, the All Apps and All Items sections filter to show matching options.
- If you’re authorized to access AppExchange, you can go directly there in one click (4), without leaving Lightning Experience.
Now let’s talk about the relationship of Salesforce apps to the navigation bar. Close the App Launcher and take another quick look at the navigation bar. It’s always there at the top of the page. But what you see in the navigation bar is tied to the app that you’re currently using. The navigation bar shows:

- The items that your admin assigned to the app (1).
- The app’s name (2).
- The app’s custom logo (3) and custom navigation bar color (4)—assuming your admin applied custom branding to the app. If not, you see the standard Salesforce logo and a blue bar.
Navigate at the Speed of Lightning
Even with all the efficiencies baked into the navigation bar and App Launcher, it doesn’t hurt to wish for more. Wouldn’t it be brilliant if you could just think about where you need to go and instantly be there? Well, Lightning Experience can’t do that (yet). But it does have two enhancements over Salesforce Classic that are almost like that.
You can personalize the items in the navigation bar. And you can create a list of shortcuts to your favorite items. Both of these options shorten the time and clicks needed to get you where you’re going. Which approach is best for you? Maybe both! Let’s see them in action.
Personalize Items in the Navigation Bar
We all have our own way of working. If you’ve spent time in Salesforce Classic customizing the tabs that appear for your apps, you’ll be happy to know that you can do the same in Lightning Experience. Want to add object-level items like Accounts or Opportunities? No problem. But in Lightning Experience, you can get even more granular by adding one-click access to individual pages—like a dashboard that you monitor daily, a list view that you work from regularly, even a specific record that’s top of mind.
In Salesforce Classic, you do this work in your personal settings. But in Lightning Experience, you do it right in the navigation bar editor.
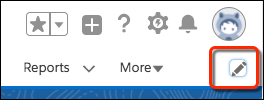
First, click the pencil icon on the navigation bar. Click Add More Items. Search through your favorites or all available objects and items in your org, and choose what to add. The Add More list doesn’t include items that are already on the navigation bar.
After you make your selections, you can reorder or remove items before saving your changes. You can’t delete or rename items that your admin has specified for the app. Nor can you rename items for standard or custom objects.
If you have a temporary tab open that you know you’ll want to reference again, you can also add it to the navigation bar without using the editor.
To see how this works, let’s say you access the Today’s Leads list view several times a day and you want to add a tab for it to the navigation bar. While you’re viewing the list view, open the Leads item menu and select Open in New Tab. Then select Add to Nav Bar.
 You can tell if a tab is temporary by the asterisk next to the tab name.

Temporary tabs are flexible. They stick around until you close them, log out of Salesforce, or switch to a different app. So you can keep them around in your current session until you don’t need them anymore.
Optimize the Order of Navigation Bar Items
Adding your critical items to the navigation bar is a good start to making apps work the way you need them to. But constantly digging into the navigation bar editor for items isn’t exactly efficient. Fortunately, you can simply drag items around to rearrange things to your liking.
A Few Considerations
Keep these things in mind as you personalize the navigation bar for apps.
- You can’t delete or rename the default items that your admin included in your apps.
- You can’t rename items for standard or custom objects.
- An app’s navigation bar tops out at 50 items. This means the number of items you can add is affected by how many default items the app includes. For example, if an app has 48 default items, you can add two items of your own.
- If you don’t see the
 icon in a specific app’s navigation bar, it means that your admin hasn’t upgraded the app for Lightning Experience yet. If the icon doesn’t appear in any of your apps, personalization is turned off for your org.
Create Shortcuts to Your Favorite Stuff
Favorites is a Lightning Experience-only boon that lets you jump to specific records, lists, groups, and other pages. Favorites are similar to bookmarks in a web browser, but much better. The favorites star (  ) at the top of the page is your personal lodestar. It’s always there to help you navigate quickly to what you use most often, regardless of the browser or computer you’re logged in to.

Adding the current page to your favorites is as simple as clicking  . Saved favorites are always just a click away in your personal favorites list.
 Create a favorite for the Closing This Month list view for opportunities. Switch to the list view any time from the favorites list.
You know you’re on a favorite page when the favorites star is highlighted. Remove a page from the favorites list by clicking the highlighted star.
As your favorites list grows, keep it organized so it stays effective. Edit the list to arrange favorites in an order that makes sense to you. And feel free to rename favorites so they’re memorable. For example, give an important opportunity a short nickname or change an ongoing case from a hard-to-remember number to a label that describes the issue. (Don’t worry, you’re not changing the actual name of the record!)
 From the favorites list, select Edit Favorites. Then drag favorites to where you want them. Give favorites names that mean something to you. Delete favorites that you don’t need anymore.
Access Favorites from the Navigation Bar
Oh, and remember those item menus that appear next to standard and custom objects in the navigation bar? If you have favorite list views or records for any of these objects, the three that you access the most are automatically included here too.
 You may find it more natural to look for object-specific favorites in the item menu. It’s also a helpful way to filter favorites by the item you’re interested in.
And remember how we quickly added items to the navigation bar? You can use the same process to add your most favorite favorites directly to the navigation bar. Click the pencil icon on the navigation bar. Click Add More Items. Search through Favorites and select which items to add to the navigation bar. (The Add More list doesn’t include favorites that have already been added to the navigation bar.) Confirm the order and save your changes.
Let’s wrap up with a few things to keep in mind when using favorites.
- You can create 200 favorites for these types of pages: records for your org’s standard and custom objects, list views, dashboards, reports, dashboard and report folders, and Chatter groups.
- You can’t create favorites for:
- List views for Reports, Dashboards, Files, Tasks, and Notes
- List views that are overridden with custom Visualforce pages
- Individual Chatter posts
Work with Many Records at Once? There’s a (Lightning Console) App for That!
If you work in a fast-paced environment, work off lists, and regularly move back-and-forth between multiple records at once, consider using a Lightning console app to reduce the amount of time you spend navigating around. Console apps are ideal for contact centers or high-volume call centers, where sales reps and support agents need to quickly find and see everything about a prospect or customer to make them happy.
What’s the difference between a console app and the standard apps we talked about in the rest of this unit? A biggie is navigation style. Apps with standard navigation display one record at a time.

With console navigation, you can open multiple records on the same screen. Notice that there isn’t a typical navigation bar in this Lightning console app?

That’s because you start by selecting an object or other navigation item from the item menu (1). Then each record you want to view opens in its own tab, called a workspace tab, which is added to the navigation bar. In this example, three records are open at the same time (2). Records related to a parent record open in subtabs under the original record (3).
The other significant difference is how Lightning console apps are laid out. You get a handy split view that shows a list view at the same time as your records (4). This layout makes it much faster to juggle multiple records at once.
To open Lightning console apps, use the App Launcher. Lightning Experience includes two standard, preconfigured Lightning console apps.
- If you’re in Sales, the Sales Console app puts all the tools at your fingertips to prospect leads, close deals, and manage relationships.
- If you’re a support agent, the Service Console app gives you tools to close cases, streamline repetitive tasks, and engage with customers on multiple channels.

Tip
If you don’t see any Lightning console app tiles in the App Launcher, ask your Salesforce admin if you can get access.
Resources
- Trailhead: Navigate Lightning Experience and Setup
- Salesforce Help: Open Another App in Lightning Experience
- Salesforce Help: Personalize Your Navigation
- Salesforce Help: Create Shortcuts to Your Top Salesforce Pages with Favorites
- Salesforce Help: Salesforce Console in Lightning Experience