Discover Lightning Web Component Actions
Learning Objectives
After completing this unit, you’ll be able to:
- Create a Lightning web component and action to populate fields based on user input and provide feedback messages to users.
- Start migrating your JavaScript custom button functionality to Lightning-friendly alternatives.
Lightning Web Component Actions: Smart, Fast, and Flexible
We've covered several solutions that work in both Lightning Experience and Salesforce Classic and that are great replacements for JavaScript buttons. But we recognize that those declarative and programmatic solutions don’t address every use case. The good news is that there’s something that addresses many more. Introducing Lightning web component actions: quick actions that call Lightning web components.

Lightning web component actions are built on the existing Lightning Web Component framework. You can easily convert your existing Lightning web components to actions and use them in Lightning Experience.
You make a Lightning web component invokable as an action by adding lightning__RecordAction as a target in the component’s metadata configuration XML file and specifying the actionTypefor the targetConfigs. For the action to appear in a modal window defined by Salesforce, you set the actionType to ScreenAction. To execute the action without a modal, or to define a custom modal window, you set the actionType to Action.
Another useful property for a Lightning web component action is recordId, which provides the record context to the component when it’s invoked from a Lightning record page. To access a record’s data or metadata, in the component’s JavaScript class, you use the @api decorator to create a public recordId property.
Let’s dive into Lightning web component actions. Next, we talk about some JavaScript button functionality that can be addressed with Lightning web component actions instead, like populating fields based on user input and providing feedback messages during data entry.
Populate Fields Based on User Input and Provide Feedback Messages to Users
Let’s say you use JavaScript buttons to validate or manipulate data and give your users feedback or instructions when they work with records. Here’s an example to show how easily you can validate or manipulate data in a Lightning web component before your users create or update a record.
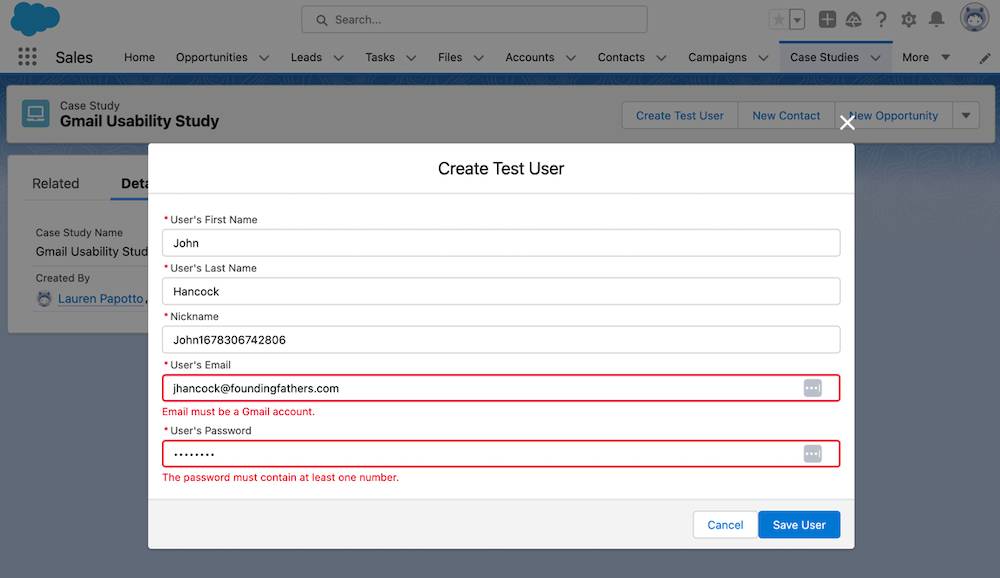
We built a custom object in our sample org called Case Study, which we use to track different research projects. We also have a Test User custom object so that we can add new test users to case studies and capture their names and email addresses. Since the email address is our primary contact method, we want to make sure it’s entered correctly. We also want to create a unique nickname for test users in the case study so that they can remain anonymous.
We’re going to create a Lightning web component action that displays the name and email address fields, validates the email address, and uses the first name and a random number to automatically create the nickname.
Here’s the code for the component called by this Lightning web component action.
-
createUser.html: The structure for the Lightning web component that you see when you open the action. It contains the UI implementation, which includes the text fields, buttons, action title, and so on.
-
createUser.js: The controller that listens to the component and any UI events that take place, such as the render lifecycle, text input, and button clicks. JavaScript methods define what to do with input, data, events, changes to state, and more to make your component work.
-
createUser.js-meta.xml: The code that defines the metadata for the component, including the design configuration for components intended for use in Lightning Experience.
createUser.html
<template>
 <lightning-quick-action-panel header="Add Test User to Case Study">
     <lightning-input
             type="text"
             data-field="firstName"
             label="User's First Name"
             onblur={updateNickName}
             required
     ></lightning-input>
     <lightning-input
             type="text"
             data-field="lastName"
             label="User's Last Name"
             required
     ></lightning-input>
     <lightning-input
             type="text"
             data-field="nickName"
             label="Nickname"
             required
     ></lightning-input>
     <lightning-input
             type="email"
             data-field="email"
             label="User's Email"
             onblur={handleEmailBlur}
             required
     ></lightning-input>
     <lightning-input
             type="password"
             data-field="password"
             label="User's Password"
             onblur={handlePasswordBlur}
             required
     ></lightning-input>
     <div slot="footer">
         <lightning-button
                 variant="neutral"
                 label="Cancel"
                 onclick={handleCancel}
         ></lightning-button>
         <lightning-button
                 variant="brand"
                 label="Save User"
                 onclick={handleSave}
         ></lightning-button>
     </div>
 </lightning-quick-action-panel>
</template>
createUser.js
import { LightningElement, api } from 'lwc';
import { ShowToastEvent } from 'lightning/platformShowToastEvent';
import { CloseActionScreenEvent } from 'lightning/actions';
import { createRecord } from 'lightning/uiRecordApi';
import TEST_USER_OBJECT from '@salesforce/schema/Test_User__c';
import NAME_FIELD from '@salesforce/schema/Test_User__c.Name';
import PASSWORD_FIELD from '@salesforce/schema/Test_User__c.Password__c';
import EMAIL_FIELD from '@salesforce/schema/Test_User__c.Email__c';
import NICKNAME_FIELD from '@salesforce/schema/Test_User__c.Nickname__c';
import CASE_STUDY_FIELD from '@salesforce/schema/Test_User__c.Case_Study__c';
export default class CreateUser extends LightningElement {
   @api recordId;
   async handleSave() {
       // query form elements
       const firstNameEl = this.template.querySelector('[data-field="firstName"]');
       const lastNameEl = this.template.querySelector('[data-field="lastName"]');
       const nickNameEl = this.template.querySelector('[data-field="nickName"]');
       const emailEl = this.template.querySelector('[data-field="email"]');
       const passwordEl = this.template.querySelector('[data-field="password"]');
       // check for errors on form elements (custom or otherwise)
       const isFirstNameValid = firstNameEl.reportValidity();
       const isLastNameValid = lastNameEl.reportValidity();
       const isNickNameValid = nickNameEl.reportValidity();
       const isPasswordValid = passwordEl.reportValidity();
       const isEmailValid = emailEl.reportValidity();
       if(!isFirstNameValid || !isLastNameValid || !isNickNameValid || !isPasswordValid || !isEmailValid) {
           return;
       }
       const recordInput = {
           apiName: TEST_USER_OBJECT.objectApiName,
           fields: {
               [NAME_FIELD.fieldApiName]: `${firstNameEl.value} ${lastNameEl.value}`,
               [PASSWORD_FIELD.fieldApiName]: passwordEl.value,
               [EMAIL_FIELD.fieldApiName]: emailEl.value,
               [NICKNAME_FIELD.fieldApiName]: nickNameEl.value,
               [CASE_STUDY_FIELD.fieldApiName]: this.recordId,
           }
       };
       try {
           await createRecord(recordInput);
           this.dispatchEvent(
               new ShowToastEvent({
                   title: 'Success!',
                   message: 'The test user has been created.',
                   variant: 'success'
               })
           );
           this.dispatchEvent(new CloseActionScreenEvent());
       } catch (error) {
           new ShowToastEvent({
               title: 'Error creating the test user, try again...',
               message: error.body.message,
               variant: 'error'
           });
       }
   }
   updateNickName() {
       const firstName = this.template.querySelector('[data-field="firstName"]').value;
       const nickNameEl = this.template.querySelector('[data-field="nickName"]');
       if(firstName && !nickNameEl.value) {
           const today = new Date();
           nickNameEl.value = firstName + today.valueOf(today)
       }
   }
   handleCancel() {
       this.dispatchEvent(new CloseActionScreenEvent());
   }
   handlePasswordBlur() {
       const passwordEl = this.template.querySelector('[data-field="password"]');
       // clear custom errors
       passwordEl.setCustomValidity('');
       this.validatePassword(passwordEl);
   }
   validatePassword(input) {
       // check lightning-input validity
       if(input.reportValidity()) {
           // perform custom validation
           const value = input.value;
           if (value === undefined) {
               input.setCustomValidity('You must enter a password.');
           } else if (value.length < 7) {
               input.setCustomValidity('The password is the wrong length (must be >= 7): ' + value.length);
           } else if (value.length > 15) {
               input.setCustomValidity('The password is the wrong length (must be <= 15): ' + value.length);
           } else if (value.search(/[0-9]+/) === -1) {
               input.setCustomValidity('The password must contain at least one number.');
           } else if (value.search(/[a-zA-Z]+/) === -1) {
               input.setCustomValidity('The password must contain at least one letter.');
           }
           // display custom validation errors (if any)
           input.reportValidity();
       }
   }
   handleEmailBlur() {
       const emailEl = this.template.querySelector('[data-field="email"]');
       // clear Custom Errors
       emailEl.setCustomValidity('');
       this.validateEmail(emailEl);
   }
   validateEmail(input) {
       // check lightning-input validity
       if (input.reportValidity()) {
           const value = input.value;
           if (!/@gmail\.com$/.test(value)) {
               input.setCustomValidity('Email must be a Gmail account.');
           }
           // display custom validation errors (if any)
           input.reportValidity();
       }
   }
}
createUser.js-meta.xml
<?xml version="1.0" encoding="UTF-8"?>
<LightningComponentBundle xmlns="http://soap.sforce.com/2006/04/metadata">
   <apiVersion>57.0</apiVersion>
   <isExposed>true</isExposed>
   <targets>
       <target>lightning__RecordAction</target>
   </targets>
   <targetConfigs>
       <targetConfig targets="lightning__RecordAction">
           <actionType>ScreenAction</actionType>
       </targetConfig>
   </targetConfigs>
</LightningComponentBundle>
Create the Lightning Web Component Action
After creating the Lightning web component, we assign it to an action. In the object management settings for Case Study, we go to Buttons, Links, and Actions, click New Action, then configure the action with these parameters.
Field |
Value |
|---|---|
Action Type |
Lightning Web Component |
Lightning Web Component |
c:createUser |
Label |
Create Test User |
Name |
Create_Test_User |
Then we add our new Lightning web component action to the Case Study page layout. When users invoke it from a case study record detail page, they see the Lightning web component action that we created.
Lightning web component actions are the future of programmatic actions in Lightning Experience. We hope that you start looking at this set of solutions as a better alternative to JavaScript buttons.
And if you depend on partner apps that use JavaScript buttons, you’ll be glad to know that many of our partners have already started migrating and upgrading their apps to Lightning. You can find more apps on the AppExchange that are updated for Lightning Experience.
Resources
- Lightning Web Components Developer Guide: Introducing Lightning Web Components
- Trailhead: Quick Start: Lightning Web Components
- Trailhead: Lightning Web Component Basics