Work with Chatter Groups
Learning Objectives
After completing this unit, you’ll be able to:
- Describe groups.
- Find and use group administrative features.
- Create public and private groups.

Introduction to Groups
Groups are the main collaboration space in Chatter. You can organize a group around a project and add all project participants to it. Members use the group feed to exchange information, process a decision, and ask and answer questions. Whether it’s a project, a topic, a line of business, a what-have-you, you can create a group to support it. Groups help users build, preserve, and share knowledge that’s vital to getting the job done and keeping everyone aligned.

Group Types
Salesforce provides group types for different purposes and audiences.
-
Public groups are visible and open to all employees. Anyone in the company can join a public group, and then post, comment, and add files to it.
-
Private groups are members-only. People must request to join a private group. Only the members of the group can post, comment, and add files. People who are not members can see the group’s picture and description but not the group feed or files. If the group allows external users, like customers, to join, the group owner or manager must invite them.
-
Unlisted groups are invitation-only and don’t appear in list views or search results. An unlisted group is hidden from everyone except the members of the group. Only the group’s owner and managers can invite people to join an unlisted group. As the admin, you must enable the option to create unlisted groups. We step through that process in a minute.
-
Broadcast Only groups are for making announcements. Only the owner and managers of a broadcast-only group can post to it. But group members can comment on those posts. You can make any type of group broadcast-only.
Monitor Engagement
All groups offer an Engagement tab for monitoring group membership and activity over time.

Use the Engagement tab to monitor how active the group is, the cadence of activity, the stability of group membership, and various count summaries. Counts include number of members, posts, questions, unanswered questions, likes, and comments.
Group Examples
When you set up Chatter for your company, create some starter groups that center around common interests and functional teams. For example, create product-related groups in research and development, sales, and marketing; set up groups for internal training, human resources, and facilities. Chatter groups make it easy to collaborate, manage projects, and stay current.
Here are some groups that have been successful at other companies. Remember, groups can be either public for every employee or private for select people.
All Company (public—internal facing)
Add all employees to this group, and use it to discuss company-wide topics and make announcements.
[Project Name] Team (private)
Add team members to this group so that they can collaborate on a project, give feedback, and share documents.
Competitive (public—internal facing)
Connect customer-facing employees with your company’s competitive and product experts so that the right people are talking to each other and sharing information.
Product Feedback (public)
Sales and customer service teams can provide client feedback directly to R&D and engineering.
Marketing (private)
Share concepts for creative campaigns, event details, and marketing ideas with the whole team.
Sales (public—internal facing)
Sales employees can share stories, strategies, and tips for winning.
[Customer Name] Meetings (private)
Create groups where all the key players on a deal can collaborate more easily on presentations, agendas, and products. For example, start a group for a customer visit called “Acme July Meeting” and invite sales, technical specialists, marketing, support, and engineering to align everyone.
[Department Name] Policies (broadcast—internal facing)
Provide a forum for broadcasting division, department, or team policies and inviting feedback from members. Though members can’t post, they can comment on posted items.
Create Groups
Let’s create two groups that are useful for most orgs: a public group that any authenticated user can join and a private group that allows customers in its membership. For both groups, we want to be able to associate records, like opportunities, accounts, and cases, with the group.
While you’re working through the content and hands-on challenges in this module, make sure that you’re logged in to your Trailhead Playground. Using your playground ensures that you aren’t changing data in your production org or posting to your company’s Chatter feed.
Enable Unlisted Groups
One type of group is the unlisted type. You can’t discover an unlisted group in a search. You must be invited to join an unlisted group. Making an unlisted group gives you a way to set up a private space for discussing sensitive material with a specific audience. For example, imagine that you want a place to discuss potential deals, compensation, or individual performance.
By default, the creation of unlisted groups is disabled. So, before we start creating groups, let’s go to Chatter Settings and enable unlisted groups.
- In the Setup Quick Find box, enter
Chatter Settings, click Chatter Settings, and then click Edit.
-
Allow Records in Groups (1) is likely selected by default; if it isn’t, select it.
- Select I want to enable unlisted groups and understand that I may need to update Apex/Visualforce code in my organization (2).
- Click Save (3).
Create a Public Group
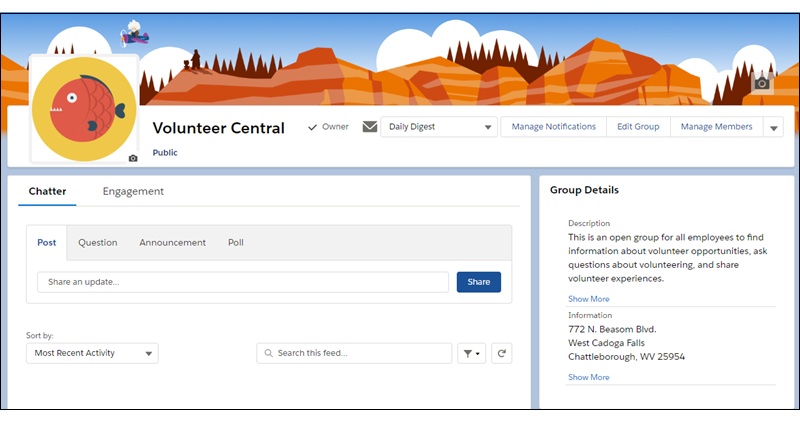
Create a public group named Volunteer Central. Volunteer Central is for sharing information about volunteer events.
- In Salesforce, click the Groups tab. If you don’t see it, open the App Launcher, search for Groups, and click your result.

- On the Groups list page, click New to open the New Group window.

Note: You can customize groups to provide choices for the layout and features of the group. When you customize a group in this way, users see the Select the Type of Group dialog.
Get more information about customizing your groups with group record types from the Resources section of this unit.
- Enter information about your group.
-
Name: Volunteer Central
-
Description: This is an open group for all employees to find information about volunteer opportunities, ask questions about volunteering, and share volunteer experiences.
- Under Information, provide any group details that you care to share, and format your details using rich text editor controls.
Tip: After you create your group, the group email address appears under Group Email. You can see it here and in the right-hand column of your group page. People with access to the group can use the address to post to the group feed through email.
-
Owner—Assign someone to be the group owner. Start entering a name, and choose from the resulting list. You can always leave it as-is and own the group yourself. A group can have only one owner, but many managers. Owners and managers have the same privileges in the group.
-
Member Count populates after you create the group.
-
Record Type shows the type of feed you chose in this step (for example, Post or Question), provided a choice was available to you.
-
Archive—With the right role or permission, you can edit a group and mark it for Archive here. By default, groups are archived after 90 inactive days. To prevent automatic archiving, select Disable automatic archiving.
When a Chatter group is archived, group members can’t post messages or share files with the group. However, previous posts, comments, and files remain available for reference. Mentioning a group (@[group_name]) doesn’t count as feed activity in that group and doesn’t delay group archiving. Group owners, group managers, and users with the permission Modify All Data can manually archive or edit the group’s automatic archiving settings at any time.
- Set the access type.
-
Access Type: Public
- Customers can’t join this group, so leave Allow customers unchecked.
- If the Broadcast Only check box is available, leave it unchecked, too.
-
Access Type: Public
- Click Save & Next.
- Click Upload Image, select an image for your volunteer group, and click Next.
- In the Manage Members window, you can search for and add people to your group. You can add members later, so for now, click Done.
Congratulations! You’ve created your first group. You can customize the group by clicking Edit Group on the actions overflow menu. You can change a group’s image, name, details, and owner. You can use Manage Members to search for and add more group members.
Create a Private Group with Customers
Private Chatter groups are a great way for project teams to collaborate and share confidential information. Private groups can also have external members. For example, create a private group to collaborate with customers or subject matter experts who are outside your company.
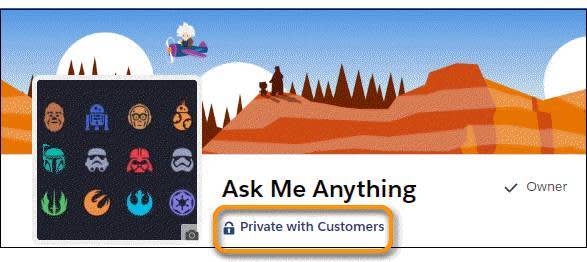
When you opt to allow customers in a private group, it’s clearly shown on the group page. The label Private with Customers appears below the group name. Always check for this statement! Let it guide the type of information that you share in this group.
You create a private group the same way that you create a public group, but you select a different group type.
- To navigate to the Groups page, click the Groups tab or find and select Groups in the App Launcher.
- Click New.
- Provide information about the group.
- Name your group and describe what it’s for.
- Provide any group details that you care to share, and format your details using rich text editor controls.
- Assign someone to be the group owner. Start typing a name and choose from the resulting list, or keep your own name as group owner
- Select the Private access type, and check the Allow Customers box.
- Click Save & Next, Next, then Done.
Add and Promote Members
After you create your group, it’s easy to add more members. Go to the group, open the actions menu in the group banner, and select Manage Members. In the Add Members dialog, search for the people that you want to add and click Add next to their names.
You can also search for existing members and assign them as group managers. Group managers can edit the group, manage its membership, and perform other actions that are available to group owners. It’s a great way to share the responsibility of managing the group.
To assign a member as a group manager:
- Open the Add Members dialog.
- Search for an existing member.
- Select Manager from the menu next to their name.
Now that you’ve mastered the art of groups, let’s explore how to get notifications in your feeds when values change on record fields. But first, let’s test your knowledge!
Resources