Create Custom Buttons and Links
Learning Objectives
After completing this unit, you'll be able to:
- Create custom buttons and links.
- Add them to a page layout.
- Explain the difference between a custom button and a custom link.

Custom Buttons and Links
Every org has a unique set of business needs. If your users frequently need to access other pages in or outside your org, you can add custom buttons and links directly to object and record detail pages.
Custom buttons and links help you integrate Salesforce data with external URLs, applications, your company’s intranet, or other back-end office systems.
When your users have all the information they need on hand, they can be even more productive with Salesforce.
What Can Custom Buttons and Links Do?
Custom links can link to an external URL, such as www.google.com, a Visualforce page, or your company’s intranet. Custom buttons can connect users to external applications, such as web pages, and launch custom links.
You can choose the display window properties that determine how the target of a link or button is displayed to your users. Custom links can include Salesforce fields as tokens within the URL. For example, you can include an account name in a URL that searches Yahoo: https://search.yahoo.com/bin/search?p={!Account_Name}.
In Lightning Experience, custom buttons and links live on your page layouts and appear in different areas of a Lightning page.
There are three primary types of custom buttons and links that you can create.
- List button—Appears on a related list on an object record page.
- Detail page link—Appears in the Links section of the record details on an object record page.
- Detail page button—Appears in the action menu in the highlights panel of a record page.
We’ll explore all three of these options.
Create a Custom List Button
You’ve read what they can do, now find out how to create one. For each type, you must define the action that occurs when a user clicks it. First, the custom list button.
A custom list button is a button that you can add to a related list. When you create a list button for an object, you can add that button to that object’s related list when the related list appears on other objects. Because Energy Audits are tied to accounts with a lookup relationship field, an Energy Audits related list automatically appears on account records.
For example, earlier in the module you entered audit information for “GenePoint 5-year review.” When you view the GenePoint account record, then click the Related tab and scroll to the end of the record page, you see an Energy Audits related list displaying that audit.
Maria wants to add a custom button to that Energy Audits related list to let users navigate directly to the Ursa Major Solar energy audit guidelines PDF. She’s already uploaded the PDF as a file, but she needs its URL in order to have the custom button point to it. Here’s how that works.
- From the App Launcher, find and select the Sales app.
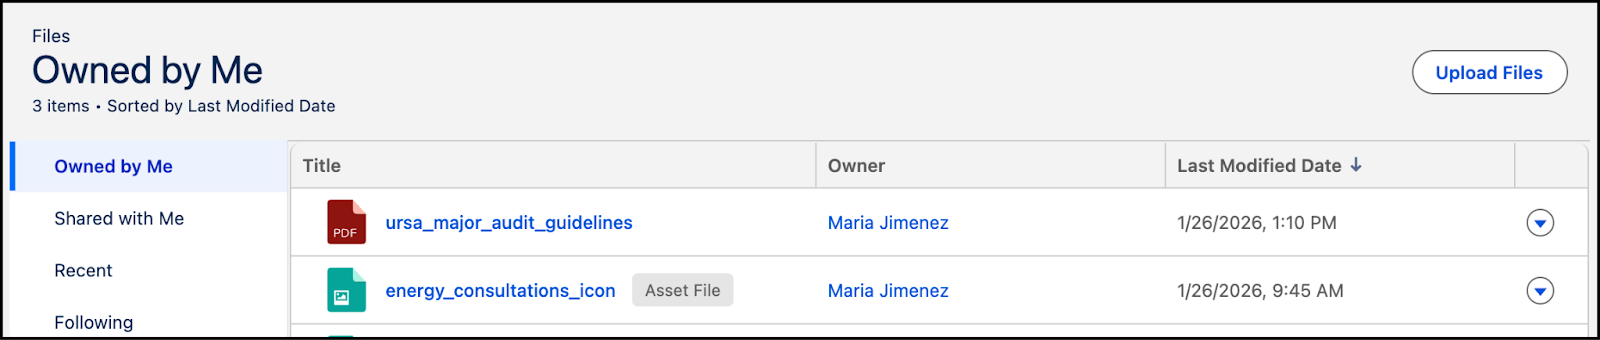
- Click the Files tab.
Here, Maria can see the guidelines PDF she uploaded.
- Upload a file of your own so you can follow along with the rest of these steps.
- Click
 for the file you just uploaded and select Share.
- Click the carat next to Who Can Access to expand that section.
- In the Create Public Link area, set the Password toggle button to Off.
- Click Create Link, then click Create.
This generates a public URL for the file that you can share with others, or in this case, add as a URL to a custom button or link. In this example, Maria's URL ishttps://ursamajorsolar.salesforce.com/sfc/p/R00000008nD1/a/R000000007LK/8Z8auAJBSeSCzqQ8Kv9ofolIWi_jP13oR3LUUYuXc3A.
- Click Copy Link, then click Done.
- From Setup, click Object Manager, then click Energy Audit.
- Click Buttons, Links, and Actions, then New Button or Link.
- Name the button
Audit Guidelines.
- Select List Button.
- Paste the file URL into the large text box.
Because the file is local to your org, use everything after the domain portion of the URL to create the custom link. Using this example, Maria's link points to/sfc/p/R00000008nD1/a/R000000007LK/8Z8auAJBSeSCzqQ8Kv9ofolIWi_jP13oR3LUUYuXc3A.
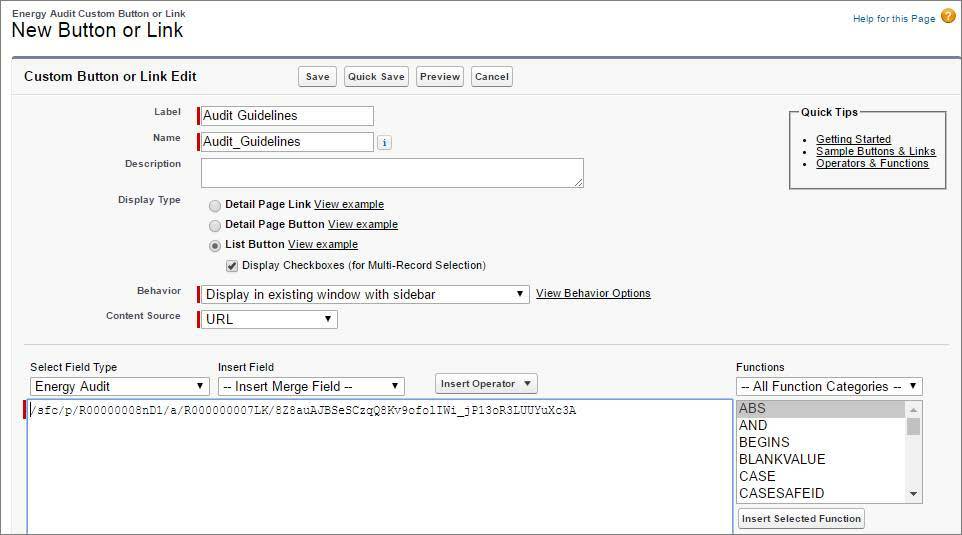
You might be thinking to yourself: “OK, whoa! What’s all that formula-looking stuff? What do I do with that?” That’s a version of Salesforce’s formula editor, and you can use it to define the properties of the button or link. For example, if your content source is URL as in this case, this section is where you put the URL you want the button or link to point to. And, you can add merge fields and operators to enhance the behavior of the button or link by including data from Salesforce. For more information on merge fields and operators, check out the Salesforce Help.
- Click Save, then OK.
The button won’t appear on the Energy Audits related list for any object until Maria adds it. That’s next.
- Click Object Manager, then click Account.
- Click Page Layouts, then click Account Layout.
- Scroll all the way down the end of the layout, to the Energy Audits related list.
- Click the wrench icon to edit it.

- Click the plus icon to expand the Buttons section header.

- Add the Audit Guidelines button to the Selected Buttons list, then click OK.
- Click Save.
- Navigate back to the Sales app, click Accounts and select the GenePoint account.
- Click the Related tab, scroll to the bottom, and you see the new Audit Guidelines button on the Energy Audits related list.

Create a Custom Detail Page Link
Maria, our Ursa Major Solar admin, wants to add a custom link that lets her users do a quick Google search on the accounts they’re viewing.
Let’s get started.
- From Setup, click Object Manager, then click Account.
- Click Buttons, Links, and Actions, then New Button or Link.
- Name the link
Google This Account.
- Make sure that Detail Page Link is selected for the display type, and leave the next two fields as-is.

Now it’s time to add the URL we want this link to point to.
- In the formula editor, enter
https://www.google.com/search?q={!Account.Name}.
- Click Save, then click OK.
You can also use Quick Save to save and continue editing. Saving validates the URL you defined if you set the content source to URL. Before you can use your custom buttons and links, you must add them to an object’s page layout. You can then see and use the button or link on a record detail page. Let’s do that next.
- Click Page Layouts, then Account Layout.
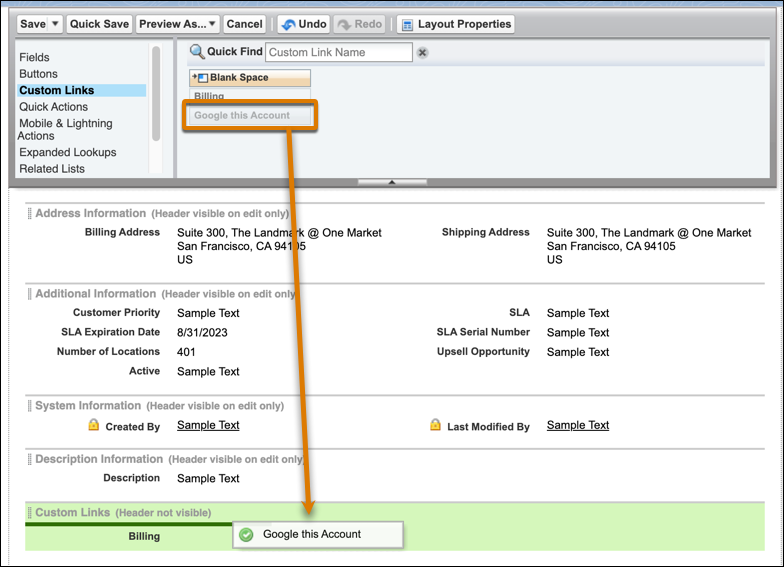
- From the Custom Links category in the palette, drag Google This Account into the Custom Links section of the layout.
- Hover over the Custom Links section and click the wrench icon that appears.
- In the Section Properties window, select Detail Page, then click OK.
- Save the page layout.
Let’s go check out the results.
- From the App Launcher, find and select Accounts.
- Open an account record.
- Click the Details tab and scroll to the bottom to find the custom link.

Create a Custom Detail Page Button
Maria wants to add a custom button to account pages that shows the account’s location on Google Maps.
- From Setup, click Object Manager, then click Account.
- Click Buttons, Links, and Actions, then click New Button or Link.
- Name the button
Map Location.
- Select Detail Page Button.
- Paste this URL into the formula editor:
http://maps.google.com/maps?q={!Account_BillingStreet}%20{!Account_BillingCity}%20{!Account_BillingState}%20{!Account_BillingPostalCode}

This URL uses merge fields ({!Account_BillingStreet}) and passes the field information from the account record that the button is clicked from into the URL.
- Click Save, then click OK.
Now add it to the Account page layout.
- Click Page Layouts, then click Account Layout.
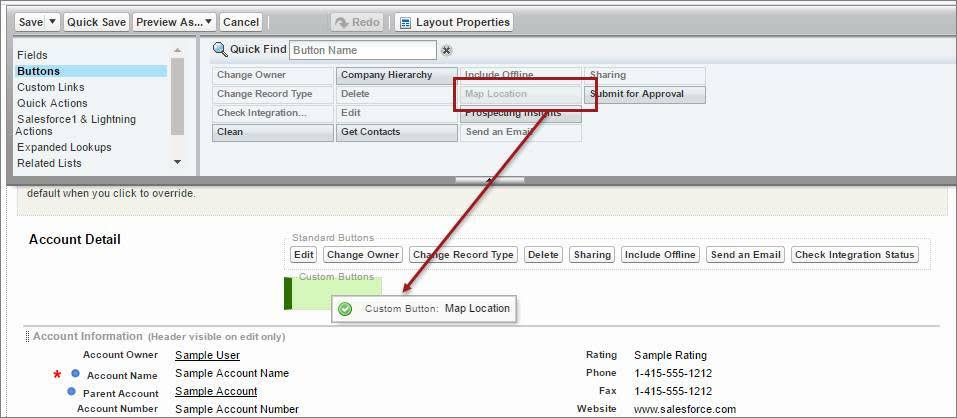
- From the Buttons category in the palette, drag Map Location into the Custom Buttons area on the page layout.
- Click Save.
OK! Now let’s test it.
- From the App Launcher, find and select Sales, then click the Accounts tab.
- Open an account record.
In the highlights panel, not only do you see the fields from the object’s compact layout, but you also see an actions menu. The actions menu is a combination of the standard buttons, custom buttons, and actions from the page layout. (We’ll go over actions in the next unit.)
- Expand the actions menu, and select Map Location.
The browser opens a new window or tab that shows you the account’s address in Google Maps.

Is Map Location not showing up in the actions menu even though you added the custom button to the page layout? This happens sometimes if you override the default settings of the "Salesforce Mobile and Lightning Experience Actions" section of a page layout. To fix it, add any missing buttons to the page layout as actions by dragging them from the "Mobile & Lightning Actions" category in the palette into the "Salesforce Mobile and Lightning Experience Actions" section.
Resources
- Salesforce Help: Define Custom Buttons and Links
- Salesforce Help: Custom Button and Link Samples
- Salesforce Help: Constructing Effective Custom URL Buttons and Links
- Salesforce Help: Custom Button Considerations