Work Your Opportunities
Learning Objectives
After completing this unit, you’ll be able to:
- Describe how to use opportunities.
- Create an opportunity.
- Add contact roles to an opportunity.
Opportunities as Deals
Opportunities represent potential sales. In Salesforce, you can create opportunities for existing accounts or by converting a qualified lead. Let’s explore how you can use opportunities to track your deals, better understand who you’re selling to, and focus your team’s efforts.
Opportunity Stages
Deals usually progress from tentative to firm before they’re finalized. As a deal progresses, you grow more confident of making the sale. In Salesforce, an opportunity moves through a series of stages linked to the types of tasks being performed, and the likelihood of completing the sale.
The stages of an opportunity may look something like this.
-
Prospecting: Prospecting is the initial phase of the sales process where the focus is on identifying and qualifying potential customers or leads. Sales reps engage in activities such as market research, cold-calling, and networking to discover and evaluate prospects.
-
Qualification/needs identification: Qualification and needs identification entail understanding the prospect's requirements, challenges, and goals. This stage emphasizes uncovering their specific needs and pain points, and assessing how products or services can address them. It involves active listening, asking probing questions, and engaging in thorough discovery conversations with the prospect.
-
Proposal/price quote: In this stage, you might outline the specific products or services being offered, their features and benefits, pricing details, and any other relevant terms and conditions. The aim is to communicate the value proposition effectively, addressing the prospect's needs and concerns.
-
Negotiation/review: Negotiating involves a back-and-forth conversation about terms, conditions, and pricing, which may be adjusted to reach a mutually beneficial agreement.
-
Closed/won: If the sales process is successful, the opportunity is closed, and the lead becomes a customer. The prospect has agreed to the terms, and the necessary contracts, paperwork, and logistics are finalized. Update the relevant information in Salesforce to reflect the closed-won opportunity.
-
Closed/lost: Unfortunately, not every prospect converts into a customer. In the Closed/Lost stage, the salesperson acknowledges that the deal did not materialize due to reasons such as budget constraints, mismatched needs, competitive offerings, or other reasons.
Additionally, every company has a different sales process. The stages your company uses for opportunities may differ from what’s in your Trailhead playground. This is just one example of a sales process.

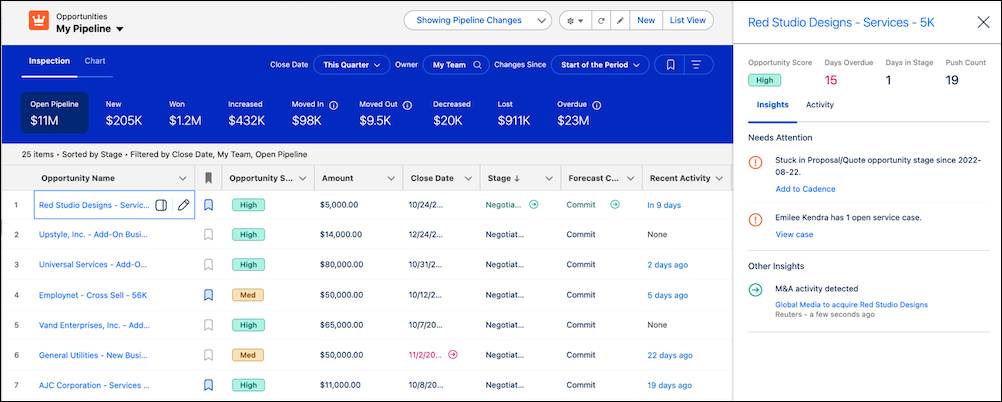
Manage Opportunities with Pipeline Inspection
When you’re working on several opportunities at once, it’s important to have one consolidated place where you can view key metrics and actionable insights about your deals. Keeping track of updates on spreadsheets, sticky notes, and old notebooks leaves vital information vulnerable to being lost, putting the future of deals and opportunities at risk.
Pipeline Inspection gives sales teams a consolidated view of pipeline metrics, opportunities, week-to-week changes, AI-driven insights, close date predictions, and activity information so they can effectively manage opportunities and close the deal. With this intelligence, sales teams can focus on the most important opportunities and forecast revenue more accurately.
-
Comprehensive visibility: Pipeline Inspection provides a consolidated view of your entire sales pipeline, offering insights into the number, value, and stages of opportunities. This comprehensive visibility allows sales teams and managers to quickly assess the health of the pipeline and identify areas that require attention.
-
Metrics and analytics: The tool provides detailed metrics and analytics related to opportunities, enabling teams to analyze key performance indicators (KPIs) that move deals forward.
-
Focus on high-value activities: Pipeline Inspection helps sales teams concentrate their efforts around activities with the most impact, such as coaching or strategy, to help get more deals across the finish line.
-
Holistic activity tracking: Integrating activity information into the pipeline inspection provides a holistic view of sales activities associated with each opportunity. This feature helps sales teams understand the level of engagement, identify potential roadblocks, and strategize accordingly to move deals forward.
-
Enhanced forecast accuracy: Sales managers can improve forecast accuracy by identifying pipeline changes and at-risk deals, helping to facilitate timely coaching when needed, bridge forecasting gaps, and create more forecasting accuracy.
-
Gain insights with Einstein: In Pipeline Inspection, AI-driven insights and features help you gain a deeper understanding of your sales pipeline’s health. If your company has Einstein Opportunity Scoring, you’ll discover a new way to visualize opportunity scores.
Scenario: A New Opportunity with Get Cloudy
A few weeks after the trade show, Aparna connects you with Lars Johnson, a colleague of hers from Get Cloudy West.

Aparna had mentioned her deal to Lars during a call, and now he’s interested in doing something similar.
During the conversation, Lars mentions that he’s interested in buying 35 sneakers and should have the budget to cover it. The deal is still in its early stages, so to move it forward, you’ll need to create a proposal outlining the type, number, and price of the sneakers.
At this point, Lars is in the Prospecting stage. As the deal moves through different stages, the likelihood of him buying increases.
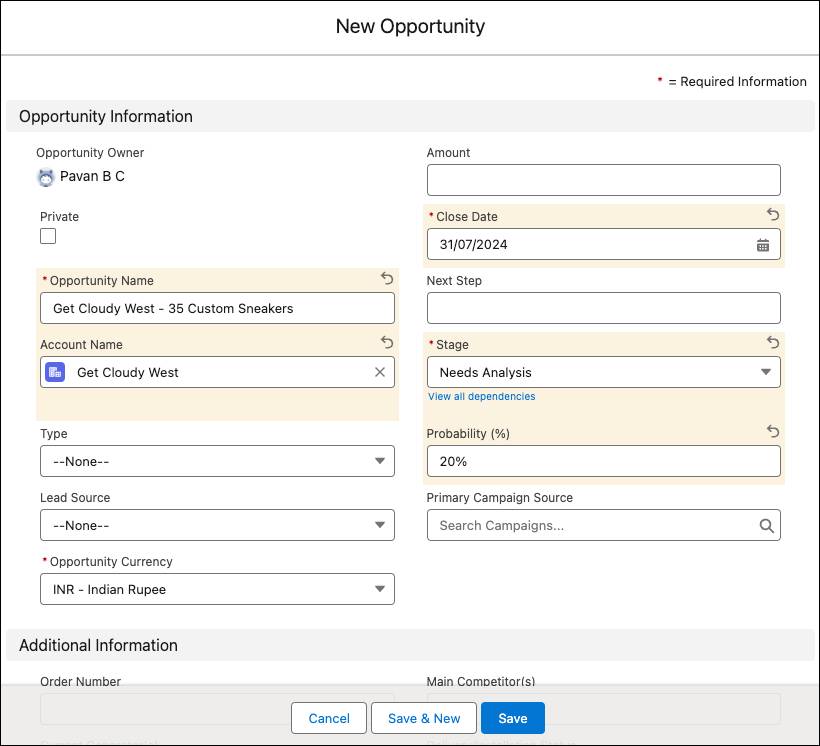
Let’s create an opportunity record to track your progress on the deal with Lars.
- On the Opportunities tab, click New. If your org has more than one record type for opportunities, select the type that best represents this opportunity.
- Give the opportunity a name:
Get Cloudy West - 35 Custom Sneakers.
- Select the account that the opportunity is related to: Get Cloudy West.
- Select a future date for the opportunity’s close date.
- Select the opportunity’s current stage. For now, let’s use Needs Analysis. Salesforce adds a probability based on the stage selected. If the probability isn’t accurate, you can change it.
- Click Save.
Congratulations! You’re on your way to closing a great deal. Now, let’s find out who’s involved in this deal.
Contact Roles on Opportunities
Contact roles on opportunities show which contacts are involved in an opportunity, how they’re related, and the role they play in moving deals forward. When you use and customize opportunity contact roles, your sales team knows who to contact, when, and for which purpose.
An opportunity contact includes the following key information.
Field |
Description |
|---|---|
Contact |
The contact’s name. |
Primary |
When selected, Primary identifies the person as the opportunity’s primary contact. |
Role |
The role of the contact for the record. |
Scenario: Add Get Cloudy Contact Roles
After meeting with Lars, you email a proposal for him to review. He quickly responds with positive feedback, but has a few outstanding questions regarding pricing. Lars CC’d Aparna to get a second opinion based on her experience doing business with you. For this sale, Aparna is an Influencer. You can track that important information by giving Aparna a role in the opportunity.
Let’s add Aparna as a contact for the Get Cloudy account. Then continue to add her contact role for the opportunity you created.
- In the Contact Roles related list on an opportunity, select Add Contact Roles.
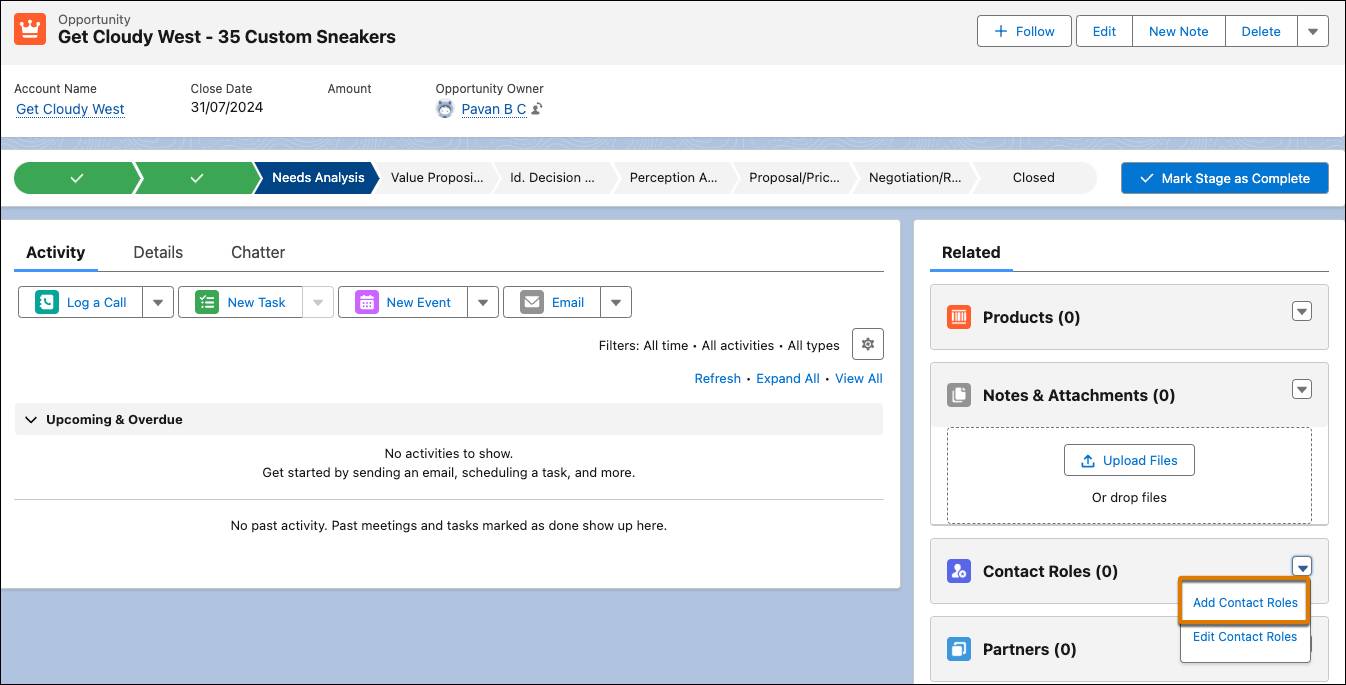
- Select the contact from the list of contacts associated with the account.
- Click Next.
- In the Add Contact Roles window, select the appropriate role.
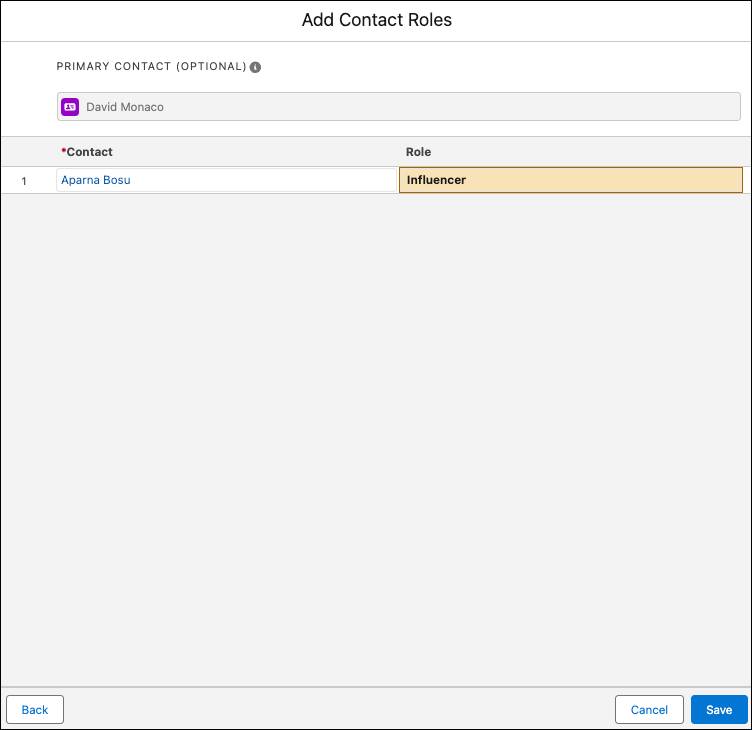
- Click Save.
Resources
- Salesforce Video: Work Your Opportunities and Manage Your Pipeline
- Salesforce Help: Opportunities
- Salesforce Help: Pipeline Inspection
- Salesforce Video: Ensuring Sales Rep Accountability with Pipeline Inspection