Start Your Journey Map
Learning Objectives
After completing this unit, you’ll be able to:
- Explain the elements of a journey map.
- Draft a journey map.
- Prepare a journey mapping workshop.
Know the Architecture of a Journey Map
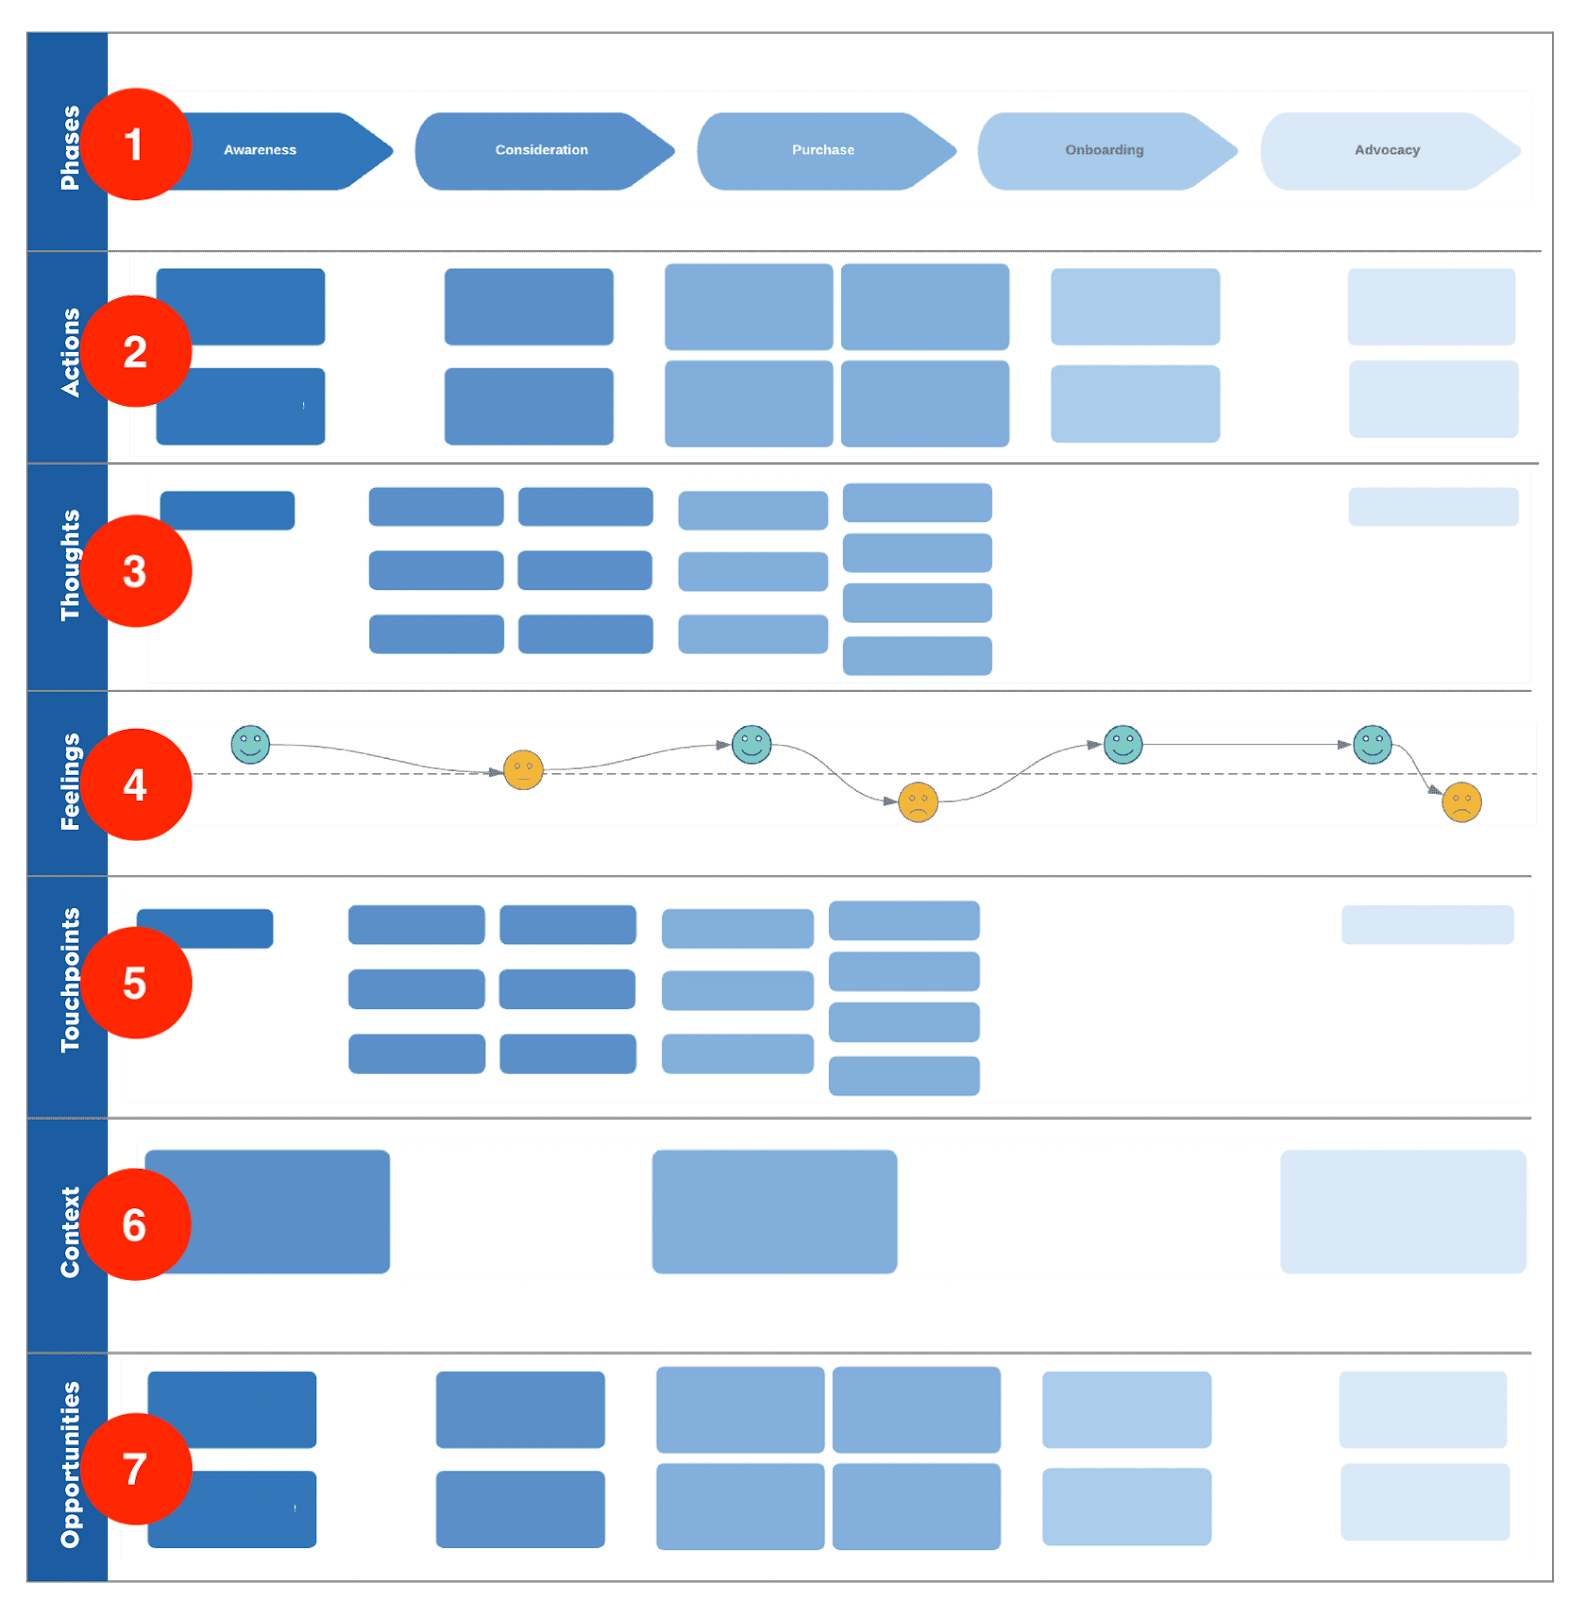
Here is another sample journey map and a description of each section.
-
Phases—the distinct stages of an experience. This example includes awareness, consideration, purchase, onboarding, and advocacy.
-
Actions—what the customer or user does in each phase.
-
Thoughts—what the customer or user thinks. Changes here often hint that they’re entering a new phase in the experience.
-
Feelings—how the customer or user is feeling. Changes here often hint they’re entering a new phase as well.
-
Touchpoints—where your brand, product, or service comes into play. These are the times when you are reaching the customer, or they’re reaching you.
-
Context—the environmental, social, and time factors that are important either to your customer’s ability to reach their goal, or to the experience of your product or service.
-
Opportunities—where and how you can have the most impact. Are you reducing pain or reinforcing your strengths?
Now that you know all the sections of a journey map and what they’re meant to communicate, are you ready to start your own? Below are best practices to help you along the way.
Get It All Out There
While you know the structure of a journey map, it helps to get your ideas out of your head and on paper before trying to fit them into one section or another. Use your customer research and try mapping out the phases of your customer’s process using sticky notes. Go step by step and write each activity and decision point on individual notes.

You may end up with a lot of notes, or you may end up first doing a really high-level job and having to go back to fill in more detail. This is all OK—the first stage is about getting all your ideas out there.
Group Activities into Phases
Group activities into phases based on mindset or context change. However, if you know the phases a user goes through, you can begin with those and break down the activities within each phase. You’ll have the same desired results no matter where you start.
To help with this process, you can color code your notes for clarity. For example, use yellow notes for actions and green for phases, so you can understand the hierarchy of information at a glance.
Before you get carried away building out the entire journey map yourself, now’s a great time to pull in more people.
Enlist Cocreators
Remember that many teams make an impact on the customer at different points in their interaction with your company. This makes it important to select a diverse group of colleagues that will bring different perspectives to your solution. Ultimately, you’ll want the final journey to resonate widely within your organization.
Who to Invite to the Journey Mapping Workshop
When you make an invite list, you can be tempted to include people based on their title or position. Instead, we urge you to keep your user-centered hat on and think behaviorally.

Great ideas can come from anywhere. Aim for five to seven people with a mix of the following characteristics.
-
People who know your customer—sales people, researchers, customer support people, and so on.
-
People who are generative—people you know who like coming up with new ideas and have an easy time brainstorming.
-
People who are optimists and realists—people who know what’s possible and who don’t default to “no” or thinking of all the reasons why an idea won’t work.
-
People who bring diversity—people from different cultures, backgrounds, and disciplines.
Prepare Your Workshop
It's important to put effort into setting the stage for a productive, fun, and collaborative experience. Making participants feel comfortable, welcome, and emotionally safe enough to contribute their wild ideas will improve the quality of your journey map and all the work that follows.
Take time to ensure you think through logistics and what it will take to create a collaborative environment where participants can efficiently and effectively share their thoughts. You can run a virtual workshop for distributed teams, or an in-person workshop if your group can gather in an office or event space.
Virtual Workshop Logistics
- Plan four sessions, 2 hours each. In virtual sessions it’s more challenging to keep people engaged for an extended period of time.
- Prompt participants to do more preparation work ahead of time in order to make the most of the collaboration time.
- Use a virtual whiteboarding tool that the team can use to brainstorm together.
- If you have time and money in your budget, send participants a care package with a few treats as a special token of appreciation.
In-Person Workshop Logistics
- Plan for an entire day of collaboration.
- Reserve a quiet place where participants can collaborate without distractions. This may mean finding a place outside your office space.
- Arrange the furniture in a way that allows for easy collaboration and discussion. Try to avoid classroom-style rows!
- Find a space with natural lighting to create a warm environment.
- Provide healthy snacks and beverages throughout the day.
- If you have money in your budget, give participants something special as a token of appreciation.
- Plan to have plenty of multi-colored sticky notes, markers, foam core boards, voting dots, and colored tape to create grids.
Set the Stage
For your workshop, set the stage with key research information and prompts. Share a brief with your participants beforehand so they’re ready for the workshop.
Your brief should include insights and data on the specific customer type’s behavior. You should also include:
- The business challenge.
- The users/customers you’re serving.
- The work that’s been done thus far.
- Their role as cocreators in the journey mapping process.
Whether you’re meeting in person or virtually, you want to have a set of boards that you can use as a shared workspace.
The first is the map board, which should have the sketched grid of your journey map, including phases and actions that you’ve drafted, and empty rows for thoughts and feelings, touchpoints, contexts, and opportunities for your participants to fill in. The remaining boards are used to drill down into each section. This allows participants to see how their input will be used.
In the next unit, you go through the steps of running a journey mapping workshop and developing the final draft of the map itself.