Set Up Advanced Access to Insurance Features
Learning Objectives
After completing this module, you’ll be able to:
- Enable Policy and Claim record rollups at the household level.
- Enable Policy and Claim rollup-by-lookup (RBL) summaries at the household level.
- Add the Insurance Agent Action Items component to the Insurance Agent Console app’s home page.
- Give users access to the Insurance Agent Console app.
Enable Rollups at Household Level
To show insurance policies, claims, insurance policy participants, and claim participants as related lists at the household level, Matt adds Insurance Policies, Claims, Insurance Policy Participants, and Claim Participants as picklist values to the Rollup__c field on the Account Contact Relationship object.
The Insurance Policies related list shows the policies where household members are primary insured (NamedInsuredId). The Claims related list shows the claims related to household members’ accounts.
In a new org with Insurance for Financial Services Cloud, the Rollup__c field on the Account Contact Relationship object includes the Insurance Policies, Claims, Insurance Policy Participants, and Claim Participants picklist values.
If you’re configuring Insurance for Financial Services Cloud in an existing org, perform these steps to add the picklist values.
- From Setup, open Object Manager, and click Account Contact Relationship.
- Click Fields & Relationships, and then select Roll-Ups.
- Under Values, click New.
- In the Roll-Ups field, enter these picklist values. Enter each value on its own line.
Insurance PoliciesInsurance Policy ParticipantsClaimsClaim Participants
- Click Save.
Enable Rollup-by-Lookup Summaries at Household Level
Matt adds the provided rollup-by-lookup (RBL) summaries on the account household page layout to show total household policies, policy premiums, claims on policies, and claim amount paid by a policyholder’s primary household. Matt then activates the RBL rules to calculate the summaries.
- From the App Launcher, search for and open Rollup By Lookup Configurations.
- Change the list view to All.
- For each of the following rules, select the check box in the Active column. If you do not see the Active column in your org, check with your Salesforce admin. For more information, refer to Create or Clone a List View in Lightning Experience.
RBLForTotalNumberPoliciesHHRBLForGWPHHRBLForTotalNumberClaimHHRBLForClaimPaidHH
Add a Component to the Console Home Page
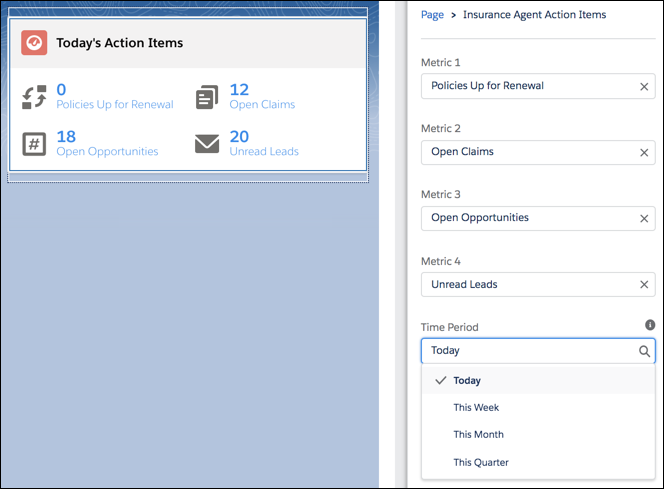
The Insurance Agent Action Items component gives agents like Zeynep and Zaw an at-a-glance view of payment-due policies, policies up for renewal, open claims and cases, unread leads, and open opportunities. Matt adds the component to the Insurance Agent Console app’s home page.
- On the Insurance Agent Console home page, from Setup, select Edit Page.
- Drag the Insurance Agent Action Items component to the highlights panel or the side panel.
- Click anywhere on the Insurance Agent Action Items component to select it.
- In the Properties pane, choose up to four metrics to show on the home page.
- Select a time period.

The time period that you select applies to only policy-related metrics. Other metrics related to cases, claims, leads, and opportunities display the total count irrespective of the time period.
- Click Save.
Give Users Access to the Insurance Agent Console App
Matt adds user profiles to the Insurance Agent Console app to give agents like Zeynep and Zaw access to the app. Insurance Agent Console helps agents track their performance and stay focused on their goals.
- From Setup, in the Quick Find box, enter
App Manager, and then select App Manager.
- On the Insurance Agent Console app’s row, click
 , and then select Edit.
- Under App Settings, click User Profiles.
- Under Available Profiles, select a profile, and then click Add.
- Click Save.
With this, Matt’s done setting up all the required access to essential insurance features. In the upcoming units, Matt enables distributor performance management and configures producers. He also sets up independent insurance agent access to insurance applications in Experience Cloud sites. This makes it easier for Cumulus to scale its operations by seamlessly distributing to partner sites.
Resources
- Salesforce Help: Enable Policy and Claim Record Rollups at Household Level
- Salesforce Help: Enable Policy and Claim Rollup-By-Lookup Summaries at Household Level
- Salesforce Help: Add the Insurance Agent Action Items Component to the Console Home Page
- Salesforce Help: Give Users Access to the Insurance Agent Console App