Price Products in the Cart
Learning Objectives
After completing this unit, you’ll be able to:
- Define price adjustments and overrides in the Cart.
- Explain how to adjust or override the price of a line item in the Cart.
- Describe how to apply manual discounts in the Cart.
Manual Price Change in the Cart
Now that Ada is on vacation, let’s wander down the hallway of Infiwave’s office to check in with her coworker, Arif.

As a sales associate at Infiwave, Arif guides customers through the buying experience by sharing information and suggestions on products and services. Ever since Infiwave’s adoption of Industries Configure, Price, Quote (CPQ), he’s enjoyed learning the capabilities of the Cart to aid in order capture and submission.
Ada regularly informs Arif about certain pricing strategies in the pipeline to prepare him for the guided-selling experience. Before she left for vacation, she showed Arif how he can make changes to product prices during the ordering process to help him upsell. Normally, Arif could use preconfigured promotions and discounts to offer special, reduced pricing, but he needs to be prepared to make manual adjustments if none are available.
Line Item Price Adjustments and Overrides
Depending on your role permissions, you may be able to manually change the price that displays in the recurring or one-time column for any product or service in the Cart. This includes any price that has already been adjusted due to bundling child products, a promotion, discount, or context rule.
In the Cart, you can manually change a price by:
- Adjusting it by a percentage or amount
- Overriding it with a new amount
In this example, you can see how a percentage adjustment and override each affect the price of a tablet product.

An adjustment decreases the price of the tablet product by 10%. An override replaces the base price with a new price of $800.
In the Cart, you can apply adjustments and overrides by clicking Adjust Price next to a product.
This opens the product’s Pricing window.

One-Time, Recurring, and Usage tabs (1). The Price Waterfall section (2) shows the Base Price, any adjustments or overrides you apply, and the total amount the customer will pay. The Adjust Pricing section (3) is where you create pricing overrides and adjustments.
Under the Adjust By dropdown menu, choose from Percentage, Amount, Adjustment Code, or Override. Adjustment codes are reusable adjustments you can define in Pricing Designer. You can choose whether the adjustment is a discount (-) or an upcharge (+). Finally, you can enter the amount to alter the price.
Adjust a Price by a Percentage
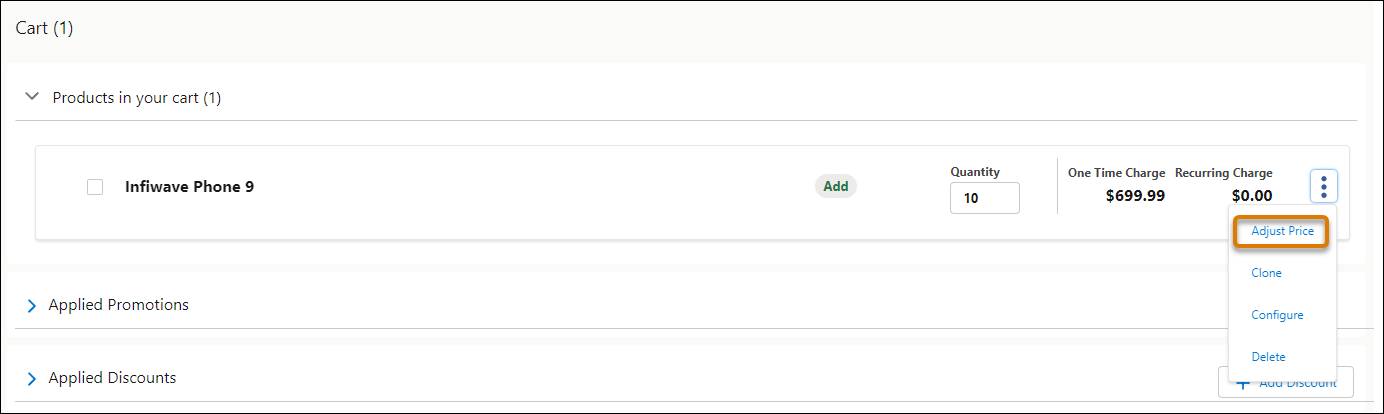
While reviewing the Cart interface, Arif receives a call from a valued customer, Carole White. She’s considering ordering 10 Infiwave phones for her extended family but is wondering if a discount is available for this bulk purchase.
Arif puts on his salesperson hat and offers Carole a 20% discount on the order. She enthusiastically agrees, so Arif adds the Infiwave Phone 9 product to the Cart, changes its quantity to 10, and clicks Adjust Price next to the product.

He changes the Adjust By property to Percentage, clicks Discount (-), and changes the Amount to 20.00%. He then clicks + Add to apply the adjustment.
Arif notices the Price Waterfall updates to show the new discount.

If needed, he could click the trashcan icon  next to the discount to remove it from the product.
Adjust a Price by an Amount
To adjust the price by an amount instead of a percentage, Arif clicks Adjust Price next to the product.

Next, he selects Amount for the Adjust By property. Then, he clicks Discount (-), enters $10.00for the Amount, and clicks + Add.
He checks out the updated Price Waterfall, and sees the new adjustment in action.
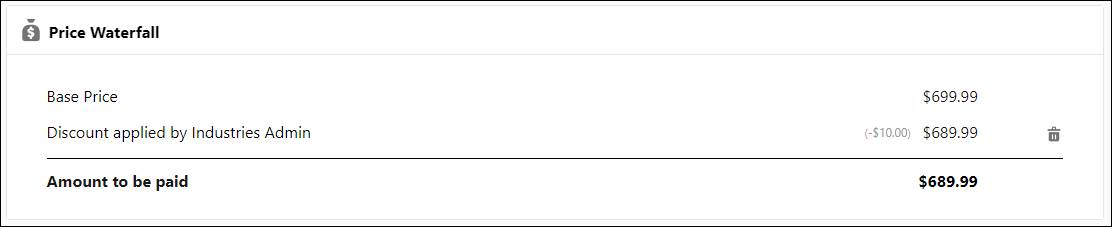
Arif is successful in adjusting the price by an amount.
Override a Price
The last thing Arif needs to learn about pricing in the Cart is how to override a price altogether.
Click Adjust Price next to the product. Select Override for the Adjust By property and then enter $20.00 for the Amount.

Notice that you can add as many adjustments and overrides as needed. For instance, you can override a price to a new amount, and then add an adjustment to reduce the new price by an additional $20 to sweeten a deal.
Creating a Custom Discount
Next, Arif reviews what Ada taught him about custom discounts.
Custom discounts work like discounts you pick from the catalog, except you create them in the Cart for the specific quote or order you’re working on. They can apply to all items in the Cart, or to specific products or product categories. You can allocate custom discounts to an account, a contract, or the current order. If you choose to apply it to an account or a contract, you’re prompted to specify a duration for the discount to be applied towards the end of the process.
To create a custom discount, in the Applied Discounts list in your Cart, click + Add Discount.

Then, click + Create Custom Discount in the Apply Discount dialog box to view details about the discount. Here, you can see a custom discount for 15% off everything in the Cart.

On the Create Custom Discount screen, you can Name (1) the discount. Use the Allocation field (2) to choose whether the discount applies to the current order, an account, or a contract. You can also include an optional Description (3). Choose whether the discount applies to All items in Cart or only Specific Products (4). In the Amount section (5), set whether the discount is one-time or recurring, and whether the adjustment is a percent or absolute value. Finally, enter either the percent or absolute value, and choose a preconfigured time policy to set the duration that the discount is active.
Custom discounts appear in the Applied Discounts of the Cart, and the price adjustments are made to the appropriate products and services in the Cart.

As with all discounts, if it’s contract-based or account-based, it won’t be active on the account or contract until the order is submitted.
When it comes to manual adjustments in the Cart, there should always be guardrails. Your organization should put rules and formal authorization processes in place to avoid mistakes, such as giving 120% discounts on products. It’s also important to always check the Price Waterfall as you make your changes, and do a sanity check before submitting a quote or order.
With his newfound pricing capabilities, Arif is confident his sales numbers will be the talk of the town this quarter. He’s also happy he didn’t have to wait until Ada was back from vacation to make changes to product prices.