Create an Object Type
Learning Objectives
After completing this unit, you’ll be able to:
- Explain how to create an object type.
- Explain how to add attributes and fields to an object type’s layout.
- Explain how to create a section within an object type’s layout.
Create Object Type
Devi, Infiwave’s product designer, now has a firm understanding of how object type inheritance works in Shared Catalog. With a vision of the perfect hierarchy for his catalog in mind, he is ready to put his knowledge to test by creating object types and subtypes in Product Designer. His new object types streamline the configuration of many products, including the highly anticipated Infiwatch.
Before we begin, remember the value of having a clear plan before configuring Enterprise Product Catalog (EPC) components, and that object types are no different. Your playground org already contains a hierarchy of object types and subtypes, as shown here.
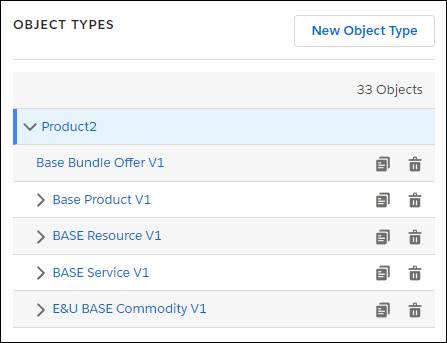
These object types contain fields, sections, and attributes, so you don’t have to start from scratch in the training exercise coming up at the end of this unit.
Normally, your first step is to develop the initial hierarchy during product modeling, so that you can prepare for all the different types of products that you expect to build.
For instance, while the base object type is already set up for you in your training org, it’s important to consider how to set up your own primary object types that store information relevant to all of the products in your catalog. Introducing and assigning values to new fields or attributes after you’ve built out several products can prove to be quite a difficult task. In short, don’t skip the product modeling phase.
As with many Shared Catalog components, more isn’t always better. Try to limit the number of fields and attributes you store on your object types so that they hold only the necessary metadata for your products. This keeps your product data tidy and prevents cluttered layouts with too much information.
Smartwatch Example
Devi has figured out how he’d like to use object types to his advantage, and has decided to have a Smartwatch object type for creating current and future wearable device products.

He follows these three steps to create an object type.
- Create the object type and, if necessary, assign a parent object type.
- Add attributes and fields to the object type layout.
- Set values or, if necessary, control the behavior of attributes.
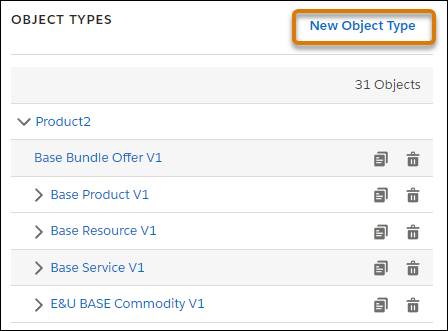
The first step in creating an object type is to click New Object Type on the Product2 Object screen.
On the object type configuration screen, specify the following information.
|
Name |
Object Type names are used in Shared Catalog searches. They don’t appear in the Industries CPQ Cart. |
|
Parent Object Type |
This property sets the new object type as a subtype of another object type. The new child object type inherits the field layouts and attributes from its parent object type. |
|
Version Label |
This property appears if you have an EPC license and have enabled versioning in the org. Enter a version for the object type, such as V1. |
|
Lifecycle Status |
This property appears if you have an EPC license and have enabled lifecycle management. New object types are automatically set to Draft, and become available when they’re released. |
|
Is Active |
A selected Active checkbox indicates that the attribute is currently in use. |
|
Effectivity Dates |
Effectivity dates specify the date range that an object type is usable. Select today’s date to take effect immediately. |
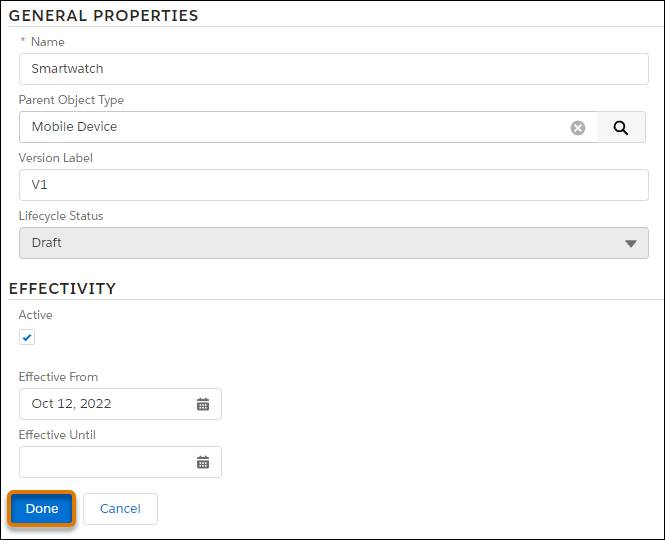
After you populate this information, select Done to add the new object type to the Product2 object type list.
Add Attributes and Fields
With the new object type in place, the next step is to adjust its layout. Select the Layout Management tab.
Here you see all sections, fields and attributes that are inherited from the Smartphone object type.
The Fields (1) and Attributes (2) tabs contain the available fields and attributes that you can add to the layout. You can also search for a specific attribute or field using the Search bar (3).
In the Layout Management tab, you can add fields or attributes to the object type’s layout.
Click and drag a field or attribute (1) to the layout section (2). Add the Band Type and Connectivity attributes to the Run Time Attributes section for the Smartwatch object type.
Set Attribute Values and Behavior
You can also select attributes to modify their values or control their behavior at the object type level. Click the name of an attribute or field in the layout to see its metadata.
In this example, we see the Edit Attribute pane for a Connectivity attribute.
The Primary Information section contains the values you configured when you created the attribute, such as the attribute category.

In the Data Information section, notice that you can set a default value for the attribute directly in the object type.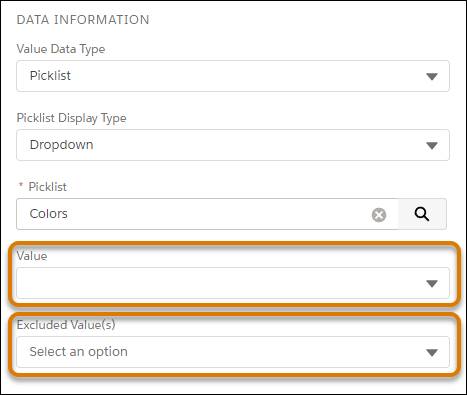
You can also exclude certain values from being used in this object type. This is useful if a certain color option is discontinued.
Finally, review the Behaviors section. This section contains options that control the attribute’s behavior at the object type level, such as making the attribute required, read only, or encrypted.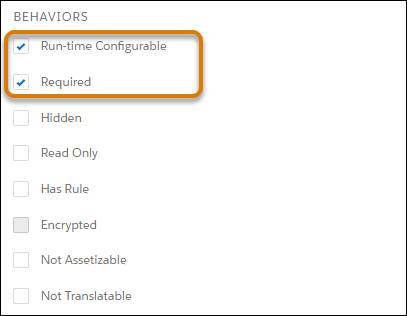
Enable Run-time Configurable and Required for the Band Type, Connectivity, and Color attributes so that their values must be defined in the Cart during order capture.
Way to go! Devi has created his first object type and has configured its layout to suit a line of smartwatch products. He’s also modified the behavior of the attributes at the object type level, so that this functionality is present when creating products from the object type.
Add a Section to the Layout
Sections are a useful way to group fields and attributes, and they’re quite easy to set up. While you aren’t adding sections in this unit’s exercise, it’s an important skill to have in your toolbox.
On the object type’s Layout Management tab, click Add Section.
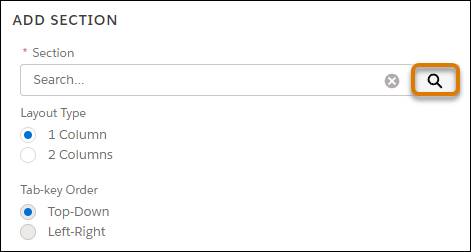
In the Add Section pane, you can search for, and apply an existing section by clicking ![]() .
.
In the Lookup Search window, you can view existing sections that you can add to the layout.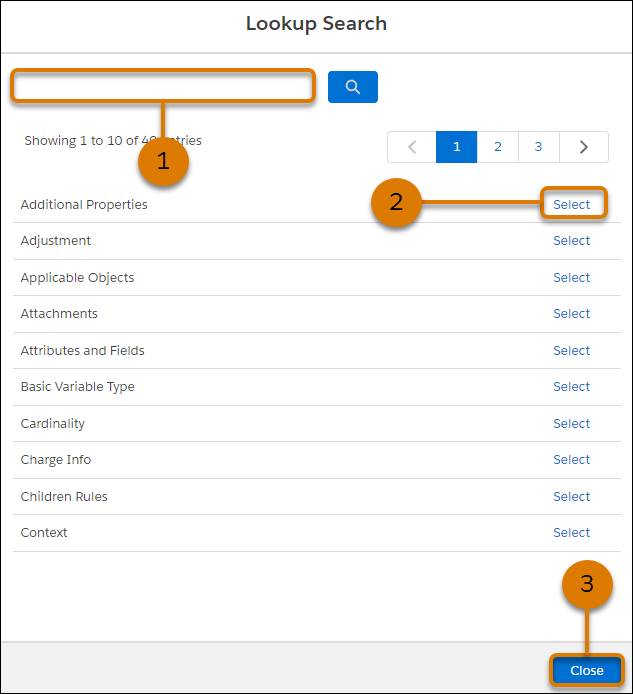
Browse the list of sections in the window, or use the search field (1) to find a specific section. Click Select (2) next to the desired section name, then click Close (3).
Next, select either a one-column or two-column Layout Type for the section. Set the Tab-key Order as either Top-Down or Left-Right. Tab-key Order controls how the tab key moves through content in the interface for accessibility.

After you click Done, the new section appears in the layout. As you saw before, you can drag and drop attributes or fields onto the new section. After you’ve added these components, you can then move the section up or down in the layout by clicking ![]() .
.

Make sure to avoid leaving empty sections on object types, as this can sometimes lead to errors. To delete a section, click ![]() .
.
Now that Devi’s got his object types in order, he can create a sellable offer for the Infiwatch and other smartwatch products quickly and easily.