Create and Apply Account-Based Discounts
Learning Objectives
After completing this unit, you’ll be able to:
- Explain the purpose of account-based discounts.
- Build an account-based discount.
- Apply and deactivate an account-based discount.
Account-Based Discounts
Now that you’re familiar with order-based discounts, it’s time to move on to account-based discounts. In this unit, find out what makes up an account-based discount and how to create, activate, and deactivate one.
An account-based discount not only reduces the price of a current order but also gets saved for future orders made by the same customer. So the discount applies to all orders made under the same account until it expires. It’s a great way to reward loyal customers and encourage repeat business.
Account-based discounts are most relevant during a conversation between a CSR and a customer. Such discounts are commonly used to retain loyal customers as part of a loyalty and retention (L&R) program. For example, ABC Company negotiates a 15% discount on all advertising placements over the next year. The negotiated discount is stored in ABC Company’s account. Once the discount is activated on the account, any future orders for ABC Company will automatically receive a 15% discount on advertising placements.
Account-based discounts differ from order-based discounts as they’re not actually activated until the order containing the order-based discount is submitted. Let’s follow along as Ada creates an account-based order in Industries CPQ.
Build Account-Based Discounts
Create a New Discount
Ada wants to create an account-based discount to reduce the prices of all products and services by 10% for 12 months. Here’s what she does.
Like with order-based discounts, go to Vlocity Product Console and click the new icon (+) to the right of Discount. On the New Discount dialog, add the following details.
- In the Name field, enter
10% Off Everything 12mo - Acct.
- For Code, enter
DSC_10_12MO_ACCT.
- In the Description field, enter
10% Off Everything for 12 months.
- For Discount Type, select Account.
- For Pricelist, select B2C Price List.
- For Discount Duration, select 12. This field value (in months) determines if or how long the discount is available to the customer.
- You want the discount to apply to all items in the cart, so select the Applies to All Items In Cart checkbox.
- Select the Active checkbox to make the discount available for use.
- Enter today’s date in the Effective From field.
- Finally, click Save.
Add Discount Items
In the second step for an order-based discount, you fill out the fields in the Discount Items tab. But if you click this tab for an account-based discount (and you’ve checked Applies to All Items In Cart on the prior screen), you receive a warning box stating, “Discount Items will be ignored as the discount applies to all items in the cart.” You can ignore this and move on to the Discount Pricing tab.
Set Discount Pricing
For the final step, Ada defines the price list entry for the discount for one-time and recurring charges in the B2C Price list. To create a one-time adjustment, she selects Discount Pricing and clicks the New button under the Adjustments tab. Here, she adds the following details.
- For Price List, select B2C Price List.
- In the Display Text, enter
10% Off Everything.
- Under the Pricing Variable section:
- In the Charge Type field, select Adjustment.
- In the Sub-Type field, select Standard.
- Click Search and select the One Time Std Price Adjustment Pct Pricing Variable.
- In the Charge Type field, select Adjustment.
- In the Pricing Element section, click 10% Off.
- Select the Active checkbox.
- In the Effective From date field, enter today’s date.
Ada reviews all the details on the page and then clicks Save.
Next, she creates a recurring adjustment. She clicks New under the Adjustments tab and fills out these details to accommodate the recurring charge.
- For Price List, select B2C Price List.
- In the Display Text, enter
10% Off Everything.
- Under the Pricing Variable section:
- In the Charge Type field, select Adjustment.
- In the Sub-Type field, select Standard.
- Click Search and select the Recurring Monthly Std Price Adjustment Pct Pricing Variable.
- In the Charge Type field, select Adjustment.
- In the Pricing Element section, click 10% Off.
- For Time Plan, select TP-12M.
- For Time Policy, select TPOL-PURCHASEDATE-ENDPLAN.
- Select the Active checkbox.
- In the Effective From date field, enter today’s date
Ada reviews all the details on the page and then clicks Save.
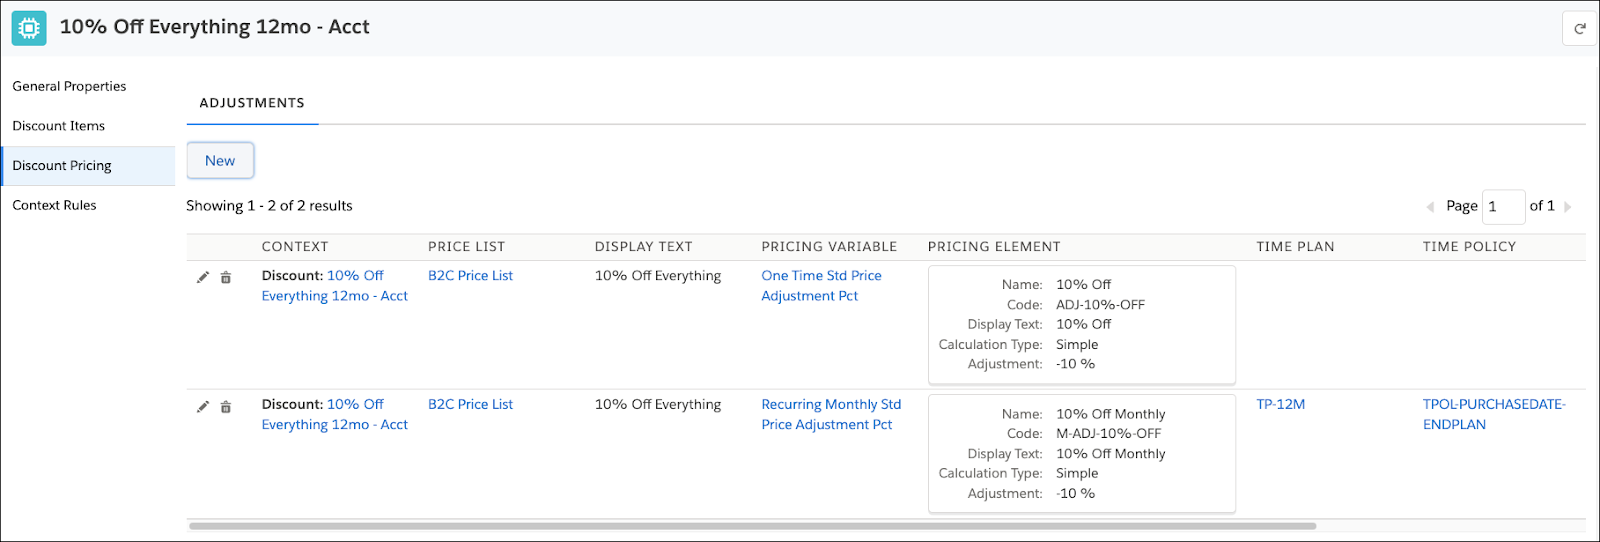
[alt text: The Discount Pricing tab with the account-based discount:10% Off Everything 12mo - Acct.]
Ada has successfully created an account-based discount to reduce the prices of all products and services by 10%.
Apply Account-Based Discounts
Eric Bishop, an Infiwave customer, wants to cancel his mobile phone contract because he’s unhappy with his cellular plan. During a call with Eric, Brooks offers him a 10% discount on everything that he purchases for the next 12 months. Thanks to Ada’s account-based discount, Brooks can retain the customer.
Brooks starts by creating an order for Eric in Industries CPQ. He clicks + Add Products to add Infiwave 3 Headphones and Infiwave Fast Charge Wireless Charging Stand to the cart. In the Applied Discounts section of the cart, Brooks clicks + Add Discount. On the Apply Discount dialog, he locates the 10% Off Everything 12mo – Acct discount and clicks Apply to add it to the cart.
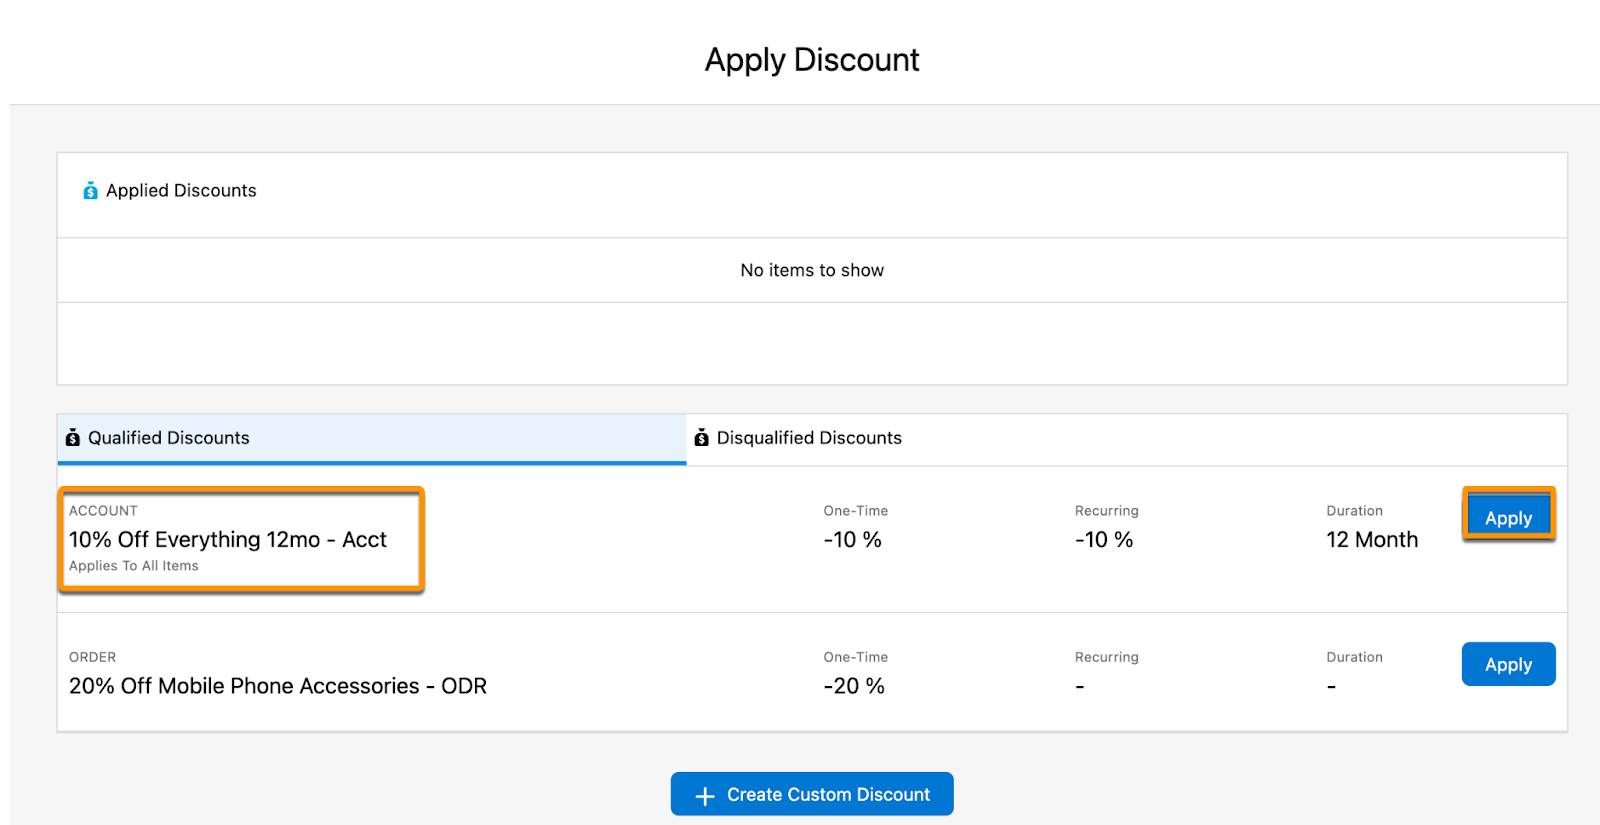
[alt text: The Apply Discount dialog showing the list of Qualified Discounts.]
All the product prices in the cart get discounted by 10%, and the account discount is displayed in the Applied Discounts list.
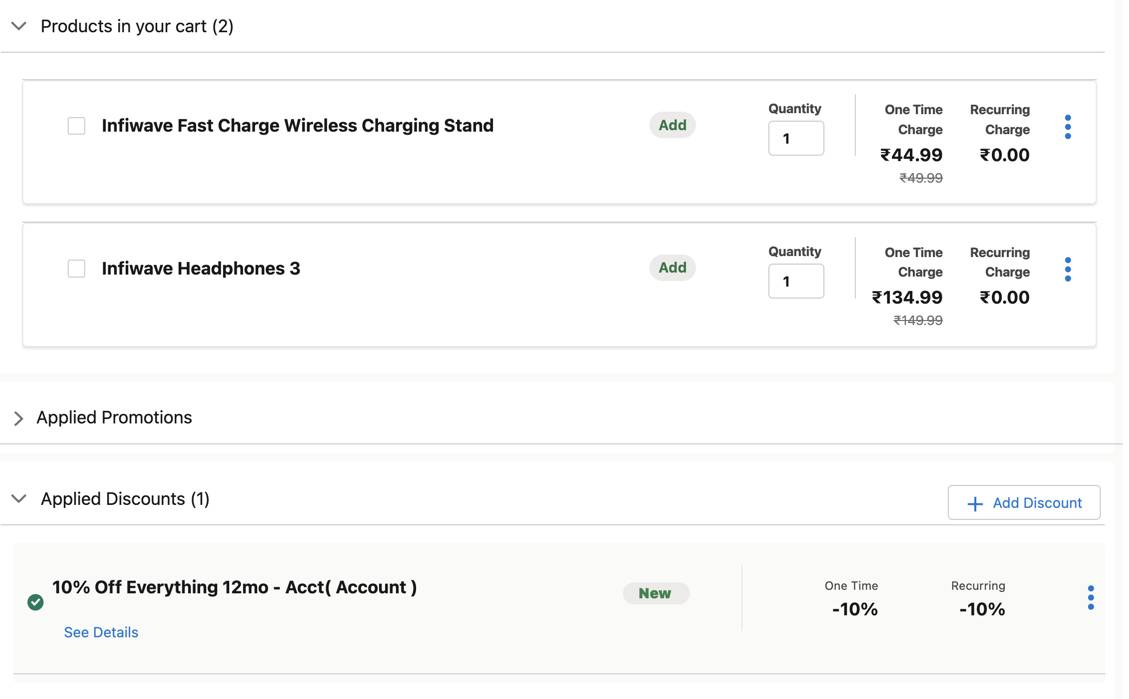
[alt text: The Apply Discount dialog showing Applied Discounts for an account.]
Finally, Brooks submits the order and activates the discount.

Deactivate an Account-Based Discount
Once an account-based discount is activated, it gets saved against the account for future discounting until the validity of the discount ends. But wait! What if the customer wants a different discount? Or you no longer want the discount to apply to the customer’s account? Industries CPQ allows you to deactivate the current account-based discount using these simple steps.
-
Create a new order: From the Industries CPQ Orders list view, click New Order to create a new order and enter your information in the fields.
-
Add products: In the cart, click + Add Products to add the products in the Catalog Preview pane.
-
Deactivate the discount: Expand the Applied Discounts list in the cart. Click the discount’s action menu and select Delete. The status of the account discount changes to Deactivate. Then, click Submit Order to deactivate the discount.
-
Confirm deactivation: Return to the order and click the Discounts tab in the cart. The discount will have a green check mark and the status will be Deactivate.
Don’t worry. Deactivating an account-based discount doesn’t prevent the discount from being used on another account.
Ada has learned how to design, create, and apply discounts in Industries CPQ. She can now apply this knowledge to help Infiwave scale its business as well as retain existing customers.
Want to Learn More?
If you’re a Salesforce customer, check out the following learning journeys to find out how to skill up on our amazing suite of digital transformation tools and industry applications.
-
Communications Cloud Developer
-
Communications Cloud Consultant
-
Media Cloud Developer
-
Media Cloud Consultant
-
Energy & Utilities Cloud Developer
-
Energy & Utilities Cloud Consultant
If you’re a Salesforce partner, you can find the same great learning plus additional partner resources on Partner Learning Camp (login required). #AlwaysBeLearning