Create Rules to Auto-Add Products in the Cart
Learning Objectives
After completing this unit, you’ll be able to:
- Build entity filters for account information.
- Create an Auto-Add configuration rule.
Make Way for New Requests
Eliza, the CPQ developer, is on a roll! The Infiwave contact center has piloted her new rules, and everyone is impressed with how well they’re working. Unnecessary support calls are declining, the customer service representatives (CSRs) are creating the perfect order, and even the new employees are up to speed.
Now, the product marketing team has a new request. They want all high-priority customers based in California who purchase the Infiwave Phone 10 to automatically receive a free phone case. Eliza knows precisely how to achieve this, so she gets to work right away.
Auto-Add Product Relationship
Start by creating a product relationship that auto-adds Infiwave Canvas Wrap Case when Infiwave Phone 10 is in the Cart.
- From the App Launcher, find and select Vlocity Product Designer.
- From the navigation menu, select Product Relationships.
- Click New.
- Provide these details.
- In the Product Relationship Name field, enter
Infiwave Phone 10 Auto-Adds a Free Phone Case.
- For Product, select Infiwave Phone 10.
- In the Relationship Type field, select Auto-Add.
- For Related Product, select Infiwave Canvas Wrap Case.
- In both the Min Quantity and Max Quantity fields, enter
1.
- Save your changes.
- In the Product Relationship Name field, enter

You’ve successfully created a product relationship that auto-adds Infiwave Canvas Wrap Case when Infiwave Phone 10 is in the Cart.
Create an Entity Filter
Next, you create an entity filter that looks at the account associated with the order to specify:
- If they are a high-priority account, and
- If they have a Californian shipping address
To achieve this, add two conditions within the entity filter.
- From the App Launcher, find and select Vlocity Entity Filters.
- Click New.
- In the New Vlocity Entity Filter page, provide these details.
- In the Entity Filter Name field, enter
Order Account is High Priority and in CA.
- For Filter On Object Name, select Order Product<OrderItem>.
- For Type, select Qualification.
- In the Valid From field, select today’s date.
- Save your changes.
- In the Entity Filter Name field, enter

Now, add conditions to the entity filter. Start by adding the first condition for high-priority accounts.
- Under Entity Filter Conditions, click Add.
- Ensure the Type field is set to Field.
- For Field/Attribute/Related Object, click Select.
- In the Field Selection window, select Order ID<OrderId>, and then select Account ID<AccountId>, and finally select Customer Priority <vlocity_cmt__vCustomerPriority__c>.
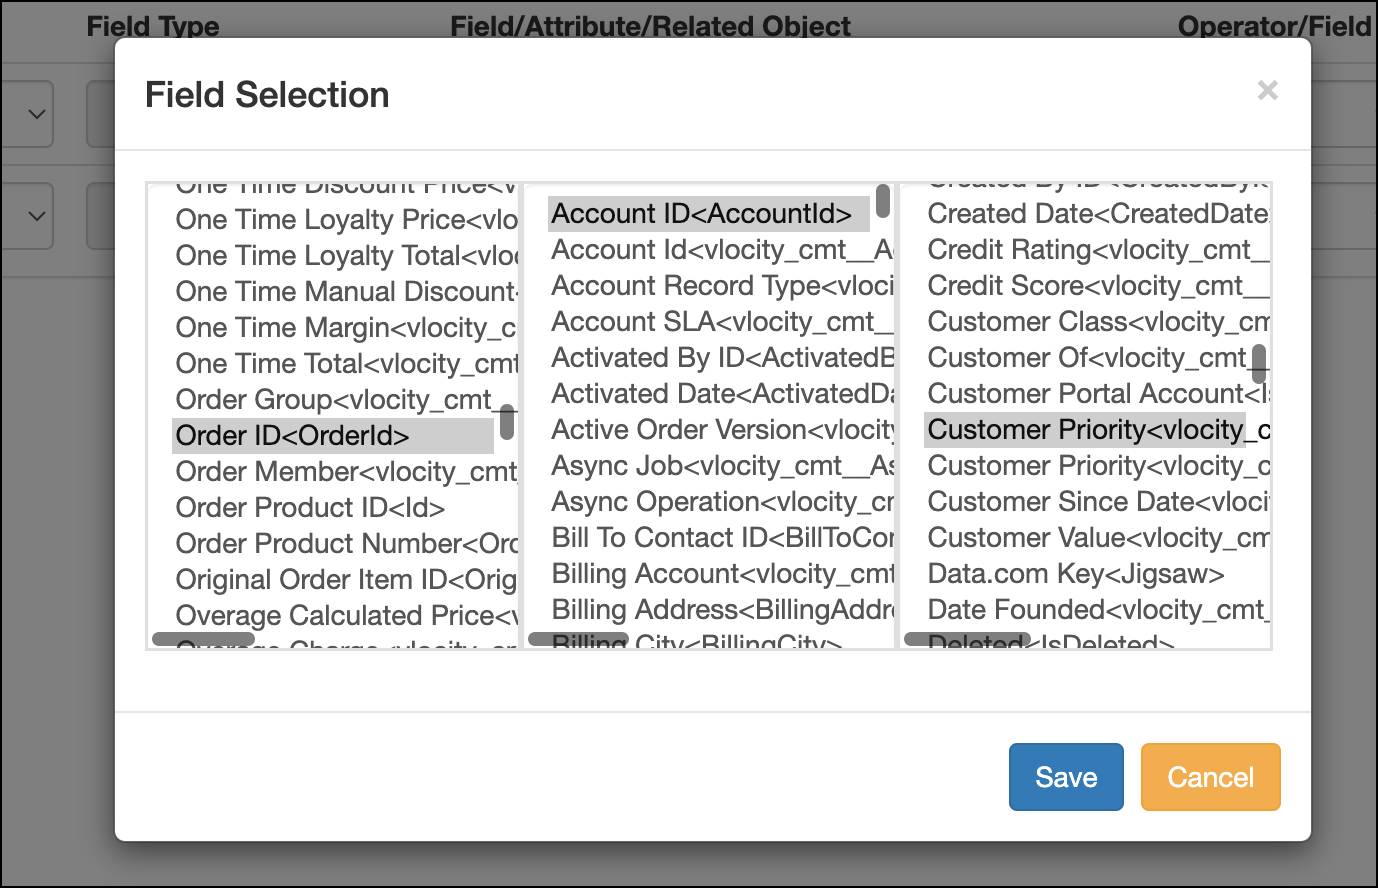
- Save your changes.
- For Operator/Field, select =.
- In the Value field, enter
High.

- Save your changes.
This condition filters high-priority accounts. Next, create a second condition for filtering accounts in California.
- Under Entity Filter Conditions, click Add.
- For Field/Attribute/Related Object, click Select.
- In the Field Selection window, select Order ID<OrderId> and then select Shipping State/Province.
- Save your changes.
- For Operator/Field, select =.
- In the Value field, enter
CA.
- Save your changes.

Your entity filter is now ready. Next, move on to the last step of your task: defining the rule.
Create an Advanced Rule
As the final step, create an advanced rule that combines the evaluation entity filter and the Auto-Add product relationship.
- From the App Launcher, find and select Vlocity Rules.
- Click New.
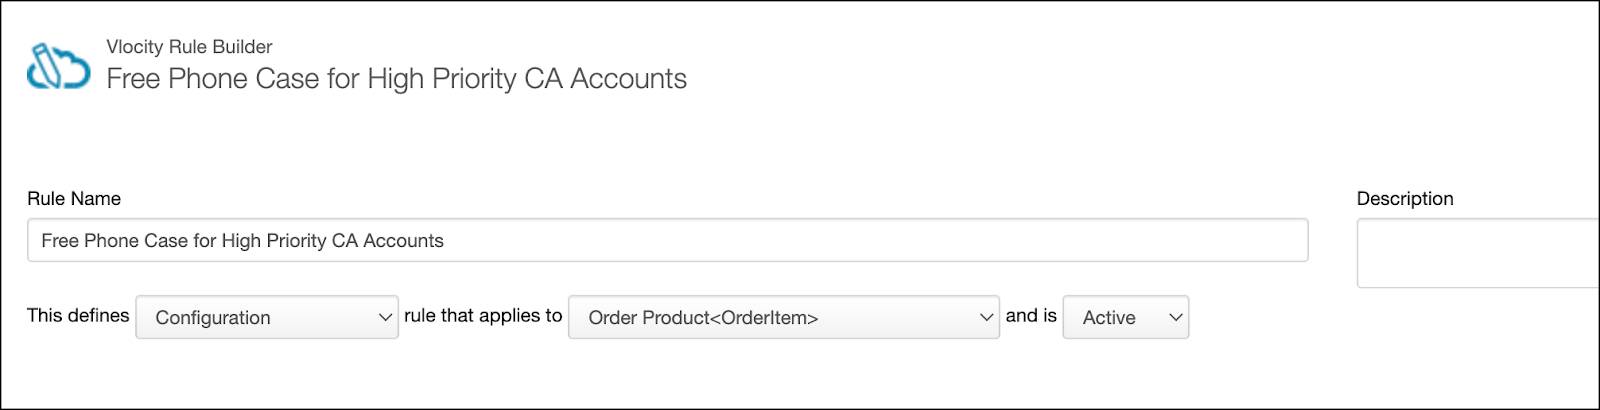
- In the New Vlocity Rule page, provide these details.
- In the Rule Name field, enter
Free Phone Case for High Priority CA Accounts.
- In the next line, for the three dropdowns, select Configuration, Order Product<OrderItem>, and Active respectively.
- In the Rule Name field, enter
Next, add the product relationship that appears as actions within the Vlocity Rule Builder.
- In the Filters And Actions List, click Actions to view all the product relationships.
- Locate Infiwave Phone 10 Auto-Adds a Free Phone Case and click Add To Rule Action.

- In the Filters And Actions List, click Filters.
- In the Filter Name column, locate Order Account is High Priority and in CA, and click Add To Rule Filter.

- Save your changes.
Congratulations! You have successfully created the advanced rule to auto-add products for an order.
Test the Rule in the Cart
With all the components of the advanced rules framework defined, you are ready to see the results of all that hard work.
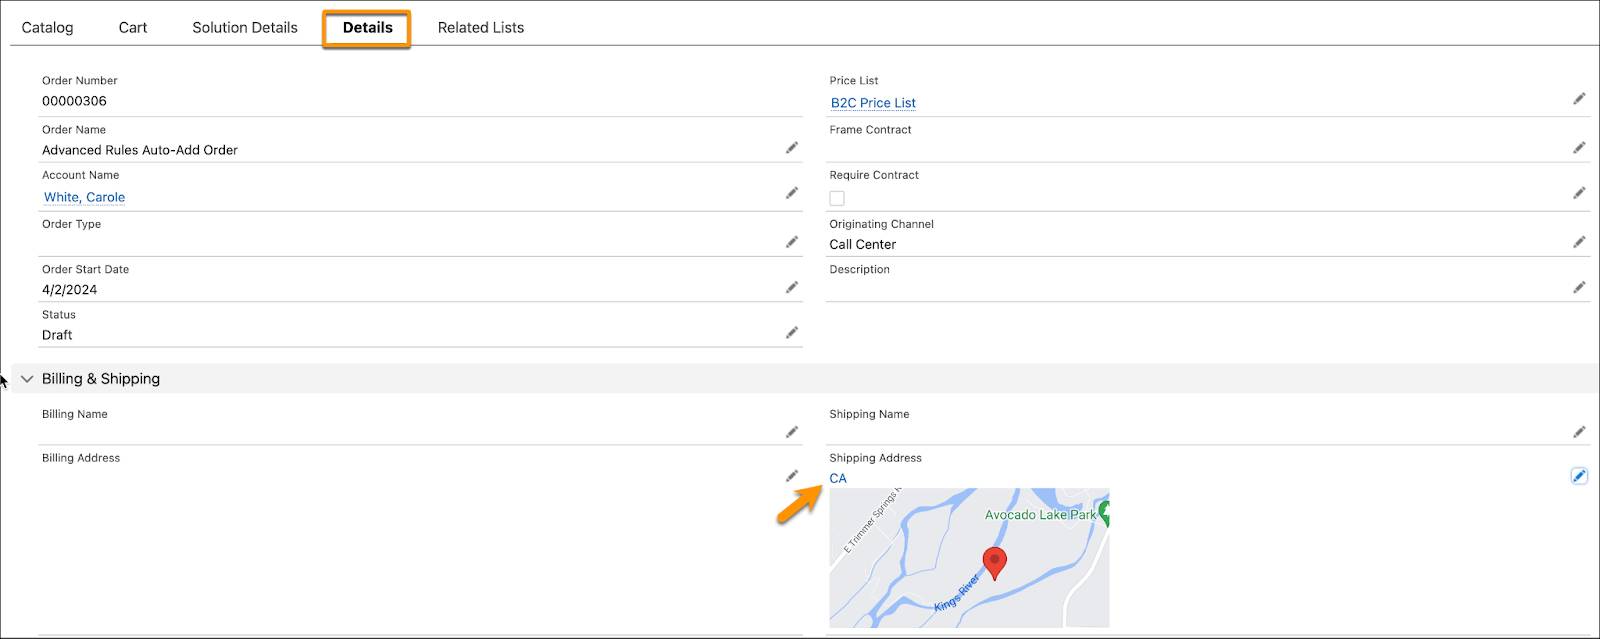
- Create a new order for an existing high-priority customer, Carol White. This satisfies the first entity filter condition.
- Then, go to the Details workspace of the order and edit the Shipping Address. In the Shipping State/Province field, enter
CA. The order now meets the second entity filter condition.
- Next, add the Infiwave Phone 10 product to the Cart.

Notice that the Infiwave Canvas Wrap Case is automatically added to the order. Your advanced rule is working precisely as you wanted it to. Good job!
Eliza is feeling confident. Using the all-powerful context rules, she can now help Infiwave adapt to new business needs. Infiwave customers can enjoy personalized experiences as they view products, promotions, and pricing that are customized for them.
Wrap Up
Congratulations! Throughout this module, you used advanced rules to solve various challenges at work. With this new found knowledge, you can easily configure products and product attributes to meet your business goals. Your company and customers will thank you.