Map Your Data
Learning Objectives
After completing this module, you’ll be able to:
- Explain how data transfers between Salesforce and AD.
- Explain how to determine which AD users can access Salesforce.
- Explain advantage of transformation scripts.
- Describe how to map attributes between AD to Salesforce.
- Describe how to map AD groups to Salesforce perms.
It’s About Mapping Data
Identity Connect creates Salesforce users from the users managed in AD.
Before you sync for the first time, you choose which AD attributes get pulled into Salesforce. You can accept the default mapping that Identity Connect provides. Or you can tailor it to meet your needs. Identity Connect gives you the tool. You choose how to use it.
What data do you map? Users, attributes, permissions. You can:
- Tell Identity Connect where to look in AD for Salesforce users.
- Choose which attributes you want to get from AD. Remove the ones that you want to manage from Salesforce. If you’ve added custom attributes to your Salesforce User object, you can control how they’re managed.
- Assign permissions. After you define the rules for assigning permissions, you don’t have to think about permissions again. Woo-hoo.
Sound like a lot of work? Think of it as upfront research. Planning takes some effort but paves the way for a smooth execution.
It’s Also About Syncing Data
When Identity Connect creates Salesforce users, it creates links to users in AD.
Each Salesforce user is actually a link to the user data stored in AD. Essentially, Identity Connect builds a “virtual” user database in Salesforce from the information in AD.
The first time Identity Connect syncs, it goes to the specified location in AD to create your Salesforce users. After that, Identity Connect monitors the specified location. If existing users change or if new users are added to the specified location in AD, Salesforce gets the changes the next time Identity Connect syncs.
Choose Your Salesforce Users
To create Salesforce users from AD, you choose which users you want in Salesforce. Jedeye has employees throughout the galaxy, which ones need Salesforce?
You tell Identity Connect where to look for Salesforce users from the Identity Connect console Data Source tab.
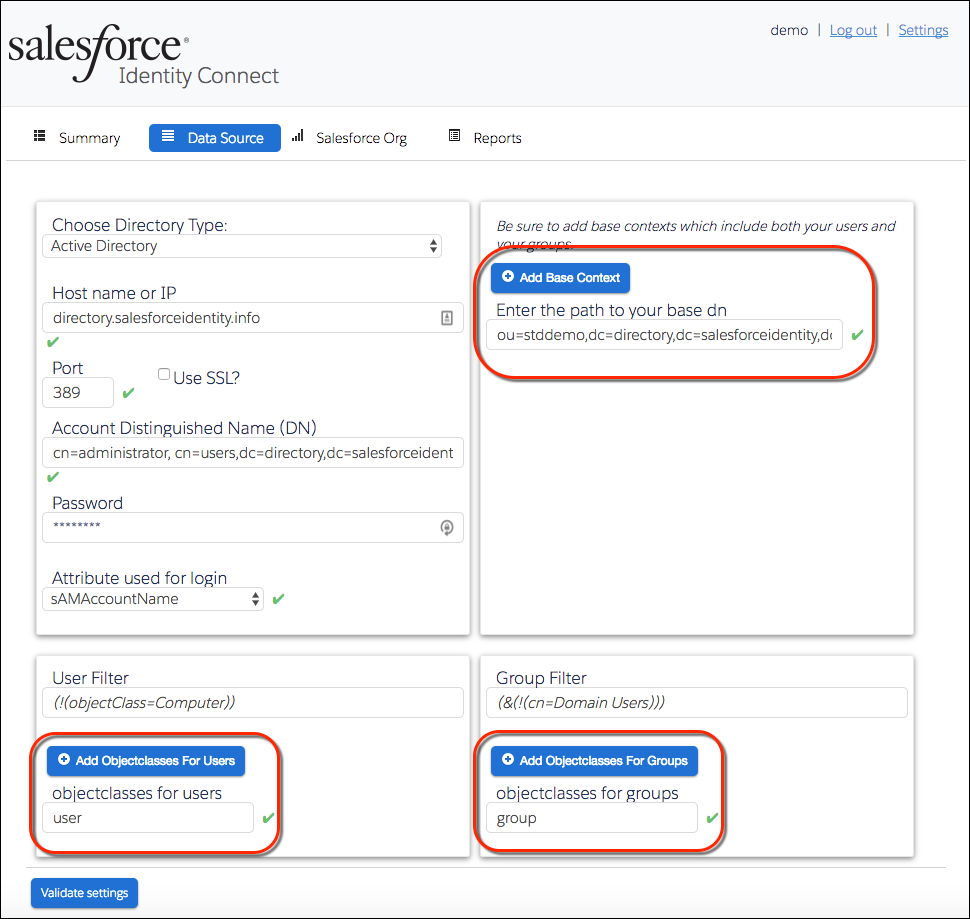
Base Context and Filters
From the Identity Connect console, you set the base context, which means “start searching at this point.” Then you set filters to refine the scope.
Base Context
AD is organized in a tree structure. So with the base context, you’re specifying the path to the branch under which AD users, groups, and resources (like computers and devices) belong. The path must be broad enough to encompass all your Salesforce users and groups.
For the uninitiated, the base context syntax is not intuitive. If you want Identity Connect to search the entire AD tree, you set the base context to the name of the domain in the format: DC=domainprefix,DC=domainsuffix. The base context for the jedeye.tech domain is dc=jedeye,dc=tech.
To start the search at a lower level in the domain, you set the base domain to the name of an organizational unit (OU) within the domain. For example, to search under Jedeye Tech’s Sales organization, you use the base context: ou=sales,dc=jedeye,dc=tech.
In the Data Source tab, Identity Connect is searching the stddemo organization under the directory.salesforceidentity.info domain.
User and Group Filters
You’ve told Identity Connect where to go to find Salesforce users and groups. Now you refine the scope using filters.
(!objectClass=Computer))
Under Group Filter, limit which AD groups can be mapped and monitored for changes.
Here’s a handy tip for those who love creating filters. You can enter LDAP regular expressions (regexs) in filters too. So if all your Salesforce groups follow a standard naming convention, you can use regexs to dynamically include appropriate users and groups.
Choose Your User Attributes
AD and Salesforce share some of the same user attributes, though they don’t use the same name. So you specify which Salesforce attribute corresponds to the attribute in AD. That’s attribute mapping.
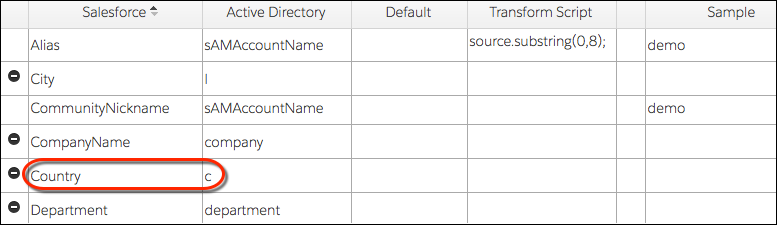
Here’s what the Attribute Mapping tab looks like out of the box. Don’t gulp. We break it down for you column by column.

Salesforce and Active Directory Columns
Check out the Salesforce and Active Directory columns. Out of the box, Identity Connect supplies common attribute mappings, like names and addresses. When Identity Connect syncs, Salesforce users get the value currently in AD.
See how “Country” under the Salesforce column maps to the AD “c” attribute under the Active Directory column. When Identity Connect syncs for the first time, if the AD user lives in Canada, the Salesforce user lives in Canada. If the user moves to Australia, the user’s “c” attribute in AD is updated to Australia. The next time Identity Connect syncs, the Salesforce user has moved to Australia.
If you don’t want to sync an attribute from AD, click ![]() next to an attribute to remove it. By removing the attribute from the mapping, Identity Connect never replaces the Salesforce value when it syncs.
next to an attribute to remove it. By removing the attribute from the mapping, Identity Connect never replaces the Salesforce value when it syncs.

Do you have custom attributes? They don’t show up by default. But you can have Identity Connect retrieve them from your Salesforce org. Click Add Attribute and your custom attributes show up in the Salesforce column.

Default Column
Use the Default column to populate a Salesforce attribute when the user’s corresponding AD attribute is empty. For example, if the user doesn’t have the EmailEncodingKey attribute in AD, Identity Connect populates the Salesforce EmailEncodingKey attribute with UTF-8.

Can you start to see the power of mapping? You can make a lot of headway simply by mapping attributes between the two data stores.
Transform Script Column
Let’s look at the Transform Script column. This is where you can add a bit of programming logic to create Salesforce values by transforming an AD attribute. Transform scripts are optional, but look at this example to see how handy they can be.
Here you can see that the Salesforce Username attribute maps to the AD sAMAccountName attribute.

source.substring(0,8);
Given an AD sAMAccountName value demoadmin, the Salesforce alias is demoadmi.

If you’re comfortable with JavaScript, you can create transformation scripts to do some dynamic magic.
Assign Salesforce Permissions
In AD, users are granted permissions using AD Groups. In Salesforce, we use profiles, permission sets, roles, and public groups. With Identity Connect, you can map permissions in AD to permissions in Salesforce.
When users are added to or removed from a group in AD, they’re automatically added or removed from the mapped profiles, permission sets, roles, and public groups in Salesforce.
To assign Salesforce permissions from AD, choose which AD groups correspond to Salesforce permissions.
Profile Mapping
From the Identity Connect console, choose the Profile Mapping tab. Under the Salesforce column, Identity Connect lists all the profiles defined in your org. For each profile, you can associate it with one or more AD groups. In this example, the AD group containing Identity Connect admins, ICadmins, gets the Salesforce System Administrator profile. The AD group containing Identity Connect users, ICusers, gets the Salesforce Standard User profile.

A key step to profile mapping is to make sure that each user has a default Salesforce profile. As you know, a Salesforce user must have a profile to specify the most basic data access. So if the user isn’t a member of any AD group listed here, you specify a default profile. This way, every user has a profile.
Role Mapping
From the console’s Roles tab, you choose which AD groups map to Salesforce roles. For example, map the Salesforce Executive Staff role to the AD group, Executives.

Permission Sets
From the console's Permission Sets tab, Identity Connect displays the permission sets you've defined in your Salesforce org. You choose which AD groups map to your Salesforce permission sets.

Salesforce Groups to AD Group Mapping
You can map all the Salesforce groups to AD groups under the SF Group to AD Group tab. For example, map your Salesforce group “Employees” to your AD group “Employees.” When you click SF Group to AD Group, Identity Connect lists all the groups you’ve created in Salesforce. You associate a Salesforce group with one or more AD groups.
If you don’t see SF Group to AD Group, don’t worry. The tab appears only after you’ve created at least one profile map.
Fewer Profiles with Targeted Permission Sets
Use permission sets to further refine profiles instead of creating more. You can use permission sets to grant access among logical groupings of users, regardless of their primary job function. For example, let’s say you have several users with a profile called Sales User. This profile allows assignees to read, create, and edit leads. Some, but not all, of these users also can delete and transfer leads.
Here’s how you can map this scenario. Let’s say in AD you have a group called “Sales” and another group called “Sales Managers.” Since the two groups share basic set of permissions, assign them both to the “Sales Users” profile in Salesforce. This profile allows assignees to read, create, and edit leads. Then, for the Sales Managers AD group, create a permission set for Lead Managers to have additional access to manage leads.

Choose Your Users
In addition to mapping attributes and permissions, you can define rules to map Salesforce users to AD users.
From the Sync tab, define rules to link AD users to Salesforce users. Then manually map the users. Why? When you already have many Salesforce users, this is how you can link each Salesforce user to its existing AD user.

Another way to tell Identity Connect where to find Salesforce users is by creating AD groups. In AD, you can create a “Salesforce Users” group (or groups) with the rule, “Only create Salesforce users from AD users who belong to this group (or groups).”
The mapping process is by far the most time-consuming aspect of configuring Identity Connect—and the most rewarding. Spend time upfront to reap rewards for eons.