Use Relationships and Affiliations to Build a Network
Learning Objectives
After completing this unit, you’ll be able to:
- Organize data for current parents in EDA.
- Describe the differences between and uses for relationships and affiliations.
- Create a list of parents and students, based on specific parameters.

In this unit, we see how Salesforce reports can be used to tap into the professional networks of your students’ parents. We follow Carl Haddish, a career counselor at a high school in the Pleasant Trail school district with a growing STEM magnet program. Pleasant Trail uses Salesforce and K-12 Architecture Kit, which is built on top of Education Data Architecture (EDA), to collect detailed information about parents and other important student relationships.
Here’s a quick introduction to Carl and the district where he works.
-
Carl Haddish is a career counselor at Sandy Creek High School. Sandy Creek is home to Pleasant Trail School District’s first STEM magnet program. Carl is responsible for coordinating with the school, parents, and the community to provide a complete, developmental counseling program focusing on academic, career, and social development. He coordinates and manages special programs and projects focused on college and career opportunities and develops plans to support students' goals.
- Pleasant Trail School District is a fictional K-12 public school district in the Midwestern United States that serves over 25,000 students. From dedicated teachers to caring administrators, Pleasant Trail has always put students at the center of everything it does.
Carl wants to identify parents in the STEM field for a career day where students in the magnet program who also participate in an after-school STEM Career Pathways program can learn more about what it’s really like to work in STEM.
Here’s what he’s looking for:
- A list of parents
- Who work for a company in the STEM field
- That are interested in participating in an event for students enrolled in the STEM Career Pathways after-school program
- A list of students
- In the STEM magnet program
- That also participate in the after-school STEM career Pathways program
First, we review the use of relationships in EDA, which is a powerful way to track the relationships that matter to your students—with parental figures being among the most important ones. Then we see how Carl uses a standard EDA report to identify the parents he’s interested in reaching out to. He uses joined reports in Salesforce to combine the parental affiliations data with student data that meets his criteria.
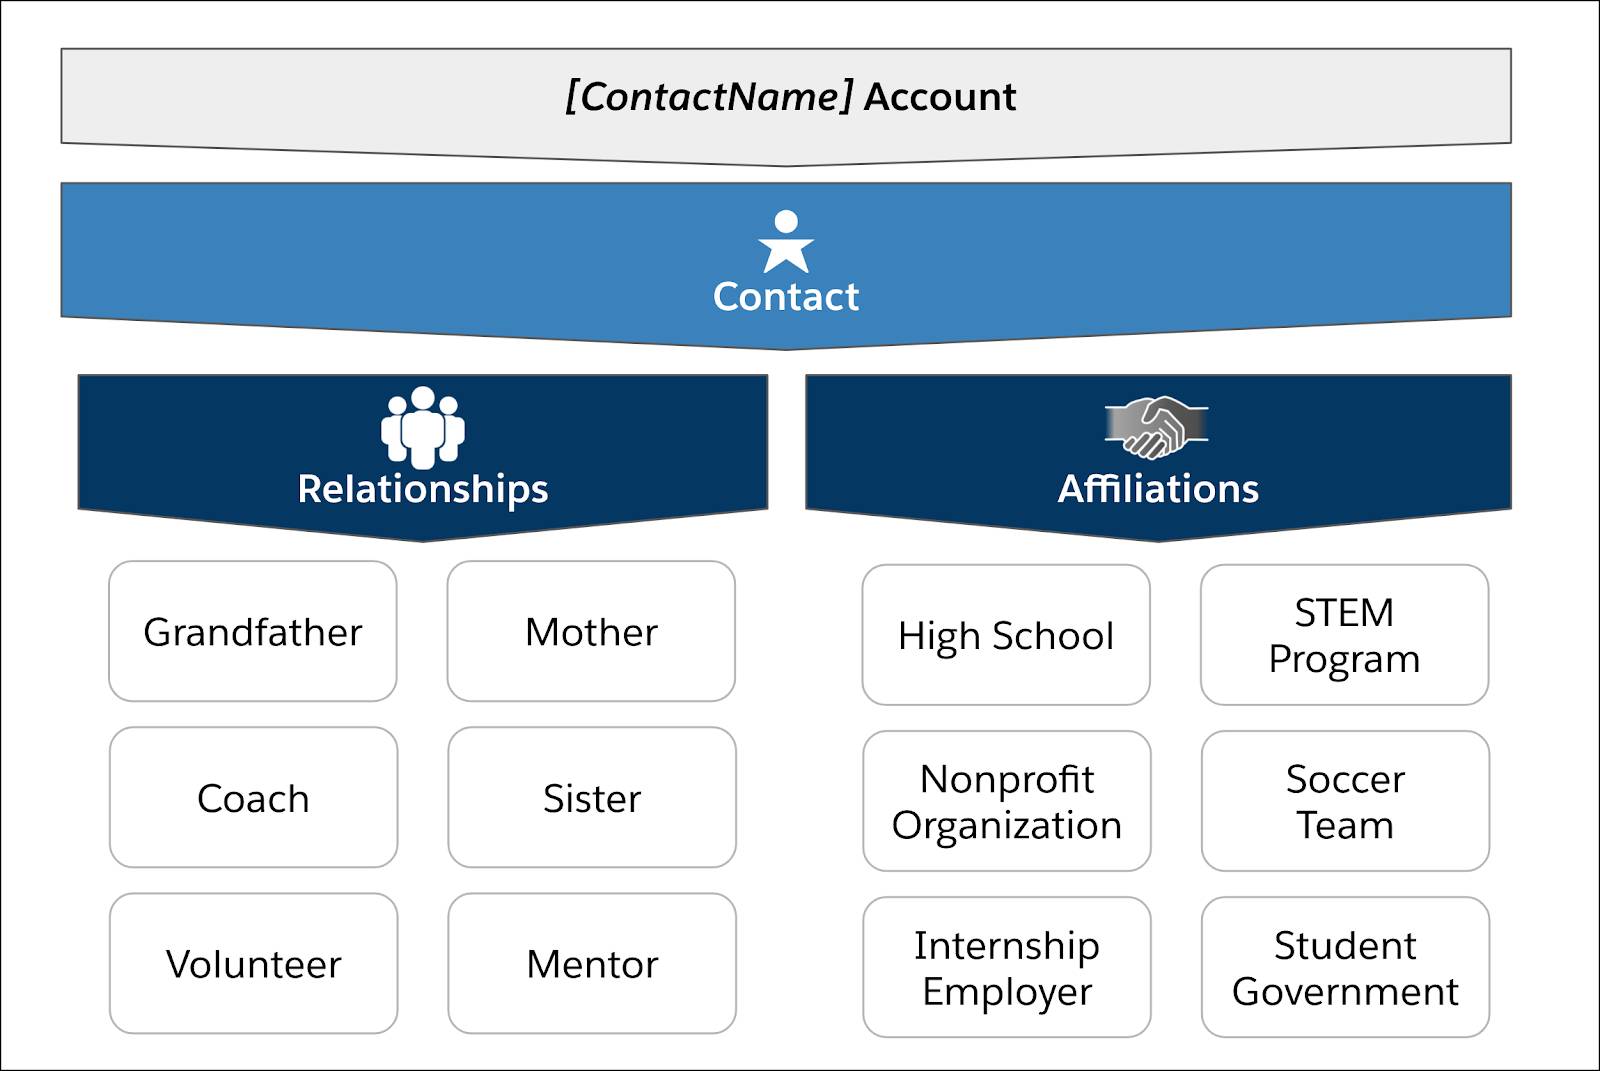
Relationships and Affiliations—A Quick Review
EDA stores information about contacts and their relationships with other contacts and accounts. In the EDA account model, two custom objects work in conjunction with your contacts.
- Relationships track connections between contacts
- Affiliations track connections between contacts and other accounts
To take a deeper dive into relationships and affiliations, check out the Constituent Management in EDA module (it’s linked in the Resources section). For a high-level view of the objects, this diagram shows examples of the types of relationships and affiliations a student may have.
For a concrete example, let’s look at the contact record for Sandy Creek student Wyatt Hill.
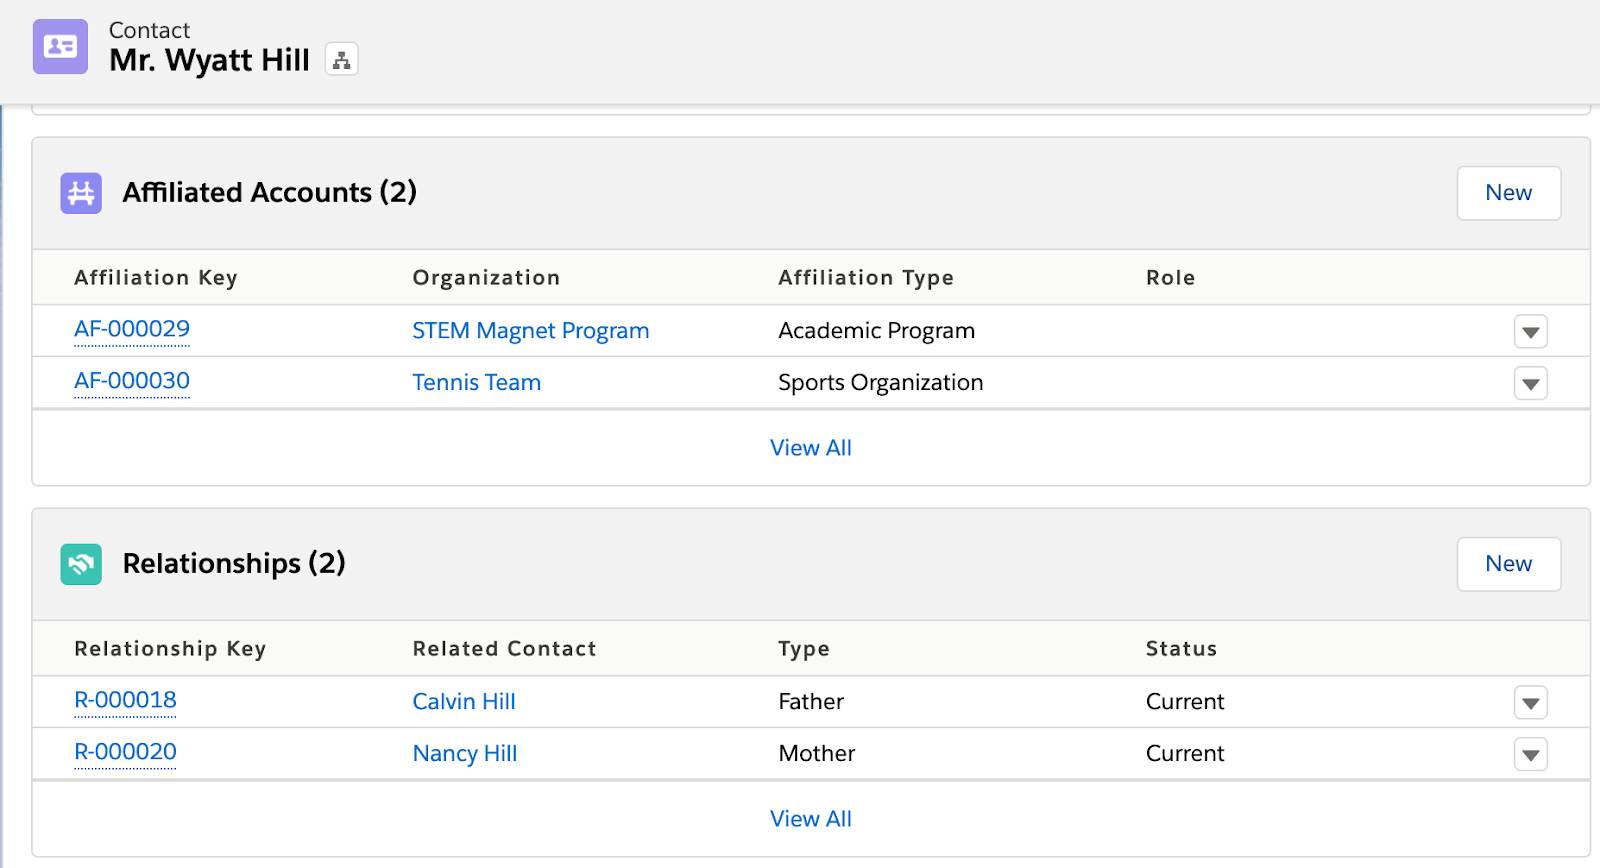
Carl can see in the Affiliated Accounts related list that Wyatt is enrolled in the STEM Magnet Program. In the Relationships related list, he sees Wyatt’s parents. Wyatt’s parents are also tracked as contacts in EDA. When Carl clicks Wyatt’s father’s name, he sees that Calvin Hill’s contact record reflects his reciprocal relationship with his son. He also sees that Calvin has an affiliated account with Secure-IT, which is Calvin’s employer.

Because Calvin works for Secure-IT, his contact record detail lists it as his Primary Business Organization. In EDA, this type of affiliation is a primary affiliation for the Business Organization record type.

Carl can use this essential piece of affiliation data to find out which parents have connections to major technology organizations. Doing outreach, facilitating career events, and matching students with opportunities of interest is a whole lot easier thanks to EDA and Salesforce reports.
If you want to follow along and create an invitee list for a networking event in your own EDA org, you need to create a sample data set.
Follow these steps to create the sample data set.
- If you created the sample data for the list of current students in Unit 1 of this module, you can use those student records in this reporting scenario. If not, create six student contact records with first and last names, and then continue with Steps 2–5 here.
- Create at least two account records to represent the different companies that are the parents’ employers. Choose the Business Organization record type. Name one of the accounts “Secure-IT,” to match the main employer in our use case, and name the other account “Infinity EdTech.”
- Create six additional contact records to represent the parents. When creating each contact record, set the Primary Business Organization field to one of the companies (accounts) that you created in the previous step. In our use case, four parents work for Secure-IT.
- From either the student’s contact record or the parent’s, create relationship records so that every student has a relationship with at least one parent or guardian.
- For the six or so students who are enrolled in the STEM Magnet Program, create and add a new program enrollment for the after-school program: Career Pathways.
Create a Relationships with Contact Report
Carl will use EDA’s Relationships with Contact standard report type. This report type shows him contact relationships, so that he can mine the rich network of connections among his students’ parents.
- Click the Reports tab. (If you don’t see the Reports tab, go to the App Launcher (
 ) then search for and select Reports.)
- Click New Report.
- Search for and select the Relationships with Contact report type.
- Click Continue.

The resulting report is skeletal and not that useful in its out-of-the-box format. Let’s fix that.
- Carl deletes and adds fields under Columns so that he ends up with these fields in his report.
- Contact: First Name
- Contact: Last Name
- Contact: Primary Business Organization
- Related Contact Type
- He adds a filter to narrow the list to only the parents who work for the region’s largest tech employer, Secure-IT.
- In the Add filter... search box, search for and select Primary Business Organization.
- Leave the Operator as equals and enter
Secure-ITin the text box.
- Click Apply.

Carl checks the filtered results in the preview pane. Only the parents who work at Secure-IT are displayed. Success! But he’s not finished just yet.
- Make sure that the report options under Filters don’t restrict your data. For example, Carl verifies that the Show menu is set to All Relationships, and the Relationship: Created Date date range is set to All Time, so that his report includes all possible results, regardless of who created the records, or when.
Add a Joined Report with Program Enrollment Information
Now that Carl has data about the parents who work for Secure-IT, he’s ready to look for students enrolled in the STEM Career Pathways program with a September 1, 2020 start date who are eligible to attend this career event.
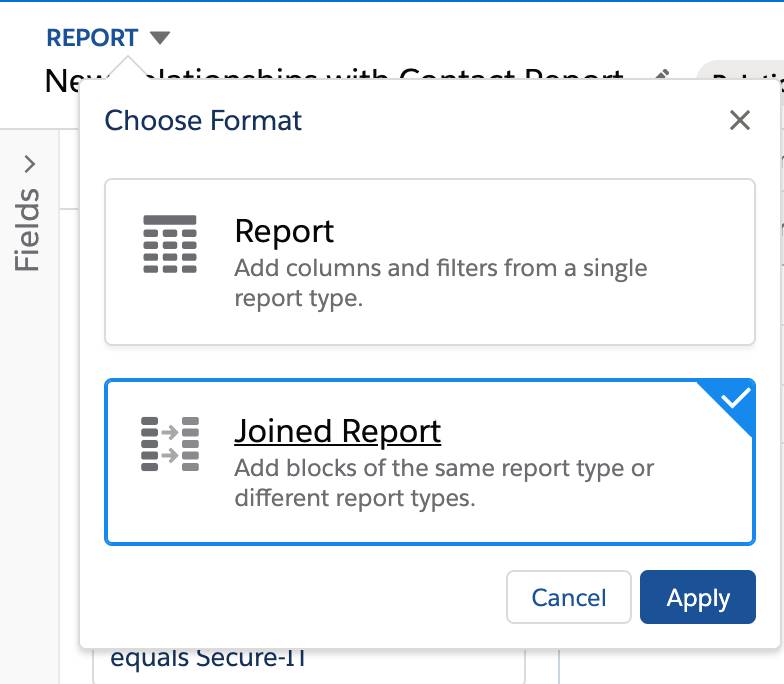
- Click the dropdown arrow next to Report and select Joined Report.
- Click Apply.
- In the joined report view, click Add Block.

- Search for and select the Program Enrollments with Contact report type.
- Click Add Block.

Notice that a new block appears in the report.
Also notice that the Fields pane updates with a new area that contains fields unique to the report type.
- Carl clicks the Outline tab in the report builder and deletes and adds columns to the Program Enrollments with Contact block so that he ends up with these fields in that block:
- Contact: Last Name
- Contact: First Name
- Program

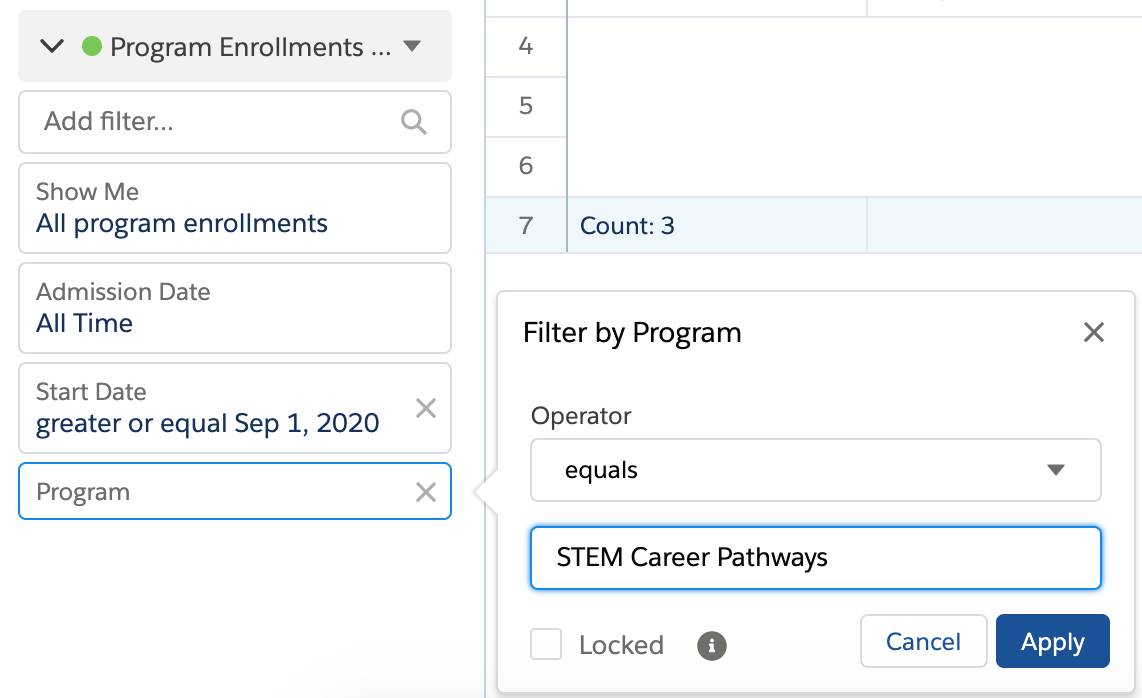
Create Filters for Start Date and Program
Carl is almost there. This career event is specifically for students who are just beginning the STEM Career Pathways after-school program in September 2020. His last task is to filter for students enrolled in the STEM Career Pathways program with a September start date to make sure that only those students are invited to the event.
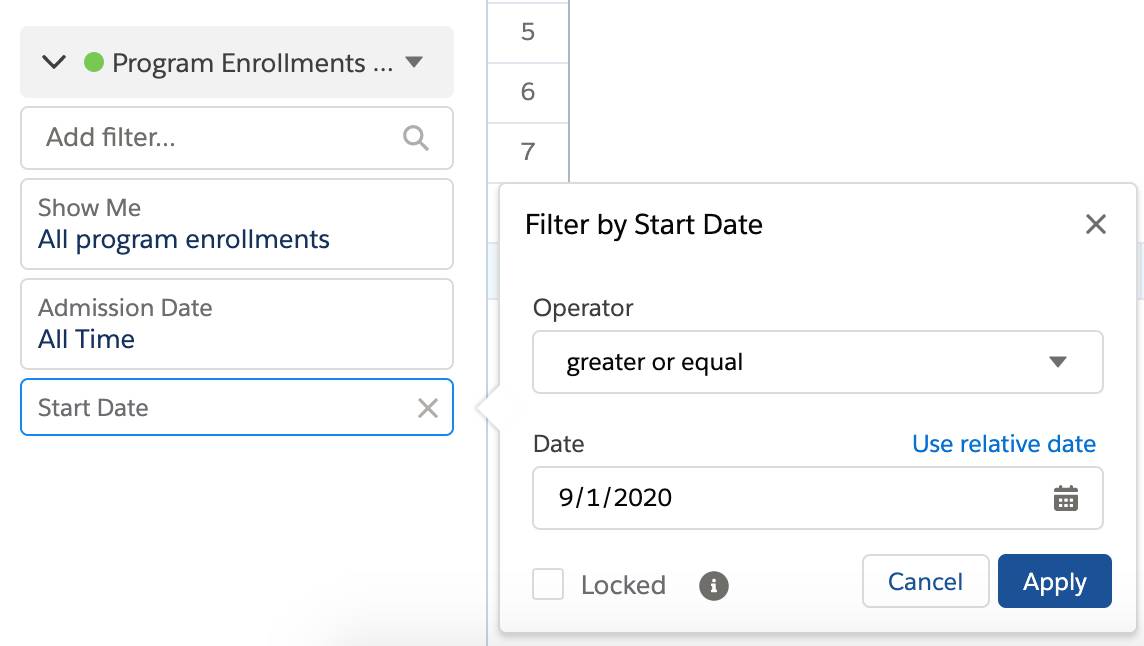
- Add a filter for Start Date.
- In the Add filter... search box, search for and select Start Date.
- Change the Operator to greater or equal and select 9/1/2020 as the date.
- Click Apply.
- Add another filter for participants in the STEM Career Pathways program.
- Click the Filters tab in the report builder.
- In the Add filters... search box, search for and select Program.
- Leave the Operator as equals and enter
STEM Career Pathwaysin the text box.
- Click Apply.
- Make sure that the report options under Filters don’t restrict your data. For example, Carl verifies that the Show Me filter is set to All program enrollments, and the date range is set appropriately. This ensures that his report includes all possible results, regardless of who created the records, or when.
Carl checks his filtered results in the preview pane. Only the students who meet his criteria are displayed.
- He clicks Save & Run to preserve his hard work on this report.
- He saves the report with the name
Secure-IT parents with STEM-CP Septand a short description so he can easily find it in a Reports folder whenever he needs to later on.
- Click Save.

And just like that, Carl has a report of the parents who work at Secure-IT combined with a report of the current STEM Career Pathways students who are starting the program in September 2020. (In this example, there are three such parents and five such students.) Carl can return to this report over and over again, and it updates automatically with data he adds or edits in his org.
With this type of data at your fingertips, creating highly personalized, targeted outreach campaigns becomes a much simpler task. You can see how EDA made it easy for Carl to tap into his constituents’ networks and help students make important career connections.
Just can’t get enough of Salesforce reporting? We know the feeling! Check out the next unit to learn how to customize an alumni report for events.