Customize Alumni Reports for Events
Learning Objectives
After completing this unit, you’ll be able to:
- Organize data for alumni in EDA.
- Explain the purpose of a relationship in EDA.
- Create a list of alumni, based on specific parameters.

In this unit, we see how to identify legacy families–those who have had more than one family member attend—at your institution. Ann Marie Garcia, the Director of Alumni Engagement at Cloudy College, is planning a legacy event during Family Weekend, which is just a few weeks away.
Need to jog your memory on all the awesome work Ann Marie does at Cloudy? We’ve got you.
- Ann Marie Garcia is the Director of Alumni Engagement at Cloudy College. Ann Marie is responsible for developing and executing the annual strategic plan for Alumni Engagement at Cloudy College. She manages alumni events and oversees all alumni communications, both print and digital. In addition to building personal relationships with Cloudy College alums, it’s up to her to engage various members of faculty and Cloudy executive leadership in events and communication processes when appropriate.
For the legacy event she’s planning, Ann Marie wants to identify alumni who are related to current students in order to invite them. See how she uses Salesforce and Education Data Architecture (EDA) to find and invite these legacy participants.
Here’s what she’s looking for.
- A list of alumni
- Who have a relationship with an existing student
To arrive at this list, we briefly review the use of relationships in the data architecture. Then we follow along with Ann Marie as she uses the Contacts with Relationships report, along with a record type filter, to identify her alumni.
Legacy Families: Relationships
We never want to bore you with reminders, but the relationship object is super important in many education reporting scenarios. So once more, in Salesforce, a relationship represents one contact’s connection to another contact. In this case, an alumni contact’s connection to a current student. When you create a relationship on one contact record, EDA automatically populates the reciprocal relationship on the other. You can see a contact’s relationships via the Relationships related list.
Relationships are a powerful organizing concept and are central to this use case. If you want to follow along as Ann Marie uses relationships and Salesforce reports to create the list of Cloudy College legacy families, you need to create some sample data in your EDA org.
Create the records in this order.
- If you previously created sample data for the list of current students in Unit 1 or Unit 2 of this module, you can use those student records to represent current students in this reporting scenario. If not, create six contact records for current students (you just need first and last names), and then continue with Steps 2 and 3.
- Create another six contact records to represent alumni. You just need first and last names. If you want to see contacts’ mailing addresses and email addresses in the resulting report—as you would for an actual event campaign—you can also fill out those fields for a more realistic experience. If you choose to skip these data fields you’ll still get the gist.
- Create relationships between some alumni and current students. You can do this by adding new relationship records via Relationships related list on a contact record. Remember, you only need to define the relationship on one contact. The reciprocal relationship will automatically populate on the other contact record.
Create a Contacts with Relationships Report
Ann Marie creates her report using a standard Salesforce report, Contacts & Accounts.
- Click the Reports tab. (If you don’t see the Reports tab, go to the App Launcher (
 ) then search for and select Reports.)
 - Click New Report.
- Search for and select the Relationships with Contacts report type.
- Click Continue.
- Ann Marie navigates to Columns deletes and adds fields until her list of columns looks like this:
- Contact: First Name
- Contact: Last Name
- Contact: Email (if you didn't create sample emails during prep you can remove the Email field.)
- Type
- Relationship Explanation
- Contact: Account Record Type
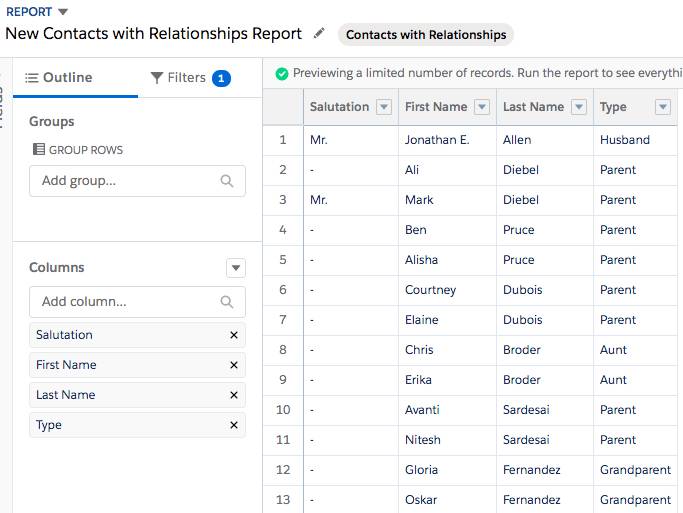
As you can see from the preview, this report helps Ann Marie identify any contacts with a relationship. However, since she’s targeting legacy families, she wants to hone in on alumni specifically. She can do that by adding a filter.
Add a Filter
The out-of-the-box report doesn't include filters, but Ann Marie needs to focus specifically on alumni contacts. Adding a filter lets her narrow the list from all contacts to legacy families only.
- Click the Filters tab in the report builder.
- In the Add Filter... search box, search for and select Contact: Account Record Type.
- Leave the Operator as equals and select EDA_Alum as the Value.
- Click Apply.

Ann Marie checks her filtered results in the preview pane. Only alumni display.
- Make sure that the report options under Filters don’t restrict your data. For example, Ann Marie verifies that the Show menu is set to All Contacts, and the Last Activity date range is set to All Time, so that her report includes all possible results, regardless of who created the records, or when.
- Click Save & Run.
The report shows all alumni who have a relationship with a current student so Ann Marie saves it with the name "Legacy Families" and a description to make it easy to find in a Reports folder.
- Click Save.

All done! Ann Marie can return to this report over and over again, and it will update automatically with data she adds or edits in her org.
With this report in hand, Ann Marie and her team can start sending out the invites to the Legacy Families event. As you can see, EDA is key to another great relationship-building opportunity for alumni and current students, and integral to cultivating connections with Cloudy’s alumni community.
Let’s Sum It Up
Now you know how easy it is to use EDA to extract the specific data you need for a variety of reporting use cases. Of course, the data you extract from EDA is only as good as the data you put into it. Maintaining best practices when organizing data is essential, as is continuing to refine your knowledge of Salesforce reporting so that you can go on to build great reports for your own use cases. Be sure to check out the community and reporting resources at the end of this section and keep going!