Set Up Provider Search
Learning Objectives
After completing this unit, you’ll be able to:
- Describe how provider search uses provider sync to look for information and return relevant results.
- Configure Provider Search.
- Add custom search and results fields.
Three Steps to Provider Search
You’ve already learned what Provider Search is and how it makes it easy for patients like Milly Lee to find a suitable provider. Now it’s time to explore how to set up this feature.
Think of the setup for Provider Search as a three-step process:
- Set up data for Provider Search.
- Add Provider Search to a Lightning Page.
- Add Provider Search to a community page through Experience Cloud.
Let’s examine these steps in more detail.
Set up Data for Provider Search
Traditionally, if you wanted to enable provider search, you had to extract data from your CRM system into a data warehouse. Sounds like a lot of extra work, right? Thankfully, Salesforce offers provider search directly on top of your CRM data, accessible to both internal users and site members. This dramatically reduces implementation time and costs.
The data in the provider data model isn’t searchable on its own. You must first convert it into a searchable format. This diagram shows how the search process works.
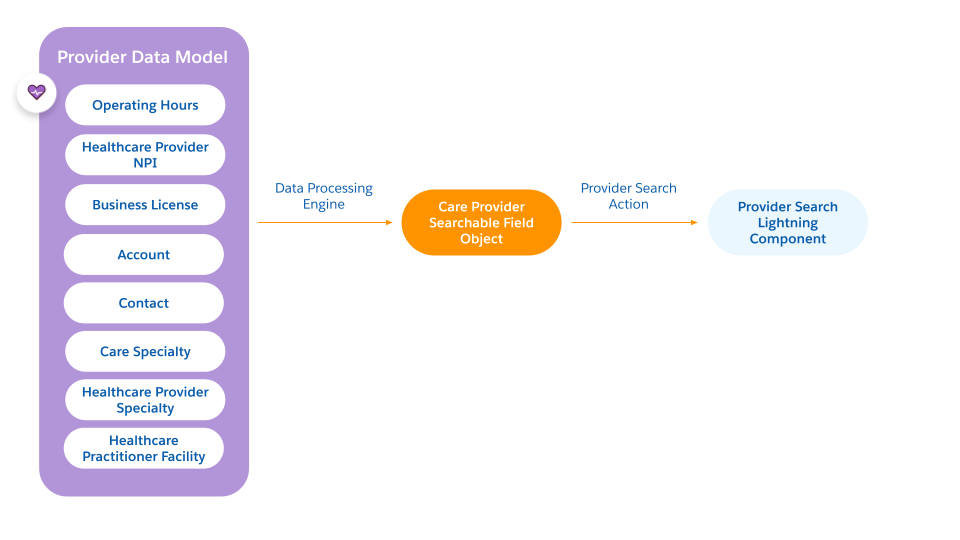
Provider Search uses a handy feature called Data Processing Engine to map and transform the source data from the Provider Data Model into a searchable object called Care Provider Searchable Field. The data syncs with the Care Provider Searchable Field object once a day, but you can sync it manually any time.
When it’s time to perform a search, the Provider Search Lightning component searches data from only in the Care Provider Searchable Field object, instead of the entire provider data model. Then it displays the search results to the user.
Up until this point, it seems like Salesforce does all the work of syncing data with the Care Provider Searchable Field object for you. You may be wondering what you need to do in this step. Your job for now is to make sure that you have the data you want to be able to search in your org. If you already have that, great. If not, we recommend that you import the data using Data Loader or the Composite API.
The Care Provider Searchable Field object has a number of standard fields that allow the search to happen. Examples of the standard fields are Provider Name, Facility Name, Languages Spoken. You can also use your custom fields with Provider Search; you just need to map them to custom fields in the Care Provider Searchable Field object.
To check if your data syncs between the data model and the Care Provider Searchable Field object, use the Provider Search Sync Logs. You can access it from the App Launcher.
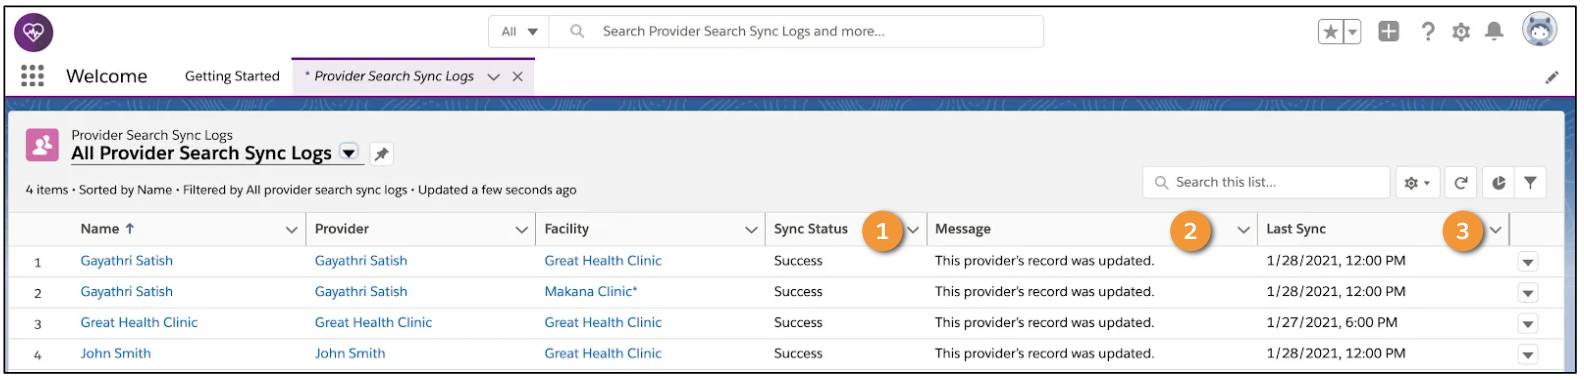
Provider Search Sync Logs lets you check the sync status of providers that you set up for search. The Sync Status field shows whether the sync is a success or failure (1). If it’s a failure, you can review the message in the message field (2). The Last Sync field shows the last time the fields synced (3).
Add Provider Search to a Lightning Page
Now that you set up your data for Provider Search, let's configure Provider Search for your users. For your users to use Provider Search in their org, add the Provider Search component to a Lightning Page. You can add it on an account record page, home page, or you can create an app that just contains the Provider Search component.
In this image, the Provider Search component is on the account record page.
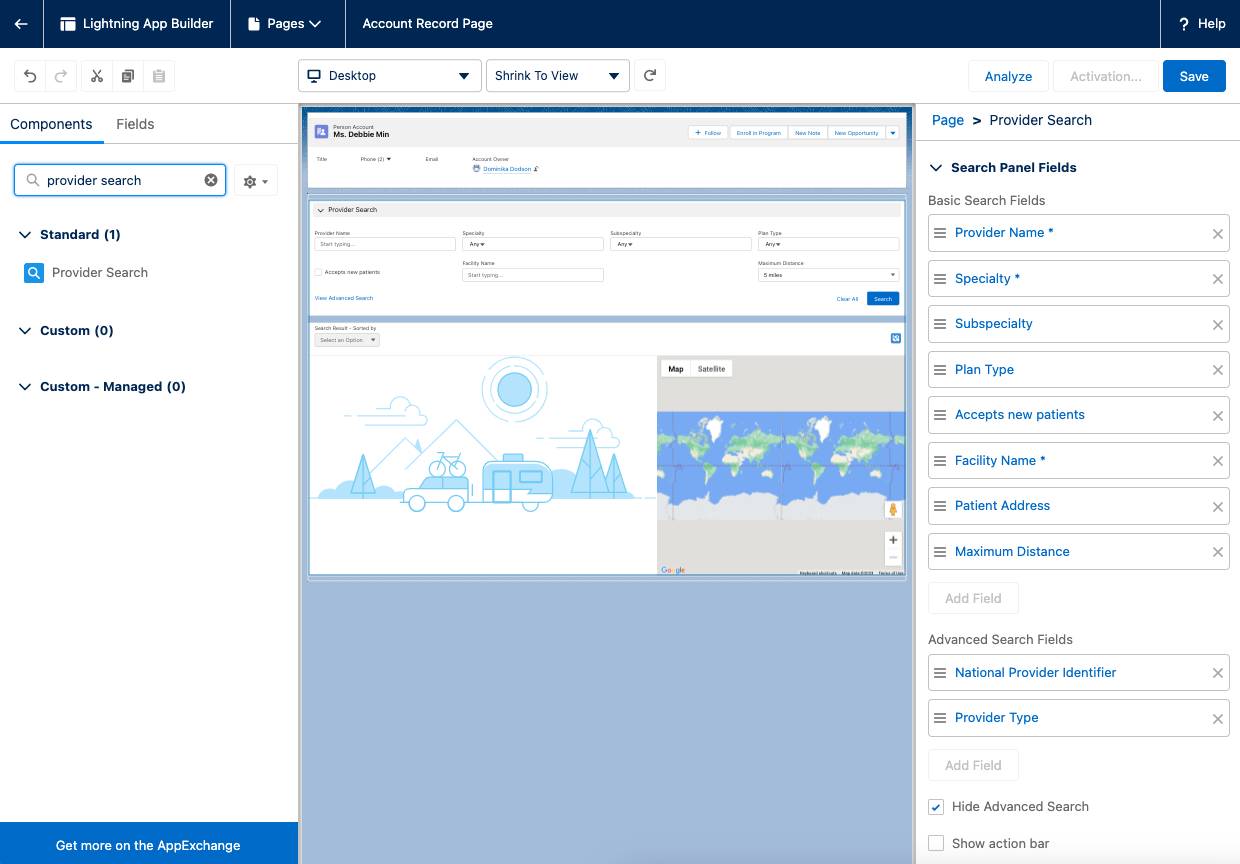
When you place the Provider Search component on the appropriate page, and after you save and publish the page, your users can start using it right away.
Add Provider Search to a Community Page
To allow patients like Milly to search for providers on their own, add the Provider Search component to a community page in Experience Cloud. This way, patients and members don’t have to call the agent for assistance, which speeds up the process and allows for a better experience. Use Experience Builder to add the Provider Search component to a page on your site.
Get Hands On with Provider Search
It’s time to try out Provider Search in action. Log into the org that you signed up for in the previous unit and complete the steps. You don’t need to complete the steps to pass the challenge.
Enable Data Pipeline and Provider Search in Your Org
- Before you begin to work with Provider Search, assign yourself the Data Pipeline permission set license.
- In Setup, search for
Usersand then click Users. Find yourself on the list, and click your name.
- Scroll to the Permissions Set Assignments, and click Edit Assignments.
- Find Data Pipelines Base User in the Available Permission Sets list, and click the right arrow to add it to the Enabled Permission Sets list.
- Click Save.
- Refresh the page to ensure the new permissions are available in Setup.
- In Setup, search for
- Enable Data Pipeline. In Setup, search for
Data Pipeline, then select Getting Started. On the Getting Started page, switch the Data Pipeline toggle to Enabled.
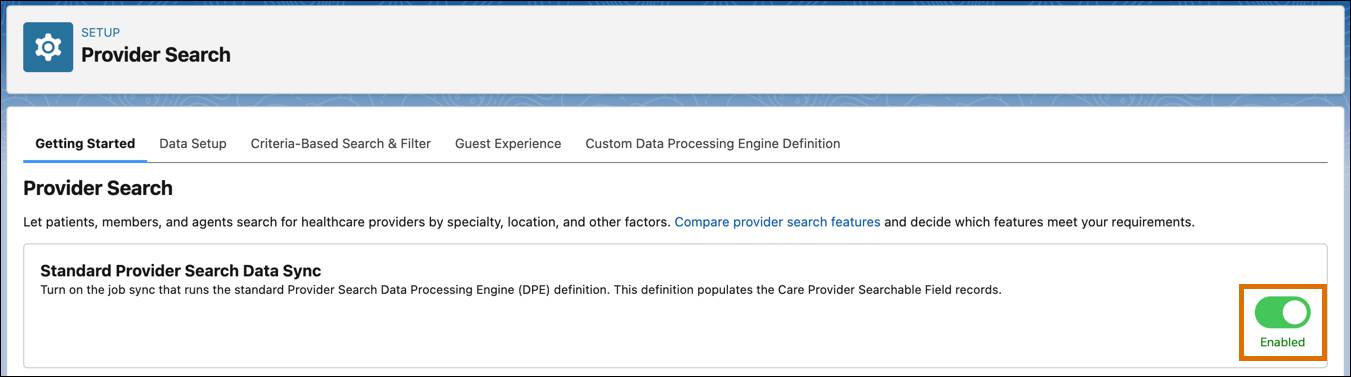
- Enable Provider Search. In Setup, search for
Provider Search, then select Provider Search Settings. On the Provider Search Settings page, switch the Standard Provider Search Data Sync toggle to Enabled.
Create Custom Search and Results Fields
- From Setup, open Object Manager, and use the quick find to locate and open the Healthcare Provider object.
- Open Fields & Relationships and click New to create a custom field label.
- Select the data type Picklist and click Next.
- Enter the details for the new custom field and click Next.
- Field Label:
Certification - Values: Select Enter values, with each value separated by a new line.
- Enter the following values and make sure to separate each value by a new line:
CAHIMS/CPHIMS (HIMSS), CHTS (AHIMA), HCISSP (ISC), RHIT (AHIMA).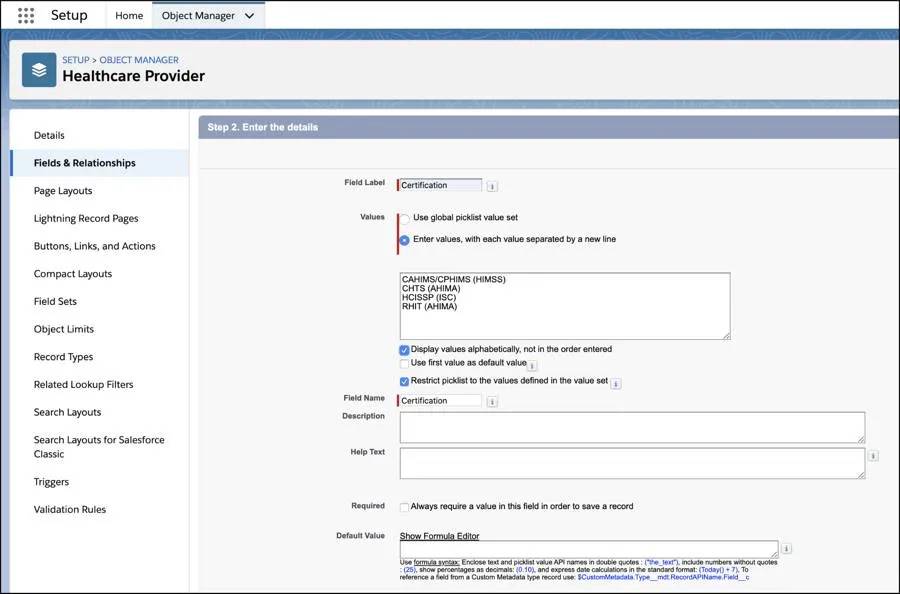
- Click Next, Next and Save.
Next, follow the same steps to add a new field to the Care Provider Searchable Field object.
- Go back to the Object Manager and click Care Provider Searchable Field.
- Open Fields & Relationships and click New to create a new custom field label.
- Select the data type Text and click Next.
- Enter the details for the new custom field and click Next.
- Field label:
Certification Search - Length:
99 - Make sure to enter a different name from the one you specified in the Healthcare Provider object.
- Click Next and Save.
Now map the two fields.
- From Setup in the quick find box, search for
Care Provider Search Config.
- Click New Care Provider Search Config.
- Enter
Certificationin the Label field. The Name field automatically populates with the same entry.
- Select the appropriate choice from the Mapped Object dropdown list. For this example, select HealthcareProvider because the new field was added to the Healthcare Provider object.
- In Source Field, add the field name you added to the Healthcare Provider object, which is
Certification__c.
- In Target Field, add the name of the field label you added to the Care Provider Searchable Field object, which is
Certification_Search__c.
- Click the IsActive checkbox.
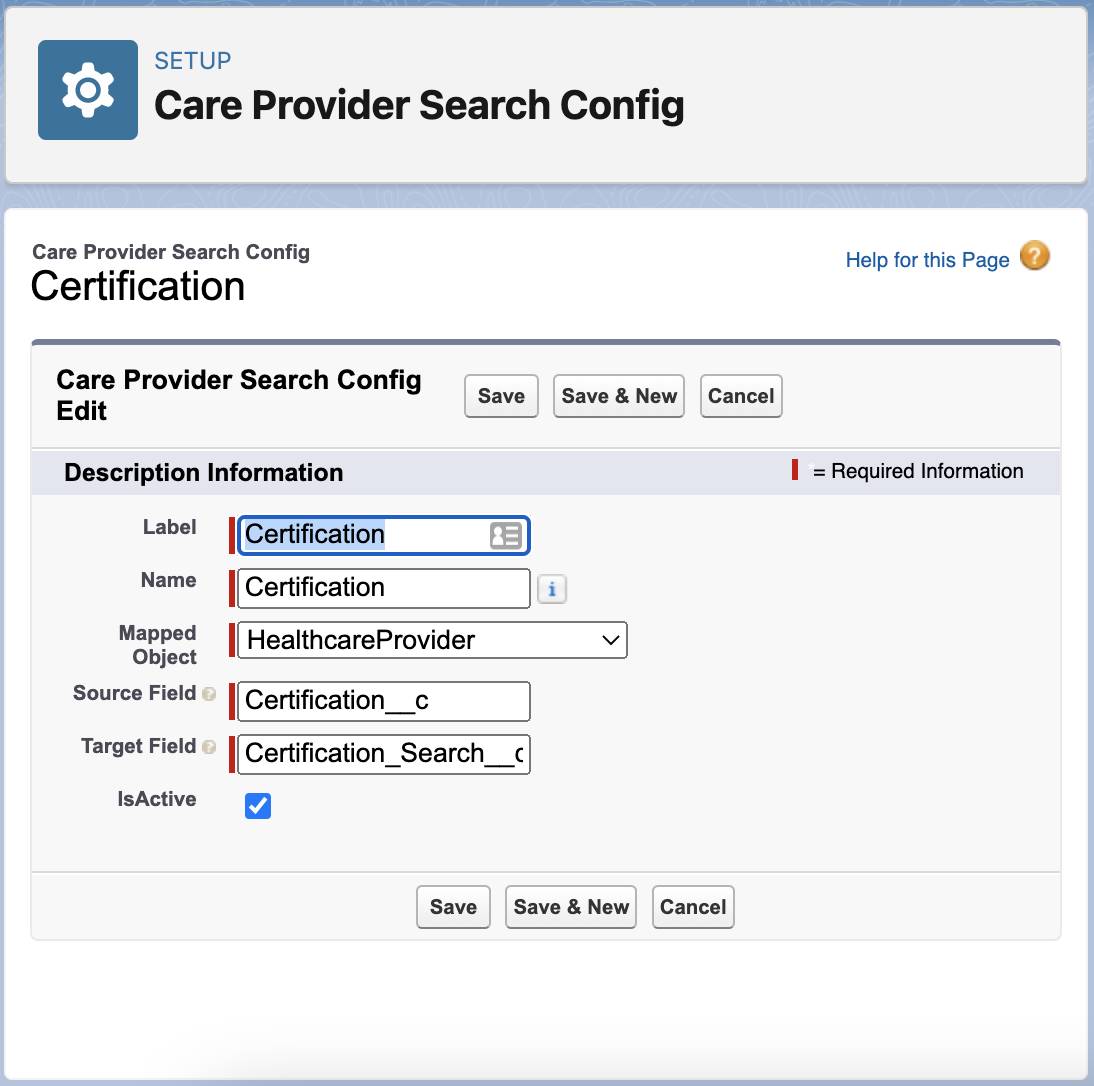
- Click Save.
Add Provider Search to the Page Layout
- Add provider search to a lightning page. In Setup, search for Lightning App and click Lightning App Builder. In Lightning App Builder, click Edit next to Patient Console with Pinned Leftbar page.
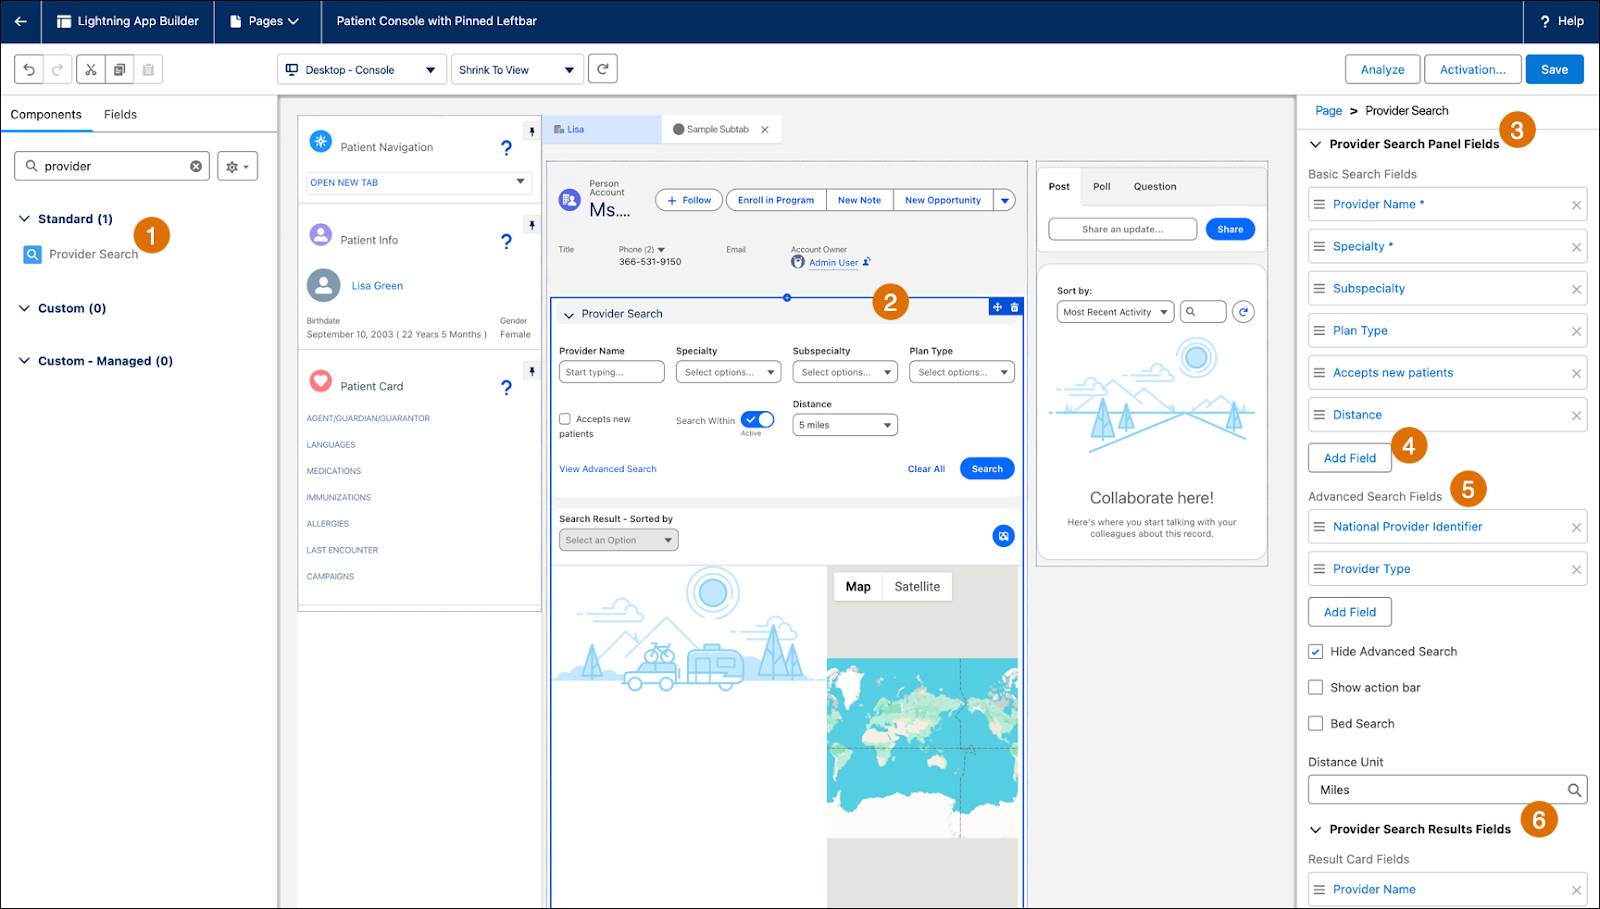
- Search for the Provider Search component in the left toolbar and drag the component to the page (1) on the top of the page under the heading (2).
- To add your preferred fields to the Provider Search panel, for example the custom Certification field you created, in Provider Search Panel Fields (3) click Add Field (4). Similarly, add fields in Advanced Search Fields (5) and Provider Search Results Fields (6).
- You can also customize the field names. Click the field, edit the label, and click Done.
- Click Activation, assign it as the org default for desktop, and then Save to save and activate the component.
In this unit, you learned about Provider Search. In the next one, see how to configure Provider Cards.
Resources
- Salesforce Help: Set Up Provider Search in Health Cloud
- Salesforce Help: Data Processing Engine
- Trailhead: Lightning App Builder