Set Up Care Programs
Learning Objectives
After completing this unit, you’ll be able to:
- Set up and configure care programs.
- Create care programs and related products.
- Associate a care provider with a care product.
- Add a consent document to a care program.
Before Leif can enroll Lisa in a care program, Harryette Randall, Goodly Healthification Pharma’s Salesforce admin, has to set up a few permission sets and configure Care Programs. Let’s walk through the setup steps with Harryette as she gets the org in shape.
Set Up User Permissions and Sharing Rules
Harryette has to enable a number of permissions and sharing rules for Leif to get started. First, she defines org-wide sharing settings. For a detailed list of sharing settings, see Configure User Permissions and Sharing Rules.
Harryette follows these instructions to set up appropriate permission sets. They’re already set up in your special Developer Edition org. Read through the steps or skip ahead to Create Care Programs and Related Products.
- Create a permission set that gives access to the objects used to manage consent forms:
- From Setup, open Permission Sets.
- Click New.
- Define a permission set:
- Label:
Manage Consent Forms - API Name:
Manage_Consent_Forms - Description:
Permission set to give access to objects used to manage consent forms. - License: None
- Click Save.

- In the new permission set, click Object Settings.
- Configure access for these objects:
- Authorization Forms: Read
- Authorization Form Consents: Read, Create, Edit
- Authorization Form Data Uses: Read
- Authorization Form Texts: Read
- Data Use Purposes: Read
- Clone the Health Cloud Foundation permission set:
- Next to Health Cloud Foundation, click Clone.
- For Label, enter
Health Cloud Foundation (clone).
- For API Name, enter
HealthCloudFoundation2.
- Click Save.
- In the new permission set, click Object Settings.
- Configure Read access for these objects:
- Care Programs
- Care Program Enrollees
- Care Program Enrollee Products
- Care Program Enrollment Cards
- Care Program Products
- Care Program Providers
- Enable care managers to enroll participants in programs:
- From Setup, open Profiles.
- Next to Standard User, click Clone.
- For Profile Name, enter
Patient Manager.
- Click Edit.
- Under General User Permissions, select Run Flows.
- Click Save.
- Allow care coordinators to enroll patients in a care program more than once:
- From Setup, in the Quick Find box, enter
Program Enrollee Settings.
- Enable Multiple Enrollments in the Same Care Program.
- Enable users to access a site:
- Open Profiles.
- Next to Customer Community Plus User, click Clone.
- Rename the clone
Community Customer Plus Cloned Version.
- Click Save.
- In the new profile, click Edit.
- Under General User Permissions, select View Content in Portals.
- Click Save.
Create Care Programs and Related Products
With the settings in place, Harryette can now start creating care programs and associated products and services. She can also upload consent documents or copy existing documents and add them to the care programs.
This feature is flexible for admins as well as care coordinators and patient managers.
Create Care Programs
Harryette first creates a care program for diabetes management. In the App Launcher search box, enter
 Care Programs and then select Care Programs.
- Click New.
- Define a new program:
- Name:
Goodly Healthification Diabetes Management Care Program - Start Date: January 1 of this year
- End Date: December 31 of this year
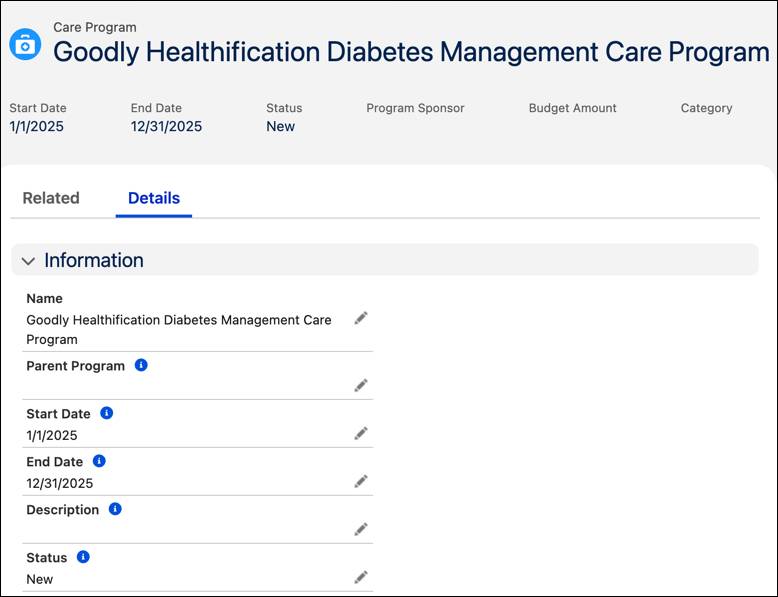
- Click Save.
Create Care Program Products
Next, Harryette defines the products associated with this care program.
- Click the Related tab.
- In Care Program Products, click New.
- Define a new care program product:
- Name:
Goodly Healthification Diabetes Type 2 Injection - Availability: All
- Status: Active
- Product: Goodly Healthification Glucoxil
- Care Program: Goodly Healthification Diabetes Management Care Program
Note: Because Harryette opened the Care Program Products tab from the Related tab of Goodly Healthification Diabetes Management Care Program, the Care Program field is automatically populated.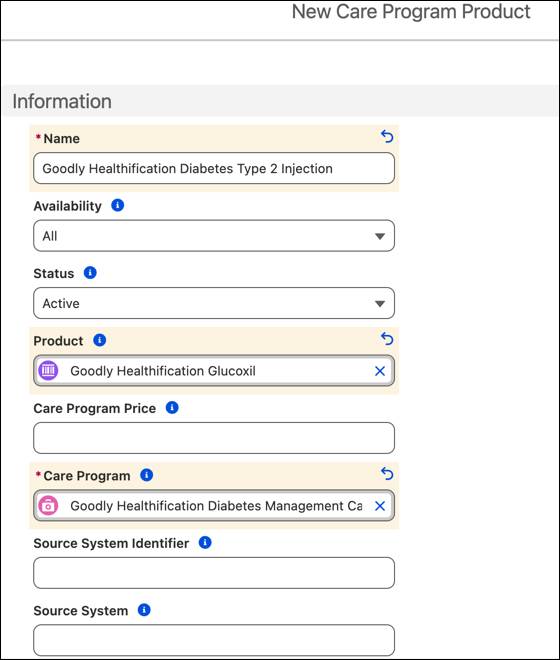
- Click Save.
Harryette can now define care program eligibility rules, create enrollee records, add team members, and connect healthcare professionals with care program providers.
Create Care Program Providers
For a patient like Lisa, whose type 2 diabetes was diagnosed quite recently, starting a course of diabetes injections can be daunting. Harryette wants to set up Goodly Healthification Clinic as the care program provider so that the clinic can arrange for a nurse to orient Lisa to the care program product. Harryette follows these instructions.
- In the App Launcher (
 ) search box, enter
 Care Program Providersand then select Care Program Providers.
- Click New.
- Define a new care program provider:
- Name:
Goodly Healthification Clinic - Account: Goodly Healthification
- Care Program Product: Goodly Healthification Diabetes Type 2 Injection
- Role: None
- Status: Active
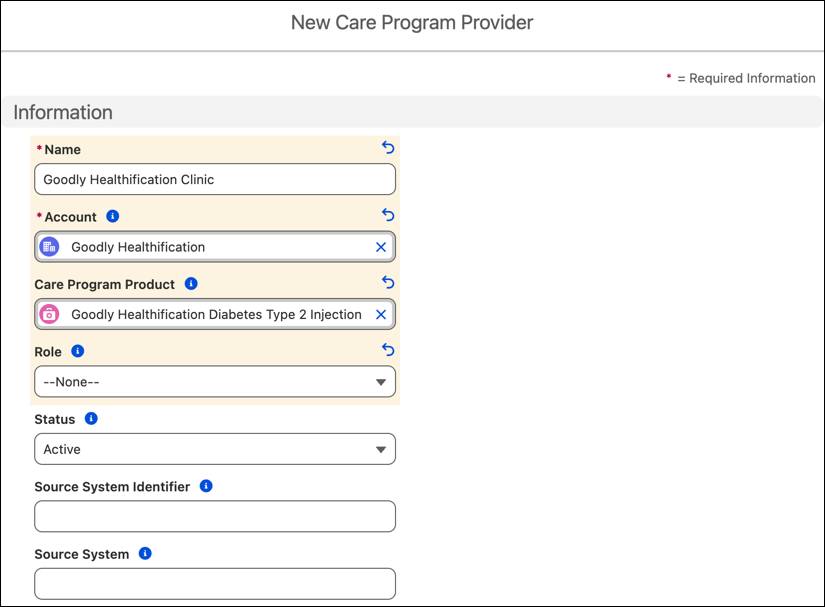
- Click Save.
Now the Goodly Healthification Clinic care program provider appears in the related list in the Goodly Healthification Diabetes Type 2 Injection care program product. When Leif enrolls Lisa in the Goodly Healthification Diabetes Management Care Program, he can also choose Goodly Healthification Clinic as the care program provider to help Lisa with her injections.
Configure Consent Management
An important part of care programs is consent management. Consent management ensures that there’s transparency regarding the privacy of a patient's data. Patients can control who has access to their healthcare information and what they can do with it. Consent forms are added to the program enrollment flow. When a patient is enrolled in a program, they can view the program details, the services and products offered, and consent documents to make an informed decision about data-sharing. To dive into the details of setting up and using consent management in care programs, complete the Consent Management module.
Before you begin, make sure Authorization Form records have an associated record in the Default Authorization Form Text field and Authorization Form Texts records are active. They’re already set up in your special Developer Edition org. Read through the steps or skip ahead to Consent Documents and Care Programs.
- From Setup, click Object Manager.
- In the Quick Find box, enter
Authorization Form Text, and then select Authorization Form Text.
- Click Page Layout, and then click Authorization Form Text Layout.
- Move Is Active from the list of available fields (1) to an editable part of the page (2).
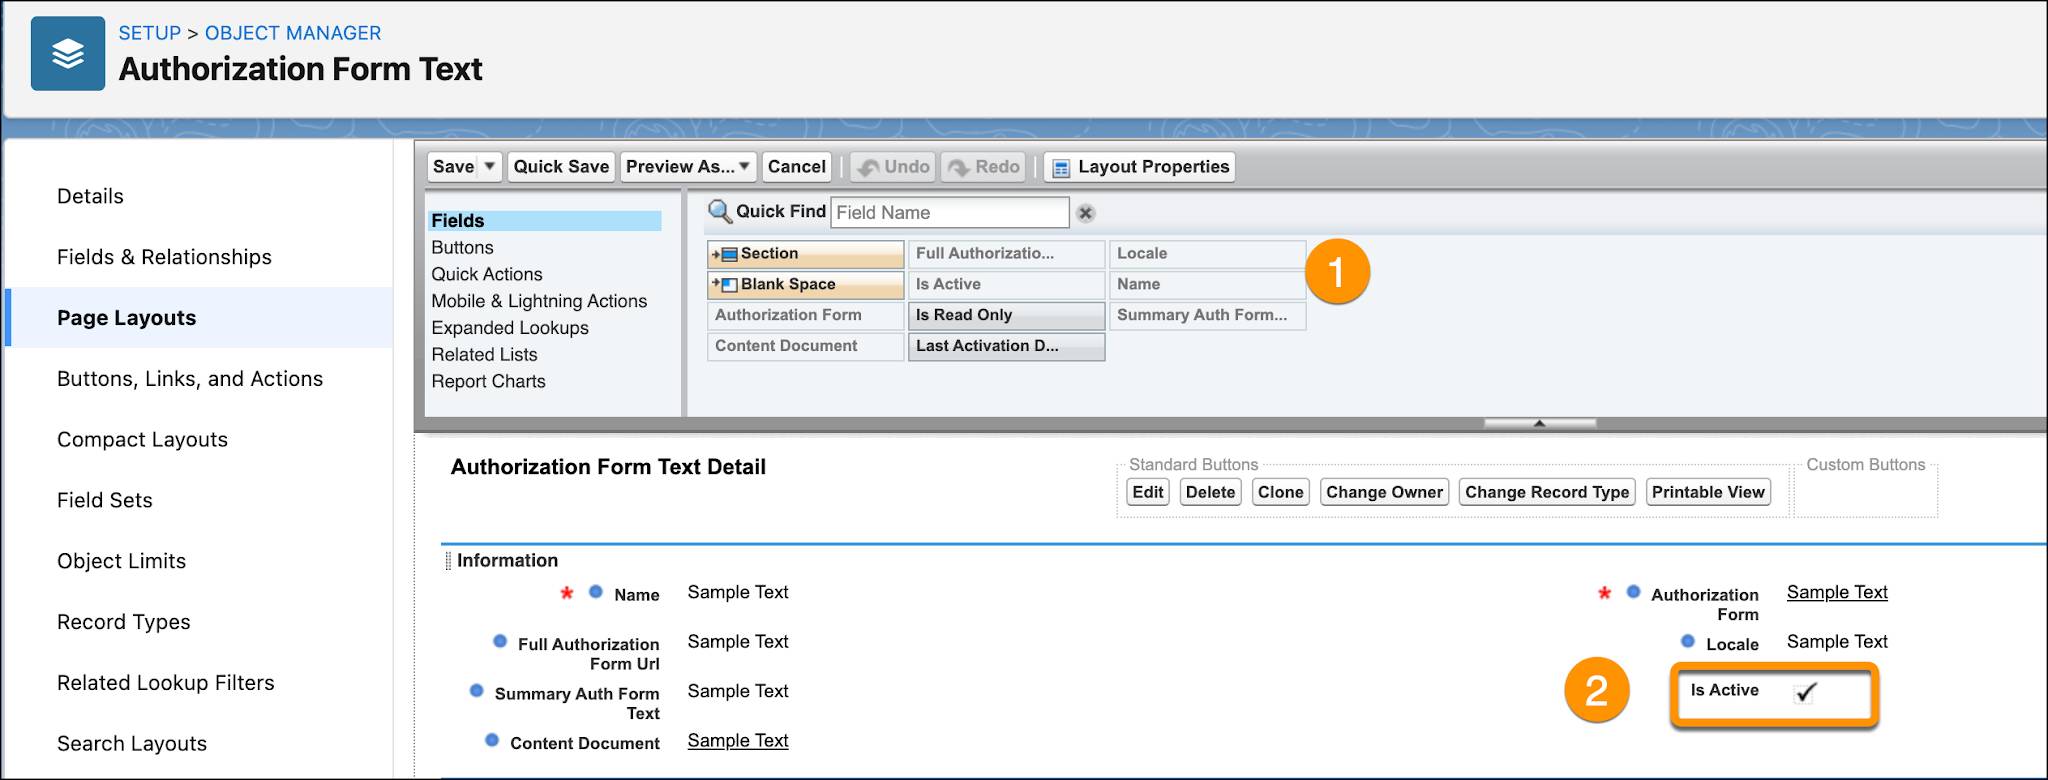
- Click Save.
- In the App Launcher (
 ) search box, enter
 Authorization Form Text, and then select Authorization Form Text.
- Select General Informed Consent Text, and click Edit.
- Select the checkbox for Is Active.
- Click Save.
- In the App Launcher (
 ) search box, enter
 Authorization Form, and then select Authorization Form.
- Select Informed Consent, and click Edit.
- In the Default Auth Form Text, select General Informed Consent Text.
- Click Save.

Consent Documents and Care Programs
Now Harryette is ready to add a consent document to Goodly Healthification Diabetes Management Care Program. Instead of uploading a document, Harryette chooses to copy an existing consent document to the care program.
- In the App Launcher (
 ) search box, enter
 Data Use Purposeand then select Data Use Purpose.
- Select the All Data Use Purposes list view.
- Click Goodly Healthification Hyperthyroidism Management Consent Form.
- Click
 and select Clone with Related.
- Select Authorization Form Data Use and then click Next.
- Define a new data use purpose with related records:
- Name:
Goodly Healthification Diabetes Management Consent Form - Description:
Displays consent form for Goodly Healthification Diabetes Management Care Program
- Purpose: Goodly Healthification Diabetes Management Care Program
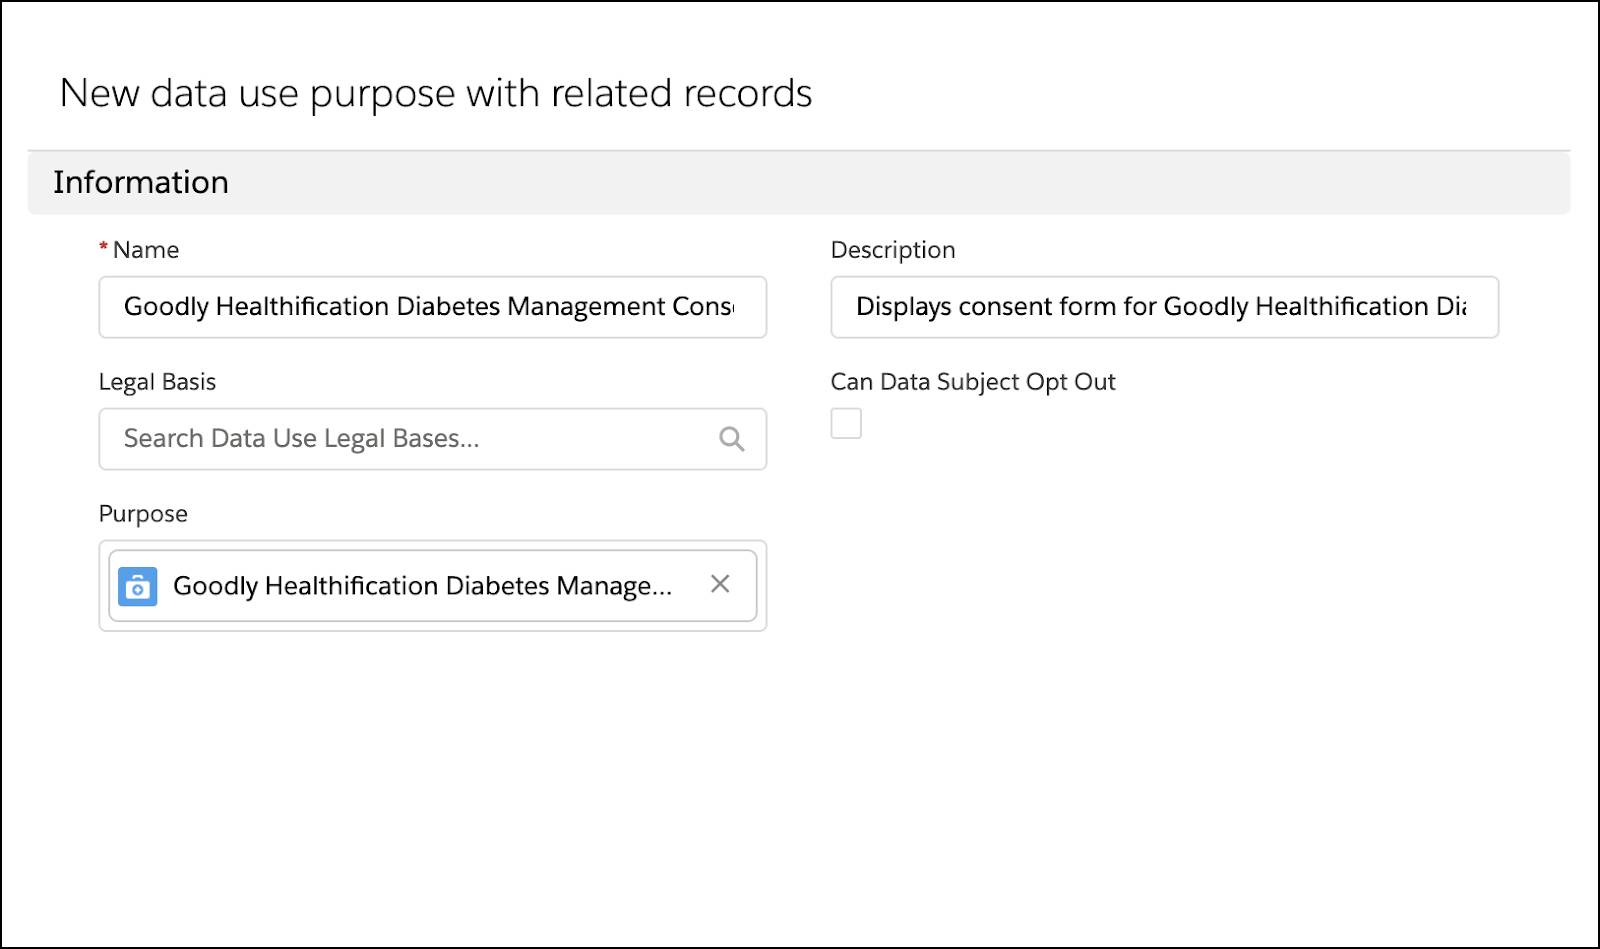
- Click Save.
Harryette has created the Goodly Healthification Diabetes Management care program and related products and providers. She also added the consent form so that Lisa can make an informed choice. Let’s continue with this story and see how Leif enrolls Lisa in the care program.
Resources
- Salesforce Help: Map External Program Enrollment Fields to Health
- Salesforce Help: Configure User Permissions and Sharing Rules
- Salesforce Help: Care Program Providers
- Salesforce Help: Copy Existing Consent Documents for a New Care Program