Create Your Google Analytics Account
Learning Objectives
After completing this unit, you’ll be able to:
- Create a Google Analytics account.
- Add tracking to your website.
Create a Google Analytics Account
The first thing you need is a Google Analytics account. Here’s how to create one.
- Go to google.com/analytics.
- Sign in with your existing personal Google username. If you don't have one, create a new Google Account and sign in.
- Click Start measuring.
You'll be prompted to set up your first property at the same time you create your account. Proceed to the next section to finish setting up your account and first property.
Set Up a Property in Your Google Analytics Account
A property represents your website or app. It’s the collection point in Google Analytics for the data from your site or app. You create one property for each website you want to track. You can add up to 50 properties to each Analytics account. To raise this limit, reach out to your account manager. You need edit permission on the account to add properties.
Google Analytics supports websites and mobile apps, but for the purposes of this module, we stick to setting up a website.
- Enter an account name in the Account name field.
- In Account Data Sharing Settings, select the settings that make sense for you.
- Click Next.
- In Property details, enter your website name in Property name, and select the appropriate time zone and currency.
- Click Show advanced options.
- Ensure your toggle on Create a Universal Analytics property.
- Enter the Website URL.The URL must be formatted correctly in order to create a property.
- Select the protocol standard (http:// or https://).
- Enter the domain name with no characters following the name—not even a trailing slash. That is, www.example.com, not www.example.com/.
- Most domain hosts support only UTF-8 characters in the URL. Use either UTF-8 characters or punycode for symbols and any non-UTF-8 characters (including Cyrillic characters) in your domain name. Try a punycode converter for help with this.
- Click Next.
- Then, enter details about your business in Business information, including industry, size, and how you intend to use Google Analytics.
- Finally, click Create.
You get a popup to accept Google Analytics Terms of Service.
- Review the terms of service.
- Check the box.
- Then, click I Accept.
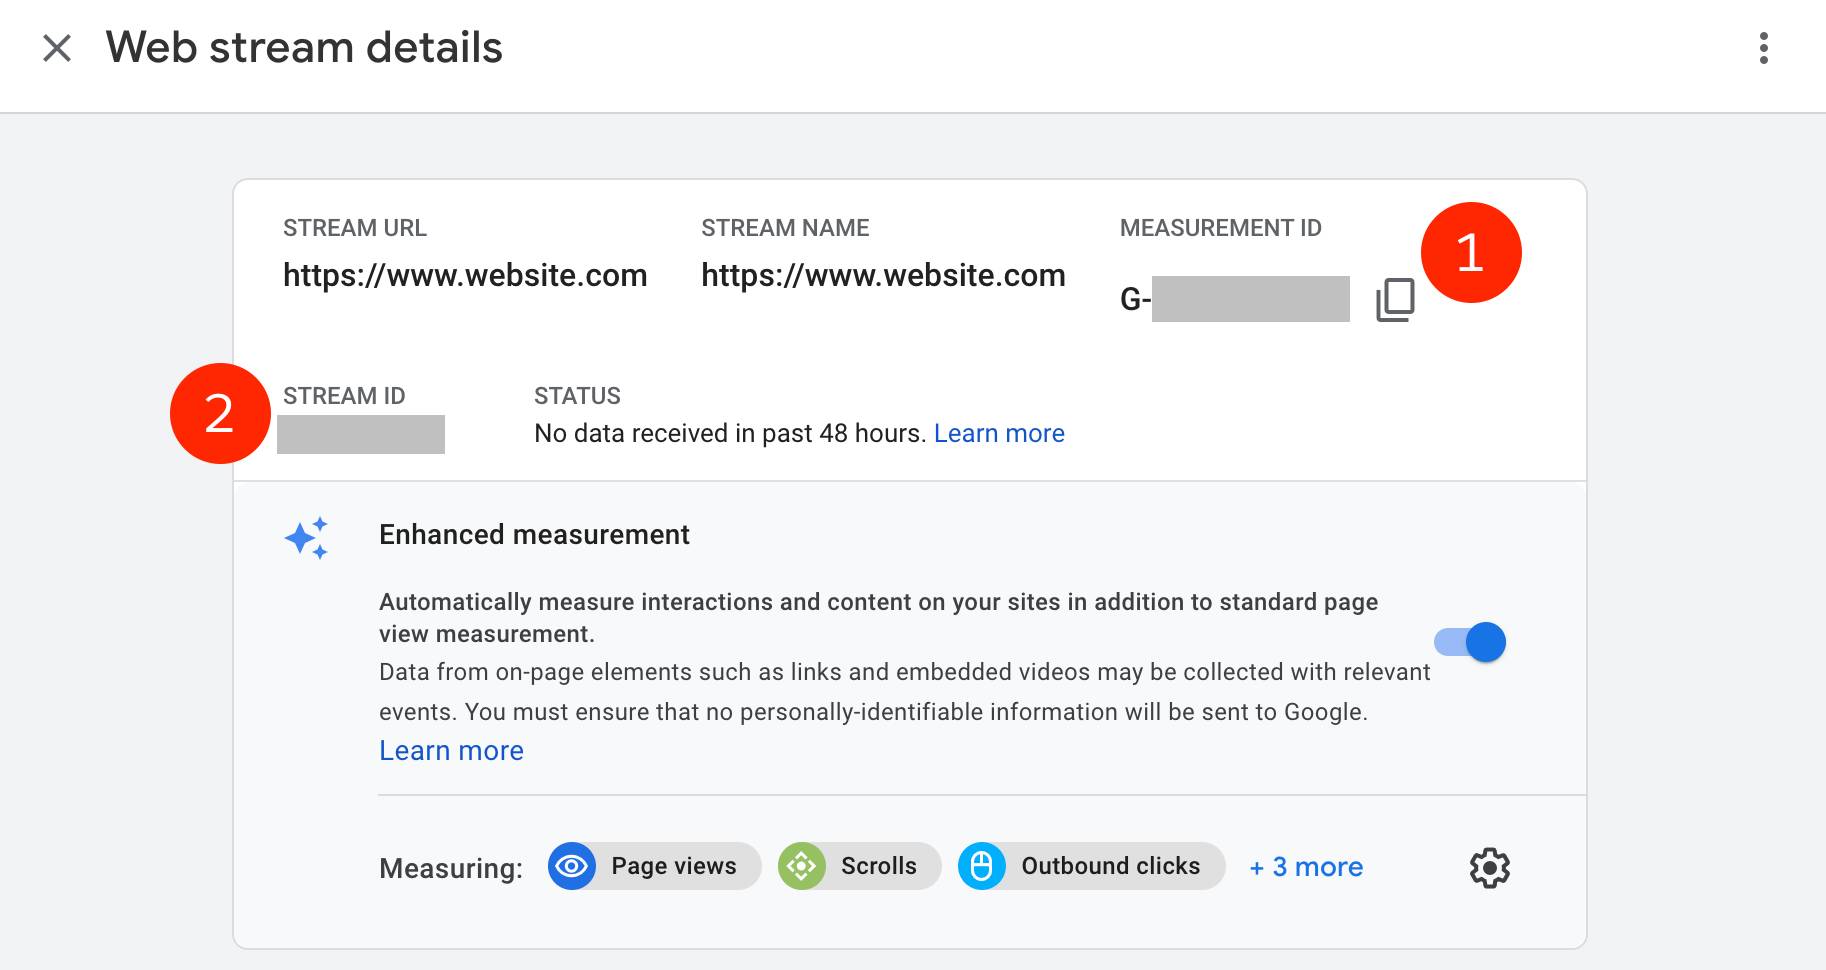
You're then provisioned a Measurement ID (1) and Stream ID (2). Ensure you copy both and save them for later.
Understanding Reporting Time Zones
When you're selecting a reporting time zone, keep in mind that this will be used as the day boundary for your reports, regardless of where the data originates. The time zone setting affects how data appears in your reports. For example, if you choose United States, Pacific Time, then the beginning and end of each day are calculated based on Pacific Time, regardless of whether the sessions originate from New York, London, or Moscow.
If you link your Analytics account to a Google AdWords account, the time zone is automatically set to your AdWords preference, and the Reporting Time Zone option does not appear. This ensures accurate reporting on your AdWords campaigns.
Changing your time zone affects data going forward, but not retroactively. You may notice a flat spot or a spike in your report data if you update your time setting after you’ve already been using this property. Your reports might also refer to the old time zone for a short period after you update this setting.
Set Up a Reporting View in Your Property
Views let you create filtered perspectives of your data. For example, you can look at all data except data from your company’s internal IP addresses, or all data associated with a specific sales region. You can add up to 25 views to a property. To raise this limit, reach out to your account manager. You need edit permission to add views.
Here’s how to set up a view.
- From Google Analytics, click Admin, and select the account and property where you want to add the view.
- In the VIEW column, click the menu, then click Create View.
- Select Website.
- Enter a Reporting View Name. Use a specific and descriptive name, so you can easily tell what data is in this view when you see the name in a list.
- Select the Reporting Time Zone. If you link your Analytics account to a Google AdWords account, the time zone is automatically set to your AdWords preference, and this option does not appear.
- Click Create View.
After you create a view, you can come back to the Admin page and edit the view settings.
Note: If your Analytics account is linked to an AdWords account, data from the AdWords account is automatically imported into any new view you create on that account.
Add Tracking to Your Website
By now, you’ve created a property in Google Analytics. When you created the property, you generated a tracking ID. You use that in your gtag.js tracking code snippet.
If you forgot to write down your tracking ID, here’s how to find it.
- From Google Analytics, click Admin and select the account and property you want to track.
- Under Property, click Tracking Info > Tracking Code. Your tracking ID appears at the top of the page.
Paste the Tracking Code Snippet
Paste the following snippet right after the <head> tag on each page of your site. Replace GA_TRACKING_ID with your own Google Analytics tracking ID:
<!-- Global Site Tag (gtag.js) - Google Analytics -->
<script async src="https://www.googletagmanager.com/gtag/js?id=GA_TRACKING_ID"></script>
<script>
window.dataLayer = window.dataLayer || [];
function gtag(){dataLayer.push(arguments);}
gtag('js', new Date());
gtag('config', 'GA_TRACKING_ID');
</script>
To verify that the tracking code is working, visit your website and check to see if your visit registers in the Real-Time reports.