Create a Models API Lightning Web Component
Learning Objectives
After completing this unit, you’ll be able to:
- Create a custom Apex class.
- Build a Lightning web component.
- Deploy a Lightning web component to your AI Playground.
- Edit an org page with Lightning App Builder.
Now that you’ve set up your environment, it’s time to add functionality to the Lightning Web Component. In this unit, we follow along with Maria as she creates a custom Apex class, designs the UI, adds functional JavaScript, and deploys her Models API dashboard to the AI Playground.
Developer Doc Writer Example Use Case
This video shows you how to build a Lightning web component that accesses the Models API, using a basic example similar to the one in this module.
Create Models API Apex Classes
- In VS Code, right-click the classes folder located under force-app/main and select SFDX: Create Apex Class. Name the class
DashboardController.
- New Apex classes in VS Code come with five lines of default code. Remove this default code. You won’t need any default code for this module since we provide complete code samples for both Apex classes and Lightning web component files.
- In the Apex class file,
DashboardController.cls, copy and paste the following code.
public with sharing class DashboardController {
    @AuraEnabled
    public static String createChatGenerations(String input) {
        String fileContent = HousingData.jsonString;
        // Escape double quotes, newlines, and carriage returns within the JSON string
        String escapedFileContent = HousingData.jsonString
        .replace('\\', '\\\\') // Escape backslashes
        .replace('"', '\\"')   // Escape double quotes
        .replace('\n', '\\n')  // Escape newlines
        .replace('\r', '\\r'); // Escape carriage returns
        // Construct the input string
        String instructions = '[{"role": "user", "message": "Summarize the sample housing data as if you were a real estate broker. Housing Data: ' + escapedFileContent + '"}]';
        // Deserialize the file content into a list of ChatMessage objects
        List<DashboardController.ChatMessage> messages = (List<DashboardController.ChatMessage>) JSON.deserialize(
            instructions,
            List<DashboardController.ChatMessage>.class
        );
        // Instantiate the API class
        aiplatform.ModelsAPI modelsAPI = new aiplatform.ModelsAPI();
        // Prepare the request and body objects
        aiplatform.ModelsAPI.createChatGenerations_Request request = new aiplatform.ModelsAPI.createChatGenerations_Request();
        aiplatform.ModelsAPI_ChatGenerationsRequest body = new aiplatform.ModelsAPI_ChatGenerationsRequest();
        // Specify model
        request.modelName = 'sfdc_ai__DefaultGPT35Turbo';
        // Create a list to hold chat messages
        List<aiplatform.ModelsAPI_ChatMessageRequest> messagesList = new List<aiplatform.ModelsAPI_ChatMessageRequest>();
        // Loop through the input messages and create message requests
        for (ChatMessage msg : messages) {
            aiplatform.ModelsAPI_ChatMessageRequest messageRequest = new aiplatform.ModelsAPI_ChatMessageRequest();
            messageRequest.content = msg.message != null ? msg.message : ''; // Handle null message
            messageRequest.role = msg.role != null ? msg.role : 'user'; // Handle null role
            messagesList.add(messageRequest);
        }
        // Set the messages in the request body
        body.messages = messagesList;
        // Set the request body and model name
        request.body = body;
        String response = '';
        try {
            // Call the API and get the response
            aiplatform.ModelsAPI.createChatGenerations_Response apiResponse = modelsAPI.createChatGenerations(
                request
            );
            // Check that we have a non-null response
            if (
                apiResponse?.Code200?.generationDetails?.generations != null &&
                !apiResponse.Code200.generationDetails.generations.isEmpty()
            ) {
                // Set the variable from the response
                response = apiResponse.Code200.generationDetails.generations[0]
                    .content;
            } else {
                // Handle the case where response is null
                response = 'No content generated';
            }
        // Handle error
        } catch(aiplatform.ModelsAPI.createChatGenerations_ResponseException e) {
            System.debug('Response code: ' + e.responseCode);
            System.debug('The following exception occurred: ' + e);
            // Add error to the output
            response = 'Unable to get a valid response. Error code: ' + e.responseCode;
        }
        return response;
    }
    public class ChatMessage {
        public String role;
        public String message;
        public ChatMessage() {
        }
        public ChatMessage(String role, String message) {
            this.role = role;
            this.message = message;
        }
    }
}- Save the file by pressing Ctrl+S (Windows) or Cmd+S (macOS).

Create a New Class for Grounding Data
For Maria’s Models API dashboard to be functional, she needs to ground the LLM with relevant housing market data. In this step, we create a new class and populate it with data so that it may be referenced by the DashboardController class.
For demonstration purposes, the data is a local file within the LWC. In an official implementation of this dashboard, the data in this step would be dynamically retrieved from a housing market API.
- In VS Code, right-click the classes folder and select SFDX: Create Apex Class. Name the class
HousingData.
- In the Apex class file,
HousingData.cls, copy and paste the following code.
public class HousingData {
    public static final String jsonString = '{\n' +
'[' +
'  {\n' +
'    "County": "Adams",\n' +
'    "Sales (SAAR)": 130,\n' +
'    "% Change by quarter": 8.3,\n' +
'    "% Change by year": -7.1,\n' +
'    "Building Permits": 12,\n' +
'    "% Change by year (Building Permits)": -25.0,\n' +
'    "Median Price ($)": 318100,\n' +
'    "% Change by year (Median Price)": 6.9,\n' +
'    "Median Buyer HAI": 83.7,\n' +
'    "First-time Buyer HAI": 59.7\n' +
'  },\n' +
'  {\n' +
'    "County": "Benton",\n' +
'    "Sales (SAAR)": 3060,\n' +
'    "% Change by quarter": 2.3,\n' +
'    "% Change by year": -16.2,\n' +
'    "Building Permits": 447,\n' +
'    "% Change by year (Building Permits)": 42.4,\n' +
'    "Median Price ($)": 426900,\n' +
'    "% Change by year (Median Price)": 0.3,\n' +
'    "Median Buyer HAI": 81.8,\n' +
'    "First-time Buyer HAI": 58.4\n' +
'  },\n' +
'  {\n' +
'    "County": "Chelan",\n' +
'    "Sales (SAAR)": 760,\n' +
'    "% Change by quarter": -3.8,\n' +
'    "% Change by year": -16.5,\n' +
'    "Building Permits": 115,\n' +
'    "% Change by year (Building Permits)": 74.2,\n' +
'    "Median Price ($)": 563500,\n' +
'    "% Change by year (Median Price)": 15.8,\n' +
'    "Median Buyer HAI": 52.5,\n' +
'    "First-time Buyer HAI": 37.5\n' +
'  },\n' +
'  {\n' +
'    "County": "Clark",\n' +
'    "Sales (SAAR)": 4830,\n' +
'    "% Change by quarter": -19.0,\n' +
'    "% Change by year": -34.3,\n' +
'    "Building Permits": 698,\n' +
'    "% Change by year (Building Permits)": -16.1,\n' +
'    "Median Price ($)": 531500,\n' +
'    "% Change by year (Median Price)": 5.8,\n' +
'    "Median Buyer HAI": 72.9,\n' +
'    "First-time Buyer HAI": 52.0\n' +
'  },\n' +
'  {\n' +
'    "County": "Columbia",\n' +
'    "Sales (SAAR)": 80,\n' +
'    "% Change by quarter": 0.0,\n' +
'    "% Change by year": -11.1,\n' +
'    "Building Permits": 2,\n' +
'    "% Change by year (Building Permits)": -86.7,\n' +
'    "Median Price ($)": 228300,\n' +
'    "% Change by year (Median Price)": -13.2,\n' +
'    "Median Buyer HAI": 166.9,\n' +
'    "First-time Buyer HAI": 119.1\n' +
'  },\n' +
'  {\n' +
'    "County": "Franklin",\n' +
'    "Sales (SAAR)": 1030,\n' +
'    "% Change by quarter": 3.0,\n' +
'    "% Change by year": -16.3,\n' +
'    "Building Permits": 138,\n' +
'    "% Change by year (Building Permits)": 29.0,\n' +
'    "Median Price ($)": 426900,\n' +
'    "% Change by year (Median Price)": 0.3,\n' +
'    "Median Buyer HAI": 90.7,\n' +
'    "First-time Buyer HAI": 64.7\n' +
'  },\n' +
'  {\n' +
'    "County": "Garfield",\n' +
'    "Sales (SAAR)": 0,\n' +
'    "% Change by quarter": "NA",\n' +
'    "% Change by year": "NA",\n' +
'    "Building Permits": 0,\n' +
'    "% Change by year (Building Permits)": "NA",\n' +
'    "Median Price ($)": 268000,\n' +
'    "% Change by year (Median Price)": 14.9,\n' +
'    "Median Buyer HAI": 104.1,\n' +
'    "First-time Buyer HAI": 74.3\n' +
'  },\n' +
'  {\n' +
'    "County": "Grays Harbor",\n' +
'    "Sales (SAAR)": 1660,\n' +
'    "% Change by quarter": 0.0,\n' +
'    "% Change by year": -19.4,\n' +
'    "Building Permits": 69,\n' +
'    "% Change by year (Building Permits)": -6.8,\n' +
'    "Median Price ($)": 351300,\n' +
'    "% Change by year (Median Price)": 7.6,\n' +
'    "Median Buyer HAI": 71.1,\n' +
'    "First-time Buyer HAI": 50.7\n' +
'  },\n' +
'  {\n' +
'    "County": "Jefferson",\n' +
'    "Sales (SAAR)": 480,\n' +
'    "% Change by quarter": -5.9,\n' +
'    "% Change by year": -12.7,\n' +
'    "Building Permits": 31,\n' +
'    "% Change by year (Building Permits)": 24.0,\n' +
'    "Median Price ($)": 650000,\n' +
'    "% Change by year (Median Price)": 16.4,\n' +
'    "Median Buyer HAI": 43.2,\n' +
'    "First-time Buyer HAI": 30.9\n' +
'  },\n' +
'  {\n' +
'    "County": "King",\n' +
'    "Sales (SAAR)": 18520,\n' +
'    "% Change by quarter": -0.1,\n' +
'    "% Change by year": -21.1,\n' +
'    "Building Permits": 3110,\n' +
'    "% Change by year (Building Permits)": 4.7,\n' +
'    "Median Price ($)": 931000,\n' +
'    "% Change by year (Median Price)": 13.4,\n' +
'    "Median Buyer HAI": 58.6,\n' +
'    "First-time Buyer HAI": 41.8\n' +
'  },\n' +
'  {\n' +
'    "County": "Kitsap",\n' +
'    "Sales (SAAR)": 3680,\n' +
'    "% Change by quarter": -0.8,\n' +
'    "% Change by year": -20.0,\n' +
'    "Building Permits": 400,\n' +
'    "% Change by year (Building Permits)": -49.0,\n' +
'    "Median Price ($)": 532200,\n' +
'    "% Change by year (Median Price)": 5.6,\n' +
'    "Median Buyer HAI": 76.0,\n' +
'    "First-time Buyer HAI": 54.2\n' +
'  },\n' +
'  {\n' +
'    "County": "Kittitas",\n' +
'    "Sales (SAAR)": 960,\n' +
'    "% Change by quarter": 6.7,\n' +
'    "% Change by year": -13.5,\n' +
'    "Building Permits": 85,\n' +
'    "% Change by year (Building Permits)": -15.0,\n' +
'    "Median Price ($)": 521700,\n' +
'    "% Change by year (Median Price)": -5.1,\n' +
'    "Median Buyer HAI": 49.3,\n' +
'    "First-time Buyer HAI": 35.2\n' +
'  },\n' +
'  {\n' +
'    "County": "Lewis",\n' +
'    "Sales (SAAR)": 970,\n' +
'    "% Change by quarter": -6.7,\n' +
'    "% Change by year": -26.5,\n' +
'    "Building Permits": 110,\n' +
'    "% Change by year (Building Permits)": 80.3,\n' +
'    "Median Price ($)": 413000,\n' +
'    "% Change by year (Median Price)": 5.7,\n' +
'    "Median Buyer HAI": 72.0,\n' +
'    "First-time Buyer HAI": 51.4\n' +
'  },\n' +
'  {\n' +
'    "County": "Mason",\n' +
'    "Sales (SAAR)": 1010,\n' +
'    "% Change by quarter": -4.7,\n' +
'    "% Change by year": -18.5,\n' +
'    "Building Permits": 93,\n' +
'    "% Change by year (Building Permits)": 31.0,\n' +
'    "Median Price ($)": 391200,\n' +
'    "% Change by year (Median Price)": 1.9,\n' +
'    "Median Buyer HAI": 89.0,\n' +
'    "First-time Buyer HAI": 63.5\n' +
'  },\n' +
'  {\n' +
'    "County": "Okanogan",\n' +
'    "Sales (SAAR)": 360,\n' +
'    "% Change by quarter": -2.7,\n' +
'    "% Change by year": -29.4,\n' +
'    "Building Permits": 57,\n' +
'    "% Change by year (Building Permits)": 29.5,\n' +
'    "Median Price ($)": 369400,\n' +
'    "% Change by year (Median Price)": 29.6,\n' +
'    "Median Buyer HAI": 68.4,\n' +
'    "First-time Buyer HAI": 48.8\n' +
'  },\n' +
'  {\n' +
'    "County": "Pierce",\n' +
'    "Sales (SAAR)": 9780,\n' +
'    "% Change by quarter": -2.4,\n' +
'    "% Change by year": -25.6,\n' +
'    "Building Permits": 629,\n' +
'    "% Change by year (Building Permits)": -17.1,\n' +
'    "Median Price ($)": 547800,\n' +
'    "% Change by year (Median Price)": 4.5,\n' +
'    "Median Buyer HAI": 72.5,\n' +
'    "First-time Buyer HAI": 51.7\n' +
'  },\n' +
'  {\n' +
'    "County": "San Juan",\n' +
'    "Sales (SAAR)": 220,\n' +
'    "% Change by quarter": 0.0,\n' +
'    "% Change by year": -8.3,\n' +
'    "Building Permits": 23,\n' +
'    "% Change by year (Building Permits)": 43.8,\n' +
'    "Median Price ($)": 737500,\n' +
'    "% Change by year (Median Price)": -13.2,\n' +
'    "Median Buyer HAI": 41.4,\n' +
'    "First-time Buyer HAI": 29.6\n' +
'  },\n' +
'  {\n' +
'    "County": "Skagit",\n' +
'    "Sales (SAAR)": 1420,\n' +
'    "% Change by quarter": -6.0,\n' +
'    "% Change by year": -24.9,\n' +
'    "Building Permits": 169,\n' +
'    "% Change by year (Building Permits)": 70.7,\n' +
'    "Median Price ($)": 553100,\n' +
'    "% Change by year (Median Price)": 6.7,\n' +
'    "Median Buyer HAI": 53.9,\n' +
'    "First-time Buyer HAI": 38.4\n' +
'  },\n' +
'  {\n' +
'    "County": "Snohomish",\n' +
'    "Sales (SAAR)": 7740,\n' +
'    "% Change by quarter": -2.5,\n' +
'    "% Change by year": -23.1,\n' +
'    "Building Permits": 1060,\n' +
'    "% Change by year (Building Permits)": 20.7,\n' +
'    "Median Price ($)": 737700,\n' +
'    "% Change by year (Median Price)": 6.4,\n' +
'    "Median Buyer HAI": 69.1,\n' +
'    "First-time Buyer HAI": 49.3\n' +
'  },\n' +
'  {\n' +
'    "County": "Spokane",\n' +
'    "Sales (SAAR)": 6010,\n' +
'    "% Change by quarter": 2.6,\n' +
'    "% Change by year": -13.4,\n' +
'    "Building Permits": 736,\n' +
'    "% Change by year (Building Permits)": -31.7,\n' +
'    "Median Price ($)": 426500,\n' +
'    "% Change by year (Median Price)": 4.8,\n' +
'    "Median Buyer HAI": 74.9,\n' +
'    "First-time Buyer HAI": 53.5\n' +
'  },\n' +
'  {\n' +
'    "County": "Stevens",\n' +
'    "Sales (SAAR)": 690,\n' +
'    "% Change by quarter": -1.4,\n' +
'    "% Change by year": -2.8,\n' +
'    "Building Permits": 50,\n' +
'    "% Change by year (Building Permits)": 31.6,\n' +
'    "Median Price ($)": 303600,\n' +
'    "% Change by year (Median Price)": 10.4,\n' +
'    "Median Buyer HAI": 92.4,\n' +
'    "First-time Buyer HAI": 66.0\n' +
'  },\n' +
'  {\n' +
'    "County": "Wahkiakum",\n' +
'    "Sales (SAAR)": 80,\n' +
'    "% Change by quarter": -11.1,\n' +
'    "% Change by year": 14.3,\n' +
'    "Building Permits": 5,\n' +
'    "% Change by year (Building Permits)": 25.0,\n' +
'    "Median Price ($)": 417000,\n' +
'    "% Change by year (Median Price)": 1.1,\n' +
'    "Median Buyer HAI": 71.3,\n' +
'    "First-time Buyer HAI": 50.9\n' +
'  },\n' +
'  {\n' +
'    "County": "Walla Walla",\n' +
'    "Sales (SAAR)": 560,\n' +
'    "% Change by quarter": 1.8,\n' +
'    "% Change by year": -11.1,\n' +
'    "Building Permits": 40,\n' +
'    "% Change by year (Building Permits)": -45.2,\n' +
'    "Median Price ($)": 418700,\n' +
'    "% Change by year (Median Price)": 3.1,\n' +
'    "Median Buyer HAI": 68.2,\n' +
'    "First-time Buyer HAI": 48.7\n' +
'  },\n' +
'  {\n' +
'    "County": "Whatcom",\n' +
'    "Sales (SAAR)": 2460,\n' +
'    "% Change by quarter": 0.8,\n' +
'    "% Change by year": -16.9,\n' +
'    "Building Permits": 279,\n' +
'    "% Change by year (Building Permits)": 16.2,\n' +
'    "Median Price ($)": 650600,\n' +
'    "% Change by year (Median Price)": 12.0,\n' +
'    "Median Buyer HAI": 50.7,\n' +
'    "First-time Buyer HAI": 36.2\n' +
'  },\n' +
'  {\n' +
'    "County": "Yakima",\n' +
'    "Sales (SAAR)": 1710,\n' +
'    "% Change by quarter": -2.3,\n' +
'    "% Change by year": -18.6,\n' +
'    "Building Permits": 82,\n' +
'    "% Change by year (Building Permits)": -33.3,\n' +
'    "Median Price ($)": 341600,\n' +
'    "% Change by year (Median Price)": 1.7,\n' +
'    "Median Buyer HAI": 82.3,\n' +
'    "First-time Buyer HAI": 58.7\n' +
'  },\n' +
'  {\n' +
'    "County": "Statewide",\n' +
'    "Sales (SAAR)": 77990,\n' +
'    "% Change by quarter": -2.3,\n' +
'    "% Change by year": -21.5,\n' +
'    "Building Permits": 9229,\n' +
'    "% Change by year (Building Permits)": -6.4,\n' +
'    "Median Price ($)": 626100,\n' +
'    "% Change by year (Median Price)": 9.3,\n' +
'    "Median Buyer HAI": 63.1,\n' +
'    "First-time Buyer HAI": 45.0\n' +
'  }\n' +
']\n' +
'}';
}- Save the file by pressing Ctrl+S (Windows) or Cmd+S (macOS).
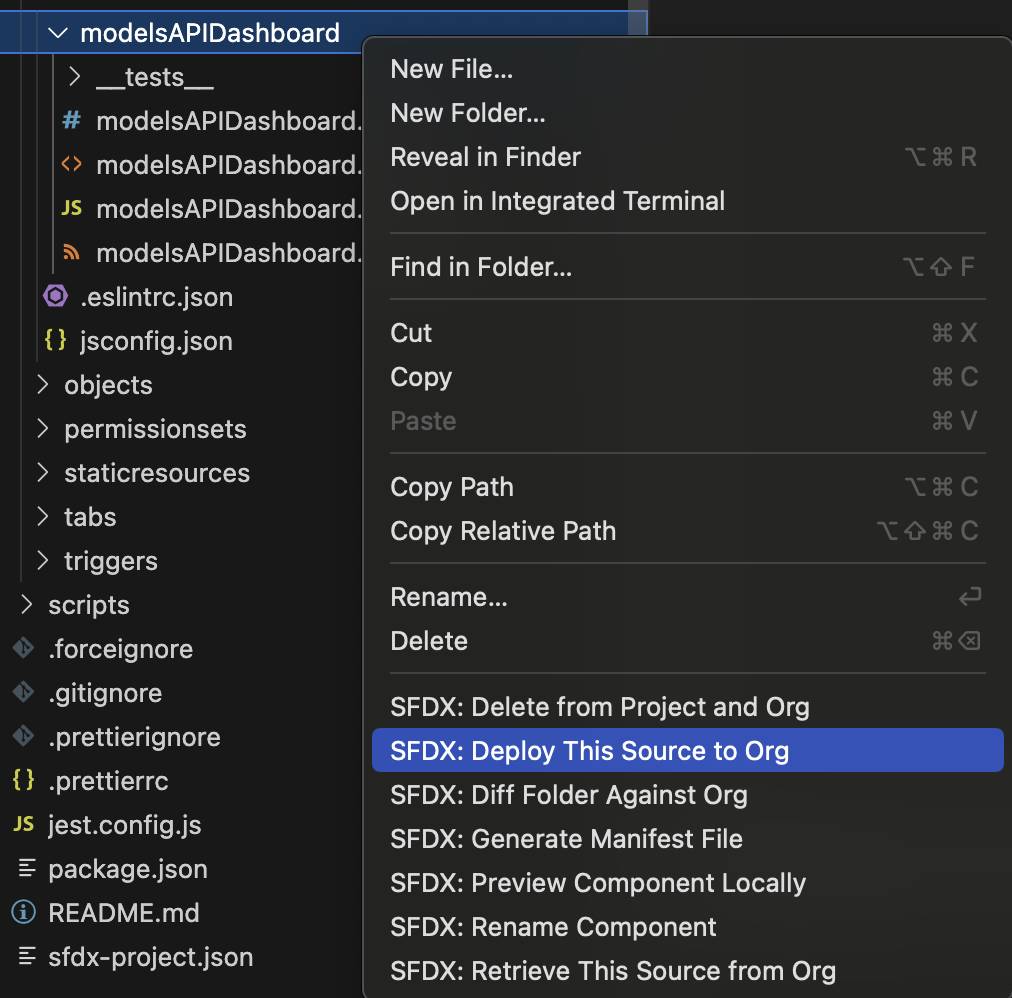
- Right-click the classes folder again, and select SFDX: Deploy This Source to Org.
- In the Output tab of the integrated terminal, view the results of your deployment. If the command ran successfully, a Deployed Source message lists the four files that were uploaded to the org.
Build a Models API Lightning Web Component
- In Visual Studio Code, open the Command Palette by pressing Ctrl+Shift+P (Windows) or Cmd+Shift+P (macOS).
- Type
SFDX.
- Select SFDX: Create Lightning Web Component.
- Enter
modelsAPIDashboardfor the name of the new component.
- Press Enter to accept the default
force-app/main/default/lwc.
- Press Enter.
- View the newly created files in the
modelsAPIDashboardfolder located underlwc.
- In the HTML file,
modelsAPIDashboard.html, copy and paste the following code.
<template>
    <div
        class="slds-var-m-around_medium slds-grid slds-grid_vertical slds-box slds-theme_default">
        <h1><font size="3"><b>Housing Market Dashboard</b></font>
        </h1>
        <!-- Chat messages container -->
        <div
        class="slds-scrollable_y"
        style="height: 440px"
        lwc:ref="chatContainer"
        >
            <!-- Iterate over each message in the messages array -->
            <template for:each={messages} for:item="message">
                <div key={message.id} class="slds-var-m-around_small">
                    <!-- If the message is from the assistant -->
                    <div class="custom-chat-message_inbound slds-var-p-around_small">
                        <div class="slds-chat-message__body">
                            <div class="slds-chat-message__text">{message.text}</div>
                        </div>
                    </div>
                </div>
            </template>
        </div>
    <!-- Loading indicator -->
    <template lwc:if={isLoading}>
        <div class="loading-container slds-var-m-around_small">
            <div class="loading-text">
                Analyzing data… One moment.
            </div>
        <div class="loading-indicator"></div>
        </div>
    </template>
        <!-- Send button -->
    <div class="slds-grid slds-grid_vertical-align-center send-button-container">
        <div class="slds-col slds-size_1-of-4">
            <lightning-button
            label="Analyze"
            variant="brand"
            onclick={handleSendMessage}
            disabled={isLoading}
            ></lightning-button>
        </div>
    </div>
    </div>
</template>- Save the file by pressing Ctrl+S (Windows) or Cmd+S (macOS).
- Right-click the
modelsAPIDashboardfolder and select New File.
- Enter
modelsAPIDashboard.cssas the file name.
- In the CSS file,
modelsAPIDashboard.css, copy and paste the following code.
.custom-chat-message_inbound {
    border-radius: 10px;
    max-width: 100%;
    background-color: #f3f2f2;
    align-self: flex-start;
}
.custom-chat-message_outbound {
  border-radius: 10px;
  max-width: 100%;
  background-color: #0070d2;
  color: white;
  align-self: flex-end;
}
.send-button-container {
  padding-top: 10px;
  padding-bottom: 1px;
}
.custom-textarea {
  width: 100%;
}
.loading-indicator {
  width: 50px;
  height: 25px;
  overflow: hidden;
  vertical-align: middle;
  position: relative;
}
.loading-indicator::after {
  content: "";
  display: inline-block;
  width: 50px;
  height: 50px;
  overflow: hidden;
  position: absolute;
  top: 50%;
  left: 50%;
  transform: translate(-50%, -50%);
  animation: loading 1s infinite steps(7);
}
@keyframes loading {
  0% {
    content: ".";
  }
  12.5% {
    content: "..";
  }
  25% {
    content: "...";
  }
  37.5% {
    content: ".....";
  }
  50% {
    content: "......";
  }
  62.5% {
    content: "........";
  }
  75% {
    content: "............";
  }
  87.5% {
    content: "";
  }
}- Save the file by pressing Ctrl+S (Windows) or Cmd+S (macOS).
- In the JavaScript file,
modelsAPIDashboard.js, copy and paste the following code.
import { LightningElement, track } from "lwc";
import createChatGenerations from "@salesforce/apex/DashboardController.createChatGenerations";
export default class HousingMarket extends LightningElement {
  @track housingData = [];
  @track isLoading = false;
  @track error;
  @track messages = []; // Initialize messages
  connectedCallback() {
    this.fetchHousingMarketData();
  }
  // Get Housing Market Data
  fetchHousingMarketData() {
    this.isLoading = true;
    createChatGenerations()
      .then((result) => {
        console.log(result);
        this.error = undefined;
      })
      .catch((error) => {
        this.error = error;
        this.housingData = [];
      })
      .finally(() => {
        this.isLoading = false;
      });
  }
  // Handle analyze button click
  handleSendMessage() {
    this.isLoading = true; // Show loading indicator
    // Call Apex method to fetch chat response
    createChatGenerations()
      .then((result) => {
        const assistantMessageObj = {
          id: this.messages.length + 1,
          text: result,
          role: "assistant",
          isUser: false,
        };
        this.messages = [...this.messages, assistantMessageObj]; // Add assistant message to messages array
      })
      .catch((error) => {
        console.error("Error fetching bot response", JSON.stringify(error));
      })
      .finally(() => {
        this.isLoading = false; // Hide loading indicator
      });
  }
}- Save the file by pressing Ctrl+S (Windows) or Cmd+S (macOS).
Let’s make our component available from various Lightning Experience pages by adding those targets to the metadata file.
- In the XML file,
modelsAPIDashboard.js-meta.xml, copy and paste the following code.
<?xml version="1.0" encoding="UTF-8"?>
<LightningComponentBundle xmlns="http://soap.sforce.com/2006/04/metadata">
    <apiVersion>61.0</apiVersion>
    <isExposed>true</isExposed>
    <targets>
        <target>lightning__AppPage</target>
        <target>lightning__HomePage</target>
        <target>lightning__RecordPage</target>
    </targets>
</LightningComponentBundle>- Save the file by pressing Ctrl+S (Windows) or Cmd+S (macOS).
Deploy to Your AI Playground
- Right-click the
modelsAPIDashboardfolder underlwc.
- Click SFDX: Deploy This Source to Org.
- In the Output tab of the integrated terminal, view the results of your deployment. If the command ran successfully, a Deployed Source message lists the four files that were uploaded to the org.
Edit Page in Lightning App Builder
- In Visual Studio Code, open the Command Palette by pressing Ctrl+Shift+P (Windows) or Cmd+Shift+P (macOS).
- Type
SFDX.
- Select SFDX: Open Default Org.
This opens your AI Playground in a separate browser.
- Click the gear icon (
 ) select Setup.
- In Quick Find, search for and select Home in the Feature Settings section.
- For Advanced Seller Home, toggle the setting to Inactive.
- In Quick Find, search for and select Lightning App Builder.
- Click New to create a new Lightning page. The existing Sales Home page in a Trailhead Playground is locked and can’t be edited, so you create a new Home page and assign it as the org default.
- Select Home Page, then click Next.
- Enter
Home_Page_Defaultfor the label, then click Next.
- Select a layout (for example, Standard Home Page), then click Done. The new page opens in Lightning App Builder.
- Scroll to the Custom section at the bottom of the Components list.
- Drag the modelsAPIDashboard Lightning web component from the Custom area of the Lightning Components list to the top of the Page Canvas.
- Click Save.
- When prompted to activate the page, click Activate.
- Select the Org Default tab, click Assign as Org Default, and then click Save.
- Click Save again to confirm.
- From the App Launcher, search for and select Sales to view your new Home page with the Models API LWC.
Congratulations on creating your first Models API Lightning web component!
Now DreamHouse Realty has a dashboard component directly on the Sales Home Page. With this dashboard, the sales team can stay aware of current housing market trends and better understand the needs of their homebuyers. This example component is simplistic, but with this implementation you can see the power of using the Models API to combine your business use cases with generative AI.